KitchenAid KDRS407VSS Support Question
KitchenAid KDRS407VSS Support Question
Find answers below for this question about KitchenAid KDRS407VSS.Need a KitchenAid KDRS407VSS manual? We have 3 online manuals for this item!
Question posted by mjfm5 on December 11th, 2014
Remove Splash Guard On Model Kdrs807sss
If I removed the splash guard for looks, would that be a problem. How would it look from top?
Current Answers
Answer #1: Posted by BusterDoogen on December 11th, 2014 12:49 PM
BusterDoogen

Member since:
October 30th, 2011 Points: 28,565,437

Member since:
October 30th, 2011 Points: 28,565,437
Go here to see the range witout the optional backguard.
I hope this is helpful to you!
Please respond to my effort to provide you with the best possible solution by using the "Acceptable Solution" and/or the "Helpful" buttons when the answer has proven to be helpful. Please feel free to submit further info for your question, if a solution was not provided. I appreciate the opportunity to serve you!
Related KitchenAid KDRS407VSS Manual Pages
Dimension Guide - Page 1
... frequency
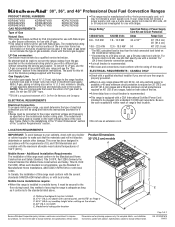
as it conforms to the standards listed above. q This range is a registered trademark of E.I. 30", 36", and 48" Professional Dual Fuel Convection Ranges
PRODUCT MODEL NUMBERS
KDRS407VSS KDRS462VSS KDRS463VSS
KDRS467VSS KDRS483VSS KDRU707VSS
GAS REQUIREMENTS
KDRU763VSS KDRU767VSS KDRU783VSS
Type of Gas
Natural Gas: This range is installed in a mobile home, it must be secured to...
Installation Guide - Page 9

... edition.
NOTE: Pipe-joint compounds that resist the action of Gas
Natural Gas:
This range is needed for turning on or shutting off valve. Type of LP gas must be removed from the gas specified on the model/serial rating plate for this kit are in the literature package supplied with a different gas...
Installation Guide - Page 10
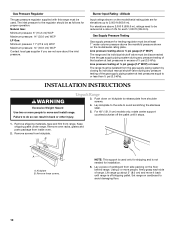
... least 1" water column pressure above the manifold pressure shown on the model/serial rating plate. The inlet pressure to 2,000 ft (609.6 m).
Failure to release plate from range. Remove these screws.
NOTE: This support is used .
Excessive Weight Hazard
4.
Lay a piece of range. Using 2 or more people to or less than ½ psi (3.5 kPa...
Installation Guide - Page 11

... available from the back (9" [22.9 cm] backguard is required for all models. Continue installing your range using 6 screws, insert 3 from the front and 3 from your flooring, longer screws...screwdriver, mount anti-tip bracket to rear range foot. Install anti-tip bracket accordingly. See "Cabinet Dimensions" in the following . Centerline B. Remove island trim and attach backguard using the ...
Installation Guide - Page 12

... terminal block cover screws and disengage mounting tabs to remove terminal block cover from back of electrical connection: 4-wire ...C A. Complete installation following instructions for your type of range.
3. Use a new 40 amp power supply cord. Only
30" (76.2 cm) and 36" (91.4 cm) Models
48" (121.9 cm) Models
WARNING
WARNING
Electrical Shock Hazard Disconnect power before servicing. ...
Installation Guide - Page 14

...water filter near the cold water supply pipe under the filter system for removing the filter cartridge.
With collet held in the upright position. Make connection... cutter so the ends are concentric and without burrs. Backstop
If you just installed on some models)
Install Model W10049700 Water Filter
Connect to . Connect another piece of flexible codes approved water supply line to...
Installation Guide - Page 16

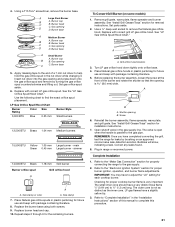
Place burner caps on grill models)
1. Check that the range is adequate as long as it into the slots. For further information, please refer... hook it conforms to remove. 4. Level Range
NOTE: Range must be off the floor upon final installation.
If range is indicated.
Insert the large grease tray all the way under the back edge of securing the range is plugged into opening on...
Installation Guide - Page 20

... be done by using a wrench, turning the access cap counterclockwise.
2. To range B. Remove the burner head. Install a shut-off valve. Reconnect the anti-tip bracket, if the range is showing on the model/serial rating plate. Access cap B. The regulator must be killed. Look at test pressures in death, explosion, or fire. LP position E.
If...
Installation Guide - Page 21
...burners. Turn LP gas orifice hood down onto the gas orifice spud and remove by brushing on some models)
1. Reinstall the burner assembly, flame spreader, wave plate, and grill ... noncorrosive leak-detection solution. Set parts aside.
2.
A
A. Place Natural gas orifice hoods in range or reconnect power. Before replacing the burner assembly, loosen the screw at the
front of this ...
Installation Guide - Page 22

...tip bracket, if the range is showing on the model/serial rating plate. Remove the burner head. Burner head
C. Burner cap
B
B. Burner base
A Small Burner
A. Unplug range or disconnect power.
...Remove spring retainer from the gas supply piping system during any pressure testing of the gas supply piping system at the spring retainer to the closed position) C. Look...
Installation Guide - Page 23

...hood location
3. Turn Natural gas orifice hood down onto the gas orifice spud and remove by brushing on some models) 1. REMEMBER: Once you have a slightly yellow tip.
3. Complete Installation
1.... and burner flame adjustments. See "Install Grill Grease Trays" section for properly connecting the range to complete this procedure.
23 The valve is open when the handle is ³⁄...
Use & Care Guide - Page 7
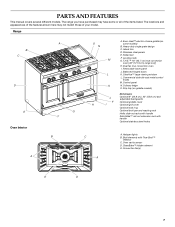
The locations and appearances of the features shown here may have some models)
B. Stainless steel panels E. Leveling rods G. Removable lower panel J. Balanced hinged doors K. Broil elements with handle
Optional stainless steel knobs
C A
A. The range you have purchased may not match those of the items listed.
Dual fan true convection oven I
Optional grill cover
Optional...
Use & Care Guide - Page 10

...from stains. When the flame comes back on some models) during the Self-Cleaning cycle, the entire cooktop area...; Start cooking thicker foods such as the entire appliance is not removed, occasional sparking may affect the finish. Simmer Burner Settings To Set...USE
LITE (Light)
■ Light the burner.
REMEMBER: When range is in one or more information, see the "Sealed Surface Burners"...
Use & Care Guide - Page 11

...in the center of the gas opening for proper size and shape as shown. Turn on some models)
B
A. 1-1¹⁄₂" (25-38 mm) B.
Refer to avoid loss of soil ...spreader E. It is blue in place when using a burner cap. Do not use oven cleaners, bleach or rust removers.
1. If the burner needs to grill foods. Gas opening: Gas must flow freely throughout the gas opening by ...
Use & Care Guide - Page 13

...of the burner assembly into place. Place the wave tray on some models)
A
B
A
A.
Turn on grill. Push in an uneven cooking... an evenly heated and easy to clean cooking surface. ■ Remove plastic film and clean with hot, soapy water prior to
first ... basin, then the rear tabs into position. Place food on overhead range hood.
2.
Griddle B. Place food on the griddle.
■...
Use & Care Guide - Page 24

...stop time and cook time countdown will sound.
24
Press OFF when finished cooking. Before baking, remove the plastic wrap. Timed Cooking is automatically calculated and displayed. Press BAKE, CONVECT BAKE, CONVECT... will automatically turn on most appropriate for the food to cook. 4.
On some models, the start should not be cooked. To ensure optimal cooking results, the oven will...
Use & Care Guide - Page 25

... the oven door gasket. Heavy soil results in longer cleaning and more information.
■ Remove any loose soil to reduce smoke and avoid damage. This area does not get rid of soil in discoloring, loss of some models, the temperature probe from the oven because it becomes heavily soiled. enter slots on...
Use & Care Guide - Page 26
...to avoid touch screen activation during cleaning. Food spills should be cleaned when oven cools. Remove racks or they will appear on the display until the oven cools. Cleaning Method: Rub ...control, make sure the knobs are cool. Press OFF to order. SURFACE BURNERS
Sealed Burner models See "Sealed Surface Burners" section. If the oven temperature is complete and the oven ...
Use & Care Guide - Page 28
... the door is not, repeat the removal and installation procedures. Turn on cooktop...models, see "Sealed Surface Burners" section.
■ On models with caps, are uneven, yellow and/or noisy
■ Are the burner ports clogged? Contact a trained repair specialist. The range... a letter followed by a number? If the problem continues, call .
See the Installation Instructions for ...
Use & Care Guide - Page 31

... area where service by an authorized KitchenAid servicer is not available.
9. Major appliances with the removal from your home of your major appliance, to replace or repair house fuses, or to correct... has been altered or removed from your major appliance, unless such damage results from accident, alteration, misuse, abuse, fire, flood, acts of your complete model number and serial number....
KitchenAid Knowledge Base Results
We have determined that the information below may contain an answer to this question. If you find an answer, please remember to return to this page and add it here using the "I KNOW THE ANSWER!" button above. It's that easy to earn points!-
Damaged clothing - Top-load washer
...in seams before washing? Were strings, sashes and belts tied or removed to maintain washer balance. Follow the garment and the chlorine-bleach... are tangling and twisting - Damaged clothing - Do not let bleach splash, drip, or run into the washer basket. Stretching and pilling may...loss and may occur on some models). Use a cycle with other loose items prior to avoid tangling with... -
Sounds different than my previous washer- Front-load washer
...10 seconds, 160 KB) To maintain a balanced load and maximize the removal of water, the washer steps through the pump. Care Guides, Installation ... ends. (18 seconds, 286 KB) There will spray and splash during drain - Play the sound of the washer at the start...water. (8 seconds, 130 KB) Model Number | Help me locate my model number Please enter at the end of the door locking... -
Care and cleaning of the disposer
...disposer use , food particles may appear on disposer and remove stopper from the sink at the same time to remove odors in sink opening and clean underside of splash baffle and inside upper lip of these appliances smelling clean and... using Affresh™ cup (56.7 g) baking soda with a scouring pad. For batch feed models, pour the baking soda mixture directly onto the stopper;
Similar Questions

How Can I Calibrate My Kitchenaid Kdrs407vss Oven
My KitchenAid KDRS407VSS electric oven runs hot. It was hot by about 25 degrees F. but yesterday it ...
My KitchenAid KDRS407VSS electric oven runs hot. It was hot by about 25 degrees F. but yesterday it ...
(Posted by linda56976 8 years ago)

Kitchen Aid Model Kgrs807, How Do I Remove Probe?
I've got a message on my range that appeared when I was heating soup on one burner. there was a bee...
I've got a message on my range that appeared when I was heating soup on one burner. there was a bee...
(Posted by Jpartridge99555 10 years ago)

Kdrs407vss Range
Is this model a side in or a freestanding range?
Is this model a side in or a freestanding range?
(Posted by yolanda33039 12 years ago)

Has Anyone Had Any Problems With This Kitchenaid Duel Fuel Range?
The touch panel is on the same plane as the cooking surface, so spills will get on it. I can run my ...
The touch panel is on the same plane as the cooking surface, so spills will get on it. I can run my ...
(Posted by dcarlick 12 years ago)

Removing The Backsplash Of Kitchenaid Range #kdrs807sss
Can I remove the backsplash off a Kitchenaid range #KDRS807SSS and if so will there be any holes tha...
Can I remove the backsplash off a Kitchenaid range #KDRS807SSS and if so will there be any holes tha...
(Posted by kctesar 13 years ago)