KitchenAid KGRA806PSS Support Question
KitchenAid KGRA806PSS Support Question
Find answers below for this question about KitchenAid KGRA806PSS - ARCHITECT Series: 30'' Gas Range.Need a KitchenAid KGRA806PSS manual? We have 2 online manuals for this item!
Question posted by mmissymouse on December 31st, 2010
Kgra806pss Gas Kitchen Range Kitchenaid Superba Gas Stove And Oven
I need to replace the whole glass control top. How can I purchase one? The glass is broken, but the controls still work. The glass is attached to the control panel/circuit boards. Any suggestions.
Current Answers
Related KitchenAid KGRA806PSS Manual Pages
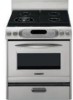
Use and Care Guide - Page 1
... www.KitchenAid.ca
CUISINIÈRE À GAZ
Guide d'utilisation et d'entretien
Au Canada, pour assistance composez le 1-800-461-5681, pour installation ou service composez le 1-800-807-6777 ou visitez notre site web à... Pour le consommateur: lire ce manuel et le conserver pour consultation ultérieure. GAS RANGE
Use...
Use and Care Guide - Page 3
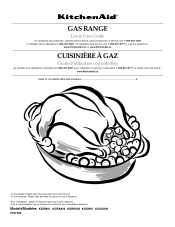
... you to such substances. All safety messages will follow instructions. WHAT TO DO IF YOU SMELL GAS:
• Do not try to some of the substances listed, including benzene, formaldehyde, carbon ... Installation and service must be performed by a qualified installer, service agency or the gas supplier. RANGE SAFETY
Your safety and the safety of others . We have provided many important safety...
Use and Care Guide - Page 5
... (12,500 BTU)
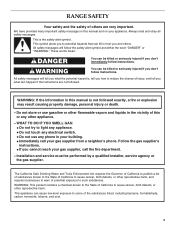
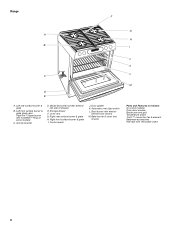
5 PARTS AND FEATURES
This manual covers several different models. Control Panel for Standard Burner (Models KGRI801 and KGSI901)
A
B
F
G
F. Right front control knob (6000 BTU) G. Surface burner locator B. Oven display C. The range you have purchased may not match those of the items listed. The locations and appearances of the features shown here may have...
Use and Care Guide - Page 6
... Control panel
J. Left front surface burner & grate (dual valve TripleTier™ flame burner with removable insert
6 Bake burner & cover (not shown)
Parts and Features not shown (on some models) Oven door... window Broiler pan and grid Temperature probe T.H.E.™ convection fan & element Bakeware accessories Half rack with InstaWok™ Ring on some models)
C. Oven...
Use and Care Guide - Page 7
.... s For more than ½" (1.25 cm) outside the cooking area.
Gas, an L.P. Check for standard ranges.
Cast iron
s Heats slowly and evenly.
s A core or base of medium-to setting.
7
Gas Conversion Kit and a kit for a tripped circuit breaker or blown fuse. Check that the control knob is transferred, which affects cooking results. Hold a lit match...
Use and Care Guide - Page 16
...30 seconds to avoid the loss of the oven rack.
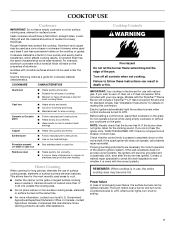
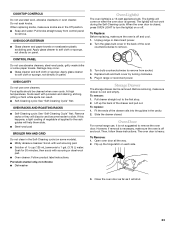
To Broil: 1.
Close oven door.
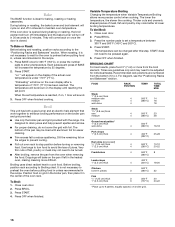
2. Press OFF when finished. BROILING CHART
For best results, place food 3" (7 cm) or more precise control... cuts of meat, fish and poultry may need to turn off in the recipe.
1. ...oven when removing the food.
To Vari Broil: 1. Broil
This unit has both a gas burner and an electric halo element that work...
Use and Care Guide - Page 17
...176;C) and cooking time can be needed. s Keep heat loss to maintain oven temperature, while the fan constantly circulates...of pork and poultry in a standard thermal oven. The convection bake range can be used for BAKED GOODS and ...oven, the fan-circulated hot air continually distributes heat more evenly, crisping surfaces while sealing in the oven with an alternative method such as 30...
Use and Care Guide - Page 23
... to remove the oven door.
To Remove: 1. s Glass cleaner and soft cloth or sponge: Apply glass cleaner
to remove from control panel
to 1 gal. (3.75 L) water:
Soak for 20 minutes, then scrub with scouring or steel-wool pad. If this happens, a light coating of vegetable oil applied to the rack guides will not work during the...
Use and Care Guide - Page 24
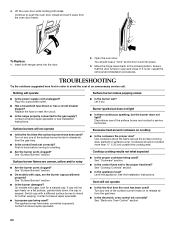
...To Replace: 1. s Has a household fuse blown or has a circuit breaker tripped? s Is the range properly connected to a setting. s Is propane gas ...
Continue to release air from the oven door frame.
If it dry. See "Electronic Oven Control" section.
24
s Are the... suggested here first in knob before turning to the gas supply?
Let it is set correctly? Lift the oven door...
Use and Care Guide - Page 26
...Troubleshooting."
If you need replacement parts If you use only factory specified parts. KitchenAid designated service technicians ...30 a.m. - 4:30 p.m. (EST).
s Accessory and repair parts sales.
It may save you can also look in your area, call . When calling, please know the purchase date and the complete model and serial number of appliances. Or visit our website at :
KitchenAid...
Use and Care Guide - Page 27
... WARRANTY ON ELECTRIC ELEMENTS, CERAMIC GLASS COOKTOP, GAS BURNERS, SOLID STATE TOUCH CONTROL SYSTEM, AND MAGNETRON TUBE
On electric ranges and electric cooktops, in the second through fifth years from the date of purchase, when this appliance is operated and maintained according to instructions attached to or furnished with the product, KitchenAid will pay for factory specified...
Installation Instructions - Page 2
... Anti-Tip Bracket...8 Install Rear Vent ...9 Verify Anti-Tip Bracket Location ...9 Level Range...9 Make Gas Connection ...9 Check Operation ...10 Replace Oven Racks & Storage or Warming Drawer...12 Complete Installation ...12 GAS CONVERSIONS...13 LP Gas Conversion ...13 Natural Gas Conversion...15
TABLE DES MATIÈRES
SÉCURITÉ DE LA CUISINIÈRE ...18 EXIGENCES D'INSTALLATION...
Installation Instructions - Page 5
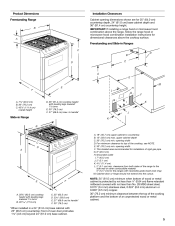
...range to top of oven door protrudes 1⁷⁄₈" (4.8 cm) beyond 24" (61.0 cm) base cabinet.
5 Cabinet door or hinge should not extend into the cutout. A
Freestanding and Slide-in a 24" (61.0 cm) base cabinet with leveling legs lowered 1¹⁄₂ turns E. 30...30" (76...Ranges
C
D
M
E F
A. 7⁷⁄₈" (20.0 cm) B. 30...;₂ turns B. 30 77.9 cm)
...
Installation Instructions - Page 6
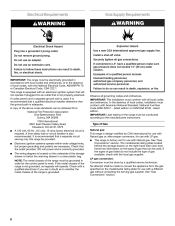
...3 prong outlet. Do not remove ground prong. Do not use an adapter. This range is adequate. Failure to follow these instructions can be electrically grounded in accordance with local ...above code standards can result in death, fire, or electrical shock. Electrical Requirements
Gas Supply Requirements
WARNING
WARNING
Electrical Shock Hazard Plug into an outlet that the ground ...
Installation Instructions - Page 9
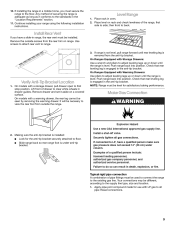
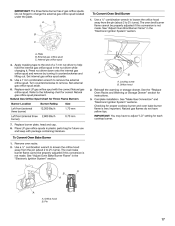
... Make Gas Connection
WARNING
Explosion Hazard Use a new CSA International approved gas supply line.
2. 10. Any method of securing the range is engaged in drawer guides. On Ranges Equipped with...the outside screws from outside the range. Use screws to attach rear vent to back. On Ranges Equipped with Warming Drawers: Use pliers to the standards in oven. 2. On models with a warming...
Installation Instructions - Page 10
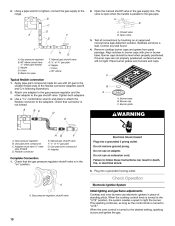
...as long as the control knob is parallel to light the burner. When the oven control is turned to the "LITE" position, the system creates a spark to the gas pipe. Nipple I
...
H
A. Do not remove ground prong. Manual gas shutoff valve F. ½" or ¾" gas pipe G. Use a combination wrench and pliers to attach the flexible connector to the range.
2. Use pipe-joint compound C. Open valve
...
Installation Instructions - Page 11
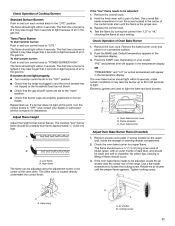
... in character. If the "low" flame needs to light.
Use a flat-blade screwdriver to be adjusted: 1. Remove the control knob. 2. Replace the control knob. 4. The first time a burner is located directly underneath the control knob.
3. The oven bake burner should be adjusted using the adjustment screw in the temperature display. 3. Oven bake burner
Repeat start-up to...
Installation Instructions - Page 13
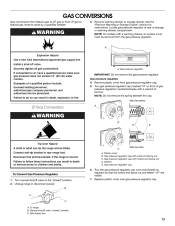
... regulator cap with a warming drawer, an access cover must be killed. Unplug range or disconnect power.
6. To range B. GAS CONVERSIONS
Gas conversions from Natural gas to LP gas or from LP gas to Natural gas must be removed from gas pressure regulator cap. 5. See the "Remove Warming or Storage Drawer" section for instructions.
Install a shut-off valve.
A.
Side view...
Installation Instructions - Page 14
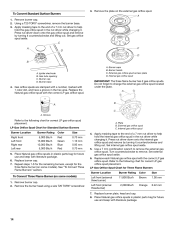
... Repeat steps 1-6 for the remaining burners, except for future use and keep with the correct LP gas orifice spud. Set internal gas orifice spud aside. 5. Replace each Natural gas orifice spud with literature package. 6.
A
B
C A D
C D
B
A. Gas tube opening C. A
A
B C
A. Place Natural gas orifice spuds in the hex area. See "To Convert Three Flame Burners" section.
4. Refer to...
Installation Instructions - Page 17
... the end of a 7 mm nut driver to 2½ turns). Natural Gas Orifice Spud Chart for correct Natural gas orifice spud placement. See the "Replace Oven Racks and Warming or Storage Drawer" section for proper cooktop burner and oven bake burner flame is very important. The oven bake burner flame cannot be properly adjusted if this conversion...
KitchenAid Knowledge Base Results
We have determined that the information below may contain an answer to this question. If you find an answer, please remember to return to this page and add it here using the "I KNOW THE ANSWER!" button above. It's that easy to earn points!-
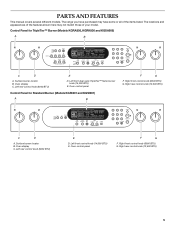
Using your meat thermometer
...ovens Ranges and built-in oven Proposition 65 Warnings Tips for using the Self-Cleaning feature - A meat thermometer is not supplied with this appliance. Insert the thermometer into the meat ½" (1.3 cm) more and read again. Architect Series... determine doneness of the thermometer should determine doneness. gas and electric ranges Hidden Options - If the temperature drops, cook ... -
Replacing oven light bulbs - Built-in ovens
Replacing oven light bulbs - To replace oven light bulbs: Before replacing any bulbs, make sure the oven is closed, touch Oven Light to operate the lights. Replace the bulb, using tissue or wearing cotton gloves to the touch. Reconnect power. Architect Series II - The oven lights will not work during the Self-Cleaning cycle. When the oven door is off and feels cool... -
Using the Control Lock feature
...). The Control Lock is activated, only the Timer Set/Start, Timer Off, and Oven Light pads will disappear from the display. Repeat to unlocked, but does not solve my problem The answer needs updating and/or additional information The answer could be used either when the range is your appliance? Built-in ovens My gas oven won...
Similar Questions

Self Clean Cycle Ran; Now Oven Doesn't Work
This is the second time this has happened . First time it was under warranty; no such luck this time...
This is the second time this has happened . First time it was under warranty; no such luck this time...
(Posted by Feileacan42 7 years ago)

Repair Kitchenaid Gas Range Architect Series Ii Oven How To Reset Controls When
fails to light
fails to light
(Posted by djmdwhil 9 years ago)

Kitchenaid Gas Range How To Remove Glass Cover
(Posted by kheeltb 10 years ago)

Oven Door Locked--control Panel Down
Oven is about 3-years old and has light use. Selected the midlevel self clean setting and left for a...
Oven is about 3-years old and has light use. Selected the midlevel self clean setting and left for a...
(Posted by nancylewis775 10 years ago)

Kitchen Aid Gas Range Model Kgra806 I Need Control Panel
i need control panel for my gas range Kitchen Aid moder KGRA806
i need control panel for my gas range Kitchen Aid moder KGRA806
(Posted by black2stars 11 years ago)