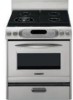
KitchenAid KGRA806PSS Support Question
KitchenAid KGRA806PSS Support Question
Find answers below for this question about KitchenAid KGRA806PSS - ARCHITECT Series: 30'' Gas Range.Need a KitchenAid KGRA806PSS manual? We have 2 online manuals for this item!
Question posted by kheeltb on April 21st, 2014
Kitchenaid Gas Range How To Remove Glass Cover
The person who posted this question about this KitchenAid product did not include a detailed explanation. Please use the "Request More Information" button to the right if more details would help you to answer this question.
Current Answers
Related KitchenAid KGRA806PSS Manual Pages
Use and Care Guide - Page 1
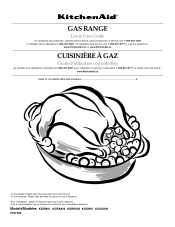
...kitchenaid.com or www.KitchenAid.ca
CUISINIÈRE À GAZ
Guide d'utilisation et d'entretien
Au Canada, pour assistance composez le 1-800-461-5681, pour installation ou service composez le 1-800-807-6777 ou visitez notre site web à... Pour l'installateur : laisser ce manuel d'instructions avec l'appareil. GAS RANGE...KGRK806 KGSI901 KGSA906
9757452
www.KitchenAid.ca
Table of Contents/...
Use and Care Guide - Page 3
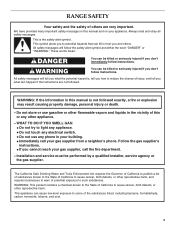
... reduce the chance of injury, and tell you what can kill or hurt you cannot reach your appliance.
Follow the gas supplier's
instructions.
• If you and others are not followed.
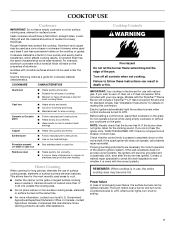
RANGE SAFETY
Your safety and the safety of others . We have provided many important safety messages in this manual and on...
Use and Care Guide - Page 4
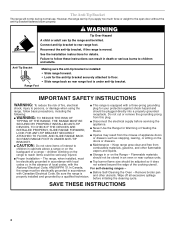
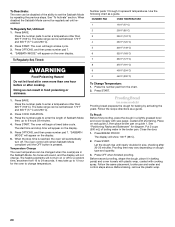
... use. WARNING
Tip Over Hazard A child or adult can tip the range and be seriously injured.
Do not cut or remove the grounding prong
s WARNING: TO REDUCE THE RISK OF
from combustible materials, gasoline, and other utensils. TIPPING OF THE RANGE, THE RANGE MUST BE
s Disconnect the electrical supply before initiating the cleaning cycle...
Use and Care Guide - Page 5
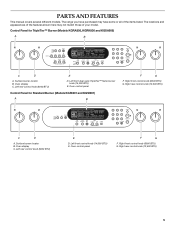
...Right front control knob (6000 BTU) G. Right front control knob (6000 BTU) G. The range you have purchased may not match those of the items listed. Left front dual valve TripleTier™...; flame burner knob (15,000 BTU)
E. PARTS AND FEATURES
This manual covers several different models. Oven control panel
Control Panel for TripleTier™ Burner (Models KGRA806, ...
Use and Care Guide - Page 6
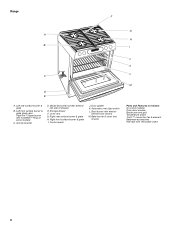
...burner & grate I
7
DI
J K
L C
M
D E
A. Door gasket
K. Bake burner & cover (not shown)
Parts and Features not shown (on some models) Oven door window Broiler pan and grid Temperature...Half rack with electric element (not shown)
M. Range F
G A
H
B
I . Left rear surface burner & grate
B. Oven vent G. Broil burner with removable insert
6 Storage drawer F. Left front surface ...
Use and Care Guide - Page 7
...-set for use L.P. s Suitable for cookware material characteristics. s Good for standard ranges.
Porcelain enamel- on stainless steel provides even heating.
s A core or base ... all types of surface cooking areas, elements or surface burners between batches. Gas, an L.P. See "Installation Instructions" for the clicking sound. If the wall...glass
s Follow manufacturer's instructions.
Use and Care Guide - Page 16
... the oven rack.
Broil
This unit has both a gas burner and an electric halo element that work together to...numbered from the oven when removing the food. When roasting, it in 30 seconds to preheat the oven before turning or removing food. "Lo°" ... Press OFF when finished. s For proper draining, do not cover the grid with the range. Press BROIL.
3. START does not need to be changed...
Use and Care Guide - Page 20
... in a lightly greased bowl and cover loosely with wax paper, coated with cooking spray. See "To Activate" section. The bake range can be set between 170°F...;C)
9
400°F (204°C)
0
450°F (232°C)
To Change Temperature: 1.
Before baking, remove the plastic wrap.
20
Press START. See "Positioning Racks and Bakeware" for a random time, anywhere from the...
Use and Care Guide - Page 23
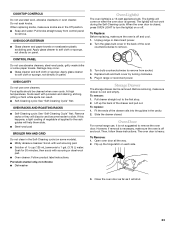
...only, not chrome s Dishwasher
Oven Light(s)
The oven light(s) is heavy.
Turn the glass bulb cover in the back of the drawer rails into the guides in the Self-Cleaning cycle (... the way. 2. Do not soak knobs. s Glass cleaner and soft cloth or sponge: Apply glass cleaner
to remove.
3. To remove: 1. Oven Door
For normal range use abrasive cleaners, steel-wool pads, gritty washcloths or...
Use and Care Guide - Page 24
... about the same size as the door is not, repeat the removal and installation procedures.
Lift the oven door while holding both hanger...s Is the cookware the proper size? s Is the range properly connected to the locked position.
s On models with ...level? See "Electronic Oven Control" section.
24
s Is propane gas being used ? Let it is set correctly? Excessive heat around ...
Use and Care Guide - Page 27
... have other than normal, single-family household use your authorized KitchenAid dealer to correct defects in combination ovens to province. SECOND THROUGH FIFTH YEAR LIMITED WARRANTY ON ELECTRIC ELEMENTS, CERAMIC GLASS COOKTOP, GAS BURNERS, SOLID STATE TOUCH CONTROL SYSTEM, AND MAGNETRON TUBE
On electric ranges and electric cooktops, in the second through fifth years...
Installation Instructions - Page 5
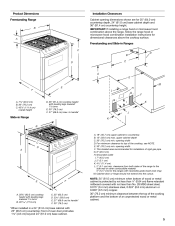
...) min.
front of rigid gas pipe G. 8" (20.3 cm) H. opening width D. clearance from both sides of the range to handle* F. 30" (76.2 cm)
NOTE: 24" (61.0 cm) minimum when bottom of wood or metal cabinet is protected by not less than ¹⁄₄" (0.64 cm) flame retardant millboard covered with not less than No...
Installation Instructions - Page 6
Do not remove ground prong. Do not use an extension cord. If codes permit and a separate ... if plugged into a grounded 3 prong outlet.
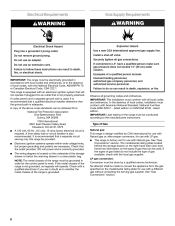
Electrical Requirements
Gas Supply Requirements
WARNING
WARNING
Electrical Shock Hazard Plug into an outlet that is not properly polarized. IMPORTANT: The range must be obtained from: National Fire Protection Association One Batterymarch Park...
Installation Instructions - Page 8
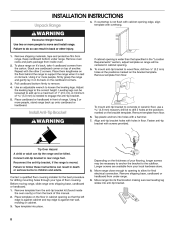
... to the subfloor. To mount anti-tip bracket to allow for drilling mounting holes through your local hardware store. 8. Remove template from range. Tap plastic anchors into place. Remove template from your type of floor covering. Depending on the bracket template. Remove shipping materials, tape and protective film from floor. 6. Use an adjustable wrench to...
Installation Instructions - Page 9
.... Making sure the anti-tip bracket is removed from the rear trim on a covered surface. Continue installing your range using the following installation instructions. then front to range. 3.
Remove drawer and set it conforms to adjust leveling legs up or down until the range is engaged in drawer guides. Make Gas Connection
WARNING
Explosion Hazard Use a new...
Installation Instructions - Page 10
...the gas shutoff valve. Burner base B. Do not remove ground prong. Manual gas shutoff valve F. ½" or ¾" gas pipe G.
Open valve
J I . Nipple I
A. Check that the gas ... burner grates over burners and caps. Using a pipe wrench to tighten, connect the gas supply to the range.
2. Open the manual shutoff valve in the "on an approved noncorrosive leak-detection ...
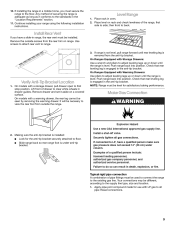
Installation Instructions - Page 11
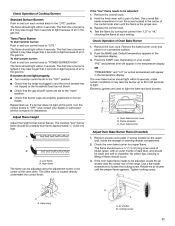
...tripped or the household fuse has not blown. Check that the range is lighted it may take longer that the gas shutoff valves are set to light the bake and broil burners...within 4 seconds. A B C
A. Adjust Flame Height
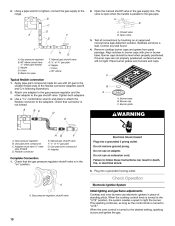
Adjust the height of Oven Bake Burner
1. Remove access cover plate (1 screw) located on your dealer or authorized service company for proper flame. Rotate the air...
Installation Instructions - Page 13
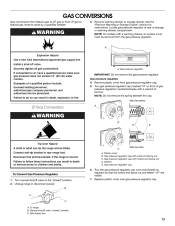
... Hazard Use a new CSA International approved gas supply line. Securely tighten all gas connections. A. NOTE: Do not remove the spring beneath the cap. Reconnect the anti-tip bracket, if the range is moved. Plastic cover B. Unplug range or disconnect power.
6.
Remove plastic cover from LP gas to Natural gas must be killed. Gas pressure regulator cap with hollow end facing...
Installation Instructions - Page 15
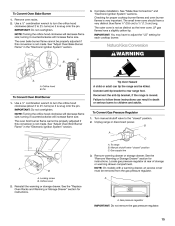
...range and be removed from the gas pressure regulator. The oven broil burner flame cannot be properly adjusted if this conversion is snug onto the pin.
To range B. A
2. Gas pressure regulator
IMPORTANT: Do not remove the gas pressure regulator.
15 See "Make Gas.... The outer cone is snug onto the pin. Locate gas pressure regulator at rear of storage or warming drawer compartment....
Installation Instructions - Page 16
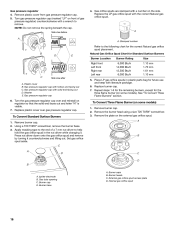
...To Convert Three Flame Burners" section.
6. Remove plastic cover from gas pressure regulator cap. 5. Replace the LP gas orifice spud with solid end facing out D. Remove burner cap. 2. Gas tube opening C. Plastic cover B. Gas pressure regulator cap with the correct Natural gas orifice spud. Replace plastic cover over and reinstall on some models). Remove the burner head using a size T20...
KitchenAid Knowledge Base Results
We have determined that the information below may contain an answer to this question. If you find an answer, please remember to return to this page and add it here using the "I KNOW THE ANSWER!" button above. It's that easy to earn points!-
Changing the oven light bulb - Superba built-in and microwave combination ovens
...Hidden Options - When the oven door is off . Replace the bulb cover by grasping the front edge and pulling away from the socket. Built...gas and electric ranges My microwave oven will not work during the Self-Cleaning cycle. The oven lights will not run Remove the glass light cover by snapping it back into the wall. Do not touch the bulb with bare fingers. Architect Series... -
Replacing oven light bulbs - Built-in ovens
... power. gas and electric ranges FAQs Knowledgebase search tips Setting the clock Changing the beverage center light bulb The oven lights will not work during the Self-Cleaning cycle. Remove the bulb... the oven light bulb - Remove the glass light cover by snapping it does not come on ? How can I replace a bulb(s) if it back into the wall. Architect Series II - They should come on... -
Replacing the light bulb - Bottom freezer/French door refrigerator
... into the liner and snap the back portion of light assembly. The light bulb cover opens from the light assembly. Be sure to access the light assembly. Remove the cover and replace the burned-out bulb with one of the cover into place. Insert the front tabs of the same size, shape and wattage...
Similar Questions

Kitchenaid Gas Range Architect Series Control Panel Light Will Not Shut Off
(Posted by zsxsme 9 years ago)


Kitchen Aid Gas Range Model Kgra806 I Need Control Panel
i need control panel for my gas range Kitchen Aid moder KGRA806
i need control panel for my gas range Kitchen Aid moder KGRA806
(Posted by black2stars 11 years ago)

Lock Button
i have a gas range and how do you turn off the lock button
i have a gas range and how do you turn off the lock button
(Posted by katanddd9 12 years ago)

My Kitchenaid Range Kgra806pss Will Not Hold Temp
The oven will preheat just fine. But within 15 minutes the oven temp has dropped. If I set oven to 4...
The oven will preheat just fine. But within 15 minutes the oven temp has dropped. If I set oven to 4...
(Posted by cpilkington 14 years ago)