
Instruction Manual
Page 2
...Opening/Closing the Monitor and Power Switch 8 Removing/Attaching the Protection Panel..........9 KVT-815DVD/745DVD/715DVD Basic operations 10 Basic Operations of Remote Controller 12 Switch Small Display (Function of KVT-815DVD 14 Switch Screen Mode 15 Control during DVD Video or Video CD Playback... Filter • Search for Program Type • DAB Information • DAB Announcement Weather Band Tuner Control (with the optional accessory Weather Band Tuner connected only 54 • Displaying the Easy Control Panel • Displaying the Weather Band Tuner Control screen Character...
...Opening/Closing the Monitor and Power Switch 8 Removing/Attaching the Protection Panel..........9 KVT-815DVD/745DVD/715DVD Basic operations 10 Basic Operations of Remote Controller 12 Switch Small Display (Function of KVT-815DVD 14 Switch Screen Mode 15 Control during DVD Video or Video CD Playback... Filter • Search for Program Type • DAB Information • DAB Announcement Weather Band Tuner Control (with the optional accessory Weather Band Tuner connected only 54 • Displaying the Easy Control Panel • Displaying the Weather Band Tuner Control screen Character...
Instruction Manual
Page 4
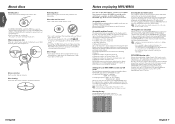
...with tape stuck on the recording surface or that the MP3/WMA recording media and formats acceptable are CD-ROM, CD-R, and CD-RW. Disc accessories Don't use your MP3/WMA encoder and CD writer Do the following formats are not properly displayed. Disc cleaning Clean from this unit are limited... characters) Up to the maximum capacity at once, check Disc at Once. Settings for play a medium containing non MP3/WMA. If you use disc type accessories. A file with a name entered with a ball pen etc. MP3/WMA playing order When selected for your CD writer to record MP3/WMA up to...
...with tape stuck on the recording surface or that the MP3/WMA recording media and formats acceptable are CD-ROM, CD-R, and CD-RW. Disc accessories Don't use your MP3/WMA encoder and CD writer Do the following formats are not properly displayed. Disc cleaning Clean from this unit are limited... characters) Up to the maximum capacity at once, check Disc at Once. Settings for play a medium containing non MP3/WMA. If you use disc type accessories. A file with a name entered with a ball pen etc. MP3/WMA playing order When selected for your CD writer to record MP3/WMA up to...

Instruction Manual
Page 6
... video sources are switched each time you press the key. *Optional accessory Clears the video image when pressed more than one second to turn the Loudness function on or off. When pressed again, the original image is pressed more than 1 second. q KVT-815DVD Small Display [DISP] key Switches to the Small Display. (see...
... video sources are switched each time you press the key. *Optional accessory Clears the video image when pressed more than one second to turn the Loudness function on or off. When pressed again, the original image is pressed more than 1 second. q KVT-815DVD Small Display [DISP] key Switches to the Small Display. (see...
Instruction Manual
Page 7
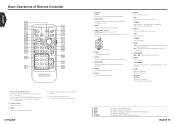
.../35/39 for the ) ; [DVD] : Slow Backward. : Slow Forward. Press it is pressed. ¡: Fast Forward. w [DVD] [VCD] Each time you press the key. *Optional accessory p [DVD] Calls the DVD Disc Menu. r [DVD] Switches an audio language. AM: Switches to the FM1, FM2, or FM3 band. The speed changes each time...
.../35/39 for the ) ; [DVD] : Slow Backward. : Slow Forward. Press it is pressed. ¡: Fast Forward. w [DVD] [VCD] Each time you press the key. *Optional accessory p [DVD] Calls the DVD Disc Menu. r [DVD] Switches an audio language. AM: Switches to the FM1, FM2, or FM3 band. The speed changes each time...
Instruction Manual
Page 19
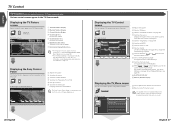
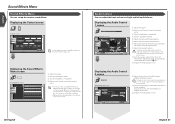
... memory of broadcasting stations, see (see page 38) or (see page 80) u Switches the source. English 37 English TV Control TV Control (with the optional accessory TV Tuner connected only) Various control screens appear in a floating position of the TV picture. Displaying the Easy Control Panel The Control Panel is cleared...
... memory of broadcasting stations, see (see page 38) or (see page 80) u Switches the source. English 37 English TV Control TV Control (with the optional accessory TV Tuner connected only) Various control screens appear in a floating position of the TV picture. Displaying the Easy Control Panel The Control Panel is cleared...

Instruction Manual
Page 21
... Scan (that tunes channels one after the other . SEEK 2: Selects channels in a floating position of SIRIUS Satellite Radio Tuner (optional accessory). 40 English English 41 a Returns to use. e Switches between 1 to 6 buttons and Function button to the SIRIUS Tuner Control ...source mode. Displays the Source Select screen when touched more than one after the other . English SIRIUS Tuner Control SIRIUS Tuner Control (with the optional accessory SIRIUS Various control screens appear in a station. 5 Switches the Seek mode. Display of image display area. I n f o rma t i...
... Scan (that tunes channels one after the other . SEEK 2: Selects channels in a floating position of SIRIUS Satellite Radio Tuner (optional accessory). 40 English English 41 a Returns to use. e Switches between 1 to 6 buttons and Function button to the SIRIUS Tuner Control ...source mode. Displays the Source Select screen when touched more than one after the other . English SIRIUS Tuner Control SIRIUS Tuner Control (with the optional accessory SIRIUS Various control screens appear in a station. 5 Switches the Seek mode. Display of image display area. I n f o rma t i...
Instruction Manual
Page 23
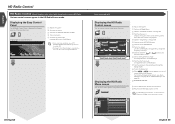
r Switches between Station Name and Song Title display modes. For memory of HD Radio tuner (optional accessory). Seek Mode Indicator a Selects options from memory. English 45 Displaying the Easy Control Panel The HD Radio Control Panel is cleared when you can call ...: F U L L AV-OUT: AV - s Returns to 6 buttons appear, you touch the center of the selected picture. English HD Radio Control HD Radio Control (with the optional accessory HD Radio Various control screens appear in a station.
r Switches between Station Name and Song Title display modes. For memory of HD Radio tuner (optional accessory). Seek Mode Indicator a Selects options from memory. English 45 Displaying the Easy Control Panel The HD Radio Control Panel is cleared when you can call ...: F U L L AV-OUT: AV - s Returns to 6 buttons appear, you touch the center of the selected picture. English HD Radio Control HD Radio Control (with the optional accessory HD Radio Various control screens appear in a station.
Instruction Manual
Page 25
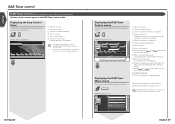
... services using various functions. s Selects options from memory. ; English DAB Tuner control DAB Tuner control (with the optional accessory DAB tuner connected only) Various control screens appear in a floating position of DAB Tuner (optional accessory). I n f o r m a t i o n 7 Adjusts the volume. 8 Calls the DAB Tuner Menu. 9 Calls the Sound Effects Menu. (see page 80) p Switches...
... services using various functions. s Selects options from memory. ; English DAB Tuner control DAB Tuner control (with the optional accessory DAB tuner connected only) Various control screens appear in a floating position of DAB Tuner (optional accessory). I n f o r m a t i o n 7 Adjusts the volume. 8 Calls the DAB Tuner Menu. 9 Calls the Sound Effects Menu. (see page 80) p Switches...
Instruction Manual
Page 28
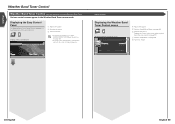
... Weather Band Tuner source mode. WBT 4 1ch 162.550MHz 4 54 English English 55 English Weather Band Tuner Control Weather Band Tuner Control (with the optional accessory Weather Band Tuner Various control screens appear in a station. Displaying the Easy Control Panel The Weather Band Tuner Control Panel is cleared when you touch...
... Weather Band Tuner source mode. WBT 4 1ch 162.550MHz 4 54 English English 55 English Weather Band Tuner Control Weather Band Tuner Control (with the optional accessory Weather Band Tuner Various control screens appear in a station. Displaying the Easy Control Panel The Weather Band Tuner Control Panel is cleared when you touch...

Instruction Manual
Page 36
... You can set to "Auto", an information is displayed for 5 seconds when updated. p Sets an on-screen display of the TV screen. ( Auto) (optional accessory) (when the optional accessory TV tuner is displayed for 5 seconds when updated. Displaying the User I/F 1 screen User I / F S e t Up User I/F 1 screen 1 3 Audio Set Up 2 SRC 4 Menu Wall Paper...
... You can set to "Auto", an information is displayed for 5 seconds when updated. p Sets an on-screen display of the TV screen. ( Auto) (optional accessory) (when the optional accessory TV tuner is displayed for 5 seconds when updated. Displaying the User I/F 1 screen User I / F S e t Up User I/F 1 screen 1 3 Audio Set Up 2 SRC 4 Menu Wall Paper...
Instruction Manual
Page 39
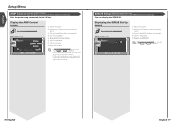
...you can control from the system, see the amp's instruction manual. S I R I U S S e t U p touch or is not shown, to display it . SIRIUS Setup (with the optional accessory LX Power Amp connected only) Sets the power amp connected via the LX bus. English Setup Menu AMP Control (with the optional... accessory SIRIUS Tuner connected only) You can change and for the amp's operation when changed, see the amp's catalog. • For the options and ...
...you can control from the system, see the amp's instruction manual. S I R I U S S e t U p touch or is not shown, to display it . SIRIUS Setup (with the optional accessory LX Power Amp connected only) Sets the power amp connected via the LX bus. English Setup Menu AMP Control (with the optional... accessory SIRIUS Tuner connected only) You can change and for the amp's operation when changed, see the amp's catalog. • For the options and ...
Instruction Manual
Page 40
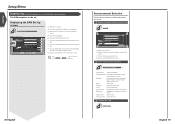
..., advance notice Sports news: Sports news Financial news: Financial news 3 Terminate the setup Return English 79 English Setup Menu DAB Set Up (with the optional accessory DAB tuner connected only) The DAB reception can be set .
..., advance notice Sports news: Sports news Financial news: Financial news 3 Terminate the setup Return English 79 English Setup Menu DAB Set Up (with the optional accessory DAB tuner connected only) The DAB reception can be set .
Instruction Manual
Page 41
... volume. If you to complete the first, then set up the receiver sound effects. See the catalog or instruction manual of the B.M.S power amplifier (optional accessory). English Sound Effects Menu Sound Effects Menu You can set some models of power amp boost to "+18". O f f s e t -15 7 SUB -1 5 6R Rear 8 8 7 ... ( On) p Displays the Audio Control 2 screen. Displaying the Control screen Control screen DVD V I DEO Audio Set Up SRC PBC REP Title 1 Chap 3 KENWOOD T-REP 13:50 IN SCRL TIME T0:05:20 You can display the same Sound Effects Menu on the is dropped for the "Amp Bass...
... volume. If you to complete the first, then set up the receiver sound effects. See the catalog or instruction manual of the B.M.S power amplifier (optional accessory). English Sound Effects Menu Sound Effects Menu You can set some models of power amp boost to "+18". O f f s e t -15 7 SUB -1 5 6R Rear 8 8 7 ... ( On) p Displays the Audio Control 2 screen. Displaying the Control screen Control screen DVD V I DEO Audio Set Up SRC PBC REP Title 1 Chap 3 KENWOOD T-REP 13:50 IN SCRL TIME T0:05:20 You can display the same Sound Effects Menu on the is dropped for the "Amp Bass...
Installation Manual
Page 2
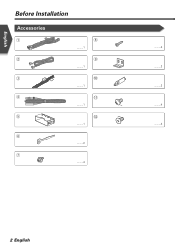
English Before Installation Accessories 1 2 3 4 5 6 7 8 ..........1 9 ..........1 0 ..........1 - ..........1 = ..........1 ..........2 ..........4 ..........4 ..........2 ..........2 ..........4 ..........4 2 English
English Before Installation Accessories 1 2 3 4 5 6 7 8 ..........1 9 ..........1 0 ..........1 - ..........1 = ..........1 ..........2 ..........4 ..........4 ..........2 ..........2 ..........4 ..........4 2 English
Installation Manual
Page 4
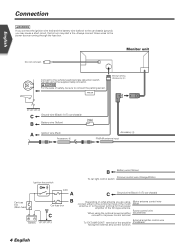
... switch harness using the optional power amplifier, (Blue/White) connect to its power control terminal. PRK SW Wiring harness (Accessory 3) C Ground wire (Black) - (To car chassis) ( 5A ) B Battery wire (Yellow) A Ignition wire (Red) Accessory 4 Accessory 2 FM/AM antenna input Ignition key switch B Battery wire (Yellow) Dimmer control wire (Orange/White) To car light...
... switch harness using the optional power amplifier, (Blue/White) connect to its power control terminal. PRK SW Wiring harness (Accessory 3) C Ground wire (Black) - (To car chassis) ( 5A ) B Battery wire (Yellow) A Ignition wire (Red) Accessory 4 Accessory 2 FM/AM antenna input Ignition key switch B Battery wire (Yellow) Dimmer control wire (Orange/White) To car light...
Installation Manual
Page 5
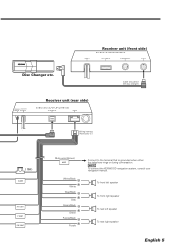
...To rear left speaker To rear right speaker English 5 PREOUT Receiver unit (front side) TO TV TUNER I/F TO NAVIGATION I/F TO 5L-I /F Wiring harness (Accessory 1) ( 10A ) ILLUMI ANT. Cable (included in the disc changer) Receiver unit (rear side) AV INPUT FM /AM AV OUTPUT ANTENNA POWER TO ...MONITOR I /F Disc Changer etc. NOTE To connect the KENWOOD navigation system, consult your navigation manual. CONT P CONT EXT.CONT Mute wire (Brown) MUTE White/Black + White Gray/Black + Gray Green/Black...
...To rear left speaker To rear right speaker English 5 PREOUT Receiver unit (front side) TO TV TUNER I/F TO NAVIGATION I/F TO 5L-I /F Wiring harness (Accessory 1) ( 10A ) ILLUMI ANT. Cable (included in the disc changer) Receiver unit (rear side) AV INPUT FM /AM AV OUTPUT ANTENNA POWER TO ...MONITOR I /F Disc Changer etc. NOTE To connect the KENWOOD navigation system, consult your navigation manual. CONT P CONT EXT.CONT Mute wire (Brown) MUTE White/Black + White Gray/Black + Gray Green/Black...
Installation Manual
Page 7
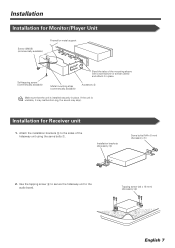
... the installation brackets 9 to the audio board. Tapping screw (ø4 × 16 mm) (Accessory 8) English 7 Metal mounting strap (commercially available) Accessory 5 Make sure that the unit is unstable, it in place. Installation for Monitor/Player Unit Screw (M4X8) (commercially available) Firewall or metal support Self-tapping ...
... the installation brackets 9 to the audio board. Tapping screw (ø4 × 16 mm) (Accessory 8) English 7 Metal mounting strap (commercially available) Accessory 5 Make sure that the unit is unstable, it in place. Installation for Monitor/Player Unit Screw (M4X8) (commercially available) Firewall or metal support Self-tapping ...

Installation Manual
Page 8
or = Bracket Screws (included in audio unit package) 8 English or = Screws (included in audio unit package) Audio unit or others Accessory - English Installation Installing in Japanese-Made Cars ■ Installing on Toyota, Nissan or Mitsubishi Car Using Brackets at Holes shown by "¶" or Accessory -
or = Bracket Screws (included in audio unit package) 8 English or = Screws (included in audio unit package) Audio unit or others Accessory - English Installation Installing in Japanese-Made Cars ■ Installing on Toyota, Nissan or Mitsubishi Car Using Brackets at Holes shown by "¶" or Accessory -

Installation Manual
Page 9
...in audio unit package) 3. ■ Installation on Toyota Car using Brackets at Holes shown by "¶" or When using accessories 0 as shown. Accessory 0 Audio unit or others 2. Use accessories 0 at both sides as shown below. 1. Use a flat-blade screwdriver or pliers, and bend each end of installation... bracket to fix the bracket. Bend each accessory tab into the hole of accessory 0 to fix the bracket. If so, tighten the bracket using the bracket shown above, you cannot use screws at each...
...in audio unit package) 3. ■ Installation on Toyota Car using Brackets at Holes shown by "¶" or When using accessories 0 as shown. Accessory 0 Audio unit or others 2. Use accessories 0 at both sides as shown below. 1. Use a flat-blade screwdriver or pliers, and bend each end of installation... bracket to fix the bracket. Bend each accessory tab into the hole of accessory 0 to fix the bracket. If so, tighten the bracket using the bracket shown above, you cannot use screws at each...
Installation Manual
Page 10
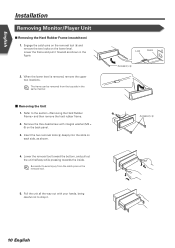
...; Removing the Hard Rubber Frame (escutcheon) 1. Engage the catch pins on the removal tool 6 and remove the two locks on the removal tool. 5. Lock Catch Accessory 6 Accessory 6 10 English
...; Removing the Hard Rubber Frame (escutcheon) 1. Engage the catch pins on the removal tool 6 and remove the two locks on the removal tool. 5. Lock Catch Accessory 6 Accessory 6 10 English


