
Instruction Manual
Page 2
...Opening/Closing the Monitor and Power Switch 8 Removing/Attaching the Protection Panel..........9 KVT-815DVD/745DVD/715DVD Basic operations 10 Basic Operations of Remote Controller 12 Switch Small Display (Function of KVT-815DVD 14 Switch Screen Mode 15 Control during DVD Video or Video CD Playback... Filter • Search for Program Type • DAB Information • DAB Announcement Weather Band Tuner Control (with the optional accessory Weather Band Tuner connected only 54 • Displaying the Easy Control Panel • Displaying the Weather Band Tuner Control screen Character...
...Opening/Closing the Monitor and Power Switch 8 Removing/Attaching the Protection Panel..........9 KVT-815DVD/745DVD/715DVD Basic operations 10 Basic Operations of Remote Controller 12 Switch Small Display (Function of KVT-815DVD 14 Switch Screen Mode 15 Control during DVD Video or Video CD Playback... Filter • Search for Program Type • DAB Information • DAB Announcement Weather Band Tuner Control (with the optional accessory Weather Band Tuner connected only 54 • Displaying the Easy Control Panel • Displaying the Weather Band Tuner Control screen Character...
Instruction Manual
Page 4
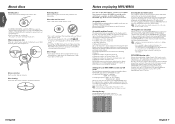
... a File Search or Folder Search may not be entered and displayed. on playing MP3/WMA This unit can be successfully played and their cases. Disc accessories Don't use it takes a long time until the unit starts playing MP3/WMA. Notes on the disc. Disc cleaning Clean from this unit. Play mode... they have the MP3/WMA extension (.MP3/.WMA). When using a new disc If the disc center hole or outside rim has burrs, use disc type accessories.
... a File Search or Folder Search may not be entered and displayed. on playing MP3/WMA This unit can be successfully played and their cases. Disc accessories Don't use it takes a long time until the unit starts playing MP3/WMA. Notes on the disc. Disc cleaning Clean from this unit. Play mode... they have the MP3/WMA extension (.MP3/.WMA). When using a new disc If the disc center hole or outside rim has burrs, use disc type accessories.

Instruction Manual
Page 6
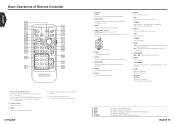
... Video Sources [V.SEL] key The video sources are switched each time you press the key. *Optional accessory Hold down more than 1 second to turn the power supply Off. English 11 English KVT-815DVD/745DVD/715DVD Basic operations ■ When the monitor is open ■ When the monitor is closed 10.../WMA. q KVT-815DVD Small Display [DISP] key Switches to the Small Display. (see page 14) KVT-715DVD/745DVD Select Seek Mode [AUTO] key Selects the Seek mode. (see page 58) e Function [FNC] key The video sources are switched each time you press the key. *Optional accessory Clears the video...
... Video Sources [V.SEL] key The video sources are switched each time you press the key. *Optional accessory Hold down more than 1 second to turn the power supply Off. English 11 English KVT-815DVD/745DVD/715DVD Basic operations ■ When the monitor is open ■ When the monitor is closed 10.../WMA. q KVT-815DVD Small Display [DISP] key Switches to the Small Display. (see page 14) KVT-715DVD/745DVD Select Seek Mode [AUTO] key Selects the Seek mode. (see page 58) e Function [FNC] key The video sources are switched each time you press the key. *Optional accessory Clears the video...
Instruction Manual
Page 7
... Control Adjusts the volume. 3 [DISC] Stops to play the built-in disc player. 4 Switches over the sound source each time you press the key. *Optional accessory p [DVD] Calls the DVD Disc Menu. w [DVD] [VCD] Each time you press the button, the angle switches. AM: Switches to cancel muting. [DVD] [VCD] [DISC...
... Control Adjusts the volume. 3 [DISC] Stops to play the built-in disc player. 4 Switches over the sound source each time you press the key. *Optional accessory p [DVD] Calls the DVD Disc Menu. w [DVD] [VCD] Each time you press the button, the angle switches. AM: Switches to cancel muting. [DVD] [VCD] [DISC...
Instruction Manual
Page 19
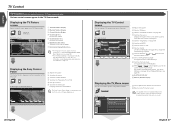
... model used (the tuner specifications and the broadcasting system that can select menu options using various functions. English TV Control TV Control (with the optional accessory TV Tuner connected only) Various control screens appear in the TV Source mode. TV Picture screen 1 TV 1 5 2 3 Preset 3 2ch MODE: F U L L AV-OUT: AV - q Switches the...
... model used (the tuner specifications and the broadcasting system that can select menu options using various functions. English TV Control TV Control (with the optional accessory TV Tuner connected only) Various control screens appear in the TV Source mode. TV Picture screen 1 TV 1 5 2 3 Preset 3 2ch MODE: F U L L AV-OUT: AV - q Switches the...

Instruction Manual
Page 21
...(see page 59) q Tunes in a station. t Switches the Seek mode. o Seek Mode Indicator ; English SIRIUS Tuner Control SIRIUS Tuner Control (with the optional accessory SIRIUS Various control screens appear in a station. 5 Switches the Seek mode. SEEK 1: Tunes channels one after the other . e Switches between 1 to 6 buttons...Selects channels in a floating position of Easy Control Panel 1 MODE: F U L L AV-OUT: AV - For memory of SIRIUS Satellite Radio Tuner (optional accessory). 40 English English 41 a Returns to 6 buttons appear, you touch the center of image display area.
...(see page 59) q Tunes in a station. t Switches the Seek mode. o Seek Mode Indicator ; English SIRIUS Tuner Control SIRIUS Tuner Control (with the optional accessory SIRIUS Various control screens appear in a station. 5 Switches the Seek mode. SEEK 1: Tunes channels one after the other . e Switches between 1 to 6 buttons...Selects channels in a floating position of Easy Control Panel 1 MODE: F U L L AV-OUT: AV - For memory of SIRIUS Satellite Radio Tuner (optional accessory). 40 English English 41 a Returns to 6 buttons appear, you touch the center of image display area.
Instruction Manual
Page 23
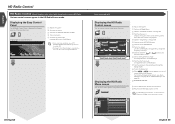
...and Song Title display modes. o When 1 to the HD Radio Control screen. s Returns to 6 buttons appear, you touch the center of HD Radio tuner (optional accessory). Menu HD Radio Menu screen 21 HD Radio R e c e i v e Mode Audio Set Up Title 22 SRC 6 Adjusts the volume. 7 Calls the HD...HD Radio Source mode. For HD Radio function details, see page 46). ; English HD Radio Control HD Radio Control (with the optional accessory HD Radio Various control screens appear in a station using various functions. English 45 Displays the Source Select screen when touched more than one ...
...and Song Title display modes. o When 1 to the HD Radio Control screen. s Returns to 6 buttons appear, you touch the center of HD Radio tuner (optional accessory). Menu HD Radio Menu screen 21 HD Radio R e c e i v e Mode Audio Set Up Title 22 SRC 6 Adjusts the volume. 7 Calls the HD...HD Radio Source mode. For HD Radio function details, see page 46). ; English HD Radio Control HD Radio Control (with the optional accessory HD Radio Various control screens appear in a station using various functions. English 45 Displays the Source Select screen when touched more than one ...
Instruction Manual
Page 25
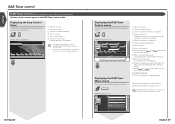
... 50 for the ) i Changes the display between 1 to 6 buttons and Function button to 6 buttons appear, you touch the center of DAB Tuner (optional accessory). Seek Mode Indicator a Selects the primary or secondary operation. DAB Tuner Control screen 7 DAB 8 9 Audio Menu 11 Set Up 14 13 Se r v ...function details, see page 59) w Switches the band (to the DAB Tuner Control screen. English DAB Tuner control DAB Tuner control (with the optional accessory DAB tuner connected only) Various control screens appear in a floating position of Easy Control Panel 1 MODE: F U L L AV-OUT: AV -...
... 50 for the ) i Changes the display between 1 to 6 buttons and Function button to 6 buttons appear, you touch the center of DAB Tuner (optional accessory). Seek Mode Indicator a Selects the primary or secondary operation. DAB Tuner Control screen 7 DAB 8 9 Audio Menu 11 Set Up 14 13 Se r v ...function details, see page 59) w Switches the band (to the DAB Tuner Control screen. English DAB Tuner control DAB Tuner control (with the optional accessory DAB tuner connected only) Various control screens appear in a floating position of Easy Control Panel 1 MODE: F U L L AV-OUT: AV -...
Instruction Manual
Page 28
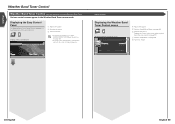
... a station. • For system key operations, see (see page 80) 6 Switches the source. English Weather Band Tuner Control Weather Band Tuner Control (with the optional accessory Weather Band Tuner Various control screens appear in a station.
... a station. • For system key operations, see (see page 80) 6 Switches the source. English Weather Band Tuner Control Weather Band Tuner Control (with the optional accessory Weather Band Tuner Various control screens appear in a station.

Instruction Manual
Page 36
p Sets an on-screen display of the TV screen. ( Auto) (optional accessory) (when the optional accessory TV tuner is connected only) If you set to "Auto", an information is not shown, touch or to display it. q Displays the User I /F 2 screen. English ...
p Sets an on-screen display of the TV screen. ( Auto) (optional accessory) (when the optional accessory TV tuner is connected only) If you set to "Auto", an information is not shown, touch or to display it. q Displays the User I /F 2 screen. English ...
Instruction Manual
Page 39
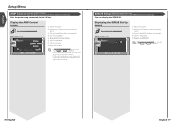
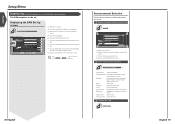
.... 2 Returns to the Control screen of the previous source. 3 Calls the Sound Effects Menu. (see the amp's instruction manual. SIRIUS Setup (with the optional accessory LX Power Amp connected only) Sets the power amp connected via the LX bus. English Setup Menu AMP Control (with the optional... accessory SIRIUS Tuner connected only) You can change and for the amp's operation when changed, see page 80) 4 Calls the Setup Menu. 5 Displays the SIRIUS...
.... 2 Returns to the Control screen of the previous source. 3 Calls the Sound Effects Menu. (see the amp's instruction manual. SIRIUS Setup (with the optional accessory LX Power Amp connected only) Sets the power amp connected via the LX bus. English Setup Menu AMP Control (with the optional... accessory SIRIUS Tuner connected only) You can change and for the amp's operation when changed, see page 80) 4 Calls the Setup Menu. 5 Displays the SIRIUS...
Instruction Manual
Page 40
... Announcement items. 4 Returns to the DAB Set Up screen. 2 Set the announcement parameters Tr a f f i c N e ws etc. English Setup Menu DAB Set Up (with the optional accessory DAB tuner connected only) The DAB reception can be set . PTY Watch PTY Watch Off 8 Off 7 8 Announcement Se l e c t S e t 9 DAB Se t Up 1 1 1 Adjusts the volume. 2 Calls...
... Announcement items. 4 Returns to the DAB Set Up screen. 2 Set the announcement parameters Tr a f f i c N e ws etc. English Setup Menu DAB Set Up (with the optional accessory DAB tuner connected only) The DAB reception can be set . PTY Watch PTY Watch Off 8 Off 7 8 Announcement Se l e c t S e t 9 DAB Se t Up 1 1 1 Adjusts the volume. 2 Calls...
Instruction Manual
Page 41
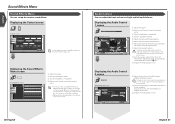
... Control screen of any source. English Sound Effects Menu Sound Effects Menu You can set up the . • Displayed items vary depending on the optional accessory connected. If you have increased the volume first, then reduced it to the Control screen of the previous source. 3 Calls the Setup Menu. (see... Menu. 5 Adjusts the right and left audio balance. Displaying the Control screen Control screen DVD V I DEO Audio Set Up SRC PBC REP Title 1 Chap 3 KENWOOD T-REP 13:50 IN SCRL TIME T0:05:20 You can adjust the front and rear and right and left volume balance. 6 Adjusts the front...
... Control screen of any source. English Sound Effects Menu Sound Effects Menu You can set up the . • Displayed items vary depending on the optional accessory connected. If you have increased the volume first, then reduced it to the Control screen of the previous source. 3 Calls the Setup Menu. (see... Menu. 5 Adjusts the right and left audio balance. Displaying the Control screen Control screen DVD V I DEO Audio Set Up SRC PBC REP Title 1 Chap 3 KENWOOD T-REP 13:50 IN SCRL TIME T0:05:20 You can adjust the front and rear and right and left volume balance. 6 Adjusts the front...
Installation Manual
Page 2
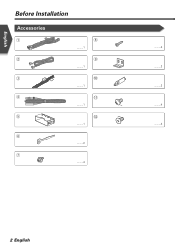
English Before Installation Accessories 1 2 3 4 5 6 7 8 ..........1 9 ..........1 0 ..........1 - ..........1 = ..........1 ..........2 ..........4 ..........4 ..........2 ..........2 ..........4 ..........4 2 English
English Before Installation Accessories 1 2 3 4 5 6 7 8 ..........1 9 ..........1 0 ..........1 - ..........1 = ..........1 ..........2 ..........4 ..........4 ..........2 ..........2 ..........4 ..........4 2 English
Installation Manual
Page 4
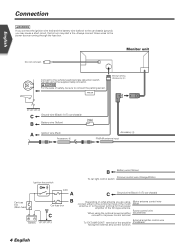
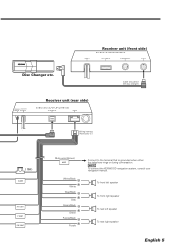
... wire (Black) - (To car chassis) ( 5A ) B Battery wire (Yellow) A Ignition wire (Red) Accessory 4 Accessory 2 FM/AM antenna input Ignition key switch B Battery wire (Yellow) Dimmer control wire (Orange/White) To car light control switch Car fuse box (Main fuse) + ...
... wire (Black) - (To car chassis) ( 5A ) B Battery wire (Yellow) A Ignition wire (Red) Accessory 4 Accessory 2 FM/AM antenna input Ignition key switch B Battery wire (Yellow) Dimmer control wire (Orange/White) To car light control switch Car fuse box (Main fuse) + ...
Installation Manual
Page 5
NOTE To connect the KENWOOD navigation system, consult your navigation manual. To front left speaker To front right speaker To rear left speaker To rear right speaker English 5 CONT P CONT ... FM /AM AV OUTPUT ANTENNA POWER TO MONITOR I /F Disc Changer etc. PREOUT Receiver unit (front side) TO TV TUNER I/F TO NAVIGATION I/F TO 5L-I /F Wiring harness (Accessory 1) ( 10A ) ILLUMI ANT.
NOTE To connect the KENWOOD navigation system, consult your navigation manual. To front left speaker To front right speaker To rear left speaker To rear right speaker English 5 CONT P CONT ... FM /AM AV OUTPUT ANTENNA POWER TO MONITOR I /F Disc Changer etc. PREOUT Receiver unit (front side) TO TV TUNER I/F TO NAVIGATION I/F TO 5L-I /F Wiring harness (Accessory 1) ( 10A ) ILLUMI ANT.
Installation Manual
Page 7
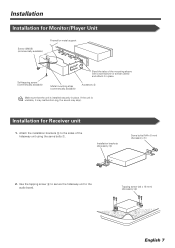
... the tabs of the hideaway unit using the sems bolts 7. Tapping screw (ø4 × 16 mm) (Accessory 8) English 7 Installation Installation for Receiver unit 1. If the unit is installed securely in place. Installation brackets (Accessory 9) Sems bolts (M4 × 8 mm) (Accessory 7) 2. Attach the installation brackets 9 to the audio board. Metal mounting strap (commercially available...
... the tabs of the hideaway unit using the sems bolts 7. Tapping screw (ø4 × 16 mm) (Accessory 8) English 7 Installation Installation for Receiver unit 1. If the unit is installed securely in place. Installation brackets (Accessory 9) Sems bolts (M4 × 8 mm) (Accessory 7) 2. Attach the installation brackets 9 to the audio board. Metal mounting strap (commercially available...

Installation Manual
Page 8
English Installation Installing in audio unit package) Audio unit or others Accessory - or = Bracket Screws (included in Japanese-Made Cars ■ Installing on Toyota, Nissan or Mitsubishi Car Using Brackets at Holes shown by "¶" or Accessory - or = Screws (included in audio unit package) 8 English
English Installation Installing in audio unit package) Audio unit or others Accessory - or = Bracket Screws (included in Japanese-Made Cars ■ Installing on Toyota, Nissan or Mitsubishi Car Using Brackets at Holes shown by "¶" or Accessory - or = Screws (included in audio unit package) 8 English

Installation Manual
Page 9
...bracket at both sides as shown below. 1. Bracket Screws (included in audio unit package) English 9 Accessory 0 Accessory Screws (included in audio unit package) 3. Bend each accessory tab into the hole of installation bracket to fix the bracket. Accessory - ■ Installation on Toyota Car using Brackets at Holes shown by "¶" or When using... accessories 0 as shown. Use a flat-blade screwdriver or pliers, and bend each end of the right and left unit sides. If so, tighten the ...
...bracket at both sides as shown below. 1. Bracket Screws (included in audio unit package) English 9 Accessory 0 Accessory Screws (included in audio unit package) 3. Bend each accessory tab into the hole of installation bracket to fix the bracket. Accessory - ■ Installation on Toyota Car using Brackets at Holes shown by "¶" or When using... accessories 0 as shown. Use a flat-blade screwdriver or pliers, and bend each end of the right and left unit sides. If so, tighten the ...
Installation Manual
Page 10
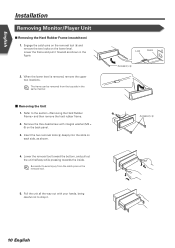
... to avoid injury from the top side in the figure. 2. English Installation Removing Monitor/Player Unit ■ Removing the Hard Rubber Frame (escutcheon) 1. Lock Catch Accessory 6 Accessory 6 10 English Engage the catch pins on the removal tool 6 and remove the two locks on each side, as shown in the same manner. ˙...
... to avoid injury from the top side in the figure. 2. English Installation Removing Monitor/Player Unit ■ Removing the Hard Rubber Frame (escutcheon) 1. Lock Catch Accessory 6 Accessory 6 10 English Engage the catch pins on the removal tool 6 and remove the two locks on each side, as shown in the same manner. ˙...


