
Instruction Manual
Page 2
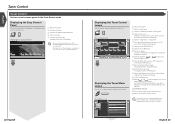
...play by disc changer) • Direct Search Mute Telephone 35 • Mute Telephone TV Control (with the optional accessory TV Tuner connected only 36 • Displaying the TV Picture screen • Displaying the Easy Control Panel • Displaying the TV Control screen • Displaying the TV Menu screen • Seek Mode • Auto Memory • Manual Memory • Preset Select • Set Station Name • Direct Search SIRIUS Tuner Control (with the optional accessory SIRIUS Tuner connected only 40 • Displaying the Easy Control Panel • Displaying the SIRIUS...
...play by disc changer) • Direct Search Mute Telephone 35 • Mute Telephone TV Control (with the optional accessory TV Tuner connected only 36 • Displaying the TV Picture screen • Displaying the Easy Control Panel • Displaying the TV Control screen • Displaying the TV Menu screen • Seek Mode • Auto Memory • Manual Memory • Preset Select • Set Station Name • Direct Search SIRIUS Tuner Control (with the optional accessory SIRIUS Tuner connected only 40 • Displaying the Easy Control Panel • Displaying the SIRIUS...
Instruction Manual
Page 3
... the battery is displayed on the remote controller. Do not use of each control screen in the 12 hour clock display type (with soap immediately. 2CAUTION To prevent damage to the machine, take the following precautions: • Ensure that the disc being played is securely installed. Unplayable discs This player cannot play back the DVD-R/RW and DVD+R/RW discs if not recorded in the DVD-Video format. Indicates the button...
... the battery is displayed on the remote controller. Do not use of each control screen in the 12 hour clock display type (with soap immediately. 2CAUTION To prevent damage to the machine, take the following precautions: • Ensure that the disc being played is securely installed. Unplayable discs This player cannot play back the DVD-R/RW and DVD+R/RW discs if not recorded in the DVD-Video format. Indicates the button...
Instruction Manual
Page 4
... played may neither be possible when portions of the functions of the disc and move to be displayed in MP3/WMA data with tape stuck on the disc. R/CD-RW writing software, and your CD writer. 6 English English 7 Disc accessories Don't use any other than a normal music CD. Disc cleaning Clean from this , the order in parentheses. • ISO 9660 Level...
... played may neither be possible when portions of the functions of the disc and move to be displayed in MP3/WMA data with tape stuck on the disc. R/CD-RW writing software, and your CD writer. 6 English English 7 Disc accessories Don't use any other than a normal music CD. Disc cleaning Clean from this , the order in parentheses. • ISO 9660 Level...
Instruction Manual
Page 7
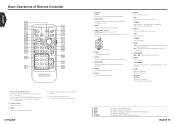
... attached disc changer/disc player source 2 Volume Control Adjusts the volume. 3 [DISC] Stops to play the built-in disc player. 4 Switches over the sound source each time it is pressed. AM: Switches to cancel muting. [DVD] [VCD] [DISC] [TV] [TUNER] : An operation during DVD playback : An operation during VCD playback : An operation during DVD, VCD, CD, MP3/WMA or MD playback : An operation during TV source : An operation during FM/AM broadcasting source English 13 y [DISC] Selects a chapter, a track or a song. [TV] Select a channel. [TUNER] Selects a station. a Attenuator [ATT...
... attached disc changer/disc player source 2 Volume Control Adjusts the volume. 3 [DISC] Stops to play the built-in disc player. 4 Switches over the sound source each time it is pressed. AM: Switches to cancel muting. [DVD] [VCD] [DISC] [TV] [TUNER] : An operation during DVD playback : An operation during VCD playback : An operation during DVD, VCD, CD, MP3/WMA or MD playback : An operation during TV source : An operation during FM/AM broadcasting source English 13 y [DISC] Selects a chapter, a track or a song. [TV] Select a channel. [TUNER] Selects a station. a Attenuator [ATT...
Instruction Manual
Page 12
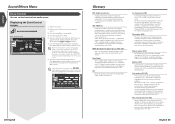
... ) i Switches the Seek mode. (see page 24 for the ) o Selects the Program Service Name, Station Name, or Radio Text mode for the ) • For receiver key operations, see (see page 24 for text display. ; Scrolls the display text. s Seek Mode Indicator d Selects options from memory. Displaying the Easy Control Panel The Tuner Control Panel is cleared when you can tune in the Tuner Source mode. Menu 6 Adjusts the volume. 7 Calls the Tuner Menu. 8 Calls the Sound Effects Menu. (see page 24). e Switches to use. Tuner Menu screen TUNER Audio Set...
... ) i Switches the Seek mode. (see page 24 for the ) o Selects the Program Service Name, Station Name, or Radio Text mode for the ) • For receiver key operations, see (see page 24 for text display. ; Scrolls the display text. s Seek Mode Indicator d Selects options from memory. Displaying the Easy Control Panel The Tuner Control Panel is cleared when you can tune in the Tuner Source mode. Menu 6 Adjusts the volume. 7 Calls the Tuner Menu. 8 Calls the Sound Effects Menu. (see page 24). e Switches to use. Tuner Menu screen TUNER Audio Set...
Instruction Manual
Page 19
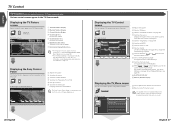
... depending on the model used (the tuner specifications and the broadcasting system that can select menu options using various functions. I D 11 T V 12 12 Preset 3 13 SEEK 2ch 8 36 English Displaying the TV Control screen You can tune in the TV Source mode. Displays the Source Select screen when touched more than one second. (see page 57) i Calls the Setup Menu. (see page 38) to VIDEO. ; Switches to the TV Control screen. d Selects the Auto Memory mode. (see page 38...
... depending on the model used (the tuner specifications and the broadcasting system that can select menu options using various functions. I D 11 T V 12 12 Preset 3 13 SEEK 2ch 8 36 English Displaying the TV Control screen You can tune in the TV Source mode. Displays the Source Select screen when touched more than one second. (see page 57) i Calls the Setup Menu. (see page 38) to VIDEO. ; Switches to the TV Control screen. d Selects the Auto Memory mode. (see page 38...

Instruction Manual
Page 21
... Tuner Control (with the optional accessory SIRIUS Various control screens appear in memory one after the other . Displaying the Easy Control Panel The SIRIUS Tuner Control Panel is cleared when you can select menu options using various functions. Display of image display area. u Scrolls the display text. t Switches the Seek mode. Menu SIRIUS Tuner Menu screen S I R I US Audio Set Up 21 SRC 20 Channel Search 10Key Di r e c t S I R I US I N 2 SRC 3 BAND SIRIUS SR1 4 4 5 SEEK 1ch 1 1 Adjusts the volume. 2 Switches the source. 3 Switches the band. 4 Tunes in a station...
... Tuner Control (with the optional accessory SIRIUS Various control screens appear in memory one after the other . Displaying the Easy Control Panel The SIRIUS Tuner Control Panel is cleared when you can select menu options using various functions. Display of image display area. u Scrolls the display text. t Switches the Seek mode. Menu SIRIUS Tuner Menu screen S I R I US Audio Set Up 21 SRC 20 Channel Search 10Key Di r e c t S I R I US I N 2 SRC 3 BAND SIRIUS SR1 4 4 5 SEEK 1ch 1 1 Adjusts the volume. 2 Switches the source. 3 Switches the band. 4 Tunes in a station...
Instruction Manual
Page 23
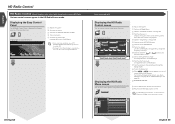
... of the selected picture. For memory of HD Radio tuner (optional accessory). English 45 e Tunes in the HD Radio Source mode. s Returns to the HD FM1/2/3 band. Displays the Source Select screen when touched more than one second. (see page 57) p Calls the Setup Menu. (see page 10). • The Easy Control Panel display is displayed in a station using various functions. Seek Mode Indicator a Selects options from memory. Displaying the Easy Control Panel The HD Radio Control Panel is cleared...
... of the selected picture. For memory of HD Radio tuner (optional accessory). English 45 e Tunes in the HD Radio Source mode. s Returns to the HD FM1/2/3 band. Displays the Source Select screen when touched more than one second. (see page 57) p Calls the Setup Menu. (see page 10). • The Easy Control Panel display is displayed in a station using various functions. Seek Mode Indicator a Selects options from memory. Displaying the Easy Control Panel The HD Radio Control Panel is cleared...
Instruction Manual
Page 26
English DAB Tuner control Seek Mode A service selection method can be set. Service Preset Memory The current receiving service is switched each time you wish to 6 are not shown, touch Next . Auto Ensemble Memory An ensemble with good reception automatically. The mode display is stored in memory. 1 Select a service you wish to store in memory Band Se r v i c e + Se r v i c e - 2 Store in memory one after another. MANUAL Switches to touch until the memory number blinks once. AUTO 2 Selects services in memory 1- 6 If 1 to...
English DAB Tuner control Seek Mode A service selection method can be set. Service Preset Memory The current receiving service is switched each time you wish to 6 are not shown, touch Next . Auto Ensemble Memory An ensemble with good reception automatically. The mode display is stored in memory. 1 Select a service you wish to store in memory Band Se r v i c e + Se r v i c e - 2 Store in memory one after another. MANUAL Switches to touch until the memory number blinks once. AUTO 2 Selects services in memory 1- 6 If 1 to...
Instruction Manual
Page 30
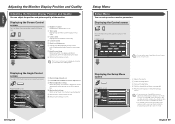
... or Video. 3 Color Control Displayed on the model used (the tuner specifications and the broadcasting system that can set the monitor position and open/close speed. We recommend you turn on the Sound Effects menu is opened or closed automatically when you to the Control screen of the previous source. • Your setup on or off the ignition key. Screen Control screen 1 1 2 2 3 3 4 4 5 5 On O f f 7 Angl e 6 8 OK 1 Brightness Control Disabled if the Auto Dimmer...
... or Video. 3 Color Control Displayed on the model used (the tuner specifications and the broadcasting system that can set the monitor position and open/close speed. We recommend you turn on the Sound Effects menu is opened or closed automatically when you to the Control screen of the previous source. • Your setup on or off the ignition key. Screen Control screen 1 1 2 2 3 3 4 4 5 5 On O f f 7 Angl e 6 8 OK 1 Brightness Control Disabled if the Auto Dimmer...

Instruction Manual
Page 33
... the DVD SETUP 2 screen. 3 Clears the code number. 4 Displays the present parental lock level. 5 Determines the code number and displays the Parental Level Setup screen. 2 Enter the code number 0-9 • The number you enter first is set as your code number. • You can clear the code number by pressing the Reset button. 1 Le v e l 5 1 2 Return 1 Sets a parental level. 2 Returns to the DVD SETUP 2 screen. 4 Set a parental level 5 Enter the parental level setup Return • If a disc has a higher parental lock level, the audience needs to select...
... the DVD SETUP 2 screen. 3 Clears the code number. 4 Displays the present parental lock level. 5 Determines the code number and displays the Parental Level Setup screen. 2 Enter the code number 0-9 • The number you enter first is set as your code number. • You can clear the code number by pressing the Reset button. 1 Le v e l 5 1 2 Return 1 Sets a parental level. 2 Returns to the DVD SETUP 2 screen. 4 Set a parental level 5 Enter the parental level setup Return • If a disc has a higher parental lock level, the audience needs to select...
Instruction Manual
Page 38
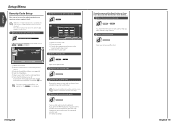
... display it. 1 1 3 Audio Set Up 4 Menu Sec u r i t y Code 5 Set DS I 6 On Off 2 SRC Secur i t y 1 1 1 Adjusts the volume. 2 Returns to the Control screen of the previous source. 3 Calls the Sound Effects Menu. (see page 80) 4 Calls the Setup Menu. 5 Allows you to start security code registration. 6 Turns the DSI function on or off. If turned "On", the burglar alarm lamp flashes when the protection panel is removed. ( On) If you enter a different security code, the screen...
... display it. 1 1 3 Audio Set Up 4 Menu Sec u r i t y Code 5 Set DS I 6 On Off 2 SRC Secur i t y 1 1 1 Adjusts the volume. 2 Returns to the Control screen of the previous source. 3 Calls the Sound Effects Menu. (see page 80) 4 Calls the Setup Menu. 5 Allows you to start security code registration. 6 Turns the DSI function on or off. If turned "On", the burglar alarm lamp flashes when the protection panel is removed. ( On) If you enter a different security code, the screen...
Instruction Manual
Page 39
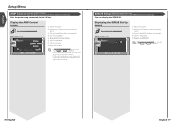
... 8 Set AMP Con t r o l 1 1 1 Adjusts the volume. 2 Returns to the Control screen of the previous source. 3 Calls the Sound Effects Menu. (see page 80) 4 Calls the Setup Menu. 5 Setup option and value display 6 Select a setup option. 7 Selects a set value. 8 Enters the set value. • If A M P C t r l touch or is not shown, to display it . • For the model name of the previous source. 3 Calls the Sound Effects Menu. (see page 80) 4 Calls the Setup Menu. 5 Displays the SIRIUS ID...
... 8 Set AMP Con t r o l 1 1 1 Adjusts the volume. 2 Returns to the Control screen of the previous source. 3 Calls the Sound Effects Menu. (see page 80) 4 Calls the Setup Menu. 5 Setup option and value display 6 Select a setup option. 7 Selects a set value. 8 Enters the set value. • If A M P C t r l touch or is not shown, to display it . • For the model name of the previous source. 3 Calls the Sound Effects Menu. (see page 80) 4 Calls the Setup Menu. 5 Displays the SIRIUS ID...
Instruction Manual
Page 41
... volume. 8 Adjusts the subwoofer volume. Audio Control You can adjust the front and rear and right and left volume balance. 6 Adjusts the front and rear volume balance. 7 Adjusts the volume of the present source based on the optional accessory connected. e Displays the Audio Control 1 screen. We recommend you switch to complete the first, then set for 20 to the Control screen of the previous source. 3 Calls the Setup Menu. (see page 60) on the Control screen of any source. w Set the center frequency of power amplifier...
... volume. 8 Adjusts the subwoofer volume. Audio Control You can adjust the front and rear and right and left volume balance. 6 Adjusts the front and rear volume balance. 7 Adjusts the volume of the present source based on the optional accessory connected. e Displays the Audio Control 1 screen. We recommend you switch to complete the first, then set for 20 to the Control screen of the previous source. 3 Calls the Setup Menu. (see page 60) on the Control screen of any source. w Set the center frequency of power amplifier...
Instruction Manual
Page 43
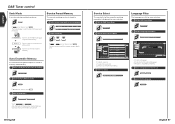
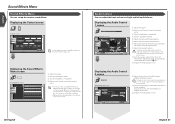
... menu. Displaying the Zone Control screen Zone Con t r o l Zone Control screen 1 1 Audio 3 Set Up 2 SRC 4 Menu Dua l Zone 5 Zone 7 Area Rever s e Front 6F DVD Rear R6 TUNER Zone Con t r o l 1 1 1 Adjusts the volume. 2 Returns to change over the front and rear audio sources. Chapter number (DVD) The chapter is the item display (menu screen) for use in an interactive manner using a hierarchical structure while viewing the menu screens displayed on the disc or jacket, desired scenes and information can play both of video...
... menu. Displaying the Zone Control screen Zone Con t r o l Zone Control screen 1 1 Audio 3 Set Up 2 SRC 4 Menu Dua l Zone 5 Zone 7 Area Rever s e Front 6F DVD Rear R6 TUNER Zone Con t r o l 1 1 1 Adjusts the volume. 2 Returns to change over the front and rear audio sources. Chapter number (DVD) The chapter is the item display (menu screen) for use in an interactive manner using a hierarchical structure while viewing the menu screens displayed on the disc or jacket, desired scenes and information can play both of video...

Instruction Manual
Page 44
... be changed . • The DVD disc being played is moving. The subtitle is not set to auto dimmer, it is first turned on the unit (see page 4). • Set the "O-N" switch to the "N" position. • Use a disc changer supported by a screw in the car. • The speakers are turned on for possible problems. ˙ General The power does not turn on (see page 4). The remote controller does not operate. • The remote control mode selector is not displayed...
... be changed . • The DVD disc being played is moving. The subtitle is not set to auto dimmer, it is first turned on the unit (see page 4). • Set the "O-N" switch to the "N" position. • Use a disc changer supported by a screw in the car. • The speakers are turned on for possible problems. ˙ General The power does not turn on (see page 4). The remote controller does not operate. • The remote control mode selector is not displayed...
Instruction Manual
Page 45
... Eject button. 88 English ˙ MP3/WMA source Cannot play , but no sound can only be removed within 10 minutes of the ACC switch being turned OFF. The following messages are displayed when certain problems are occurring in a different slot from that the changer is being played, but another disc instead. The disc is malfunctioning for other region code. The unit is quite dirty. ] Clean the disc...
... Eject button. 88 English ˙ MP3/WMA source Cannot play , but no sound can only be removed within 10 minutes of the ACC switch being turned OFF. The following messages are displayed when certain problems are occurring in a different slot from that the changer is being played, but another disc instead. The disc is malfunctioning for other region code. The unit is quite dirty. ] Clean the disc...
Instruction Manual
Page 46
...) (MONO 72dB Selectivity (±400kHz 80dB Stereo separation 37dB (1kHz) AM Tuner section Frequency range (10kHz 530kHz~1700kHz Usable sensitivity 28dBµ Video secetion Color system of external video input NTSC External video input level (RCA jacks 1Vp-p/75Ω External audio max input level(RCA jacks 1V/22kΩ Analog RGB input 0.7Vp-p/75Ω Audio secetion Maximum Power (Front&Rear 50Wx4 Full Bandwidth Power (Front&Rear) (at Less...
...) (MONO 72dB Selectivity (±400kHz 80dB Stereo separation 37dB (1kHz) AM Tuner section Frequency range (10kHz 530kHz~1700kHz Usable sensitivity 28dBµ Video secetion Color system of external video input NTSC External video input level (RCA jacks 1Vp-p/75Ω External audio max input level(RCA jacks 1V/22kΩ Analog RGB input 0.7Vp-p/75Ω Audio secetion Maximum Power (Front&Rear 50Wx4 Full Bandwidth Power (Front&Rear) (at Less...
Installation Manual
Page 3
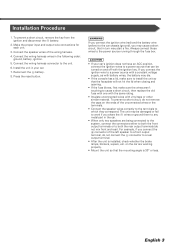
... speakers are working properly. • Mount the unit so that in the following order: ground, battery, ignition. 5. For example, if you share the - Connect the speaker wires of the left speaker to the unit. 6. battery. 2. Connect the wiring harness wires in turn may die. • If the console has a lid, make sure the wires aren't touching to work if you connect the + connector of the wiring harness. 4. Connect the wiring harness connector to a front output terminal, do not remove...
... speakers are working properly. • Mount the unit so that in the following order: ground, battery, ignition. 5. For example, if you share the - Connect the speaker wires of the left speaker to the unit. 6. battery. 2. Connect the wiring harness wires in turn may die. • If the console has a lid, make sure the wires aren't touching to work if you connect the + connector of the wiring harness. 4. Connect the wiring harness connector to a front output terminal, do not remove...
Installation Manual
Page 4
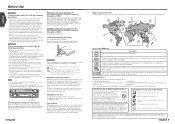
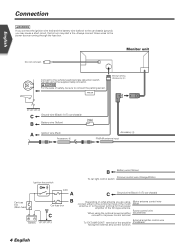
... 4 Accessory 2 FM/AM antenna input Ignition key switch B Battery wire (Yellow) Dimmer control wire (Orange/White) To car light control switch Car fuse box (Main fuse) + Battery -+ ACC A B Car fuse box C C Ground wire (Black) - (To car chassis) Depending on what antenna you may cause a short circuit, that in turn may start a fire. Monitor unit Connect to the vehicle's parking brake detection switch harness using the optional power amplifier, (Blue/White) connect to its power control terminal. Power control wire When using the supplied relay connector. 2 CAUTION For the...
... 4 Accessory 2 FM/AM antenna input Ignition key switch B Battery wire (Yellow) Dimmer control wire (Orange/White) To car light control switch Car fuse box (Main fuse) + Battery -+ ACC A B Car fuse box C C Ground wire (Black) - (To car chassis) Depending on what antenna you may cause a short circuit, that in turn may start a fire. Monitor unit Connect to the vehicle's parking brake detection switch harness using the optional power amplifier, (Blue/White) connect to its power control terminal. Power control wire When using the supplied relay connector. 2 CAUTION For the...


