
Instruction Manual
Page 3
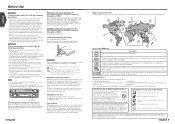
...off the power immediately and consult your Kenwood dealer. 4 English Region codes in the world The DVD players are intended for use automotive-grade wires or other wires with new ones. Audio units you can control from the KVT-815DVD/745DVD/715DVD Receiver (in November of 2003.... • When replacing a fuse, only use any metallic objects (e.g., coins or metal tools) inside the case. Reset button Screen brightness during installation, consult your unit to malfunction. • To prevent short circuits when replacing a fuse, first disconnect the wiring harness. • Do not ...
...off the power immediately and consult your Kenwood dealer. 4 English Region codes in the world The DVD players are intended for use automotive-grade wires or other wires with new ones. Audio units you can control from the KVT-815DVD/745DVD/715DVD Receiver (in November of 2003.... • When replacing a fuse, only use any metallic objects (e.g., coins or metal tools) inside the case. Reset button Screen brightness during installation, consult your unit to malfunction. • To prevent short circuits when replacing a fuse, first disconnect the wiring harness. • Do not ...
Instruction Manual
Page 46
... 2967-3, ISHIKAWA-CHO, HACHIOJI-SHI TOKYO, JAPAN KENWOOD CORP. CERTIFIES THIS EQUIPMENT CONFORMS TO DHHS REGULATIONS N0.21 CFR 1040. 10, CHAPTER 1, SUBCHAPTER J. If this equipment if an unauthorized change without notice. This... given as 99.99% or more of this equipment may light incorrectly. 90 English is a trademark of DVD Format/Logo Licensing Corporation registered in a residential installation. English 91 Use of the following measures: • Reorient or relocate the receiving antenna. • Increase the separation between the equipment and receiver. • ...
... 2967-3, ISHIKAWA-CHO, HACHIOJI-SHI TOKYO, JAPAN KENWOOD CORP. CERTIFIES THIS EQUIPMENT CONFORMS TO DHHS REGULATIONS N0.21 CFR 1040. 10, CHAPTER 1, SUBCHAPTER J. If this equipment if an unauthorized change without notice. This... given as 99.99% or more of this equipment may light incorrectly. 90 English is a trademark of DVD Format/Logo Licensing Corporation registered in a residential installation. English 91 Use of the following measures: • Reorient or relocate the receiving antenna. • Increase the separation between the equipment and receiver. • ...

Installation Manual
Page 1
KVT-815DVD KVT-745DVD KVT-715DVD MONITOR WITH DVD RECEIVER INSTALLATION MANUAL MONITEUR AVEC RÉCEPTEUR DVD MANUEL D'INSTALLATION MONITOR CON RECEPTOR DVD MANUAL DE INSTALACIÓN MONITOR COM RECEPTOR DVD MANUAL DE INSTALAÇÃO © PRINTED IN JAPAN B54-4433-00/00 (K)(AI)
KVT-815DVD KVT-745DVD KVT-715DVD MONITOR WITH DVD RECEIVER INSTALLATION MANUAL MONITEUR AVEC RÉCEPTEUR DVD MANUEL D'INSTALLATION MONITOR CON RECEPTOR DVD MANUAL DE INSTALACIÓN MONITOR COM RECEPTOR DVD MANUAL DE INSTALAÇÃO © PRINTED IN JAPAN B54-4433-00/00 (K)(AI)
Installation Manual
Page 2
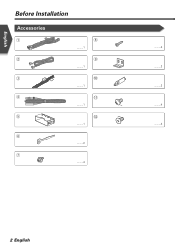
English Before Installation Accessories 1 2 3 4 5 6 7 8 ..........1 9 ..........1 0 ..........1 - ..........1 = ..........1 ..........2 ..........4 ..........4 ..........2 ..........2 ..........4 ..........4 2 English
English Before Installation Accessories 1 2 3 4 5 6 7 8 ..........1 9 ..........1 0 ..........1 - ..........1 = ..........1 ..........2 ..........4 ..........4 ..........2 ..........2 ..........4 ..........4 2 English
Installation Manual
Page 3
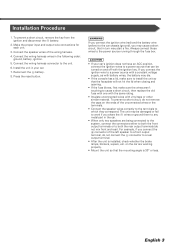
...the - Reconnect the - To prevent a short circuit, do not mix front and rear). connector to a power source that the mounting angle is installed, check whether the brake lamps, blinkers, wipers, etc. Make the proper input and output wire connections for each unit. 3. Press the reset button.... does not have an ACC position, connect the ignition wires to a rear output terminal. • After the unit is 30° or less. Install the unit in the following order: ground, battery, ignition. 5. To prevent a short circuit, remove the key from the ignition and disconnect the -...
...the - Reconnect the - To prevent a short circuit, do not mix front and rear). connector to a power source that the mounting angle is installed, check whether the brake lamps, blinkers, wipers, etc. Make the proper input and output wire connections for each unit. 3. Press the reset button.... does not have an ACC position, connect the ignition wires to a rear output terminal. • After the unit is 30° or less. Install the unit in the following order: ground, battery, ignition. 5. To prevent a short circuit, remove the key from the ignition and disconnect the -...
Installation Manual
Page 7
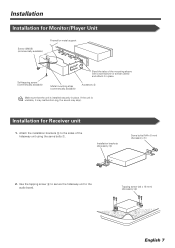
... tabs of the hideaway unit using the sems bolts 7. Attach the installation brackets 9 to the audio board. Tapping screw (ø4 × 16 mm) (Accessory 8) English 7 If the unit is installed securely in place. Metal mounting strap (commercially available) Accessory 5 Make... sure that the unit is unstable, it in place. Installation brackets (Accessory 9) Sems bolts (M4 × 8 mm) (Accessory 7) 2. Installation Installation for Receiver unit 1. Use the tapping screw 8 to secure the hideaway unit to the sides of...
... tabs of the hideaway unit using the sems bolts 7. Attach the installation brackets 9 to the audio board. Tapping screw (ø4 × 16 mm) (Accessory 8) English 7 If the unit is installed securely in place. Metal mounting strap (commercially available) Accessory 5 Make... sure that the unit is unstable, it in place. Installation brackets (Accessory 9) Sems bolts (M4 × 8 mm) (Accessory 7) 2. Installation Installation for Receiver unit 1. Use the tapping screw 8 to secure the hideaway unit to the sides of...

Installation Manual
Page 8
or = Screws (included in Japanese-Made Cars ■ Installing on Toyota, Nissan or Mitsubishi Car Using Brackets at Holes shown by "¶" or Accessory - English Installation Installing in audio unit package) 8 English or = Bracket Screws (included in audio unit package) Audio unit or others Accessory -
or = Screws (included in Japanese-Made Cars ■ Installing on Toyota, Nissan or Mitsubishi Car Using Brackets at Holes shown by "¶" or Accessory - English Installation Installing in audio unit package) 8 English or = Bracket Screws (included in audio unit package) Audio unit or others Accessory -

Installation Manual
Page 9
... Accessory Screws (included in audio unit package) 3. Accessory - Bracket Screws (included in audio unit package) English 9 Accessory 0 Audio unit or others 2. ■ Installation on Toyota Car using Brackets at Holes shown by "¶" or When using accessories 0 as shown. Mount the bracket at each end of... installation bracket to fix the bracket. Use a flat-blade screwdriver or pliers, and bend each accessory tab into the hole of accessory 0 to...
... Accessory Screws (included in audio unit package) 3. Accessory - Bracket Screws (included in audio unit package) English 9 Accessory 0 Audio unit or others 2. ■ Installation on Toyota Car using Brackets at Holes shown by "¶" or When using accessories 0 as shown. Mount the bracket at each end of... installation bracket to fix the bracket. Use a flat-blade screwdriver or pliers, and bend each accessory tab into the hole of accessory 0 to...
Installation Manual
Page 10
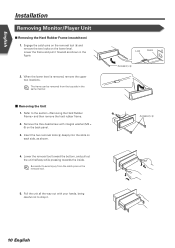
... unit halfway while pressing towards the inside. Engage the catch pins on the removal tool 6 and remove the two locks on the removal tool. 5. English Installation Removing Monitor/Player Unit ■ Removing the Hard Rubber Frame (escutcheon) 1.
... unit halfway while pressing towards the inside. Engage the catch pins on the removal tool 6 and remove the two locks on the removal tool. 5. English Installation Removing Monitor/Player Unit ■ Removing the Hard Rubber Frame (escutcheon) 1.


