
User Manual
Page 3
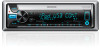
...Press again to scroll the current display information. ( not available ) * For KMR-D358 : The power will also be erased. * Not used. Change the display information Press DISP SCRL repeatedly. • Press and hold SRC to reset Your preset adjustments will automatically turn off the power. ( Pressing SRC does not... SRC. • Press and hold to turn off the power.* Press and hold to cancel. Pull out the insulation sheet when using for KMR-D358 ) Remote sensor (Do not expose to bright sunlight.) Detach button Attach Detach How to turn on the power. ) Adjust the volume Turn...
...Press again to scroll the current display information. ( not available ) * For KMR-D358 : The power will also be erased. * Not used. Change the display information Press DISP SCRL repeatedly. • Press and hold SRC to reset Your preset adjustments will automatically turn off the power. ( Pressing SRC does not... SRC. • Press and hold to turn off the power.* Press and hold to cancel. Pull out the insulation sheet when using for KMR-D358 ) Remote sensor (Do not expose to bright sunlight.) Detach button Attach Detach How to turn on the power. ) Adjust the volume Turn...
User Manual
Page 4
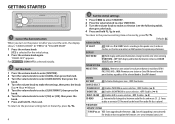
For KMR-D358 , [DEMO OFF] is selected for each preset button in source selection. ; To return ...;9 inches or 6 inches) or OEM speakers for each band (FM1/ FM2/ FM3/ AM). ; GETTING STARTED 1 Cancel the demonstration When you reset the unit), the display shows: "CANCEL DEMO" B "PRESS" B "VOLUME KNOB" 1 Press the volume knob. [YES] is selected initially.... to select [CLOCK ADJUST], then press the knob. 4 Turn the volume knob to make a selection (see : www.kenwood.com/cs/ce/ DISPLAY EASY MENU ON: Both display and button illumination change to play as [COLOR SELECT] color. (B...
For KMR-D358 , [DEMO OFF] is selected for each preset button in source selection. ; To return ...;9 inches or 6 inches) or OEM speakers for each band (FM1/ FM2/ FM3/ AM). ; GETTING STARTED 1 Cancel the demonstration When you reset the unit), the display shows: "CANCEL DEMO" B "PRESS" B "VOLUME KNOB" 1 Press the volume knob. [YES] is selected initially.... to select [CLOCK ADJUST], then press the knob. 4 Turn the volume knob to make a selection (see : www.kenwood.com/cs/ce/ DISPLAY EASY MENU ON: Both display and button illumination change to play as [COLOR SELECT] color. (B...
User Manual
Page 11
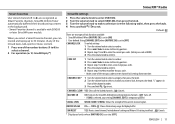
.... 3 Repeat steps 1 and 2 to enter the current pass code. (Initial pass code is temporary ignored. CHANNEL CLEAR* YES: Clears all the locked channels. ; SXM RESET YES: Resets stored channel, locked channel setting and Mature CH setting to exit. SiriusXM® Radio Smart Favorites User stored channels (1 to 6) are two types of lock...
.... 3 Repeat steps 1 and 2 to enter the current pass code. (Initial pass code is temporary ignored. CHANNEL CLEAR* YES: Clears all the locked channels. ; SXM RESET YES: Resets stored channel, locked channel setting and Mature CH setting to exit. SiriusXM® Radio Smart Favorites User stored channels (1 to 6) are two types of lock...
User Manual
Page 14
...selecting the PANDORA source. The unit does not work . • Radio reception is incorrect. For KMR-D358 : The Auto Power Off function (that contains playable audio files. • Reconnect the iPod. • Reset the iPod. 14 "TOC ERROR" appears. "COPY PRO" appears. "NO MUSIC" appears. ... no operations can be done. • Sound cannot be ejected. "NA FILE" appears. "READ ERROR" appears. "NA DEVICE" appears. Clean the connectors. (B 2) Reset the unit. (B 3) Make sure [OFF] is selected for [DEMO MODE]. (B 4) • Connect the antenna firmly. • Pull the antenna out all . ...
...selecting the PANDORA source. The unit does not work . • Radio reception is incorrect. For KMR-D358 : The Auto Power Off function (that contains playable audio files. • Reconnect the iPod. • Reset the iPod. 14 "TOC ERROR" appears. "COPY PRO" appears. "NO MUSIC" appears. ... no operations can be done. • Sound cannot be ejected. "NA FILE" appears. "READ ERROR" appears. "NA DEVICE" appears. Clean the connectors. (B 2) Reset the unit. (B 3) Make sure [OFF] is selected for [DEMO MODE]. (B 4) • Connect the antenna firmly. • Pull the antenna out all . ...
User Manual
Page 16
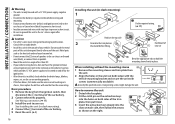
... 12 V DC power supply and is installed, check whether the brake lamps, blinkers, wipers, etc. Do the required wiring. (B 17) Dashboard of the car battery. 5 Reset the unit. (B 3) Installing the unit (in the unit (on both sides) with the vehicle mounting bracket and secure the unit with screws (commercially available). Metal...
... 12 V DC power supply and is installed, check whether the brake lamps, blinkers, wipers, etc. Do the required wiring. (B 17) Dashboard of the car battery. 5 Reset the unit. (B 3) Installing the unit (in the unit (on both sides) with the vehicle mounting bracket and secure the unit with screws (commercially available). Metal...

