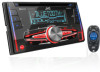
Instruction Manual
Page 4
... explosion if replaced incorrectly. CONTENTS BEFORE USE BEFORE USE BASICS GETIING STARTED CD I USB I iPod RADIO AUX Pandora® iHeartRadio® BLUETOOTH® AUDIO SETIINGS DISPLAY SEliiNGS MORE INFORMATION TROUBLESHOOTING SPECIFICATIONS INSTALLATION I CONNECTION '2 3 4 5 7 8 9 10 11 --- 1-6- 18 19 20 22 24 . We shall bear no responsibility for any loss of recorded data...
... explosion if replaced incorrectly. CONTENTS BEFORE USE BEFORE USE BASICS GETIING STARTED CD I USB I iPod RADIO AUX Pandora® iHeartRadio® BLUETOOTH® AUDIO SETIINGS DISPLAY SEliiNGS MORE INFORMATION TROUBLESHOOTING SPECIFICATIONS INSTALLATION I CONNECTION '2 3 4 5 7 8 9 10 11 --- 1-6- 18 19 20 22 24 . We shall bear no responsibility for any loss of recorded data...
Instruction Manual
Page 5
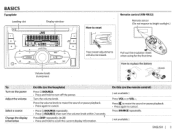
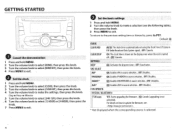
Pull out the insulation sheet when using for the first time. BASICS Faceplate ,...L,o.a-di-ng-s-lo,t -1---1--D-is-p-lay,w-i-nd-o-w---r-'\ JVC How to bright sunlight.) [y..v,.-..-r .rYY w-. Press the volume knob to mute the sound or pause playback. • Press again to...current information. (not available) Press VOL + or VOL-. Volume knob (turn/press) Turn on the power Adjust the volume . ' Select a source Change the display information Press C) /SOURCE. • Press and hold to cancel. • Press C)/SOURCE repeatedly. • Press C)/SOURCE, then turn off the nn\AICH...
Pull out the insulation sheet when using for the first time. BASICS Faceplate ,...L,o.a-di-ng-s-lo,t -1---1--D-is-p-lay,w-i-nd-o-w---r-'\ JVC How to bright sunlight.) [y..v,.-..-r .rYY w-. Press the volume knob to mute the sound or pause playback. • Press again to...current information. (not available) Press VOL + or VOL-. Volume knob (turn/press) Turn on the power Adjust the volume . ' Select a source Change the display information Press C) /SOURCE. • Press and hold to cancel. • Press C)/SOURCE repeatedly. • Press C)/SOURCE, then turn off the nn\AICH...
Instruction Manual
Page 6
...;the settings, then pr.ess the knob. OFF: Cancels. AM* ON: Enables AM in source selection.; NO: Cancels (upgrading is selected. ,f 4 For details on the display even when the u·nit is automatically set using the Clock Time (CT) data in source selection.; ON: The clock time is shown on how...], then press the knob. 3 Turn the volume knob to select [CLOCK SET], then press the knob. 4 Turn the volume knob to make a selection (see : p:/(~~~.:J.Y * Not displayed when the corresponding source is not activated).
...;the settings, then pr.ess the knob. OFF: Cancels. AM* ON: Enables AM in source selection.; NO: Cancels (upgrading is selected. ,f 4 For details on the display even when the u·nit is automatically set using the Clock Time (CT) data in source selection.; ON: The clock time is shown on how...], then press the knob. 3 Turn the volume knob to select [CLOCK SET], then press the knob. 4 Turn the volume knob to make a selection (see : p:/(~~~.:J.Y * Not displayed when the corresponding source is not activated).
Instruction Manual
Page 10
Radio Timer will be turned on. 2 FM/ AM: Select the FM or AM band. 3 01 to 18 {for FM}/ 01 to 06 {for AM): Select the preset station. 4 Set the activation day* and time. · "0" lights up when complete. . * Selectable only when [ONCE] or [WEEKLY] is selected in [SRC SELEa] after Radio Timer for AM is selected for [AM] in step 1. RADIO AUX Default: XX RADIO TIMER Turns on the radio at a specific time regardless of the current source. 1 ONCE/ DAILYI WEEKLYI OFF: Select how often the timer will not activate forthe following cases. • The unit is turned off. • [OFF] is
Radio Timer will be turned on. 2 FM/ AM: Select the FM or AM band. 3 01 to 18 {for FM}/ 01 to 06 {for AM): Select the preset station. 4 Set the activation day* and time. · "0" lights up when complete. . * Selectable only when [ONCE] or [WEEKLY] is selected in [SRC SELEa] after Radio Timer for AM is selected for [AM] in step 1. RADIO AUX Default: XX RADIO TIMER Turns on the radio at a specific time regardless of the current source. 1 ONCE/ DAILYI WEEKLYI OFF: Select how often the timer will not activate forthe following cases. • The unit is turned off. • [OFF] is
Instruction Manual
Page 13
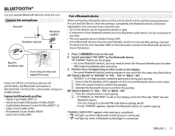
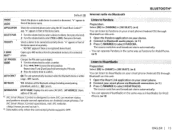
Supported Bluetooth profiles - Hands-Free Profile (HFP1.5) ·-Advanced Audio Distribution Profile (A2DP) - Once the pairing is disconnected. anytime. • This unit supports Secure Simple Pairing (SSP). . • Some Bluetooth devices may not automatically connect to the unit manually. AudioNideo Remote Control Profile (AVRCP1.3) - Refer to the instruction manual of two Bluetooth phones and one Bluetooth audio device can operate Bluetooth devices using this unit. · Rear panel Microphone supplied) C· •• I.......J li t:: ::: Microphone ...
Supported Bluetooth profiles - Hands-Free Profile (HFP1.5) ·-Advanced Audio Distribution Profile (A2DP) - Once the pairing is disconnected. anytime. • This unit supports Secure Simple Pairing (SSP). . • Some Bluetooth devices may not automatically connect to the unit manually. AudioNideo Remote Control Profile (AVRCP1.3) - Refer to the instruction manual of two Bluetooth phones and one Bluetooth audio device can operate Bluetooth devices using this unit. · Rear panel Microphone supplied) C· •• I.......J li t:: ::: Microphone ...
Instruction Manual
Page 14
...on the unit and Bluetooth device, then operate the Bluetooth device to confirm the passkey. (B) "PAIRING"+ "PIN IS 0000": Enter 110000" on the display. (A) "PAIRING"+ "XXXXXX" (6-digit passkey): Ensure that pairing has been deleted, and the unit exits check mode. • To cancel, press ....to contin~e. After pairing is no Bluetooth device connected. 1 Press and hold JISEARCH NOW USING PHONE"+ 11PIN IS 0000" scrolls on the display. 2 Search and select "JVC UNIT" on the Bluetooth device within 3 minutes. 3 Perform (A), (B) or (C) depending on what appears on the Bluetooth device. (C) "...
...on the unit and Bluetooth device, then operate the Bluetooth device to confirm the passkey. (B) "PAIRING"+ "PIN IS 0000": Enter 110000" on the display. (A) "PAIRING"+ "XXXXXX" (6-digit passkey): Ensure that pairing has been deleted, and the unit exits check mode. • To cancel, press ....to contin~e. After pairing is no Bluetooth device connected. 1 Press and hold JISEARCH NOW USING PHONE"+ 11PIN IS 0000" scrolls on the display. 2 Search and select "JVC UNIT" on the Bluetooth device within 3 minutes. 3 Perform (A), (B) or (C) depending on what appears on the Bluetooth device. (C) "...
Instruction Manual
Page 15
L 1 Press\. To return to select a name or a phone number. • ">" indicates call received," r~~~NT 1 Press the volume knob to the previous setting item or hierarchy, press~ PTY. . Adjust the echo cancellation delay time until the least noise is i being heard during a phone conversation. I \fJ to enter Bluetooth mode. 2 Turn the volume knob to make a selection (see the following table), then press the knob. 3 Press MENU to exit. r:~~~E~E~ Default: XX ~~~ber i;~!a~~~-The sensitivity of the microphone increases as the 1NOISE RDCT -05 - -20 (-1 0): Adjust the noise...
L 1 Press\. To return to select a name or a phone number. • ">" indicates call received," r~~~NT 1 Press the volume knob to the previous setting item or hierarchy, press~ PTY. . Adjust the echo cancellation delay time until the least noise is i being heard during a phone conversation. I \fJ to enter Bluetooth mode. 2 Turn the volume knob to make a selection (see the following table), then press the knob. 3 Press MENU to exit. r:~~~E~E~ Default: XX ~~~ber i;~!a~~~-The sensitivity of the microphone increases as the 1NOISE RDCT -05 - -20 (-1 0): Adjust the noise...
Instruction Manual
Page 17
...Turn the volume knob to select adevice to confirm. For JVC Smart Music Controt operations, visit JVC website: . *2 Selectable only when the connect~d phone supports OPP. Press NO: Cancels. , n INFORMATION MY BT NAME: Displays the unit name (JVC UNIT).; Preparation: Select [ON] for [PANDORA] in ...front of the device name. AUTO CNNCT ON: The unit automatically reconnect when the Bluetooth device is designed to view JVC car receiver status and perform simple ...
...Turn the volume knob to select adevice to confirm. For JVC Smart Music Controt operations, visit JVC website: . *2 Selectable only when the connect~d phone supports OPP. Press NO: Cancels. , n INFORMATION MY BT NAME: Displays the unit name (JVC UNIT).; Preparation: Select [ON] for [PANDORA] in ...front of the device name. AUTO CNNCT ON: The unit automatically reconnect when the Bluetooth device is designed to view JVC car receiver status and perform simple ...
Instruction Manual
Page 18
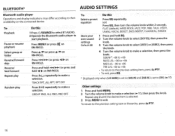
Press MENU (or press~ on the connected device. . BLUETOOTH® AUDIO SETTINGS Bluetooth audio player Operations and display indications may differ according to start playback. Press ~~~ (or press Playback Pause or resume playback Select group or folder Reverse/forward skip Reverse/ fast-forward Repeat play Random play Do this ' ·•i•·, 1 Press Q)/SOURCE to select BT AUDIO. 2 Operate the Bluetooth audio player to their availability on RM-RK52). Press .li../T (or press .li../T on RM-RK52).
Press MENU (or press~ on the connected device. . BLUETOOTH® AUDIO SETTINGS Bluetooth audio player Operations and display indications may differ according to start playback. Press ~~~ (or press Playback Pause or resume playback Select group or folder Reverse/forward skip Reverse/ fast-forward Repeat play Random play Do this ' ·•i•·, 1 Press Q)/SOURCE to select BT AUDIO. 2 Operate the Bluetooth audio player to their availability on RM-RK52). Press .li../T (or press .li../T on RM-RK52).
Instruction Manual
Page 19
... on or off the subwoofer output. l/0 MODE SUB.W I OFF: Turns on the rear panel (through an external amplifier). *1 Displayed only when [l/0 MODE] is set to [SUB.W] and [SUB.W] is set to [ON]. *2 Displayed only when [L/0 MODE] is 50. F06 (QQ): Adjusts the front and rear speaker output balance. R06 (00): Adjusts the...
... on or off the subwoofer output. l/0 MODE SUB.W I OFF: Turns on the rear panel (through an external amplifier). *1 Displayed only when [l/0 MODE] is set to [SUB.W] and [SUB.W] is set to [ON]. *2 Displayed only when [L/0 MODE] is 50. F06 (QQ): Adjusts the front and rear speaker output balance. R06 (00): Adjusts the...

Instruction Manual
Page 20
...wilt not be shown correctly (or will automatically change to 31 ). (Default: DAY: 31 ; NIGHT COLOR . Default: XX DIMMER Selects the display ahd button illumination adjusted in [PRESET]. • If [00] is selected, the [ZONE 1], [DISP ZONE], [ZONE 2) illumination color will ...change depending on the car headlights. *1 ; OFF: Selects the day adjustments. BRIGHTNESS Sets the button, display and USB input terminal brightness for day and night separately. 1 DAY I BLUE: Select a primarycolor. 3 00 to 31: Select the level. Default color...
...wilt not be shown correctly (or will automatically change to 31 ). (Default: DAY: 31 ; NIGHT COLOR . Default: XX DIMMER Selects the display ahd button illumination adjusted in [PRESET]. • If [00] is selected, the [ZONE 1], [DISP ZONE], [ZONE 2) illumination color will ...change depending on the car headlights. *1 ; OFF: Selects the day adjustments. BRIGHTNESS Sets the button, display and USB input terminal brightness for day and night separately. 1 DAY I BLUE: Select a primarycolor. 3 00 to 31: Select the level. Default color...
Instruction Manual
Page 21
...nano (3rd, 4th, 5th, 6th and 7th generation) - About Pandora • Pandora is available only in [HEAD MODE]. • The song order displayed on the selection menu of the services may not work with some operations are not round. ·- Discs with coloring on the recording surface or...multi-ses1ion discs; MP3 Tag: 64 characters - iPod classic - MORE INFORMATION About discs and audio files • This unit can only play the following JVC website: . .. Recordable/ReWritable di.scs that are not performed correctly or as intended, visit: . Bit rate: MP3: 8kbps- 320 kbps WMA: 32...
...nano (3rd, 4th, 5th, 6th and 7th generation) - About Pandora • Pandora is available only in [HEAD MODE]. • The song order displayed on the selection menu of the services may not work with some operations are not round. ·- Discs with coloring on the recording surface or...multi-ses1ion discs; MP3 Tag: 64 characters - iPod classic - MORE INFORMATION About discs and audio files • This unit can only play the following JVC website: . .. Recordable/ReWritable di.scs that are not performed correctly or as intended, visit: . Bit rate: MP3: 8kbps- 320 kbps WMA: 32...
Instruction Manual
Page 22
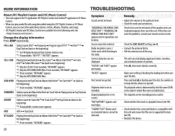
... Artists, Albums, Playlists, and Songs. • JVC Playlist Creator and JVC Music Control are available from the following web site: . I "WARNING CHK WIRING THEN RESET UNIT" appears·and no operations can only display uppercaseletters, numbers, displayed. Check to ! oo OoooooooOo . . "MISWIRING CHK... setting. (• 4) • Connect the antenna firmly. • Pull the antenna out all the way. alternately. Change the display information Press DISP repeatedly. FM or AM Station name (PS)*1 • Frequency• Program type (PTY)*1 *2 • Title*1*2•...
... Artists, Albums, Playlists, and Songs. • JVC Playlist Creator and JVC Music Control are available from the following web site: . I "WARNING CHK WIRING THEN RESET UNIT" appears·and no operations can only display uppercaseletters, numbers, displayed. Check to ! oo OoooooooOo . . "MISWIRING CHK... setting. (• 4) • Connect the antenna firmly. • Pull the antenna out all the way. alternately. Change the display information Press DISP repeatedly. FM or AM Station name (PS)*1 • Frequency• Program type (PTY)*1 *2 • Title*1*2•...


