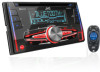

Instruction Manual
Page 20
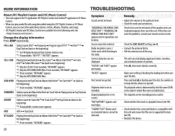
... [DAY COLOR] or [NIGHT COLOR] is shown. • COLOR FLOW 01 to COLOR FLOW 03: Color changes at 5-second intervals.;OFF: Cancels. *1 The illumination control wire connection is changed by turning on or off or on the left column) 2 Select a color for the selected zone. • COLOR 01 to COLOR 29...
... [DAY COLOR] or [NIGHT COLOR] is shown. • COLOR FLOW 01 to COLOR FLOW 03: Color changes at 5-second intervals.;OFF: Cancels. *1 The illumination control wire connection is changed by turning on or off or on the left column) 2 Select a color for the selected zone. • COLOR 01 to COLOR 29...
Instruction Manual
Page 22
...WIRING THEN RESET UNIT" appears·and no operations can only display uppercaseletters, numbers, displayed. Check the [SRC SElEU] setting. (• 4) • Connect the antenna firmly. • Pull the antenna out all the way. Correct characters are available from the following web site: . MORE INFORMATION About JVC Playlist Creator and JVC... Artist*B• Day/Clock • (backto the beginning) *B If unavailable, station name appears. "MISWIRING CHK WIRING THEN RESET UNIT" I 1 USB-IPOD Playing time • Day/Clock • Album title/Artist*?• Tracktitle...
...WIRING THEN RESET UNIT" appears·and no operations can only display uppercaseletters, numbers, displayed. Check the [SRC SElEU] setting. (• 4) • Connect the antenna firmly. • Pull the antenna out all the way. Correct characters are available from the following web site: . MORE INFORMATION About JVC Playlist Creator and JVC... Artist*B• Day/Clock • (backto the beginning) *B If unavailable, station name appears. "MISWIRING CHK WIRING THEN RESET UNIT" I 1 USB-IPOD Playing time • Day/Clock • Album title/Artist*?• Tracktitle...
Instruction Manual
Page 26
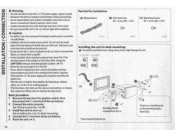
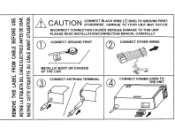
...If your car. Do not touch the metal parts of this unit during and shortly after installation. 0 u A Caution • For safety'ssake, leave wiring and mounting to avoid damaging the speakers. (+ 17) 1- • Mount the unit at an angle of less than 30°. See Installing the unit... (in-dash mounting). 4 co'nnect the 8 terminal qf the car battery. 5 Reset the unit. (+ 3) Part list for installation (A} Wiring harness (B) Flat head screw I : (C) Round head screw M5 X 8mm (M5 X 3/8") ~: M5 X 8 mm (M5 X 3/8") I I .,I I I I • I • ...
...If your car. Do not touch the metal parts of this unit during and shortly after installation. 0 u A Caution • For safety'ssake, leave wiring and mounting to avoid damaging the speakers. (+ 17) 1- • Mount the unit at an angle of less than 30°. See Installing the unit... (in-dash mounting). 4 co'nnect the 8 terminal qf the car battery. 5 Reset the unit. (+ 3) Part list for installation (A} Wiring harness (B) Flat head screw I : (C) Round head screw M5 X 8mm (M5 X 3/8") ~: M5 X 8 mm (M5 X 3/8") I I .,I I I I • I • ...
Instruction Manual
Page 27
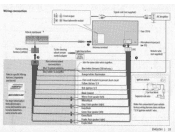
ENGLISH I J For more information: Metra Electronics: www.metraonline.com Scosche Industries: o'o / car fuse block Separate red wire Make this connection ifyour vehicle factory wiring harness does not have "12 Vignition switch" wire. Wiring connection 1 !: .~, @R@FLront output ... 1 Signal cord (In-ot s-upp-lied-) -~~ : ~ ~ JVCAmplifier l ~@ @ Rear/subwoofer output l : \ --:E ... ___ ' : ~,:---~ ~~··:1r Fuse 10 Vehicle -' dashboa"-r-d --4 c . ( A) 1 __...
ENGLISH I J For more information: Metra Electronics: www.metraonline.com Scosche Industries: o'o / car fuse block Separate red wire Make this connection ifyour vehicle factory wiring harness does not have "12 Vignition switch" wire. Wiring connection 1 !: .~, @R@FLront output ... 1 Signal cord (In-ot s-upp-lied-) -~~ : ~ ~ JVCAmplifier l ~@ @ Rear/subwoofer output l : \ --:E ... ___ ' : ~,:---~ ~~··:1r Fuse 10 Vehicle -' dashboa"-r-d --4 c . ( A) 1 __...
Instruction Manual
Page 29
w w 0::: c 0 U) LL w m !Wz
w w 0::: c 0 U) LL w m !Wz


