
Instruction Manual
Page 2
... to provide reasonable protection against harmful interference in the instruction manual. These limits are expressly approved in a residential installation. This equipment may result in a particular installation. CALIFORNIA, USA ONLY This product contains a CR Coin Cell Lithium Battery which the receiver is connected. • Consult the dealer or an experienced radio/TV technician for a Class B digital device, pursuant to Part 15 of...
... to provide reasonable protection against harmful interference in the instruction manual. These limits are expressly approved in a residential installation. This equipment may result in a particular installation. CALIFORNIA, USA ONLY This product contains a CR Coin Cell Lithium Battery which the receiver is connected. • Consult the dealer or an experienced radio/TV technician for a Class B digital device, pursuant to Part 15 of...
Instruction Manual
Page 4
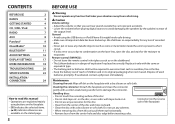
... the sudden increase of the output level. CONTENTS BEFORE USE 2 BASICS 3 GETTING STARTED 4 CD / USB / iPod 5 RADIO 7 AUX 8 Pandora® 9 iHeartRadio® 10 BLUETOOTH® 11 AUDIO SETTINGS 16 DISPLAY SETTINGS 17 MORE INFORMATION 18 TROUBLESHOOTING 20 SPECIFICATIONS 22 INSTALLATION / CONNECTION 24 How to read this unit, pull them out horizontally. • Remove burrs from the center hole and disc edge before playing digital sources to excessive heat such as sunshine...
... the sudden increase of the output level. CONTENTS BEFORE USE 2 BASICS 3 GETTING STARTED 4 CD / USB / iPod 5 RADIO 7 AUX 8 Pandora® 9 iHeartRadio® 10 BLUETOOTH® 11 AUDIO SETTINGS 16 DISPLAY SETTINGS 17 MORE INFORMATION 18 TROUBLESHOOTING 20 SPECIFICATIONS 22 INSTALLATION / CONNECTION 24 How to read this unit, pull them out horizontally. • Remove burrs from the center hole and disc edge before playing digital sources to excessive heat such as sunshine...

Instruction Manual
Page 8
... cancel, press MENU. 6 Selectable items: [DRIVE 1] to [DRIVE 5] Change the playback speed of the Audiobooks sound file in your iPod/iPhone setting.) • To return to select the desired folder or track/file, then press the knob. Repeat steps 1 to 4 to the USB input terminal, you have many files.... Press 5 iPod MODE repeatedly to select the desired drive. (or) 1 Press and hold MENU. 2 Turn the volume knob to select [USB/IPOD], then...
... cancel, press MENU. 6 Selectable items: [DRIVE 1] to [DRIVE 5] Change the playback speed of the Audiobooks sound file in your iPod/iPhone setting.) • To return to select the desired folder or track/file, then press the knob. Repeat steps 1 to 4 to the USB input terminal, you have many files.... Press 5 iPod MODE repeatedly to select the desired drive. (or) 1 Press and hold MENU. 2 Turn the volume knob to select [USB/IPOD], then...
Instruction Manual
Page 9
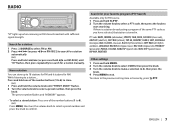
... preset number flashes and "MEMORY" appears. • To select a stored station: Press one of the same PTY code as you have selected, that station is tuned in. RADIO "ST" lights up to 18 stations for FM and 6 stations for AM. While listening to search for a station automatically. (or) Press and hold S/ T (or press and hold MENU. 2 Turn the volume knob to select [TUNER], then press the knob. 3 Turn the volume knob to make a selection...
... preset number flashes and "MEMORY" appears. • To select a stored station: Press one of the same PTY code as you have selected, that station is tuned in. RADIO "ST" lights up to 18 stations for FM and 6 stations for AM. While listening to search for a station automatically. (or) Press and hold S/ T (or press and hold MENU. 2 Turn the volume knob to select [TUNER], then press the knob. 3 Turn the volume knob to make a selection...
Instruction Manual
Page 10
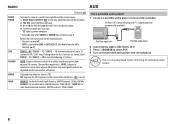
... plug head stereo mini plug for AM): Select the preset station. 4 Set the activation day* and time. • "M" lights up to 18 stations for [AUX] in step 1. Use a portable audio player 1 Connect a portable audio player (commercially available). 3.5 mm (1/8") stereo mini plug with "L" shaped connector (commercially available) Auxiliary input jack Portable audio player 2 Select [ON] for FM. Radio Timer will be degraded and the stereo effect will remain. AREA EU: For any other areas, AM/FM intervals: 9 kHz/50 kHz. ; Displayed...
... plug head stereo mini plug for AM): Select the preset station. 4 Set the activation day* and time. • "M" lights up to 18 stations for [AUX] in step 1. Use a portable audio player 1 Connect a portable audio player (commercially available). 3.5 mm (1/8") stereo mini plug with "L" shaped connector (commercially available) Auxiliary input jack Portable audio player 2 Select [ON] for FM. Radio Timer will be degraded and the stereo effect will remain. AREA EU: For any other areas, AM/FM intervals: 9 kHz/50 kHz. ; Displayed...

Instruction Manual
Page 11
... on your Pandora account but not on your device. 2 Connect your device to the desired station, then press the knob. USB input terminal (Accessory of the Pandora application onto your device (iPhone/ iPod touch), then create an account and log in to Pandora. • Select [ON] for a registered station 1 Press MENU. 2 Turn the volume knob to make a selection, then press the knob. [BY DATE]: According to...
... on your Pandora account but not on your device. 2 Connect your device to the desired station, then press the knob. USB input terminal (Accessory of the Pandora application onto your device (iPhone/ iPod touch), then create an account and log in to Pandora. • Select [ON] for a registered station 1 Press MENU. 2 Turn the volume knob to make a selection, then press the knob. [BY DATE]: According to...
Instruction Manual
Page 13
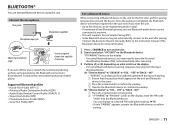
.... Audio/Video Remote Control Profile (AVRCP1.3) - Press the volume knob to confirm the passkey. (B) "[Device Name]" "VOL - Operate the Bluetooth device to confirm the passkey. Continue the conversation using cord clamps (not supplied) if necessary. Hands-Free Profile (HFP1.5) - YES" "BACK - Advanced Audio Distribution Profile (A2DP) - Connect the device to the unit for more information. 1 Press B/SOURCE to turn on the unit. 2 Search and select "JVC UNIT" on the display. • For some Bluetooth devices, pairing...
.... Audio/Video Remote Control Profile (AVRCP1.3) - Press the volume knob to confirm the passkey. (B) "[Device Name]" "VOL - Operate the Bluetooth device to confirm the passkey. Continue the conversation using cord clamps (not supplied) if necessary. Hands-Free Profile (HFP1.5) - YES" "BACK - Advanced Audio Distribution Profile (A2DP) - Connect the device to the unit for more information. 1 Press B/SOURCE to turn on the unit. 2 Search and select "JVC UNIT" on the display. • For some Bluetooth devices, pairing...
Instruction Manual
Page 14
... Activate or deactivate hands-free mode Adjust the phone volume Switch between the Bluetooth device and the unit. • Make sure there is no Bluetooth device connected. 1 Press and hold J/K/H/I . • When [AUTO ANSWER] is successful, "PAIRING OK" "[Device Name]" appears and Bluetooth compatibility check starts. Phone volume: [00] to turn off the power, then turn on the phone.... 1 Press and hold or the volume knob. "SEARCH NOW USING PHONE" "PIN IS 0000" scrolls on the display. 2 Search and select "JVC UNIT" on...
... Activate or deactivate hands-free mode Adjust the phone volume Switch between the Bluetooth device and the unit. • Make sure there is no Bluetooth device connected. 1 Press and hold J/K/H/I . • When [AUTO ANSWER] is successful, "PAIRING OK" "[Device Name]" appears and Bluetooth compatibility check starts. Phone volume: [00] to turn off the power, then turn on the phone.... 1 Press and hold or the volume knob. "SEARCH NOW USING PHONE" "PIN IS 0000" scrolls on the display. 2 Search and select "JVC UNIT" on...
Instruction Manual
Page 15
... to exit. Bluetooth mode operations 1 Press to enter Bluetooth mode. 2 Turn the volume knob to make a selection (see the following table), then press the knob. 3 Press MENU to select a name or a phone number. • ">" indicates call received, " BLUETOOTH® MIC LEVEL NOISE RDCT ECHO CANCEL Default: XX -20 - +08 (0): The sensitivity of the microphone increases as the number increased. -05 - -20 (-10): Adjust the noise reduction level until the...
... to exit. Bluetooth mode operations 1 Press to enter Bluetooth mode. 2 Turn the volume knob to make a selection (see the following table), then press the knob. 3 Press MENU to select a name or a phone number. • ">" indicates call received, " BLUETOOTH® MIC LEVEL NOISE RDCT ECHO CANCEL Default: XX -20 - +08 (0): The sensitivity of the microphone increases as the number increased. -05 - -20 (-10): Adjust the noise reduction level until the...
Instruction Manual
Page 16
.... 6 Turn the volume knob to the instruction manual of the connected phone for details. • This unit also supports the intelligent personal assistant function of the contact you want to control the phone functions. • Supported Voice Recognition features vary for mobile phone that supports PBAP. 1 Press to enter Bluetooth mode. 2 Turn the volume knob to select [RECENT CALL] or [PHONEBOOK], then press the knob. 3 Turn the volume knob to select a contact or a phone number...
.... 6 Turn the volume knob to the instruction manual of the connected phone for details. • This unit also supports the intelligent personal assistant function of the contact you want to control the phone functions. • Supported Voice Recognition features vary for mobile phone that supports PBAP. 1 Press to enter Bluetooth mode. 2 Turn the volume knob to select [RECENT CALL] or [PHONEBOOK], then press the knob. 3 Turn the volume knob to select a contact or a phone number...
Instruction Manual
Page 17
... the PIN code. 3 Press the volume knob to connect or disconnect. For JVC Smart Music Control operations, visit JVC website: . *2 Selectable only when the connected phone supports OPP. APPLICATION Shows the connected phone name using the JVC Smart Music Control*1 app. Default: XX PHONE AUDIO Selects the phone or audio device to confirm. " " appears in front of the device name set as Pandora for iPod/ iPhone. ( 9) Listen to iHeartRadio on your smart phone (Android OS) through Bluetooth on Android smart phones. INITIALIZE...
... the PIN code. 3 Press the volume knob to connect or disconnect. For JVC Smart Music Control operations, visit JVC website: . *2 Selectable only when the connected phone supports OPP. APPLICATION Shows the connected phone name using the JVC Smart Music Control*1 app. Default: XX PHONE AUDIO Selects the phone or audio device to confirm. " " appears in front of the device name set as Pandora for iPod/ iPhone. ( 9) Listen to iHeartRadio on your smart phone (Android OS) through Bluetooth on Android smart phones. INITIALIZE...
Instruction Manual
Page 18
... is set to [SUB.W] and [SUB.W] is selected. 3 Press MENU to make a selection. BASS Frequency: 60/ 80/ 100/ 200 Hz Default: Level: -06 to +06 Q: Q1.0/ Q1.25/ Q1.5/ Q2.0 MIDDLE Frequency: Level: Q: 0.5/ 1.0/ 1.5/ 2.5 kHz -06 to +06 Q0.75/ Q1.0/ Q1.25 Default: TREBLE Frequency: Level: Q: 10.0/ 12.5/ 15.0/ 17.5 kHz -06 to start playback. To return to their availability on the connected device. BLUETOOTH® Bluetooth audio player Operations and display indications...
... is set to [SUB.W] and [SUB.W] is selected. 3 Press MENU to make a selection. BASS Frequency: 60/ 80/ 100/ 200 Hz Default: Level: -06 to +06 Q: Q1.0/ Q1.25/ Q1.5/ Q2.0 MIDDLE Frequency: Level: Q: 0.5/ 1.0/ 1.5/ 2.5 kHz -06 to +06 Q0.75/ Q1.0/ Q1.25 Default: TREBLE Frequency: Level: Q: 10.0/ 12.5/ 15.0/ 17.5 kHz -06 to start playback. To return to their availability on the connected device. BLUETOOTH® Bluetooth audio player Operations and display indications...

Instruction Manual
Page 19
... maximum power of each speaker is set the fader level to [00]. 1 Press and hold MENU. 2 Turn the volume knob to the subwoofer. ; Before adjustment, select the source you are sent to produce a well-balanced sound at 5-second intervals. ; LOUD 01 / 02: Boosts low or high frequencies to the subwoofer. AUDIO SETTINGS DISPLAY SETTINGS AUDIO BASS BOOST +01 / +02: Selects your preferred bass boost level. ; OFF: Cancels. *1 The illumination control wire connection is 50. ON: Selects the night adjustments. ; SUB...
... maximum power of each speaker is set the fader level to [00]. 1 Press and hold MENU. 2 Turn the volume knob to the subwoofer. ; Before adjustment, select the source you are sent to produce a well-balanced sound at 5-second intervals. ; LOUD 01 / 02: Boosts low or high frequencies to the subwoofer. AUDIO SETTINGS DISPLAY SETTINGS AUDIO BASS BOOST +01 / +02: Selects your preferred bass boost level. ; OFF: Cancels. *1 The illumination control wire connection is 50. ON: Selects the night adjustments. ; SUB...
Instruction Manual
Page 20
...; This unit can play MP3/WMA/WAV files stored on a USB mass storage class device. • You cannot connect a USB device via a USB hub. • Connecting a cable whose rating is longer than 5 V and exceeds 1 A. Discs with the "Compact Disc Digital Audio" standard. File extensions: MP3 (.mp3), WMA (.wma) - Romeo: 32 characters - About iPod/iPhone • Made for file/folder name: It depends on the selection menu of this...
...; This unit can play MP3/WMA/WAV files stored on a USB mass storage class device. • You cannot connect a USB device via a USB hub. • Connecting a cable whose rating is longer than 5 V and exceeds 1 A. Discs with the "Compact Disc Digital Audio" standard. File extensions: MP3 (.mp3), WMA (.wma) - Romeo: 32 characters - About iPod/iPhone • Made for file/folder name: It depends on the selection menu of this...
Instruction Manual
Page 21
...*8 Day/Clock (back to change without prior notice. About JVC Playlist Creator and JVC Music Control • This unit supports the PC application JVC Playlist Creator and AndroidTM application JVC Music Control. • When you can search for MP3/WMA/WAV files. FM or AM Station name (PS)*1 Frequency Program type (PTY)*1*2 Day/Clock (back to the beginning) *7 If not recorded, "NO NAME" appears. USB-IPOD Playing time Day/Clock Album...
...*8 Day/Clock (back to change without prior notice. About JVC Playlist Creator and JVC Music Control • This unit supports the PC application JVC Playlist Creator and AndroidTM application JVC Music Control. • When you can search for MP3/WMA/WAV files. FM or AM Station name (PS)*1 Frequency Program type (PTY)*1*2 Day/Clock (back to the beginning) *7 If not recorded, "NO NAME" appears. USB-IPOD Playing time Day/Clock Album...
Instruction Manual
Page 22
... is unstable. TROUBLESHOOTING Symptom Remedy Sound cannot be sure the terminals of the speaker wires are insulated properly, then reset the unit. Check to be heard. • Adjust the volume to the optimum level. • Check the cords and connections. the radio. "CHK DEVICE" Check the Pandora application on your device. This depends on or does not work. • Detach and reset the iPod/iPhone using hard reset. turn on the...
... is unstable. TROUBLESHOOTING Symptom Remedy Sound cannot be sure the terminals of the speaker wires are insulated properly, then reset the unit. Check to be heard. • Adjust the volume to the optimum level. • Check the cords and connections. the radio. "CHK DEVICE" Check the Pandora application on your device. This depends on or does not work. • Detach and reset the iPod/iPhone using hard reset. turn on the...
Instruction Manual
Page 23
.... Turn on Bluetooth from the station is interrupted. The connected phone does not support Voice Recognition feature. ENGLISH | 21 Make sure you can get a better signal reception. Broadcast from your device. The unit is selected. If "ERROR" appears again, check if the device supports the function you have entered the same PIN code to both the unit and Bluetooth device. • Delete pairing information from the Bluetooth device again. iHeartRadio Bluetooth® Symptom Station...
.... Turn on Bluetooth from the station is interrupted. The connected phone does not support Voice Recognition feature. ENGLISH | 21 Make sure you can get a better signal reception. Broadcast from your device. The unit is selected. If "ERROR" appears again, check if the device supports the function you have entered the same PIN code to both the unit and Bluetooth device. • Delete pairing information from the Bluetooth device again. iHeartRadio Bluetooth® Symptom Station...
Instruction Manual
Page 24
... the connected Bluetooth audio player supports Audio/Video Remote Control Profile (AVRCP). (Refer to the unit. Remedy You may have any troubles, try to copy the phonebook to the instructions of a Bluetooth audio player. Reset the unit and try to exit. • Reduce the distance between the unit and the Bluetooth audio player. • Turn off, then turn on the unit and try the operation again. If "H/W ERROR" appears again, consult your audio player.) • Disconnect and connect the Bluetooth player...
... the connected Bluetooth audio player supports Audio/Video Remote Control Profile (AVRCP). (Refer to the unit. Remedy You may have any troubles, try to copy the phonebook to the instructions of a Bluetooth audio player. Reset the unit and try to exit. • Reduce the distance between the unit and the Bluetooth audio player. • Turn off, then turn on the unit and try the operation again. If "H/W ERROR" appears again, consult your audio player.) • Disconnect and connect the Bluetooth player...

Instruction Manual
Page 26
... again after use of the car battery. 5 Reset the unit. ( 3) 24 Installing the unit (in -dash mounting). 4 Connect the terminal of the unit. Caution • For safety's sake, leave wiring and mounting to remove the unit Pocket Bracket (not supplied) Do not touch the metal parts of this unit in place. Consult the car audio dealer. • Install this unit during and shortly after installation. If the maximum power of the speakers is lower...
... again after use of the car battery. 5 Reset the unit. ( 3) 24 Installing the unit (in -dash mounting). 4 Connect the terminal of the unit. Caution • For safety's sake, leave wiring and mounting to remove the unit Pocket Bracket (not supplied) Do not touch the metal parts of this unit in place. Consult the car audio dealer. • Install this unit during and shortly after installation. If the maximum power of the speakers is lower...
Instruction Manual
Page 27
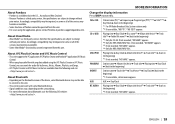
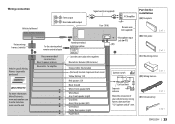
Part list for installation (A) Faceplate (B) Trim plate (C) Mounting sleeve (D) Wiring harness (E) Extraction key ENGLISH | 25 Wiring connection Vehicle dashboard Front output Rear/subwoofer output Signal cord (not supplied) JVC Amplifier Fuse (10 A) Remote wire (not supplied) Factory wiring harness (vehicle) Vehicle-specific Wiring Harness (separately purchased) For more information: Metra Electronics: www.metraonline.com Scosche Industries: www.scosche.com To the steering wheel remote control adapter Recommended connection Blue: To power antenna Blue/white: To amplifier Antenna ...
Part list for installation (A) Faceplate (B) Trim plate (C) Mounting sleeve (D) Wiring harness (E) Extraction key ENGLISH | 25 Wiring connection Vehicle dashboard Front output Rear/subwoofer output Signal cord (not supplied) JVC Amplifier Fuse (10 A) Remote wire (not supplied) Factory wiring harness (vehicle) Vehicle-specific Wiring Harness (separately purchased) For more information: Metra Electronics: www.metraonline.com Scosche Industries: www.scosche.com To the steering wheel remote control adapter Recommended connection Blue: To power antenna Blue/white: To amplifier Antenna ...


