
Instruction Manual
Page 2
... prejudicais à nossa saúde e ao meio ambiente. If this equipment if an unauthorized change or modification is not installed and used in accordance with Federal Regulations, following measures: • Reorient or relocate the receiving antenna. • Increase the ... Connect the equipment into an outlet on , or inside the product relating to provide reasonable protection against harmful interference in a residential installation. JVC KENWOOD Corporation 2967-3, ISHIKAWA-MACHI, HACHIOJI-SHI, TOKYO, JAPAN THIS PRODUCT COMPLIES WITH DHHS RULES 21CFR SUBCHAPTER J IN EFFECT AT ...
... prejudicais à nossa saúde e ao meio ambiente. If this equipment if an unauthorized change or modification is not installed and used in accordance with Federal Regulations, following measures: • Reorient or relocate the receiving antenna. • Increase the ... Connect the equipment into an outlet on , or inside the product relating to provide reasonable protection against harmful interference in a residential installation. JVC KENWOOD Corporation 2967-3, ISHIKAWA-MACHI, HACHIOJI-SHI, TOKYO, JAPAN THIS PRODUCT COMPLIES WITH DHHS RULES 21CFR SUBCHAPTER J IN EFFECT AT ...
Instruction Manual
Page 6
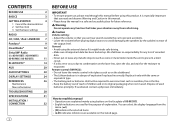
...manual • Operations are used for the purpose of children and in its original packaging when not in danger of KD-R975BTS. • English indications are explained mainly using buttons on the stated page. Replace it might hinder safe ...174; 9 iHeartRadio® 10 SiriusXM® Radio (for KD-R975BTS / KD-R970BTS / KD-R97MBS / KD-R875BTS) 11 BLUETOOTH® 14 AUX 20 AUDIO SETTINGS 20 DISPLAY SETTINGS 24 REFERENCES 26 Maintenance More information TROUBLESHOOTING 28 SPECIFICATIONS 31 INSTALLATION / CONNECTION 32 2 BEFORE USE IMPORTANT • To ensure ...
...manual • Operations are used for the purpose of children and in its original packaging when not in danger of KD-R975BTS. • English indications are explained mainly using buttons on the stated page. Replace it might hinder safe ...174; 9 iHeartRadio® 10 SiriusXM® Radio (for KD-R975BTS / KD-R970BTS / KD-R97MBS / KD-R875BTS) 11 BLUETOOTH® 14 AUX 20 AUDIO SETTINGS 20 DISPLAY SETTINGS 24 REFERENCES 26 Maintenance More information TROUBLESHOOTING 28 SPECIFICATIONS 31 INSTALLATION / CONNECTION 32 2 BEFORE USE IMPORTANT • To ensure ...
Instruction Manual
Page 11
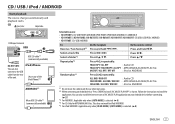
... available) KD-R975BTS: You can also install the latest version of the iPod/iPhone)*1 ANDROID*2 Micro USB 2.0 cable*1 (commercially available) Selectable source: • KD-R975BTS: CD/ USB FRONT/ USB REAR/ IPOD FRONT/ IPOD REAR/ ANDROID-F/ ANDROID-R • KD-R970BTS / KD-R97MBS / KD-R875BTS / KD-R870BT / KD-RD97BT / KD-RD87BT: ...ANDROID *1 Do not leave the cable inside the car when not using. *2 When connecting an Android device, "Press [VIEW] to install JVC MUSIC PLAY APP" is selected. ( 8) ENGLISH 7 This does not work for MP3/WMA/AAC files. Press . TRACK RPT/ ALL...
... available) KD-R975BTS: You can also install the latest version of the iPod/iPhone)*1 ANDROID*2 Micro USB 2.0 cable*1 (commercially available) Selectable source: • KD-R975BTS: CD/ USB FRONT/ USB REAR/ IPOD FRONT/ IPOD REAR/ ANDROID-F/ ANDROID-R • KD-R970BTS / KD-R97MBS / KD-R875BTS / KD-R870BT / KD-RD97BT / KD-RD87BT: ...ANDROID *1 Do not leave the cable inside the car when not using. *2 When connecting an Android device, "Press [VIEW] to install JVC MUSIC PLAY APP" is selected. ( 8) ENGLISH 7 This does not work for MP3/WMA/AAC files. Press . TRACK RPT/ ALL...
Instruction Manual
Page 12
AUDIO MODE: Control Android device using the iPod itself via JVC MUSIC PLAY application installed in the Android device. Turn the volume knob quickly to the first character. Select "OTHERS" if the first character is other media player applications installed in IPOD FRONT/ IPOD REAR/ USB-IPOD source, press repeatedly. IPHONE MODE: Control iPod...
AUDIO MODE: Control Android device using the iPod itself via JVC MUSIC PLAY application installed in the Android device. Turn the volume knob quickly to the first character. Select "OTHERS" if the first character is other media player applications installed in IPOD FRONT/ IPOD REAR/ USB-IPOD source, press repeatedly. IPHONE MODE: Control iPod...
Instruction Manual
Page 13
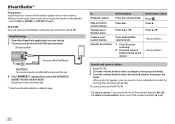
Pandora® Preparation: Install the latest version of the unit. 3 Press repeatedly to select PANDORA/ PANDORA-F/ ...Turn the volume knob to select the desired station, then press the knob. Search for [PANDORA] in [SRC SELECT]. ( 4) KD-R770BT: You can listen to Pandora via Bluetooth connection. ( 14, 19) Start listening 1 Open the Pandora application on the ...Skip a track Press T. A new station is skipped. USB input terminal (Accessory of the iPod/iPhone)*1 and / or KD-R975BTS: You can also connect to the USB cable from the rear of the Pandora application on your device (iPhone/ ...
Pandora® Preparation: Install the latest version of the unit. 3 Press repeatedly to select PANDORA/ PANDORA-F/ ...Turn the volume knob to select the desired station, then press the knob. Search for [PANDORA] in [SRC SELECT]. ( 4) KD-R770BT: You can listen to Pandora via Bluetooth connection. ( 14, 19) Start listening 1 Open the Pandora application on the ...Skip a track Press T. A new station is skipped. USB input terminal (Accessory of the iPod/iPhone)*1 and / or KD-R975BTS: You can also connect to the USB cable from the rear of the Pandora application on your device (iPhone/ ...
Instruction Manual
Page 14
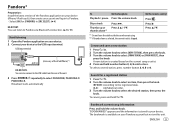
... a category, then press the knob. 3 Turn the volume knob to the station. Press I. When a city list appears, you can search cities in [SRC SELECT]. ( 4) KD-R770BT: You can also connect to the USB cable from the rear of the number buttons (4 to 6). 10 To cancel, press and hold . • To...of the number buttons (4 to 6). • To select a stored station: Press one of the unit. 3 Press repeatedly to the USB input terminal. iHeartRadio® Preparation: Install the latest version of iHeartAuto application on your device to select IHEARTRADIO/ IHEART FRONT/ IHEART REAR.
... a category, then press the knob. 3 Turn the volume knob to the station. Press I. When a city list appears, you can search cities in [SRC SELECT]. ( 4) KD-R770BT: You can also connect to the USB cable from the rear of the number buttons (4 to 6). 10 To cancel, press and hold . • To...of the number buttons (4 to 6). • To select a stored station: Press one of the unit. 3 Press repeatedly to the USB input terminal. iHeartRadio® Preparation: Install the latest version of iHeartAuto application on your device to select IHEARTRADIO/ IHEART FRONT/ IHEART REAR.

Instruction Manual
Page 19
... a call When there is an incoming call: • For KD-R975BTS / KD-R970BTS / KD-RD97BT / KD-R97MBS: The buttons will blink in the color you have selected in [RING COLOR]. ( 16) For KD-R875BTS / KD-R870BT / KD-R770BT / KD-RD87BT: The buttons will blink in the blinking pattern you have ... knob to pair once you have selected in [RING COLOR]. ( 16) For KD-R875BTS / KD-R870BT / KD-R770BT / KD-RD87BT: The buttons stop blinking and illuminate in the color you have confirmed the device name. JVC MUSIC PLAY application is installed on . - [AUTO CNNT] is disconnected. Answer a call Reject a call ...
... a call When there is an incoming call: • For KD-R975BTS / KD-R970BTS / KD-RD97BT / KD-R97MBS: The buttons will blink in the color you have selected in [RING COLOR]. ( 16) For KD-R875BTS / KD-R870BT / KD-R770BT / KD-RD87BT: The buttons will blink in the blinking pattern you have ... knob to pair once you have selected in [RING COLOR]. ( 16) For KD-R875BTS / KD-R870BT / KD-R770BT / KD-RD87BT: The buttons stop blinking and illuminate in the color you have confirmed the device name. JVC MUSIC PLAY application is installed on . - [AUTO CNNT] is disconnected. Answer a call Reject a call ...
Instruction Manual
Page 33
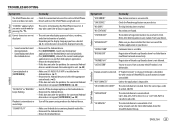
...to unit. ( 28) Cannot playback at [AUTO MODE]. • Make sure JVC MUSIC PLAY APP is unstable. The selected channel is impossible. ENGLISH 29 turn on the display language you have installed the latest version of registered stations has reached its limit. keeps flashing. •... up /thumbs down has failed due to subscribe. "LICENSE ERR" You try again later. Correct characters are found. "CONNECT ERR" Communication is installed on the Android device. ( 7) • Reconnect the Android device and select the appropriate control mode. ( 8) • If this unit ...
...to unit. ( 28) Cannot playback at [AUTO MODE]. • Make sure JVC MUSIC PLAY APP is unstable. The selected channel is impossible. ENGLISH 29 turn on the display language you have installed the latest version of registered stations has reached its limit. keeps flashing. •... up /thumbs down has failed due to subscribe. "LICENSE ERR" You try again later. Correct characters are found. "CONNECT ERR" Communication is installed on the Android device. ( 7) • Reconnect the Android device and select the appropriate control mode. ( 8) • If this unit ...
Instruction Manual
Page 36
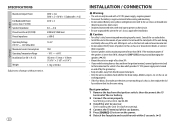
...4 4 Ω - 8 Ω 4 000 mV/10 kΩ load ≤ 600 Ω General Operating Voltage (10.5 V - 16 V allowable) Maximum Current Consumption Operating Temperature Range Installation Size (W × H × D) Weight 14.4 V 10 A -10°C - +60°C 182 mm × 53 mm × 158 mm (7-3/16" × 2-1/8" &#...215; 6-1/4") 1.1 kg (2.43 lbs) Subject to change without notice. 32 INSTALLATION / CONNECTION Warning • The unit can only be used with a 12 V DC power supply, negative ground. • Disconnect the battery's negative ...
...4 4 Ω - 8 Ω 4 000 mV/10 kΩ load ≤ 600 Ω General Operating Voltage (10.5 V - 16 V allowable) Maximum Current Consumption Operating Temperature Range Installation Size (W × H × D) Weight 14.4 V 10 A -10°C - +60°C 182 mm × 53 mm × 158 mm (7-3/16" × 2-1/8" &#...215; 6-1/4") 1.1 kg (2.43 lbs) Subject to change without notice. 32 INSTALLATION / CONNECTION Warning • The unit can only be used with a 12 V DC power supply, negative ground. • Disconnect the battery's negative ...
Instruction Manual
Page 37
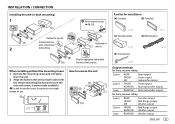
... firmly in the unit (on the top side Orientate the trim plate as illustrated before fitting. Use only the specified screws. When installing without the mounting sleeve 1 Remove the mounting sleeve and trim plate from the unit. 2 Align the holes in place.... INSTALLATION / CONNECTION Installing the unit (in-dash mounting) Do the required wiring. ( 34, 35) Part list for installation (A) Faceplate (B) Trim plate Hook on both sides) with the vehicle mounting bracket and secure the unit ...
... firmly in the unit (on the top side Orientate the trim plate as illustrated before fitting. Use only the specified screws. When installing without the mounting sleeve 1 Remove the mounting sleeve and trim plate from the unit. 2 Align the holes in place.... INSTALLATION / CONNECTION Installing the unit (in-dash mounting) Do the required wiring. ( 34, 35) Part list for installation (A) Faceplate (B) Trim plate Hook on both sides) with the vehicle mounting bracket and secure the unit ...
Instruction Manual
Page 38
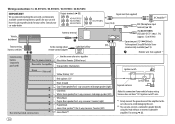
...Factory wiring harness (vehicle) To the steering wheel remote control adapter Light blue/yellow STEERING WHEEL REMOTE Signal cord (not supplied) JVC Amplifier*1 Fuse (10 A) MIC (Microphone input terminal) ( 14) (For KD-R975BTS) USB cable (DC 5 V 1.5 A) (approx. 1.2 m/4 feet) Expansion port (12 V 500 mA) To ... amplifier Brown (Not used) Join the same color wires together. For setting, 22. 34 Wiring connection (for KD-R975BTS / KD-R970BTS / KD-R97MBS / KD-R875BTS) IMPORTANT We recommend installing the unit with a commercially available custom wiring harness specific for your safety.
...Factory wiring harness (vehicle) To the steering wheel remote control adapter Light blue/yellow STEERING WHEEL REMOTE Signal cord (not supplied) JVC Amplifier*1 Fuse (10 A) MIC (Microphone input terminal) ( 14) (For KD-R975BTS) USB cable (DC 5 V 1.5 A) (approx. 1.2 m/4 feet) Expansion port (12 V 500 mA) To ... amplifier Brown (Not used) Join the same color wires together. For setting, 22. 34 Wiring connection (for KD-R975BTS / KD-R970BTS / KD-R97MBS / KD-R875BTS) IMPORTANT We recommend installing the unit with a commercially available custom wiring harness specific for your safety.
Instruction Manual
Page 39
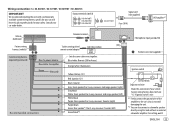
...to professionals for your safety. For setting, 22. Output terminals ( 33) Signal cord (not supplied) Fuse (10 A) JVC Amplifier*1 Vehicle dashboard Antenna terminal Microphone input jack ( 14) Factory wiring harness (vehicle) To the steering wheel remote control ...a subwoofer speaker directly using this lead without an external subwoofer amplifier. ENGLISH 35 Wiring connection (for KD-R870BT / KD-R770BT / KD-RD97BT / KD-RD87BT) IMPORTANT We recommend installing the unit with a commercially available custom wiring harness specific for your car and leave this connection if...
...to professionals for your safety. For setting, 22. Output terminals ( 33) Signal cord (not supplied) Fuse (10 A) JVC Amplifier*1 Vehicle dashboard Antenna terminal Microphone input jack ( 14) Factory wiring harness (vehicle) To the steering wheel remote control ...a subwoofer speaker directly using this lead without an external subwoofer amplifier. ENGLISH 35 Wiring connection (for KD-R870BT / KD-R770BT / KD-RD97BT / KD-RD87BT) IMPORTANT We recommend installing the unit with a commercially available custom wiring harness specific for your car and leave this connection if...


