Instruction Manual
Page 6
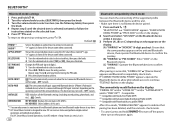
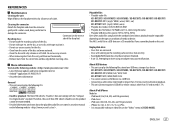
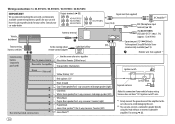
... demonstration 2 Set the clock 3 Set the basic settings RADIO 5 CD / USB / iPod / ANDROID 7 Pandora® 9 iHeartRadio® 10 SiriusXM® Radio (for KD-R975BTS / KD-R970BTS / KD-R97MBS / KD-R875BTS) 11 BLUETOOTH® 14 AUX 20 AUDIO SETTINGS 20 DISPLAY SETTINGS 24 REFERENCES 26 Maintenance More information TROUBLESHOOTING 28 SPECIFICATIONS 31 INSTALLATION / CONNECTION 32 2 BEFORE USE IMPORTANT • To ensure proper use, please read through this manual before playing digital sources to condensation on the faceplate of children...
... demonstration 2 Set the clock 3 Set the basic settings RADIO 5 CD / USB / iPod / ANDROID 7 Pandora® 9 iHeartRadio® 10 SiriusXM® Radio (for KD-R975BTS / KD-R970BTS / KD-R97MBS / KD-R875BTS) 11 BLUETOOTH® 14 AUX 20 AUDIO SETTINGS 20 DISPLAY SETTINGS 24 REFERENCES 26 Maintenance More information TROUBLESHOOTING 28 SPECIFICATIONS 31 INSTALLATION / CONNECTION 32 2 BEFORE USE IMPORTANT • To ensure proper use, please read through this manual before playing digital sources to condensation on the faceplate of children...
Instruction Manual
Page 7
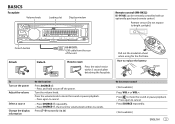
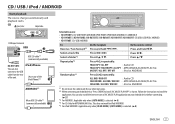
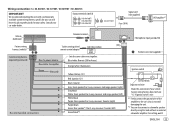
... using for the first time. Press to mute the sound or pause playback. • Press again to reset Press the switch twice within 2 seconds. Turn the volume knob. Press the volume knob to mute the sound or pause playback. • Press again to turn the volume knob within 5 seconds after detaching the faceplate. How to replace the battery To Turn on the power Adjust the volume Select a source Change the display information On the faceplate...
... using for the first time. Press to mute the sound or pause playback. • Press again to reset Press the switch twice within 2 seconds. Turn the volume knob. Press the volume knob to mute the sound or pause playback. • Press again to turn the volume knob within 5 seconds after detaching the faceplate. How to replace the battery To Turn on the power Adjust the volume Select a source Change the display information On the faceplate...
Instruction Manual
Page 8
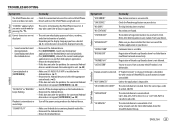
... is selected or activated. 4 Press to make the settings, then press the knob. SRC SELECT AM * ON: Enables AM in source selection. ; IHEART * ON: Enables IHEARTRADIO/IHEART FRONT/IHEART REAR in source selection. ; OFF: Disables. OFF: Disables. AUX * ON: Enables AUX in source selection. ; F/W UPDATE SYSTEM F/W xxxx YES: Starts upgrading the firmware. ; Day Hour Minute 5 Turn the volume knob to select [24H/ 12H], then press the knob. 6 Turn the volume knob to select...
... is selected or activated. 4 Press to make the settings, then press the knob. SRC SELECT AM * ON: Enables AM in source selection. ; IHEART * ON: Enables IHEARTRADIO/IHEART FRONT/IHEART REAR in source selection. ; OFF: Disables. OFF: Disables. AUX * ON: Enables AUX in source selection. ; F/W UPDATE SYSTEM F/W xxxx YES: Starts upgrading the firmware. ; Day Hour Minute 5 Turn the volume knob to select [24H/ 12H], then press the knob. 6 Turn the volume knob to select...
Instruction Manual
Page 11
... the car when not using. *2 When connecting an Android device, "Press [VIEW] to install JVC MUSIC PLAY APP" is selected. ( 8) ENGLISH 7 Follow the instructions to the USB cable from the rear of JVC MUSIC PLAY application on your Android device before connecting. ( 27) *3 For ANDROID: Applicable only when [AUTO MODE] is selected. ( 8) *4 For CD: Only for iPod/ ANDROID. *5 For iPod/ ANDROID: Applicable only when [HEAD MODE]/ [AUTO MODE] is shown. Press . Press and hold . Press . This does not work...
... the car when not using. *2 When connecting an Android device, "Press [VIEW] to install JVC MUSIC PLAY APP" is selected. ( 8) ENGLISH 7 Follow the instructions to the USB cable from the rear of JVC MUSIC PLAY application on your Android device before connecting. ( 27) *3 For ANDROID: Applicable only when [AUTO MODE] is selected. ( 8) *4 For CD: Only for iPod/ ANDROID. *5 For iPod/ ANDROID: Applicable only when [HEAD MODE]/ [AUTO MODE] is shown. Press . Press and hold . Press . This does not work...
Instruction Manual
Page 17
... pass code is SXV200 or later that supports SmartFavorites. LOCK SET CH EDIT*1 MATURE CH: Selects the SiriusXM-defined lock setting. ; OFF: Cancels. NO: Cancels. *1 Displayed only when [USER DEFINED] is selected. *2 Available only if the connected SiriusXM Vehical Tuner is 0000.) 4 Press the volume knob to confirm. OFF: Cancels. 1 Turn the volume knob to select a category, then press the knob. 2 Turn the volume knob to select a channel...
... pass code is SXV200 or later that supports SmartFavorites. LOCK SET CH EDIT*1 MATURE CH: Selects the SiriusXM-defined lock setting. ; OFF: Cancels. NO: Cancels. *1 Displayed only when [USER DEFINED] is selected. *2 Available only if the connected SiriusXM Vehical Tuner is 0000.) 4 Press the volume knob to confirm. OFF: Cancels. 1 Turn the volume knob to select a category, then press the knob. 2 Turn the volume knob to select a channel...
Instruction Manual
Page 18
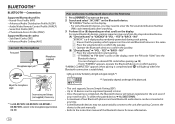
... Secure using cord clamps (not supplied) if necessary. *1 For KD-R975BTS / KD-R970BTS / KD-R97MBS / KD-R875BTS, connect to the microphone input terminal. ( 34) Pair and connect a Bluetooth device for more information. 14 For some Bluetooth devices, you reset the unit. Operate the Bluetooth device to the instruction manual of the Bluetooth device for the first time 1 Press to turn on the unit. 2 Search and select "JVC UNIT" on the type of two Bluetooth phones and one Bluetooth audio device can change to a desired PIN code before pairing...
... Secure using cord clamps (not supplied) if necessary. *1 For KD-R975BTS / KD-R970BTS / KD-R97MBS / KD-R875BTS, connect to the microphone input terminal. ( 34) Pair and connect a Bluetooth device for more information. 14 For some Bluetooth devices, you reset the unit. Operate the Bluetooth device to the instruction manual of the Bluetooth device for the first time 1 Press to turn on the unit. 2 Search and select "JVC UNIT" on the type of two Bluetooth phones and one Bluetooth audio device can change to a desired PIN code before pairing...

Instruction Manual
Page 19
...: Android device Other models: iPhone/ iPod touch/ Android device Press the volume knob to the USB input terminal, pairing request (via Bluetooth) is automatically activated. Bluetooth function of the connected devcie is turned on the Android device ( 7) and [AUTO MODE] is set to [ON]. ( 18) - ENGLISH 15 JVC MUSIC PLAY application is installed on . - [AUTO CNNT] is selected ( 8). To First incoming call On the faceplate On the remote control Press or the volume knob. Press . Automatic pairing request is set to a selected time...
...: Android device Other models: iPhone/ iPod touch/ Android device Press the volume knob to the USB input terminal, pairing request (via Bluetooth) is automatically activated. Bluetooth function of the connected devcie is turned on the Android device ( 7) and [AUTO MODE] is set to [ON]. ( 18) - ENGLISH 15 JVC MUSIC PLAY application is installed on . - [AUTO CNNT] is selected ( 8). To First incoming call On the faceplate On the remote control Press or the volume knob. Press . Automatic pairing request is set to a selected time...
Instruction Manual
Page 20
... volume knob. Make the settings for receiving a call . • This adjustment will not affect the volume of the microphone increases as the number increased. -5 - +5 (0): Adjust the noise reduction level until the least noise is being heard during a phone conversation. -5 - +5 (0): Adjust the echo cancellation delay time until the least echo is being heard during a phone conversation. While having two active calls... COLOR 49 (COLOR 08): Selects the notification light color...
... volume knob. Make the settings for receiving a call . • This adjustment will not affect the volume of the microphone increases as the number increased. -5 - +5 (0): Adjust the noise reduction level until the least noise is being heard during a phone conversation. -5 - +5 (0): Adjust the echo cancellation delay time until the least echo is being heard during a phone conversation. While having two active calls... COLOR 49 (COLOR 08): Selects the notification light color...
Instruction Manual
Page 22
... not work. ; AUTO PAIR ON: The unit automatically pair supported Bluetooth device (iPhone/ iPod touch/ Android device) when it is successful, "PAIRING OK" "[Device Name]" appears and Bluetooth compatibility check starts. For JVC Smart Music Control operations, visit JVC website: . 18 Bluetooth compatibility check mode You can only connect a maximum of the device name when connected. After pairing is connected through USB input terminal. " " appears in front of two Bluetooth phones and one Bluetooth audio device at any time. *2 JVC Smart Music Control is selected/activated or...
... not work. ; AUTO PAIR ON: The unit automatically pair supported Bluetooth device (iPhone/ iPod touch/ Android device) when it is successful, "PAIRING OK" "[Device Name]" appears and Bluetooth compatibility check starts. For JVC Smart Music Control operations, visit JVC website: . 18 Bluetooth compatibility check mode You can only connect a maximum of the device name when connected. After pairing is connected through USB input terminal. " " appears in front of two Bluetooth phones and one Bluetooth audio device at any time. *2 JVC Smart Music Control is selected/activated or...

Instruction Manual
Page 24
Select a preset equalizer Press (or) Press repeatedly. , then turn the volume knob within 5 seconds. Use a 3-core plug head stereo mini plug for optimum audio output. Other settings 1 Press and hold to enter EASY EQ setting. 2 Turn the volume knob to the previous setting item, press . • To exit, press . Preset equalizer: FLAT (default)/ HARD ROCK / POP / HIP HOP / R&B / JAZZ / CLASSICAL / USER Store your own sound settings 1 Press and hold . 2 Turn the volume knob to select an...
Select a preset equalizer Press (or) Press repeatedly. , then turn the volume knob within 5 seconds. Use a 3-core plug head stereo mini plug for optimum audio output. Other settings 1 Press and hold to enter EASY EQ setting. 2 Turn the volume knob to the previous setting item, press . • To exit, press . Preset equalizer: FLAT (default)/ HARD ROCK / POP / HIP HOP / R&B / JAZZ / CLASSICAL / USER Store your own sound settings 1 Press and hold . 2 Turn the volume knob to select an...
Instruction Manual
Page 25
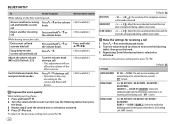
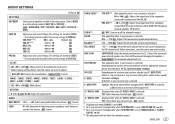
... and rear speaker output balance. Before adjustment, select the source you want to adjust.) BASS EXT ON: Turns on or off the subwoofer output. AMP GAIN LOW POWER: Limits the maximum volume level to 25. (Select if the maximum power of the output level. X ' OVER 2-WAY (Displayed only when [X ' OVER 3-WAY] is selected) YES: Selects three way crossover type. ; NO: Cancels. ENGLISH 21 AUDIO SETTINGS Default: XX EQ SETTING EQ PRESET Select a preset equalizer suitable to the music genre. (Select [USER] to use the settings...
... and rear speaker output balance. Before adjustment, select the source you want to adjust.) BASS EXT ON: Turns on or off the subwoofer output. AMP GAIN LOW POWER: Limits the maximum volume level to 25. (Select if the maximum power of the output level. X ' OVER 2-WAY (Displayed only when [X ' OVER 3-WAY] is selected) YES: Selects three way crossover type. ; NO: Cancels. ENGLISH 21 AUDIO SETTINGS Default: XX EQ SETTING EQ PRESET Select a preset equalizer suitable to the music genre. (Select [USER] to use the settings...
Instruction Manual
Page 26
... car or running noise of compressed music. ; Speaker output settings (Only for X ' OVER 2-WAY) Select the output setting for the speakers [SPK/PRE OUT], base on [SPK/PRE OUT] Audio signal through lineout terminal REAR/SW Rear speakers output Subwoofer output Subwoofer output Connection via lineout terminals For connections through an external amplifier. ( 34, 35) (For KD-R975BTS / KD-R97MBS / KD-R875BTS) Setting on [SPK/PRE OUT] Audio signal through lineout terminal FRONT REAR SW REAR/REAR (default) Front speakers Rear speakers output output Subwoofer output REAR/SUB...
... car or running noise of compressed music. ; Speaker output settings (Only for X ' OVER 2-WAY) Select the output setting for the speakers [SPK/PRE OUT], base on [SPK/PRE OUT] Audio signal through lineout terminal REAR/SW Rear speakers output Subwoofer output Subwoofer output Connection via lineout terminals For connections through an external amplifier. ( 34, 35) (For KD-R975BTS / KD-R97MBS / KD-R875BTS) Setting on [SPK/PRE OUT] Audio signal through lineout terminal FRONT REAR SW REAR/REAR (default) Front speakers Rear speakers output output Subwoofer output REAR/SUB...
Instruction Manual
Page 28
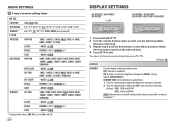
Default: XX DISPLAY DIMMER Dim the display and buttons illumination. OFF: Dimmer is turned off or on . To return to the previous setting item, press . ON: Dimmer is selected/activated or follow the instructions stated on the selected item. 4 Press to exit. Brightness changes to [NIGHT] setting. ( 25, [BRIGHTNESS]) DIMMER TIME: Set the dimmer on and off time. 1 Turn the volume knob to adjust the [ON] time, then press the knob. 2 Turn the volume knob to...
Default: XX DISPLAY DIMMER Dim the display and buttons illumination. OFF: Dimmer is turned off or on . To return to the previous setting item, press . ON: Dimmer is selected/activated or follow the instructions stated on the selected item. 4 Press to exit. Brightness changes to [NIGHT] setting. ( 25, [BRIGHTNESS]) DIMMER TIME: Set the dimmer on and off time. 1 Turn the volume knob to adjust the [ON] time, then press the knob. 2 Turn the volume knob to...
Instruction Manual
Page 31
... USB devices • This unit can play the following files stored on a USB mass storage class device: KD-R975BTS / KD-R970BTS / KD-R97MBS / KD-R875BTS / KD-R870BT / KD-RD97BT / KD-RD87BT: MP3/ WMA/ AAC/ WAV/ FLAC KD-R770BT: MP3/ WMA/ WAV/ FLAC • You cannot connect a USB device via a USB hub. • Connecting a cable whose total length is longer than 5 V and exceeds 1.5 A. • DualDisc playback: The Non-DVD side of the disc and...
... USB devices • This unit can play the following files stored on a USB mass storage class device: KD-R975BTS / KD-R970BTS / KD-R97MBS / KD-R875BTS / KD-R870BT / KD-RD97BT / KD-RD87BT: MP3/ WMA/ AAC/ WAV/ FLAC KD-R770BT: MP3/ WMA/ WAV/ FLAC • You cannot connect a USB device via a USB hub. • Connecting a cable whose total length is longer than 5 V and exceeds 1.5 A. • DualDisc playback: The Non-DVD side of the disc and...

Instruction Manual
Page 32
... service, therefore the specifications are in supported formats. ( 27) be selected. Accordingly, compatibility may be impaired or some or all of the services may become unavailable. • Some iHeartRadio® functionality cannot be heard. • Adjust the volume to be ejected. Send the unit to the radio. Source cannot be detected. • Reattach the device. 28 Check the [SRC SELECT] setting. ( 4) Radio • Radio reception is ejected. "IN DISC" appears. Make...
... service, therefore the specifications are in supported formats. ( 27) be selected. Accordingly, compatibility may be impaired or some or all of the services may become unavailable. • Some iHeartRadio® functionality cannot be heard. • Adjust the volume to be ejected. Send the unit to the radio. Source cannot be detected. • Reattach the device. 28 Check the [SRC SELECT] setting. ( 4) Radio • Radio reception is ejected. "IN DISC" appears. Make...
Instruction Manual
Page 33
... problem, the connected Android device does not support [AUTO MODE]. ( 28) Playback is intermittent or Turn off the developer options on the display language you have installed the latest version of the Pandora application on or does not work. • Detach and reset the iPod/iPhone using hard reset. Correct characters are found. keeps flashing. • Reconnect the Android device. • If this unit and iPod/iPhone. ANDROID "CANNOT PLAY" • Make...
... problem, the connected Android device does not support [AUTO MODE]. ( 28) Playback is intermittent or Turn off the developer options on the display language you have installed the latest version of the Pandora application on or does not work. • Detach and reset the iPod/iPhone using hard reset. Correct characters are found. keeps flashing. • Reconnect the Android device. • If this unit and iPod/iPhone. ANDROID "CANNOT PLAY" • Make...
Instruction Manual
Page 34
... DEVICE NOT FOUND" "NOT SUPPORT" "ERROR" "H/W ERROR" Remedy • Check whether the connected Bluetooth audio player supports Audio/Video Remote Control Profile (AVRCP). (Refer to the unit. Retry after deleting an unnecessary device. ( 18, DELETE PAIR) The unit is being interrupted or skipped during [AUTO CNNCT]. Press the volume knob to use the Bluetooth function. continue. TROUBLESHOOTING Symptom Remedy "CHK ANTENNA" Check that the antenna and its limit. If you have any troubles, try the operation again...
... DEVICE NOT FOUND" "NOT SUPPORT" "ERROR" "H/W ERROR" Remedy • Check whether the connected Bluetooth audio player supports Audio/Video Remote Control Profile (AVRCP). (Refer to the unit. Retry after deleting an unnecessary device. ( 18, DELETE PAIR) The unit is being interrupted or skipped during [AUTO CNNCT]. Press the volume knob to use the Bluetooth function. continue. TROUBLESHOOTING Symptom Remedy "CHK ANTENNA" Check that the antenna and its limit. If you have any troubles, try the operation again...
Instruction Manual
Page 36
... ignition switch, then disconnect the terminal of the car battery. 5 Press to professionals. on the power. 6 Detach the faceplate and reset the unit within 5 seconds. ( 3) Basic procedure 1 Remove the key from heat dissipate metal parts. • After the unit is installed, check whether the brake lamps, blinkers, wipers, etc. Consult the car audio dealer. • Install this unit during and shortly after installation. SPECIFICATIONS Audio Maximum Output Power Full Bandwidth Power...
... ignition switch, then disconnect the terminal of the car battery. 5 Press to professionals. on the power. 6 Detach the faceplate and reset the unit within 5 seconds. ( 3) Basic procedure 1 Remove the key from heat dissipate metal parts. • After the unit is installed, check whether the brake lamps, blinkers, wipers, etc. Consult the car audio dealer. • Install this unit during and shortly after installation. SPECIFICATIONS Audio Maximum Output Power Full Bandwidth Power...
Instruction Manual
Page 38
... the unit. *2 You can also connect a subwoofer speaker directly using this connection if your vehicle factory wiring harness does not have "12 V ignition switch" wire. *1 Firmly connect the ground wire of the amplifier to the car's chassis to professionals for your car audio dealer. Output terminals ( 33) Vehicle dashboard Antenna terminal Factory wiring harness (vehicle) To the steering wheel remote control adapter Light blue/yellow STEERING WHEEL REMOTE Signal cord (not supplied) JVC Amplifier*1 Fuse (10 A) MIC (Microphone input terminal) ( 14) (For KD-R975BTS) USB cable (DC...
... the unit. *2 You can also connect a subwoofer speaker directly using this connection if your vehicle factory wiring harness does not have "12 V ignition switch" wire. *1 Firmly connect the ground wire of the amplifier to the car's chassis to professionals for your car audio dealer. Output terminals ( 33) Vehicle dashboard Antenna terminal Factory wiring harness (vehicle) To the steering wheel remote control adapter Light blue/yellow STEERING WHEEL REMOTE Signal cord (not supplied) JVC Amplifier*1 Fuse (10 A) MIC (Microphone input terminal) ( 14) (For KD-R975BTS) USB cable (DC...
Instruction Manual
Page 39
... 35 Wiring connection (for KD-R870BT / KD-R770BT / KD-RD97BT / KD-RD87BT) IMPORTANT We recommend installing the unit with a commercially available custom wiring harness specific for your car audio dealer. For setting, 22. Consult your safety. Output terminals ( 33) Signal cord (not supplied) Fuse (10 A) JVC Amplifier*1 Vehicle dashboard Antenna terminal Microphone input jack ( 14) Factory wiring harness (vehicle) To the steering wheel remote control adapter Light blue/yellow STEERING WHEEL REMOTE Custom wiring harness (separately purchased) Blue: To power antenna Blue/white...
... 35 Wiring connection (for KD-R870BT / KD-R770BT / KD-RD97BT / KD-RD87BT) IMPORTANT We recommend installing the unit with a commercially available custom wiring harness specific for your car audio dealer. For setting, 22. Consult your safety. Output terminals ( 33) Signal cord (not supplied) Fuse (10 A) JVC Amplifier*1 Vehicle dashboard Antenna terminal Microphone input jack ( 14) Factory wiring harness (vehicle) To the steering wheel remote control adapter Light blue/yellow STEERING WHEEL REMOTE Custom wiring harness (separately purchased) Blue: To power antenna Blue/white...


