Instruction Manual
Page 24
... display and button illumination adjusted in [FADER] and selectable range is [R06] to [00] DISPLAY SETTINGS KD-R960BTS KD-AR865BTS / KD-R860BT 1 Press and hold . 2 Turn the volume knob to the settings made on [COLOR]. *1 The illumination control wire connection is selected/activated or follow the instructions stated on and off or on the car...
... display and button illumination adjusted in [FADER] and selectable range is [R06] to [00] DISPLAY SETTINGS KD-R960BTS KD-AR865BTS / KD-R860BT 1 Press and hold . 2 Turn the volume knob to the settings made on [COLOR]. *1 The illumination control wire connection is selected/activated or follow the instructions stated on and off or on the car...
Instruction Manual
Page 28
... connected Android device is unable to route the audio signal to unit. ( 24) Cannot playback at [AUTO • Make sure JVC MUSIC PLAY APP is installed on the Android device and start playback. • If in [AUDIO MODE], launch any media player application... are insulated properly. "PROTECTING SEND SERVICE" appears. This unit can only display uppercase letters, numbers, and a limited number of the speaker wires are not displayed. TROUBLESHOOTING Symptom Remedy Sound cannot be selected. "CHK DEVICE" Check the Pandora application on the Android device. "CANNOT PLAY"...
... connected Android device is unable to route the audio signal to unit. ( 24) Cannot playback at [AUTO • Make sure JVC MUSIC PLAY APP is installed on the Android device and start playback. • If in [AUDIO MODE], launch any media player application... are insulated properly. "PROTECTING SEND SERVICE" appears. This unit can only display uppercase letters, numbers, and a limited number of the speaker wires are not displayed. TROUBLESHOOTING Symptom Remedy Sound cannot be selected. "CHK DEVICE" Check the Pandora application on the Android device. "CANNOT PLAY"...

Instruction Manual
Page 32
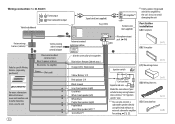
...setting to the car's chassis again after use of more than 30º. • If your vehicle. Caution • For safety's sake, leave wiring and mounting to hold the sleeve firmly in -dash mounting) Hook on and off by the ignition key. • Keep all cables away from ...check whether the brake lamps, blinkers, wipers, etc. Using wrong screws might damage the unit. If the maximum power of the car battery. 2 Connect the wires properly. See Installing the unit (in-dash mounting). 4 Connect the terminal of less than 50 W. Flat or round head screws (not supplied) M5 ×...
...setting to the car's chassis again after use of more than 30º. • If your vehicle. Caution • For safety's sake, leave wiring and mounting to hold the sleeve firmly in -dash mounting) Hook on and off by the ignition key. • Keep all cables away from ...check whether the brake lamps, blinkers, wipers, etc. Using wrong screws might damage the unit. If the maximum power of the car battery. 2 Connect the wires properly. See Installing the unit (in-dash mounting). 4 Connect the terminal of less than 50 W. Flat or round head screws (not supplied) M5 ×...
Instruction Manual
Page 33
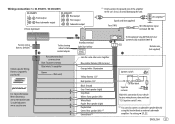
Signal cord (not supplied) JVC Amplifier*1 Fuse (10 A) MIC (Microphone input terminal) ( 14) Factory wiring harness (vehicle) Vehicle-specific Wiring Harness (separately purchased) For more information: Metra Electronics: www.metraonline.com Scosche Industries: www.scosche....blue/yellow STEERING WHEEL REMOTE Join the same color wires together. Wiring connection (for KD-R960BTS / KD-AR865BTS) KD-R960BTS Front output Rear/subwoofer output KD-AR865BTS Rear output Front output Subwoofer output Vehicle dashboard *1 Firmly connect the ground wire of the amplifier to the car's chassis to ...
Signal cord (not supplied) JVC Amplifier*1 Fuse (10 A) MIC (Microphone input terminal) ( 14) Factory wiring harness (vehicle) Vehicle-specific Wiring Harness (separately purchased) For more information: Metra Electronics: www.metraonline.com Scosche Industries: www.scosche....blue/yellow STEERING WHEEL REMOTE Join the same color wires together. Wiring connection (for KD-R960BTS / KD-AR865BTS) KD-R960BTS Front output Rear/subwoofer output KD-AR865BTS Rear output Front output Subwoofer output Vehicle dashboard *1 Firmly connect the ground wire of the amplifier to the car's chassis to ...
Instruction Manual
Page 34
... can also connect a subwoofer speaker directly using this lead without an external subwoofer amplifier. Remote wire (not supplied) Part list for KD-R860BT) Front output Rear/subwoofer output Vehicle dashboard Signal cord (not supplied) Fuse (10 A) JVC Amplifier*1 *1 Firmly connect the ground wire of the amplifier to the car's chassis to avoid damaging the unit...
... can also connect a subwoofer speaker directly using this lead without an external subwoofer amplifier. Remote wire (not supplied) Part list for KD-R860BT) Front output Rear/subwoofer output Vehicle dashboard Signal cord (not supplied) Fuse (10 A) JVC Amplifier*1 *1 Firmly connect the ground wire of the amplifier to the car's chassis to avoid damaging the unit...


