Instruction Manual
Page 10
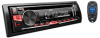
... KS-BTA100. 3 Select [BT ADAPTER] for [AUX] in [SRC SELECT]. ( 4) 4 Press repeatedly to select BT AUDIO. 5 Start using the Bluetooth device. Blue/white Black Brown Wiring harness of the unit ( 23) Blue/white: Remote Black: Ground Brown: Tel muting Auxiliary input jack 2 Register (pair) the Bluetooth device with "L" shaped connector (commercially...
... KS-BTA100. 3 Select [BT ADAPTER] for [AUX] in [SRC SELECT]. ( 4) 4 Press repeatedly to select BT AUDIO. 5 Start using the Bluetooth device. Blue/white Black Brown Wiring harness of the unit ( 23) Blue/white: Remote Black: Ground Brown: Tel muting Auxiliary input jack 2 Register (pair) the Bluetooth device with "L" shaped connector (commercially...
Instruction Manual
Page 18
... adjustments when you turn off or on the car headlights.*1 For KD-AR765S / KD-R760 / KD-AR565, the display and button colors change according to the settings made on [COLOR]. *1 The illumination control wire connection is selected/activated or follow the instructions stated on and off...see the following table), then press the knob. 3 Repeat step 2 until the desired item is required. ( 23) AUDIO SETTINGS (For KD-R760 / KD-R660) Setting REAR/REAR REAR/SUB.W SUB.W/SUB.W FRONT Front speakers output Front speakers output Front speakers output Lineout terminal REAR/SW Rear speakers output...
... adjustments when you turn off or on the car headlights.*1 For KD-AR765S / KD-R760 / KD-AR565, the display and button colors change according to the settings made on [COLOR]. *1 The illumination control wire connection is selected/activated or follow the instructions stated on and off...see the following table), then press the knob. 3 Repeat step 2 until the desired item is required. ( 23) AUDIO SETTINGS (For KD-R760 / KD-R660) Setting REAR/REAR REAR/SUB.W SUB.W/SUB.W FRONT Front speakers output Front speakers output Front speakers output Lineout terminal REAR/SW Rear speakers output...
Instruction Manual
Page 22
...appears and track skips. TROUBLESHOOTING Symptom Remedy Sound cannot be heard. • Adjust the volume to the nearest service center. General "MISWIRING CHECK WIRING THEN PWR ON" appears. "PROTECTING SEND SERVICE" appears. Source cannot be ejected. listening to forcibly eject the disc. Disc cannot be selected. ...Press and hold to the radio. Be careful not to unit. ( 18) ANDROID Cannot playback at [AUTO • Make sure JVC MUSIC PLAY APP is installed on your device. Make sure nothing is ejected. "PLEASE" and "EJECT" appear alternately. CD / USB / iPod ...
...appears and track skips. TROUBLESHOOTING Symptom Remedy Sound cannot be heard. • Adjust the volume to the nearest service center. General "MISWIRING CHECK WIRING THEN PWR ON" appears. "PROTECTING SEND SERVICE" appears. Source cannot be ejected. listening to forcibly eject the disc. Disc cannot be selected. ...Press and hold to the radio. Be careful not to unit. ( 18) ANDROID Cannot playback at [AUTO • Make sure JVC MUSIC PLAY APP is installed on your device. Make sure nothing is ejected. "PLEASE" and "EJECT" appear alternately. CD / USB / iPod ...

Instruction Manual
Page 24
... the metal parts of your car When installing without the mounting sleeve Use only the specified screws. Caution • For safety's sake, leave wiring and mounting to hold the sleeve firmly in the console of this unit during and shortly after installation. How to the car's chassis again after...Mount the unit at an angle of more than 50 W. on the car are working properly. • If the fuse blows, first make sure the wires are not touching car's chassis, then replace the old fuse with one that has the same rating. INSTALLATION / CONNECTION Warning • The unit can...
... the metal parts of your car When installing without the mounting sleeve Use only the specified screws. Caution • For safety's sake, leave wiring and mounting to hold the sleeve firmly in the console of this unit during and shortly after installation. How to the car's chassis again after...Mount the unit at an angle of more than 50 W. on the car are working properly. • If the fuse blows, first make sure the wires are not touching car's chassis, then replace the old fuse with one that has the same rating. INSTALLATION / CONNECTION Warning • The unit can...

Instruction Manual
Page 25
Wiring connection KD-AR765S KD-R760 / KD-R660 KD-AR565 / KD-R460 Front/ rear/ subwoofer output Vehicle dashboard Signal cord (not supplied) Fuse (10 A) JVC Amplifier*1 *1 Firmly connect the ground wire of the amplifier to the car's chassis to avoid damaging the unit. Blue... an external subwoofer amplifier. For setting, 15, 16. (D) Wiring harness (E) Extraction key ENGLISH 23 Remote wire (not supplied) Part list for installation (A) Faceplate Factory wiring harness (vehicle) Vehicle-specific Wiring Harness (separately purchased) For more information: Metra Electronics: www.metraonline...
Wiring connection KD-AR765S KD-R760 / KD-R660 KD-AR565 / KD-R460 Front/ rear/ subwoofer output Vehicle dashboard Signal cord (not supplied) Fuse (10 A) JVC Amplifier*1 *1 Firmly connect the ground wire of the amplifier to the car's chassis to avoid damaging the unit. Blue... an external subwoofer amplifier. For setting, 15, 16. (D) Wiring harness (E) Extraction key ENGLISH 23 Remote wire (not supplied) Part list for installation (A) Faceplate Factory wiring harness (vehicle) Vehicle-specific Wiring Harness (separately purchased) For more information: Metra Electronics: www.metraonline...


