Instruction Manual
Page 4
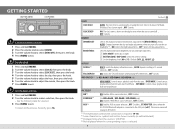
...turn off . ; OFF: Selects the day adjustments. NIGHT: 15) DISPLAY SCROLL *2 ONCE: Scrolls the display information once. ; PANDORA *4 (For KD-A645 / KD-R640 / KD-R540 only) ON: Enables PANDORA in the [BRIGHTNESS] setting. The source name will change to the AUX jack (« 7). ON: Selects the night ...31). (Default: DAY: 31 ; BT ADAPTER: Select when the KS-BTA100 Bluetooth adapter is connected to BT AUDIO. *1 The illumination control wire connection is required. (« 15) *2 Some characters or symbols will not be shown correctly (or will be blanked). *3 Displayed only when ...
...turn off . ; OFF: Selects the day adjustments. NIGHT: 15) DISPLAY SCROLL *2 ONCE: Scrolls the display information once. ; PANDORA *4 (For KD-A645 / KD-R640 / KD-R540 only) ON: Enables PANDORA in the [BRIGHTNESS] setting. The source name will change to the AUX jack (« 7). ON: Selects the night ...31). (Default: DAY: 31 ; BT ADAPTER: Select when the KS-BTA100 Bluetooth adapter is connected to BT AUDIO. *1 The illumination control wire connection is required. (« 15) *2 Some characters or symbols will not be shown correctly (or will be blanked). *3 Displayed only when ...
Instruction Manual
Page 7
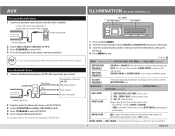
... Black: Ground Brown: Tel muting Auxiliary input jack 2 Register (pair) the Bluetooth device with "L" shaped connector (commercially available) Portable audio player ILLUMINATION (KD-A645 / KD-R640 only) Auxiliary input jack 2 Select [ON] for [BUTTON ZONE], [DISP ZONE], and [ALL ZONE] separately. Default: XX COLOR: Select a...select AUX. 4 Turn on the display. BUTTON ZONE [COLOR 06] DISP ZONE [COLOR 01] COLOR 01 to exit. Blue/white Black Brown Wiring harness of KS-BTA100. 1 Press and hold MENU. 2 Turn the volume knob to select [COLOR] or [COLOR SETUP], then press the ...
... Black: Ground Brown: Tel muting Auxiliary input jack 2 Register (pair) the Bluetooth device with "L" shaped connector (commercially available) Portable audio player ILLUMINATION (KD-A645 / KD-R640 only) Auxiliary input jack 2 Select [ON] for [BUTTON ZONE], [DISP ZONE], and [ALL ZONE] separately. Default: XX COLOR: Select a...select AUX. 4 Turn on the display. BUTTON ZONE [COLOR 06] DISP ZONE [COLOR 01] COLOR 01 to exit. Blue/white Black Brown Wiring harness of KS-BTA100. 1 Press and hold MENU. 2 Turn the volume knob to select [COLOR] or [COLOR SETUP], then press the ...
Instruction Manual
Page 12
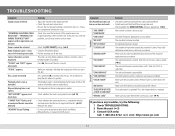
... "UPGRADE APP" "CH LOCKED" "CHAN UNSUB" "CHAN UNAVAIL" "CHK ANTENNA" "CHECK TUNER" "NO SIGNAL" "SUBSCRIPTN UPDATED - The number of the speaker wires are insulated properly, then reset the unit. Call 1-866-635-2349 to be done. Check the antenna and its connection are in good condition. Make... the following: 1 Check TROUBLESHOOTING 2 Reset the unit (« 3) 3 Contact (USA only) Call: 1-800-252-5722 ( or ) visit: http://www.jvc.com 12 EN_KD-A645_R640_540_440[J]f.indd 12 7/25/12 5:05:40 PM Make sure the antenna is not as intended. Playback order is mounted outside the...
... "UPGRADE APP" "CH LOCKED" "CHAN UNSUB" "CHAN UNAVAIL" "CHK ANTENNA" "CHECK TUNER" "NO SIGNAL" "SUBSCRIPTN UPDATED - The number of the speaker wires are insulated properly, then reset the unit. Call 1-866-635-2349 to be done. Check the antenna and its connection are in good condition. Make... the following: 1 Check TROUBLESHOOTING 2 Reset the unit (« 3) 3 Contact (USA only) Call: 1-800-252-5722 ( or ) visit: http://www.jvc.com 12 EN_KD-A645_R640_540_440[J]f.indd 12 7/25/12 5:05:40 PM Make sure the antenna is not as intended. Playback order is mounted outside the...
Instruction Manual
Page 14
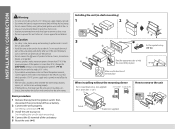
... prevent a short circuit. • Be sure to ground this unit during and shortly after installation. Caution • For safety's sake, leave wiring and mounting to hold the sleeve firmly in the console of your car. Basic procedure 1 Remove the key from the ignition switch, then disconnect ... installing without the mounting sleeve Flat or round head screws (not supplied) M5 × 8 mm (M5 × 3/8") How to your vehicle. See Wiring connection. (« 15) 3 Install the unit to remove the unit Pocket Bracket (not supplied) 14 EN_KD-A645_R640_540_440[J]f.indd 14 7/24/12 12:21:25...
... prevent a short circuit. • Be sure to ground this unit during and shortly after installation. Caution • For safety's sake, leave wiring and mounting to hold the sleeve firmly in the console of your car. Basic procedure 1 Remove the key from the ignition switch, then disconnect ... installing without the mounting sleeve Flat or round head screws (not supplied) M5 × 8 mm (M5 × 3/8") How to your vehicle. See Wiring connection. (« 15) 3 Install the unit to remove the unit Pocket Bracket (not supplied) 14 EN_KD-A645_R640_540_440[J]f.indd 14 7/24/12 12:21:25...
Instruction Manual
Page 15
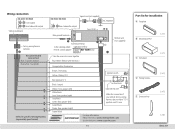
... Front output Rear/subwoofer output Vehicle dashboard Factory wiring harness (vehicle) Recommended connection Blue: To power antenna Blue/white: To amplifier Vehicle-specific Wiring Harness (separately purchased) KD-R540 / KD-R440 Signal cord (not supplied) JVC Amplifier Rear/subwoofer output Fuse (10 A) (« 8) Rear ground terminal Antenna terminal To the steering wheel Light blue/yellow remote...
... Front output Rear/subwoofer output Vehicle dashboard Factory wiring harness (vehicle) Recommended connection Blue: To power antenna Blue/white: To amplifier Vehicle-specific Wiring Harness (separately purchased) KD-R540 / KD-R440 Signal cord (not supplied) JVC Amplifier Rear/subwoofer output Fuse (10 A) (« 8) Rear ground terminal Antenna terminal To the steering wheel Light blue/yellow remote...


