Instruction Manual
Page 1
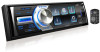
KD-AV300 MONITOR WITH DVD RECEIVER INSTRUCTION MANUAL MONITOR CON RECEPTOR DE DVD MANUAL DE INSTRUCCIONES Please read all instructions carefully before operation to obtain the best possible performance from the unit. Por favor lea detenidamente este manual para comprender a fondo todas las instrucciones y obtener un máximo disfrute de esta unidad. LVT2501-001B [J/JW]
KD-AV300 MONITOR WITH DVD RECEIVER INSTRUCTION MANUAL MONITOR CON RECEPTOR DE DVD MANUAL DE INSTRUCCIONES Please read all instructions carefully before operation to obtain the best possible performance from the unit. Por favor lea detenidamente este manual para comprender a fondo todas las instrucciones y obtener un máximo disfrute de esta unidad. LVT2501-001B [J/JW]
Instruction Manual
Page 2
.... • iPhone, iPod, iPod classic, iPod nano, and iPod touch are prohibited. • "Made for iPod," and "Made for a Class B digital device, pursuant to Part 15 of a weaker class. It means that the unit is attached to the chassis/case and says that the component uses laser beams that are designed to provide reasonable protection against harmful interference in a particular installation. NO LICENSE...
.... • iPhone, iPod, iPod classic, iPod nano, and iPod touch are prohibited. • "Made for iPod," and "Made for a Class B digital device, pursuant to Part 15 of a weaker class. It means that the unit is attached to the chassis/case and says that the component uses laser beams that are designed to provide reasonable protection against harmful interference in a particular installation. NO LICENSE...
Instruction Manual
Page 3
... Before Use 3 Basics 4 Tuner 6 iPod/iPhone 7 Disc/USB 8 External Components 10 Sound/Display/Other Settings 11 More Information 12 Troubleshooting 14 Specifications 15 Installation/Connection 16 How to read this manual • The buttons on the dashboard. • The Lithium battery is in original package when not used batteries promptly. However, if the remote control has the same or similar button names, they can also be exposed to avoid damaging the speakers...
... Before Use 3 Basics 4 Tuner 6 iPod/iPhone 7 Disc/USB 8 External Components 10 Sound/Display/Other Settings 11 More Information 12 Troubleshooting 14 Specifications 15 Installation/Connection 16 How to read this manual • The buttons on the dashboard. • The Lithium battery is in original package when not used batteries promptly. However, if the remote control has the same or similar button names, they can also be exposed to avoid damaging the speakers...
Instruction Manual
Page 4
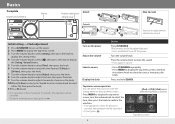
... confirm the selection. • If no operation is connected. Basics Faceplate Volume knob (turn/press) Monitor Faceplate-open button Remote sensor Attach Detach How to turn off the power. To Turn on the power Adjust the volume Select a source Display the clock Do this Press L/SOURCE. (The buttons on the top menu screen. Top menu screen operation You can select the source or enter the setting menu on the faceplate light up.) • Press and hold CLOCK. Press the volume knob to mute the sound. •...
... confirm the selection. • If no operation is connected. Basics Faceplate Volume knob (turn/press) Monitor Faceplate-open button Remote sensor Attach Detach How to turn off the power. To Turn on the power Adjust the volume Select a source Display the clock Do this Press L/SOURCE. (The buttons on the top menu screen. Top menu screen operation You can select the source or enter the setting menu on the faceplate light up.) • Press and hold CLOCK. Press the volume knob to mute the sound. •...
Instruction Manual
Page 5
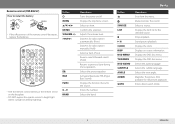
..., replace the batteries. • Aim the remote control directly at the remote sensor on the faceplate. • DO NOT expose the remote sensor to previous layer during menu operation. Mutes/restores the sound. Displays the clock. Displays on /off. Confirms the selection. Enters the number. Basics Button G SOURCE LIST 7 6 CLOCK DISP DVD MENU TOP MENU DVD AUDIO SUBTITLE ANGLE ZOOM GOTO Operations Exits from the menu. Displays the item list for the source. Adjusts the volume level. Selects the audio language. Stops playback. Displays the function menu...
..., replace the batteries. • Aim the remote control directly at the remote sensor on the faceplate. • DO NOT expose the remote sensor to previous layer during menu operation. Mutes/restores the sound. Displays the clock. Displays on /off. Confirms the selection. Enters the number. Basics Button G SOURCE LIST 7 6 CLOCK DISP DVD MENU TOP MENU DVD AUDIO SUBTITLE ANGLE ZOOM GOTO Operations Exits from the menu. Displays the item list for the source. Adjusts the volume level. Selects the audio language. Stops playback. Displays the function menu...
Instruction Manual
Page 6
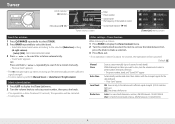
... to display the [Tuner function] menu. 2 Turn the volume knob to select the item to set (see the table below), then press the knob to make a selection. 3 Press G to exit. • If no operation is done for about 10 seconds, the operation will be canceled. • To exit, press G. Local Seek ON: Tunes in station Sound mode indicator (➜ 11) [Tuner List] menu screen Search for a station 1 Press L/SOURCE repeatedly to select [TUNER...
... to display the [Tuner function] menu. 2 Turn the volume knob to select the item to set (see the table below), then press the knob to make a selection. 3 Press G to exit. • If no operation is done for about 10 seconds, the operation will be canceled. • To exit, press G. Local Seek ON: Tunes in station Sound mode indicator (➜ 11) [Tuner List] menu screen Search for a station 1 Press L/SOURCE repeatedly to select [TUNER...
Instruction Manual
Page 7
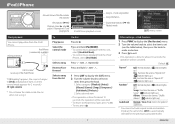
... number Song information Sound mode indicator (➜ 11) Playback mode [LIST] menu screen Start playback You cannot play /8: pause) / Playing time / Total playing time iPod/iPhone playback screen Song no operation is done for about 10 seconds, the operation will be canceled. iPod/iPhone Artwork (shown if the file contains the artwork) HBS indicator (➜ 11) Playback status (3: play video from the list Do this unit, select [Head Unit Mode]. • To control music playback from the iPod/ iPhone, select [iPod Mode]. USB input...
... number Song information Sound mode indicator (➜ 11) Playback mode [LIST] menu screen Start playback You cannot play /8: pause) / Playing time / Total playing time iPod/iPhone playback screen Song no operation is done for about 10 seconds, the operation will be canceled. iPod/iPhone Artwork (shown if the file contains the artwork) HBS indicator (➜ 11) Playback status (3: play video from the list Do this unit, select [Head Unit Mode]. • To control music playback from the iPod/ iPhone, select [iPod Mode]. USB input...
Instruction Manual
Page 8
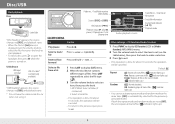
... to display [CD function] (CD) or [Media function] (MP3/WMA) menu. 2 Turn the volume knob to select the item to set to [OFF], the unit repeats all files in the current folder. ( indicator lights up .) 8 USB device USB input terminal USB 2.0 cable* (commercially available) "USB Reading" appears, the source changes to open the faceplate, then press 0 while the power is turned on. Press and hold T/S. 1 Press LIST to display [LIST] menu. 2 When the disc/device contains...
... to display [CD function] (CD) or [Media function] (MP3/WMA) menu. 2 Turn the volume knob to select the item to set to [OFF], the unit repeats all files in the current folder. ( indicator lights up .) 8 USB device USB input terminal USB 2.0 cable* (commercially available) "USB Reading" appears, the source changes to open the faceplate, then press 0 while the power is turned on. Press and hold T/S. 1 Press LIST to display [LIST] menu. 2 When the disc/device contains...
Instruction Manual
Page 9
... item switches between chapter, title, and time. 2 Press the number button to select a chapter/title/scene. 3 Press ENTER. Display the disc menu Press DVD MENU or TOP MENU. (DVD) Search for about 10 seconds, the operation will be canceled. • To return to the previous layer, press T. • DVD/VCD: To exit, press G. 9 Disc/USB Playback file type : Audio : Picture : Video [LIST] menu screen Various disc operations from the remote control (RM-RK257) Display the...
... item switches between chapter, title, and time. 2 Press the number button to select a chapter/title/scene. 3 Press ENTER. Display the disc menu Press DVD MENU or TOP MENU. (DVD) Search for about 10 seconds, the operation will be canceled. • To return to the previous layer, press T. • DVD/VCD: To exit, press G. 9 Disc/USB Playback file type : Audio : Picture : Video [LIST] menu screen Various disc operations from the remote control (RM-RK257) Display the...
Instruction Manual
Page 10
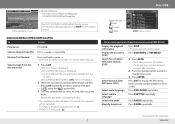
... optimum audio output. MPEG4 One: Repeats current track/file. Selects the subtitle language. Selects the view angle. 16:9 / 4:3: Selects the aspect ratio. ON: Activates the PBC function. Disc/USB External Components Other settings-DVD function/VCD function/Media function 1 Press FUNC to display the [DVD function] (DVD), [VCD function] (VCD), or [Media function] (MPEG1/MPEG2/MPEG4) menu. 2 Turn the volume knob to select the item to set (see "Installation/Connection". (➜ 17) When a rear view camera is connected, the rear view screen is displayed when...
... optimum audio output. MPEG4 One: Repeats current track/file. Selects the subtitle language. Selects the view angle. 16:9 / 4:3: Selects the aspect ratio. ON: Activates the PBC function. Disc/USB External Components Other settings-DVD function/VCD function/Media function 1 Press FUNC to display the [DVD function] (DVD), [VCD function] (VCD), or [Media function] (MPEG1/MPEG2/MPEG4) menu. 2 Turn the volume knob to select the item to set (see "Installation/Connection". (➜ 17) When a rear view camera is connected, the rear view screen is displayed when...
Instruction Manual
Page 11
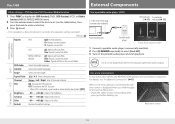
... select [Dimmer Low] or [Dimmer High]. F12 (00): Adjusts the front and rear speaker output balance. Language English / Spanish: Selects the text language used for on the [Setting] menu 1 Press MENU to display the top menu screen. 2 Turn the volume knob to select [Setting], then press the knob to display the setting menu. 3 Turn the volume knob to select the category ( : [Setting / Audio]/ : [Setting / General]), then press the knob. 4 Turn the volume knob to select the item to set ([Bass]/[Treble]), then press the knob. 6 Turn...
... select [Dimmer Low] or [Dimmer High]. F12 (00): Adjusts the front and rear speaker output balance. Language English / Spanish: Selects the text language used for on the [Setting] menu 1 Press MENU to display the top menu screen. 2 Turn the volume knob to select [Setting], then press the knob to display the setting menu. 3 Turn the volume knob to select the category ( : [Setting / Audio]/ : [Setting / General]), then press the knob. 4 Turn the volume knob to select the item to set ([Bass]/[Treble]), then press the knob. 6 Turn...
Instruction Manual
Page 12
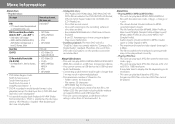
...; Unplayable discs: - This unit can play back JPEG files with coloring on a USB mass storage class device. • You cannot connect a USB device via a USB hub and Multi Card Reader. • Connecting a cable whose rating is also playable (except for : - The maximum bit rate for video signals (average) is loaded. +RW double layer discs are not round. - DVD-RW dual layer discs are at Low Level)/ MPEG...
...; Unplayable discs: - This unit can play back JPEG files with coloring on a USB mass storage class device. • You cannot connect a USB device via a USB hub and Multi Card Reader. • Connecting a cable whose rating is also playable (except for : - The maximum bit rate for video signals (average) is loaded. +RW double layer discs are not round. - DVD-RW dual layer discs are at Low Level)/ MPEG...
Instruction Manual
Page 13
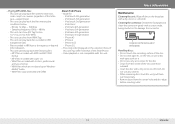
... the faceplate) Handling discs: • Do not touch the recording surface of the letter case-upper/lower). - Cleaning the connector: Detach the faceplate and clean the connector gently with a dry silicon or soft cloth. • Playing MP3/WMA files: - This unit can play back files recorded in elapsed time indication. - iPod touch 3rd generation - Connector (on the selection menu of this unit. This unit can play...
... the faceplate) Handling discs: • Do not touch the recording surface of the letter case-upper/lower). - Cleaning the connector: Detach the faceplate and clean the connector gently with a dry silicon or soft cloth. • Playing MP3/WMA files: - This unit can play back files recorded in elapsed time indication. - iPod touch 3rd generation - Connector (on the selection menu of this unit. This unit can play...
Instruction Manual
Page 14
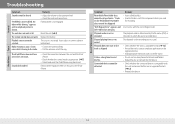
... time to the optimum level. • Check the cords and connections. Remedy • Adjust the volume to read the file. Insert a disc or connect a device beforehand. • Connect the antenna firmly. • Pull the antenna out all . Elapsed playing time is shown. Connected device cannot be skippped. The playback order is not as intended. "PARKING is skipped. Sound id distorded. • Check the connection between this unit or the iPod/ iPhone. iPod/iPhone Tuner Discs/USB device...
... time to the optimum level. • Check the cords and connections. Remedy • Adjust the volume to read the file. Insert a disc or connect a device beforehand. • Connect the antenna firmly. • Pull the antenna out all . Elapsed playing time is shown. Connected device cannot be skippped. The playback order is not as intended. "PARKING is skipped. Sound id distorded. • Check the connection between this unit or the iPod/ iPhone. iPod/iPhone Tuner Discs/USB device...
Instruction Manual
Page 15
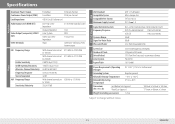
... Specifications Amplifier Maximum Power Output Continuous Power Output (RMS) Load Impedance Audio Output Level (REAR OUT) Video Output (composite) (VIDEO OUT) Other terminals Front/Rear Front/Rear 50 W per channel 20 W per channel 4 Ω (4 Ω to 8 Ω allowance) Line-Out Level/ Impedance Output Impedance Color System Video-out Level/ Impedance Input 2.5 V/10 kΩ load (full scale) 1 kΩ NTSC 1 Vp-p/75 Ω Camera In, USB input, AUX, Antenna input FM Frequency Range Usable Sensitivity 50 dB Quieting Sensitivity Alternate Channel Selectivity Frequency Response Stereo...
... Specifications Amplifier Maximum Power Output Continuous Power Output (RMS) Load Impedance Audio Output Level (REAR OUT) Video Output (composite) (VIDEO OUT) Other terminals Front/Rear Front/Rear 50 W per channel 20 W per channel 4 Ω (4 Ω to 8 Ω allowance) Line-Out Level/ Impedance Output Impedance Color System Video-out Level/ Impedance Input 2.5 V/10 kΩ load (full scale) 1 kΩ NTSC 1 Vp-p/75 Ω Camera In, USB input, AUX, Antenna input FM Frequency Range Usable Sensitivity 50 dB Quieting Sensitivity Alternate Channel Selectivity Frequency Response Stereo...

Instruction Manual
Page 16
... after installation. Installing the unit (in-dash mounting) * Do the required wiring.(➜ 17) F B C A B When installing without the mounting sleeve Flat head screws (supplied (I): M5 × 8 mm) or round head screws (not supplied: M5 × 6 mm) HG * Bend the appropriate tabs to the car's chassis again after use of the car battery. 5 Reset the unit. (➜ 4) F C A * *1 Face the side with one that has the same rating. Installation/Connection Warning...
... after installation. Installing the unit (in-dash mounting) * Do the required wiring.(➜ 17) F B C A B When installing without the mounting sleeve Flat head screws (supplied (I): M5 × 8 mm) or round head screws (not supplied: M5 × 6 mm) HG * Bend the appropriate tabs to the car's chassis again after use of the car battery. 5 Reset the unit. (➜ 4) F C A * *1 Face the side with one that has the same rating. Installation/Connection Warning...
Instruction Manual
Page 17
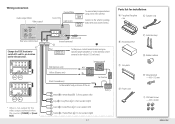
Wiring connection Audio output (Rear) Video output* Video Out L R Rear Camera In Rear view camera input E Change the FUSE location to switch ACC and B+ pin location on the ISO connector. * Video is [TUNER] or [Front AUX]. M5 × 12 mm I Flat head screws - Antenna cord Antenna terminal D Blue POWER ANT/ REMOTE OUT To the power control terminal when using a rear view camera) Connect to the antenna control terminal in the vehicle (150 mA max) Ignition switch Red (Ignition wire) ACC Yellow (Battery wire) B+ Black (Ground wire) To the metallic body or chassis of...
Wiring connection Audio output (Rear) Video output* Video Out L R Rear Camera In Rear view camera input E Change the FUSE location to switch ACC and B+ pin location on the ISO connector. * Video is [TUNER] or [Front AUX]. M5 × 12 mm I Flat head screws - Antenna cord Antenna terminal D Blue POWER ANT/ REMOTE OUT To the power control terminal when using a rear view camera) Connect to the antenna control terminal in the vehicle (150 mA max) Ignition switch Red (Ignition wire) ACC Yellow (Battery wire) B+ Black (Ground wire) To the metallic body or chassis of...


