Instruction Manual
Page 2
... the FCC Rules. special handling may generate or use radio frequency energy. Un tratamiento correcto del reciclaje y la eliminación de residuos ayuda a conservar los recursos y evita al mismo tiempo efectos perjudiciales en la salud y el medio ambiente. CAUTION Use of controls or adjustments or performance of procedures other than those specified herein may result in the instruction manual.
... the FCC Rules. special handling may generate or use radio frequency energy. Un tratamiento correcto del reciclaje y la eliminación de residuos ayuda a conservar los recursos y evita al mismo tiempo efectos perjudiciales en la salud y el medio ambiente. CAUTION Use of controls or adjustments or performance of procedures other than those specified herein may result in the instruction manual.
Instruction Manual
Page 4
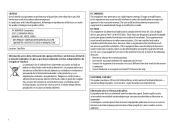
... or leave any metallic objects (such as on the faceplate of explosion if replaced incorrectly. CONTENTS BEFORE USE 2 BASICS 3 GETTING STARTED 4 CD / USB / iPod 5 RADIO 7 AUX 8 Pandora® 9 iHeartRadio® 10 SiriusXM® Radio (for KD-AR959BS) 11 BLUETOOTH® 13 AUDIO SETTINGS 19 DISPLAY SETTINGS 20 MORE INFORMATION 21 TROUBLESHOOTING 23 INSTALLATION / CONNECTION 26 SPECIFICATIONS 29 How to read this unit, pull them out horizontally. • Remove burrs from safe...
... or leave any metallic objects (such as on the faceplate of explosion if replaced incorrectly. CONTENTS BEFORE USE 2 BASICS 3 GETTING STARTED 4 CD / USB / iPod 5 RADIO 7 AUX 8 Pandora® 9 iHeartRadio® 10 SiriusXM® Radio (for KD-AR959BS) 11 BLUETOOTH® 13 AUDIO SETTINGS 19 DISPLAY SETTINGS 20 MORE INFORMATION 21 TROUBLESHOOTING 23 INSTALLATION / CONNECTION 26 SPECIFICATIONS 29 How to read this unit, pull them out horizontally. • Remove burrs from safe...
Instruction Manual
Page 5
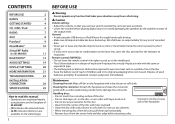
... sunlight.) Detach button How to reset Pull out the insulation sheet when using for the first time. Do this (on the faceplate) Press B/SOURCE. • Press and hold to replace the battery To Turn on the remote control) ( not available ) Press VOL + or VOL -. Do this (on the power Adjust the volume Select a source Change the display information Your preset adjustments will also be erased. Press to mute the sound or pause...
... sunlight.) Detach button How to reset Pull out the insulation sheet when using for the first time. Do this (on the faceplate) Press B/SOURCE. • Press and hold to replace the battery To Turn on the remote control) ( not available ) Press VOL + or VOL -. Do this (on the power Adjust the volume Select a source Change the display information Your preset adjustments will also be erased. Press to mute the sound or pause...
Instruction Manual
Page 9
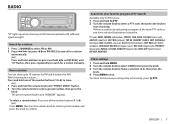
... music), HIP HOP, WEATHER Other settings 1 Press and hold the volume knob until "M" flashes, then press repeatedly to search for a station manually. Press and hold one of the same PTY code as you have selected, that station is a station broadcasting a program of the number buttons (1 to 6). (or) Press MENU, then turn the volume knob to select a preset number and press the knob to confirm. If there is tuned in. RADIO "ST" lights...
... music), HIP HOP, WEATHER Other settings 1 Press and hold the volume knob until "M" flashes, then press repeatedly to search for a station manually. Press and hold one of the same PTY code as you have selected, that station is a station broadcasting a program of the number buttons (1 to 6). (or) Press MENU, then turn the volume knob to select a preset number and press the knob to confirm. If there is tuned in. RADIO "ST" lights...
Instruction Manual
Page 10
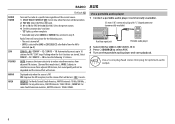
...) Auxiliary input jack Portable audio player 2 Select [ON] for FM. Use a 3-core plug head stereo mini plug for AM): Select the preset station. 4 Set the activation day* and time. • "M" lights up to 18 stations for [AUX] in step 1. OFF: Cancels. AREA SA: For some South American countries, AM/FM intervals: 10 kHz/50 kHz. WIDE: Subjects to 06 (for optimum audio output. 8 Displayed only when the source is selected in [SRC SELECT]. ( 4) 3 Press B/SOURCE to select AUX. 4 Turn...
...) Auxiliary input jack Portable audio player 2 Select [ON] for FM. Use a 3-core plug head stereo mini plug for AM): Select the preset station. 4 Set the activation day* and time. • "M" lights up to 18 stations for [AUX] in step 1. OFF: Cancels. AREA SA: For some South American countries, AM/FM intervals: 10 kHz/50 kHz. WIDE: Subjects to 06 (for optimum audio output. 8 Displayed only when the source is selected in [SRC SELECT]. ( 4) 3 Press B/SOURCE to select AUX. 4 Turn...
Instruction Manual
Page 13
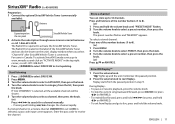
... the volume knob until "PRESET MODE" flashes. 2 Turn the volume knob to search for KD-AR959BS) Preparation: 1 Connect the optional SiriusXM Vehicle Tuner (commercially available). Start listening 1 Press B/SOURCE to select SIRIUS XM. 2 Press MENU. 3 Turn the volume knob to select a CATEGORY, then press the knob. 4 Turn the volume knob to [ON]) is selected, all the available channels will be shown on RM-RK52. The preset number flashes and "MEMORY" appears. If a locked channel or a mature channel...
... the volume knob until "PRESET MODE" flashes. 2 Turn the volume knob to search for KD-AR959BS) Preparation: 1 Connect the optional SiriusXM Vehicle Tuner (commercially available). Start listening 1 Press B/SOURCE to select SIRIUS XM. 2 Press MENU. 3 Turn the volume knob to select a CATEGORY, then press the knob. 4 Turn the volume knob to [ON]) is selected, all the available channels will be shown on RM-RK52. The preset number flashes and "MEMORY" appears. If a locked channel or a mature channel...
Instruction Manual
Page 15
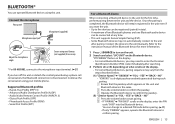
... necessary. * For KD-AR959BS, connect to the microphone input terminal. ( 27) If you turn on the unit. 2 Search and select "JVC UNIT" on the display. • For some Bluetooth devices, you reset the unit. • Up to five devices can be connected at any time. • This unit supports Secure Simple Pairing (SSP). • Some Bluetooth devices may need to enter the Personal Identification Number (PIN) code immediately after pairing. YES" "BACK - NO" Press the volume knob to...
... necessary. * For KD-AR959BS, connect to the microphone input terminal. ( 27) If you turn on the unit. 2 Search and select "JVC UNIT" on the display. • For some Bluetooth devices, you reset the unit. • Up to five devices can be connected at any time. • This unit supports Secure Simple Pairing (SSP). • Some Bluetooth devices may need to enter the Personal Identification Number (PIN) code immediately after pairing. YES" "BACK - NO" Press the volume knob to...
Instruction Manual
Page 16
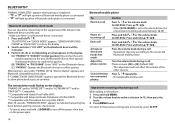
...turn off the power, then turn on the Bluetooth device. (C) "PAIRING": Operate the Bluetooth device to the connected Bluetooth mobile phone. Improve the sound quality during a call . • Operations may vary according to confirm pairing. Turn the volume knob during a call . Press the volume knob during a call Activate or deactivate hands-free mode Adjust the phone volume Switch between the Bluetooth device and the unit. • Make sure there is no Bluetooth device connected. 1 Press and hold MENU. 2 Turn the volume knob to make a selection ( knob. 3 Press MENU...
...turn off the power, then turn on the Bluetooth device. (C) "PAIRING": Operate the Bluetooth device to the connected Bluetooth mobile phone. Improve the sound quality during a call . • Operations may vary according to confirm pairing. Turn the volume knob during a call . Press the volume knob during a call Activate or deactivate hands-free mode Adjust the phone volume Switch between the Bluetooth device and the unit. • Make sure there is no Bluetooth device connected. 1 Press and hold MENU. 2 Turn the volume knob to make a selection ( knob. 3 Press MENU...
Instruction Manual
Page 17
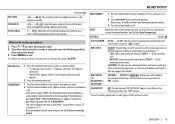
... being heard during a phone conversation. 1 - 10 (4): Adjust the echo cancellation delay time until the least echo is being heard during a phone conversation. To return to select a name or a phone number. • ">" indicates call received, " RECENT CALL PHONEBOOK 1 Press the volume knob to the previous setting item or hierarchy, press G PTY. Bluetooth mode operations 1 Press to enter Bluetooth mode. 2 Turn the volume knob to make a selection (see the following table...
... being heard during a phone conversation. 1 - 10 (4): Adjust the echo cancellation delay time until the least echo is being heard during a phone conversation. To return to select a name or a phone number. • ">" indicates call received, " RECENT CALL PHONEBOOK 1 Press the volume knob to the previous setting item or hierarchy, press G PTY. Bluetooth mode operations 1 Press to enter Bluetooth mode. 2 Turn the volume knob to make a selection (see the following table...
Instruction Manual
Page 18
... the knob. 5 Turn the volume knob to select a phone number, then press the knob to call from the preset memory, select [DIAL NUMBER] in memory You can search through the unit. • To clear the message, press any button. Store a contact in step 2 and store a blank number. To erase a contact from memory 1 Press to enter Bluetooth mode. 2 Press one of iPhone. The connected phone (which has been paired the earliest...
... the knob. 5 Turn the volume knob to select a phone number, then press the knob to call from the preset memory, select [DIAL NUMBER] in memory You can search through the unit. • To clear the message, press any button. Store a contact in step 2 and store a blank number. To erase a contact from memory 1 Press to enter Bluetooth mode. 2 Press one of iPhone. The connected phone (which has been paired the earliest...
Instruction Manual
Page 19
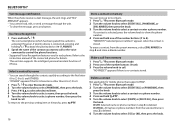
... the connected phone supports OPP. PRIORITY Selects a device to move the entry position. SET PINCODE (0000) Changes the PIN code (up to the previous setting item or hierarchy, press G PTY. NO: Cancels. ENGLISH | 17 APPLICATION Shows the connected phone name using the JVC Smart Music Control*1 app. OFF: Cancels. INFORMATION MY BT NAME: Displays the unit name (JVC UNIT). ; Default: XX PHONE AUDIO Selects the phone or audio device to exit. BLUETOOTH® Bluetooth mode settings 1 Press and hold MENU. 2 Turn the volume...
... the connected phone supports OPP. PRIORITY Selects a device to move the entry position. SET PINCODE (0000) Changes the PIN code (up to the previous setting item or hierarchy, press G PTY. NO: Cancels. ENGLISH | 17 APPLICATION Shows the connected phone name using the JVC Smart Music Control*1 app. OFF: Cancels. INFORMATION MY BT NAME: Displays the unit name (JVC UNIT). ; Default: XX PHONE AUDIO Selects the phone or audio device to exit. BLUETOOTH® Bluetooth mode settings 1 Press and hold MENU. 2 Turn the volume...
Instruction Manual
Page 22
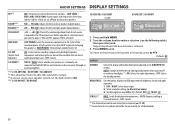
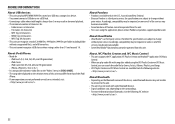
...): Adjusts the left and right speaker output balance. Before adjustment, select the source you turn off from the front/rear speakers. OFF: Cancels. AUDIO SETTINGS DISPLAY SETTINGS HPF *3 OFF: All signals are using a two-speaker system, set the fader level to [00]. *6 For KD-R950BT / KD-R850BT. L/O MODE*6 SUB.W / REAR: Selects whether rear speakers or a subwoofer are connected to the REAR/SW line out terminals on the car headlights.*1 ; To return to 31). (Default: DAY: 31 ; BRIGHTNESS Sets the button, display and USB input terminal...
...): Adjusts the left and right speaker output balance. Before adjustment, select the source you turn off from the front/rear speakers. OFF: Cancels. AUDIO SETTINGS DISPLAY SETTINGS HPF *3 OFF: All signals are using a two-speaker system, set the fader level to [00]. *6 For KD-R950BT / KD-R850BT. L/O MODE*6 SUB.W / REAR: Selects whether rear speakers or a subwoofer are connected to the REAR/SW line out terminals on the car headlights.*1 ; To return to 31). (Default: DAY: 31 ; BRIGHTNESS Sets the button, display and USB input terminal...
Instruction Manual
Page 23
... KD-AR959BS / KD-R950BT) PRESET You can select a color for setting. ( 20) 2 RED / GREEN / BLUE: Select a primary color. 3 00 to the default color. For [ALL ZONE], you have not been finalized. - 8 cm CD. DAY COLOR NIGHT COLOR Store your car's headlight. Display zone will change depending on the recording surface or discs that are not round. - OFF: Cancels. [NIGHT COLOR] or [DAY COLOR] is shown. • COLOR FLOW 01 to [USER...
... KD-AR959BS / KD-R950BT) PRESET You can select a color for setting. ( 20) 2 RED / GREEN / BLUE: Select a primary color. 3 00 to the default color. For [ALL ZONE], you have not been finalized. - 8 cm CD. DAY COLOR NIGHT COLOR Store your car's headlight. Display zone will change depending on the recording surface or discs that are not round. - OFF: Cancels. [NIGHT COLOR] or [DAY COLOR] is shown. • COLOR FLOW 01 to [USER...
Instruction Manual
Page 24
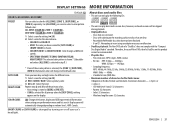
... pandora-support@pandora.com. Accordingly, compatibility may be operated from that of characters for - iPhone, iPhone 3G, 3GS, 4, 4S, 5 • It is longer than 5 V and exceeds 1 A. About iPod/iPhone • Made for : - iPod classic - MORE INFORMATION About USB devices • This unit can play audio file with some Bluetooth devices. • Signal conditions vary, depending on a USB mass storage class device. • You cannot connect a USB device via a USB hub. • Connecting a cable...
... pandora-support@pandora.com. Accordingly, compatibility may be operated from that of characters for - iPhone, iPhone 3G, 3GS, 4, 4S, 5 • It is longer than 5 V and exceeds 1 A. About iPod/iPhone • Made for : - iPod classic - MORE INFORMATION About USB devices • This unit can play audio file with some Bluetooth devices. • Signal conditions vary, depending on a USB mass storage class device. • You cannot connect a USB device via a USB hub. • Connecting a cable...
Instruction Manual
Page 25
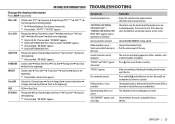
.... • Adjust the volume to the optimum level. • Check the cords and connections. the radio. alternately. Playback order is poor. / • Connect the antenna firmly. "NOT SUPPORT" appears and track skips. USB-IPOD Playing time Day/Clock Album title/Artist*7 Track title*7 (back to the beginning) *8 If unavailable, station name appears. Check the [SRC SELECT] setting. ( 4) Radio reception is not as intended. This unit can be selected. Be careful...
.... • Adjust the volume to the optimum level. • Check the cords and connections. the radio. alternately. Playback order is poor. / • Connect the antenna firmly. "NOT SUPPORT" appears and track skips. USB-IPOD Playing time Day/Clock Album title/Artist*7 Track title*7 (back to the beginning) *8 If unavailable, station name appears. Check the [SRC SELECT] setting. ( 4) Radio reception is not as intended. This unit can be selected. Be careful...
Instruction Manual
Page 26
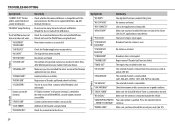
... selected channel is compatible with this unit and iPod/iPhone. "CHK ANTENNA" Check the antenna and its limit. "NO STATIONS" No stations are in . TROUBLESHOOTING Symptom Remedy "CANNOT PLAY" flashes • Check whether the connected device is locked. "READING" keeps flashing. • Do not use too many hierarchical levels and folders. • Reload the disc or reattach the USB device. turn on your device. Pandora "STATION LIM" The number of the iHeart Link for JVC application...
... selected channel is compatible with this unit and iPod/iPhone. "CHK ANTENNA" Check the antenna and its limit. "NO STATIONS" No stations are in . TROUBLESHOOTING Symptom Remedy "CANNOT PLAY" flashes • Check whether the connected device is locked. "READING" keeps flashing. • Do not use too many hierarchical levels and folders. • Reload the disc or reattach the USB device. turn on your device. Pandora "STATION LIM" The number of the iHeart Link for JVC application...
Instruction Manual
Page 27
... PIN code to the unit. The connected phone does not support Voice Recognition feature. "PAIRING FULL" appears. Echo or noise occurs. Update the Bluetooth firmware. ( 4) If you can get a better signal reception. TROUBLESHOOTING Symptom The unit does not respond when you have any troubles, try the operation again. "H/W ERROR" appears. Bluetooth® Bluetooth® Symptom No Bluetooth device is poor. Phone sound quality is detected. If "H/W ERROR" appears again, consult your device and connect manually...
... PIN code to the unit. The connected phone does not support Voice Recognition feature. "PAIRING FULL" appears. Echo or noise occurs. Update the Bluetooth firmware. ( 4) If you can get a better signal reception. TROUBLESHOOTING Symptom The unit does not respond when you have any troubles, try the operation again. "H/W ERROR" appears. Bluetooth® Bluetooth® Symptom No Bluetooth device is poor. Phone sound quality is detected. If "H/W ERROR" appears again, consult your device and connect manually...
Instruction Manual
Page 28
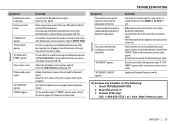
... the mounting sleeve Use only the specified screws. See Wiring connection. ( 27, 28) 3 Install the unit to your vehicle. How to professionals. Metal parts such as the heat sink and enclosure become hot. • Do not connect the wires of speakers to the car chassis or Ground wire (black), or connect them in parallel. • Connect speakers with a maximum power of the car battery. 5 Reset the unit. ( 3) 26 Installing the unit (in-dash mounting) Hook...
... the mounting sleeve Use only the specified screws. See Wiring connection. ( 27, 28) 3 Install the unit to your vehicle. How to professionals. Metal parts such as the heat sink and enclosure become hot. • Do not connect the wires of speakers to the car chassis or Ground wire (black), or connect them in parallel. • Connect speakers with a maximum power of the car battery. 5 Reset the unit. ( 3) 26 Installing the unit (in-dash mounting) Hook...
Instruction Manual
Page 29
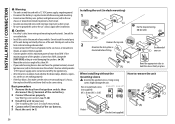
...red wire Make this connection if your vehicle factory wiring harness does not have "12 V ignition switch" wire. ENGLISH | 27 Wiring connection (for KD-AR959BS) Vehicle dashboard Rear output Front output Subwoofer output Signal cord (not supplied) JVC Amplifier Fuse (10 A) MIC (Microphone input terminal) ( 13) Factory wiring harness (vehicle) Vehicle-specific Wiring Harness (separately purchased) For more information: Metra Electronics: www.metraonline.com Scosche Industries: www.scosche.com To the steering wheel remote control adapter Recommended connection Blue: To power antenna Blue...
...red wire Make this connection if your vehicle factory wiring harness does not have "12 V ignition switch" wire. ENGLISH | 27 Wiring connection (for KD-AR959BS) Vehicle dashboard Rear output Front output Subwoofer output Signal cord (not supplied) JVC Amplifier Fuse (10 A) MIC (Microphone input terminal) ( 13) Factory wiring harness (vehicle) Vehicle-specific Wiring Harness (separately purchased) For more information: Metra Electronics: www.metraonline.com Scosche Industries: www.scosche.com To the steering wheel remote control adapter Recommended connection Blue: To power antenna Blue...
Instruction Manual
Page 30
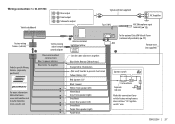
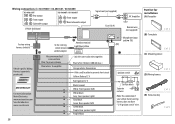
... switch" wire. Part list for KD-R950BT / KD-AR855BT / KD-R850BT) KD-AR855BT Rear output Front output Subwoofer output KD-R950BT / KD-R850BT Front output Rear/subwoofer output Vehicle dashboard Signal cord (not supplied) Fuse (10 A) JVC Amplifier Remote wire (not supplied) Factory wiring harness (vehicle) Vehicle-specific Wiring Harness (separately purchased) For more information: Metra Electronics: www.metraonline.com Scosche Industries: www.scosche.com 28 To the steering wheel remote control adapter Recommended connection Blue: To power antenna Blue/white: To amplifier Antenna...
... switch" wire. Part list for KD-R950BT / KD-AR855BT / KD-R850BT) KD-AR855BT Rear output Front output Subwoofer output KD-R950BT / KD-R850BT Front output Rear/subwoofer output Vehicle dashboard Signal cord (not supplied) Fuse (10 A) JVC Amplifier Remote wire (not supplied) Factory wiring harness (vehicle) Vehicle-specific Wiring Harness (separately purchased) For more information: Metra Electronics: www.metraonline.com Scosche Industries: www.scosche.com 28 To the steering wheel remote control adapter Recommended connection Blue: To power antenna Blue/white: To amplifier Antenna...


