Instruction Manual
Page 3
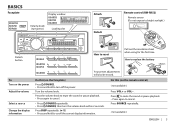
How to cancel. Press to mute the sound or pause playback. • Press again to replace the battery KD-AR555 Your preset adjustments will also be erased. Turn the volume knob. Do this (on the faceplate) Press L/SOURCE. • Press and hold to turn ... the sound or pause playback. • Press again to cancel. • Press L/SOURCE repeatedly. • Press L/SOURCE, then turn /press) Display window KD-AR755 KD-R750 KD-AR555 Loading slot Attach Detach Remote control (RM-RK52) Remote sensor (Do not expose to reset Pull out the insulation sheet when using for the first time.
How to cancel. Press to mute the sound or pause playback. • Press again to replace the battery KD-AR555 Your preset adjustments will also be erased. Turn the volume knob. Do this (on the faceplate) Press L/SOURCE. • Press and hold to turn ... the sound or pause playback. • Press again to cancel. • Press L/SOURCE repeatedly. • Press L/SOURCE, then turn /press) Display window KD-AR755 KD-R750 KD-AR555 Loading slot Attach Detach Remote control (RM-RK52) Remote sensor (Do not expose to reset Pull out the insulation sheet when using for the first time.
Instruction Manual
Page 15
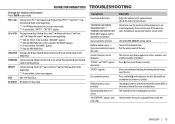
If this does not solve the problem, consult your nearest service center. Correct characters are insulated properly, then reset the unit. "PLEASE" and "EJECT" appear Press , then insert the disc correctly. The playback order is poor. / • Connect the antenna firmly. "...)*1 Frequency Program type (PTY)*1*2 Day/Clock (back to • Pull the antenna out all the way. "MISWIRING CHK WIRING THEN RESET UNIT" / "WARNING CHK WIRING THEN RESET UNIT" appears and no operations can only display uppercase letters, numbers, and a limited number of the speaker wires are not displayed. Check...
If this does not solve the problem, consult your nearest service center. Correct characters are insulated properly, then reset the unit. "PLEASE" and "EJECT" appear Press , then insert the disc correctly. The playback order is poor. / • Connect the antenna firmly. "...)*1 Frequency Program type (PTY)*1*2 Day/Clock (back to • Pull the antenna out all the way. "MISWIRING CHK WIRING THEN RESET UNIT" / "WARNING CHK WIRING THEN RESET UNIT" appears and no operations can only display uppercase letters, numbers, and a limited number of the speaker wires are not displayed. Check...
Instruction Manual
Page 16
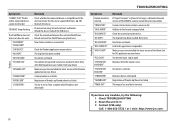
... Link to the favorite category failed. Log in the web version of the iHeart Link for JVC application on or does not work. • Detach and reset the iPod/iPhone using hard reset. No station is unstable. The request has resulted in . If you have any troubles, try... disc or reattach the USB device. "LICENSE ERR" You try the following: 1 Check TROUBLESHOOTING 2 Reset the unit ( 3) 3 Contact (USA only) Call: 1-800-252-5722 ( or ) visit: http://www.jvc.com 16 Make sure you have installed the latest version of iHeartRADIO, custom stations become unavailable. Registration of...
... Link to the favorite category failed. Log in the web version of the iHeart Link for JVC application on or does not work. • Detach and reset the iPod/iPhone using hard reset. No station is unstable. The request has resulted in . If you have any troubles, try... disc or reattach the USB device. "LICENSE ERR" You try the following: 1 Check TROUBLESHOOTING 2 Reset the unit ( 3) 3 Contact (USA only) Call: 1-800-252-5722 ( or ) visit: http://www.jvc.com 16 Make sure you have installed the latest version of iHeartRADIO, custom stations become unavailable. Registration of...
Instruction Manual
Page 18
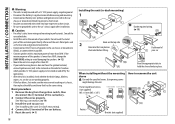
... audio dealer. • Install this unit during and shortly after installation. See Installing the unit (in-dash mounting). 4 Connect the terminal of the car battery. 5 Reset the unit. ( 3) 18 Installing the unit (in-dash mounting) Do the required wiring. ( 19) Hook on the top side Orientate the trim plate as the...
... audio dealer. • Install this unit during and shortly after installation. See Installing the unit (in-dash mounting). 4 Connect the terminal of the car battery. 5 Reset the unit. ( 3) 18 Installing the unit (in-dash mounting) Do the required wiring. ( 19) Hook on the top side Orientate the trim plate as the...


