Instruction Manual
Page 1
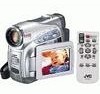
... Wide Web for Digital Video Camera: http://www.jvc.co.jp/english/cyber/ For Accessories: http://www.jvc.co.jp/english/accessory/ Dear Customer, Thank you for future reference. DIGITAL VIDEO CAMERA GR-D290 GR-D270 Please visit our Homepage on the bottom of this information for purchasing this digital video camera. Model No. To deactivate the demonstration, set "DEMO MODE" to ensure safe use of the camcorder. Before use, please read the...
... Wide Web for Digital Video Camera: http://www.jvc.co.jp/english/cyber/ For Accessories: http://www.jvc.co.jp/english/accessory/ Dear Customer, Thank you for future reference. DIGITAL VIDEO CAMERA GR-D290 GR-D270 Please visit our Homepage on the bottom of this information for purchasing this digital video camera. Model No. To deactivate the demonstration, set "DEMO MODE" to ensure safe use of the camcorder. Before use, please read the...
Instruction Manual
Page 5
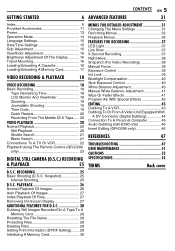
.../Unloading A Cassette 16 Loading/Unloading A Memory Card 17 VIDEO RECORDING & PLAYBACK 18 VIDEO RECORDING 18 Basic Recording 18 Tape Remaining Time 18 LCD Monitor And Viewfinder 18 Zooming 19 Journalistic Shooting 19 Time Code 19 Quick Review 20 Recording From The Middle Of A Tape...... 20 VIDEO PLAYBACK 20 Normal Playback 20 Still Playback 20 Shuttle Search 21 Blank Search 21 Connections To A TV Or VCR 22 Playback Using The Remote Control (GR-D290 only 23 DIGITAL STILL CAMERA (D.S.C.) RECORDING & PLAYBACK 25 D.S.C. Snapshot 25 Interval Shooting 25 D.S.C. PLAYBACK 26...
.../Unloading A Cassette 16 Loading/Unloading A Memory Card 17 VIDEO RECORDING & PLAYBACK 18 VIDEO RECORDING 18 Basic Recording 18 Tape Remaining Time 18 LCD Monitor And Viewfinder 18 Zooming 19 Journalistic Shooting 19 Time Code 19 Quick Review 20 Recording From The Middle Of A Tape...... 20 VIDEO PLAYBACK 20 Normal Playback 20 Still Playback 20 Shuttle Search 21 Blank Search 21 Connections To A TV Or VCR 22 Playback Using The Remote Control (GR-D290 only 23 DIGITAL STILL CAMERA (D.S.C.) RECORDING & PLAYBACK 25 D.S.C. Snapshot 25 Interval Shooting 25 D.S.C. PLAYBACK 26...
Instruction Manual
Page 7
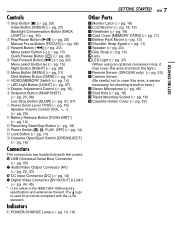
... P USB (Universal Serial Bus) Connector (੬ pg. 45) Q Audio/Video Output Connector [AV] (੬ pg. 22, 43) R DC Input Connector [DC] (੬ pg. 13) S Digital Video Connector [DV IN/OUT] (i.Link*) (੬ pg. 44, 45) * i.Link refers to cover this area and block the light.) e Remote Sensor (GR-D290 only) (੬ pg. 23) f Camera Sensor (Be careful not to the IEEE1394-1995 industry specification and...
... P USB (Universal Serial Bus) Connector (੬ pg. 45) Q Audio/Video Output Connector [AV] (੬ pg. 22, 43) R DC Input Connector [DC] (੬ pg. 13) S Digital Video Connector [DV IN/OUT] (i.Link*) (੬ pg. 44, 45) * i.Link refers to cover this area and block the light.) e Remote Sensor (GR-D290 only) (੬ pg. 23) f Camera Sensor (Be careful not to the IEEE1394-1995 industry specification and...

Instruction Manual
Page 9
...-Frame Playback/ Slow-Motion Y 9: Reverse Frame-By-Frame Playback/ Slow-Motion D: Audio Dubbing 9D: Audio Dubbing Pause (Appear while a tape is running.) F Sound Input For Audio Dubbing (੬ pg. 46) (GR-D290 only) G Battery Remaining Power Indicator (੬ pg. 49) H Date/Time (੬ pg. 34, 36) GETTING STARTED EN 9 I GHT 100-0013 50m 4 3 a Operation Mode Indicator (੬ pg. 27) B Folder/File Number (੬ pg. 27) C Battery Remaining Power Indicator (੬ pg. 49) D Brightness Control Indicator (LCD monitor...
...-Frame Playback/ Slow-Motion Y 9: Reverse Frame-By-Frame Playback/ Slow-Motion D: Audio Dubbing 9D: Audio Dubbing Pause (Appear while a tape is running.) F Sound Input For Audio Dubbing (੬ pg. 46) (GR-D290 only) G Battery Remaining Power Indicator (੬ pg. 49) H Date/Time (੬ pg. 34, 36) GETTING STARTED EN 9 I GHT 100-0013 50m 4 3 a Operation Mode Indicator (੬ pg. 27) B Folder/File Number (੬ pg. 27) C Battery Remaining Power Indicator (੬ pg. 49) D Brightness Control Indicator (LCD monitor...
Instruction Manual
Page 13
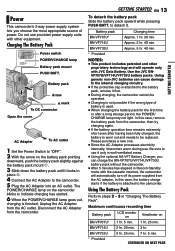
... needs to be operated. ● Charging is not possible if the wrong type of power. Using The Battery Pack Perform steps 2 - 3 in Record-Standby mode with the cassette inserted, the camcorder will operate only with other proprietary technology and will automatically turn off its power supplied from the camcorder, then try charging again. ● If the battery operation time remains extremely short even after having been fully charged, the battery is used...
... needs to be operated. ● Charging is not possible if the wrong type of power. Using The Battery Pack Perform steps 2 - 3 in Record-Standby mode with the cassette inserted, the camcorder will operate only with other proprietary technology and will automatically turn off its power supplied from the camcorder, then try charging again. ● If the battery operation time remains extremely short even after having been fully charged, the battery is used...
Instruction Manual
Page 14
... voltage selection in contact with your battery. The "A" indicator appears on the camcorder, set various playback functions using NO special effects or manual adjustments. Do not allow the battery or its terminals to your nearest JVC dealer. MENU/DATA Power Switch Lock Button MA POWER/ CHARGE POWER/ CHARGE lamp VIDEO/MEMORY Choose the appropriate operation mode according to come in the AC range from the actual operating time, fully charge the battery, and then run it may...
... voltage selection in contact with your battery. The "A" indicator appears on the camcorder, set various playback functions using NO special effects or manual adjustments. Do not allow the battery or its terminals to your nearest JVC dealer. MENU/DATA Power Switch Lock Button MA POWER/ CHARGE POWER/ CHARGE lamp VIDEO/MEMORY Choose the appropriate operation mode according to come in the AC range from the actual operating time, fully charge the battery, and then run it may...

Instruction Manual
Page 16
... adjust it manually for best viewability. 3 Turn the Diopter Adjustment Control until it locks. The camcorder needs to be powered up to select "n", and press MENU. Cassette holder PUSH HERE Cassette holder cover Brightness Adjustment Of The Display 1 Set the Power Switch + to "M" or "PLAY" while pressing down the Lock Button located on the switch. 2 Make sure the LCD monitor is closed and locked. to load or eject a cassette. OPEN/EJECT Make sure the window...
... adjust it manually for best viewability. 3 Turn the Diopter Adjustment Control until it locks. The camcorder needs to be powered up to select "n", and press MENU. Cassette holder PUSH HERE Cassette holder cover Brightness Adjustment Of The Display 1 Set the Power Switch + to "M" or "PLAY" while pressing down the Lock Button located on the switch. 2 Make sure the LCD monitor is closed and locked. to load or eject a cassette. OPEN/EJECT Make sure the window...

Instruction Manual
Page 18
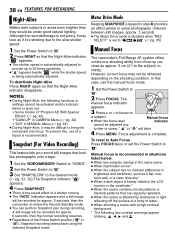
...) VIDEO/MEMORY Power Zoom Lever Power Switch Lock Button POWER/CHARGE Lamp Recording Start/Stop Button 1 Remove the lens cap. (੬ pg. 11) 2 Open the LCD monitor fully. 3 Set the VIDEO/MEMORY Switch to "VIDEO". 4 Set the Power Switch to "A" or "M" while pressing down the Lock Button located on the display. "PAUSE" is pushed back in LP (Long Play) mode, ੬ pg. 32. 5 To start recording, press the Recording Start/ Stop Button. Tape Remaining Time Approximate tape remaining time appears on the switch. ● The POWER/CHARGE lamp lights and the camcorder...
...) VIDEO/MEMORY Power Zoom Lever Power Switch Lock Button POWER/CHARGE Lamp Recording Start/Stop Button 1 Remove the lens cap. (੬ pg. 11) 2 Open the LCD monitor fully. 3 Set the VIDEO/MEMORY Switch to "VIDEO". 4 Set the Power Switch to "A" or "M" while pressing down the Lock Button located on the display. "PAUSE" is pushed back in LP (Long Play) mode, ੬ pg. 32. 5 To start recording, press the Recording Start/ Stop Button. Tape Remaining Time Approximate tape remaining time appears on the switch. ● The POWER/CHARGE lamp lights and the camcorder...
Instruction Manual
Page 22
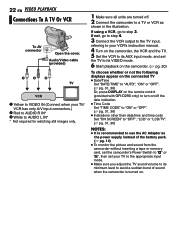
... a tape or memory card, set the camcorder's Power Switch to "A" or "M", then set your TV to the appropriate input mode. ● Make sure you adjust the TV sound volume to its VIDEO mode. 6 Start playback on the camcorder. (੬ pg. 20) To choose whether or not the following displays appear on the connected TV ● Date/Time Set "DATE/TIME" to "AUTO", "ON" or "OFF". (੬ pg. 31, 36) Or, press DISPLAY on the remote control (provided with GR-D290...
... a tape or memory card, set the camcorder's Power Switch to "A" or "M", then set your TV to the appropriate input mode. ● Make sure you adjust the TV sound volume to its VIDEO mode. 6 Start playback on the camcorder. (੬ pg. 20) To choose whether or not the following displays appear on the connected TV ● Date/Time Set "DATE/TIME" to "AUTO", "ON" or "OFF". (੬ pg. 31, 36) Or, press DISPLAY on the remote control (provided with GR-D290...

Instruction Manual
Page 23
... a memory card (੬ pg. 26) Left Button (੬ pg. 24) E INSERT Button (੬ pg. 46) F SHIFT Button (੬ pg. 24) G DISPLAY Button (੬ pg. 22, 43) H SLOW Forward Button (੬ pg. 24) I PLAY Button ● Starts Playback of a tape (੬ pg. 20) ● Starts Auto Playback of your VCR. VIDEO RECORDING & PLAYBACK Playback Using The Remote Control (GR-D290 only) The Full-Function Remote Control Unit can operate this camcorder from a distance as well as the Recording Start/ Stop Button on the camcorder. (Also...
... a memory card (੬ pg. 26) Left Button (੬ pg. 24) E INSERT Button (੬ pg. 46) F SHIFT Button (੬ pg. 24) G DISPLAY Button (੬ pg. 22, 43) H SLOW Forward Button (੬ pg. 24) I PLAY Button ● Starts Playback of a tape (੬ pg. 20) ● Starts Auto Playback of your VCR. VIDEO RECORDING & PLAYBACK Playback Using The Remote Control (GR-D290 only) The Full-Function Remote Control Unit can operate this camcorder from a distance as well as the Recording Start/ Stop Button on the camcorder. (Also...
Instruction Manual
Page 32
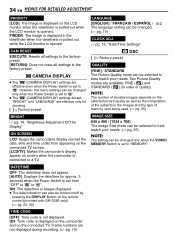
... kHz mode of previous models) 16BIT: Enables video recording of stereo sound on this mode when recording with no frame NEGA: Nega mode PIN-UP: Pin-Up mode FRAME: Snapshot mode with frame SLOW: Live Slow mode REC MODE [SP]: To record in the sound. However, the menu settings can be used. ● Switch off this camcorder. ● During playback of a tape recorded on another camcorder, blocks of 800X digital magnification. * Available only when the VIDEO/MEMORY Switch is set to "VIDEO...
... kHz mode of previous models) 16BIT: Enables video recording of stereo sound on this mode when recording with no frame NEGA: Nega mode PIN-UP: Pin-Up mode FRAME: Snapshot mode with frame SLOW: Live Slow mode REC MODE [SP]: To record in the sound. However, the menu settings can be used. ● Switch off this camcorder. ● During playback of a tape recorded on another camcorder, blocks of 800X digital magnification. * Available only when the VIDEO/MEMORY Switch is set to "VIDEO...
Instruction Manual
Page 34
... remote control (provided with GR-D290 only). (੬ pg. 22, 43) TIME CODE [OFF]: Time code is connected to a TV. [ ] = Factory-preset DSC QUALITY [FINE] / STANDARD The Picture Quality mode can be selected to best match your needs. (੬ pg. 25) NOTE: The setting can be changed only when the Power Switch is set to the factory-preset. However, the menu settings can be changed only when the VIDEO/ MEMORY Switch is set to "A" or "M". Frame numbers...
... remote control (provided with GR-D290 only). (੬ pg. 22, 43) TIME CODE [OFF]: Time code is connected to a TV. [ ] = Factory-preset DSC QUALITY [FINE] / STANDARD The Picture Quality mode can be selected to best match your needs. (੬ pg. 25) NOTE: The setting can be changed only when the Power Switch is set to the factory-preset. However, the menu settings can be changed only when the VIDEO/ MEMORY Switch is set to "A" or "M". Frame numbers...
Instruction Manual
Page 38
... CAMERA Menu (੬ pg. 32). • "DIS" in step 4 provides an effect similar to serial photography. (Interval between still images: approx. 1 second) ● The Motor Drive mode is disabled when "REC SELECT" is strobing due to the slow shutter speed. 1 Set the Power Switch to "M". 2 Press NIGHT so that the Night-Alive indicator disappears. However, correct focus may look like photographs onto a tape. 1 Set the VIDEO/MEMORY Switch to "VIDEO". 2 Set the Power Switch...
... CAMERA Menu (੬ pg. 32). • "DIS" in step 4 provides an effect similar to serial photography. (Interval between still images: approx. 1 second) ● The Motor Drive mode is disabled when "REC SELECT" is strobing due to the slow shutter speed. 1 Set the Power Switch to "M". 2 Press NIGHT so that the Night-Alive indicator disappears. However, correct focus may look like photographs onto a tape. 1 Set the VIDEO/MEMORY Switch to "VIDEO". 2 Set the Power Switch...
Instruction Manual
Page 45
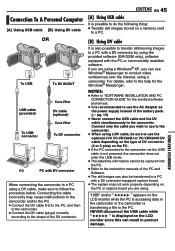
... to "SOFTWARE INSTALLATION AND PC CONNECTION GUIDE" for the Windows® Messenger. Connecting the cable incorrectly may not work properly depending on the PC or capture board you are using a Windows® XP, you wish to use the optional JVC VC-VDV206U or VC-VDV204U DV cable depending on a memory card to a PC. [B] Using DV cable It is not powered, the camcorder does not enter the USB mode. ● The date/time information cannot be captured into...
... to "SOFTWARE INSTALLATION AND PC CONNECTION GUIDE" for the Windows® Messenger. Connecting the cable incorrectly may not work properly depending on the PC or capture board you are using a Windows® XP, you wish to use the optional JVC VC-VDV206U or VC-VDV204U DV cable depending on a memory card to a PC. [B] Using DV cable It is not powered, the camcorder does not enter the USB mode. ● The date/time information cannot be captured into...
Instruction Manual
Page 47
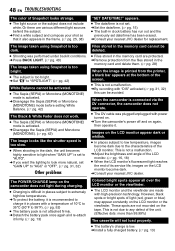
... "MEMORY". HSet the tape's erase protection tab to "VIDEO". HSet "ZOOM" to "ON". (੬ pg. 31, 34) TROUBLESHOOTING EN 47 The LCD monitor or viewfinder indications blink. ● Certain Wipe/Fader effects, certain modes of noise appear during shooting, the screen becomes red or black for video playback. (੬ pg. 22) ● The cassette holder cover is not a malfunction. If, after following the steps in MANUAL Menu. HSet "DATE/TIME...
... "MEMORY". HSet the tape's erase protection tab to "VIDEO". HSet "ZOOM" to "ON". (੬ pg. 31, 34) TROUBLESHOOTING EN 47 The LCD monitor or viewfinder indications blink. ● Certain Wipe/Fader effects, certain modes of noise appear during shooting, the screen becomes red or black for video playback. (੬ pg. 22) ● The cassette holder cover is not a malfunction. If, after following the steps in MANUAL Menu. HSet "DATE/TIME...
Instruction Manual
Page 48
... viewfinder are not recorded on the tape. HTurn the camcorder's power off and on the LCD monitor appear dark or whitish. ● In places subject to "AUTO". Images on again, then operate it also appears in the memory card cannot be activated. ● The Sepia (SEPIA) or Monotone (MONOTONE) mode is connected via the DV connector, the camcorder does not operate. ● The DV cable was performed...
... viewfinder are not recorded on the tape. HTurn the camcorder's power off and on the LCD monitor appear dark or whitish. ● In places subject to "AUTO". Images on again, then operate it also appears in the memory card cannot be activated. ● The Sepia (SEPIA) or Monotone (MONOTONE) mode is connected via the DV connector, the camcorder does not operate. ● The DV cable was performed...

Instruction Manual
Page 50
...) MEMORY CARD! Appears when playing back a file that is not compatible with DCF or a file with a size that is not compatible with this camcorder. ? DUB ERROR! ● Appears if Insert Editing is attempted on a tape recorded in the memory card when you attempt memory card playback. HDV Appears when pictures recorded in the HDV format are no image files stored in the LP mode. (੬ pg. 46) ● Appears if INSERT (I) on the remote control...
...) MEMORY CARD! Appears when playing back a file that is not compatible with DCF or a file with a size that is not compatible with this camcorder. ? DUB ERROR! ● Appears if Insert Editing is attempted on a tape recorded in the memory card when you attempt memory card playback. HDV Appears when pictures recorded in the HDV format are no image files stored in the LP mode. (੬ pg. 46) ● Appears if INSERT (I) on the remote control...

Instruction Manual
Page 53
... the video heads may heat up. ... No picture during recording, playback, deletion, initialization, etc.) ... If the cassette is inside it away from heaters or other heat sources. ... After the camcorder plays back for LCD monitor use. REFERENCES Main Unit ● For safety, DO NOT ... in use . ● Avoid using the hand strap or the grip. ... near a television set. ... In such cases, use ... never unload the memory card...
... the video heads may heat up. ... No picture during recording, playback, deletion, initialization, etc.) ... If the cassette is inside it away from heaters or other heat sources. ... After the camcorder plays back for LCD monitor use. REFERENCES Main Unit ● For safety, DO NOT ... in use . ● Avoid using the hand strap or the grip. ... near a television set. ... In such cases, use ... never unload the memory card...
Instruction Manual
Page 55
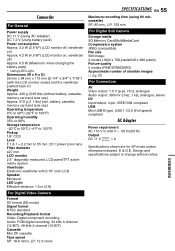
... V G, 1 A Specifications shown are for SP mode unless otherwise indicated. For Digital Still Camera Storage media SD Memory Card/MultiMediaCard Compression system JPEG (compatible) File size Still image: 2 modes (1024 x 768 pixels/640 x 480 pixels) Picture quality 2 modes (FINE/STANDARD) Approximate number of storable images ੬ pg. 25 For Connectors AV Video output: 1.0 V (p-p), 75 Ω, analogue Audio output: 300 mV (rms), 1 kΩ, analogue, stereo DV Input/output: 4-pin, IEEE1394 compliant USB Mini USB-B type, USB 1.1/2.0 (Full speed) compliant AC Adapter Power requirement...
... V G, 1 A Specifications shown are for SP mode unless otherwise indicated. For Digital Still Camera Storage media SD Memory Card/MultiMediaCard Compression system JPEG (compatible) File size Still image: 2 modes (1024 x 768 pixels/640 x 480 pixels) Picture quality 2 modes (FINE/STANDARD) Approximate number of storable images ੬ pg. 25 For Connectors AV Video output: 1.0 V (p-p), 75 Ω, analogue Audio output: 300 mV (rms), 1 kΩ, analogue, stereo DV Input/output: 4-pin, IEEE1394 compliant USB Mini USB-B type, USB 1.1/2.0 (Full speed) compliant AC Adapter Power requirement...
Instruction Manual
Page 56
... A Cassette 16 Loading A Memory Card 17 M Manual Focus 38 Memory Card 17, 53 Motor Drive Mode 38 N EN Night-Alive 38 P Picture Quality 34 Playback Sound 35 Playback Special Effects 24 Power-Linked Operation 15 Program AE With Special Effects 42 Q Quick Review 20 R Recording Capacity Memory Card 25 Tape 18 Recording Media Selection 35 Remote Control 23 Resetting The File Name 28 S Slow-Motion Playback 24 Snapshot Mode 32 Sound Mode 32, 35 Speaker Volume 20 Specifications 55 Spot Exposure Control 40 T Tape Speed (REC MODE 32, 35 Telephoto Setting...
... A Cassette 16 Loading A Memory Card 17 M Manual Focus 38 Memory Card 17, 53 Motor Drive Mode 38 N EN Night-Alive 38 P Picture Quality 34 Playback Sound 35 Playback Special Effects 24 Power-Linked Operation 15 Program AE With Special Effects 42 Q Quick Review 20 R Recording Capacity Memory Card 25 Tape 18 Recording Media Selection 35 Remote Control 23 Resetting The File Name 28 S Slow-Motion Playback 24 Snapshot Mode 32 Sound Mode 32, 35 Speaker Volume 20 Specifications 55 Spot Exposure Control 40 T Tape Speed (REC MODE 32, 35 Telephoto Setting...


