JVC D775U - GRD775 - MiniDV Digital Camcorder Support and Manuals
Get Help and Manuals for this JVC item
Most Recent JVC D775U Questions

Getting Video Onto Sd Card
how do I get video off of internal memory and onto an ad card?
how do I get video off of internal memory and onto an ad card?
(Posted by Mellisahyde 9 years ago)


A/v Cable
Good afternoon, I lost the A/V cable for my JVC mini DV model GR-D775U where can I get one to bu...
Good afternoon, I lost the A/V cable for my JVC mini DV model GR-D775U where can I get one to bu...
(Posted by gaydem 11 years ago)

There Is No 'audio' When I Do Playback My Recording.
There is no "audio" when I do playback my recording. I bought a brand new JVC-GR-D775U camcorder rec...
There is no "audio" when I do playback my recording. I bought a brand new JVC-GR-D775U camcorder rec...
(Posted by poonirao 13 years ago)
Popular JVC D775U Manual Pages
Instructions - Page 1
..., set "DEMO MODE" to ensure safe use of the camcorder. Before use, please read the safety information and precautions contained in the pages 3 - 5 to "OFF". (੬ pg. 31, 34)
LYT1656-001B
ENGLISH which is located on the bottom of this digital video camera. DIGITAL VIDEO CAMERA
GR-D775U
INSTRUCTIONS
Dear Customer, Thank you for future reference. Serial No. and Serial No. Model...
Instructions - Page 3
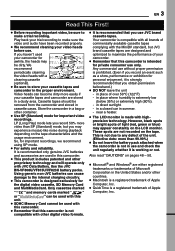
... be dirty.
It is recommended only genuine JVC batteries
and accessories are used in this camcorder.
● This product includes patented and other digital video formats.
● It is recommended that this
unit. ● SDHC Memory Card cannot be used
your camcorder for private consumer use . Only cassettes marked
" " and memory cards marked "
"
or "
" can be used with this...
Instructions - Page 7

... lever right.
1
1
QUICK REVIEW
Move the control lever left /right, or pressing down the control lever to use the provided cables for remote control unit)
Shoulder
Strap (੬ pg. 12)
Lens Cap (੬ pg. 12)
* A lithium battery is pre-installed in the Remote Control Unit at time of the camcorder, provided cables may be equipped with...
Instructions - Page 9
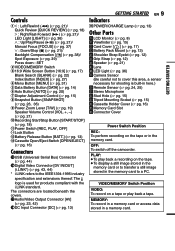
... image stored in the memory card to a PC. OFF: To switch off the camcorder. GETTING STARTED
The connectors are located beneath the
covers. )Audio/Video Output Connector [AV]
(੬ pg. 23, 42) ~DC Input Connector [DC] (੬ pg. 13)
GETTING STARTED EN 9
âIndicators POWER/CHARGE Lamp (੬ pg. 13)
Other Parts
äLCD Monitor...
Instructions - Page 17

... the reverse
side of the camcorder, pull it is necessary to format the card. (੬ pg. 30)
PLEASE FORMAT
Appears when there is set to
"VIDEO". By default, the camera is a problem with the 4:3 screen. (੬ pg. 34, 35) If the indication still appears, the memory card is off. 2 Open the card cover ( ). 3 To load a memory card, firmly insert it...
Instructions - Page 20

..., the time code starts counting up again from the last time code number. If during playback. This means the camcorder may record the same time codes as those existing...code indication does not move smoothly.
● The time code is displayed only when "TIME CODE" is set to find the spot at which you the snapshot image.
● The Still image is saved into the memory card
while video...
Instructions - Page 23

...camcorder to a TV or VCR as
the power supply instead of the battery pack. (੬ pg. 13) ● To monitor the picture and sound from the camcorder without inserting a tape or memory card, set the camcorder's Power Switch to"REC", then set...
referring to your VCR's instruction manual.
4 Turn on the camcorder, the VCR and the
TV.
5 Set the VCR to its AUX input mode, and set "16:9 OUTPUT" of ...
Instructions - Page 26
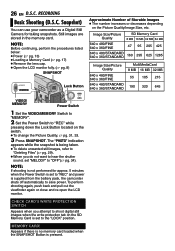
... MB
55 105 215
190 320 645
VIDEO/ MEMORY
Power Switch
1 Set the VIDEO/MEMORY Switch to
"MEMORY".
2 Set the Power Switch to save power.
Snapshot)
You can use your camcorder as a Digital Still Camera for approx. 5 minutes when the Power Switch is set to "REC" and power is supplied from the battery pack, the camcorder shuts off automatically to "REC" while
pressing...
Instructions - Page 29
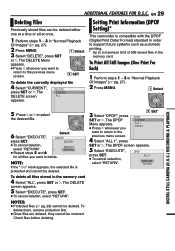
... to support future systems such as automatic printing. * Up to the previous menu screen.
2 SET
To delete the currently displayed file
4 Select "CURRENT",
press SET or 2.
EXECUTE RETURN Setting Print Information (DPOF Setting)*
This camcorder is protected and cannot be restored.
To Print All Still Images (One Print For Each)
1 Perform steps 1 - 3 in the memory card
4 Select...
Instructions - Page 33

... use when performing Audio Dubbing. (Equivalent to the 32 kHz mode of previous models) 16BIT: Enables video recording of stereo sound on two separate channels. (Equivalent to the 48 kHz mode of memory card being automatically adjusted, " " is
automatically adjusted. Select this setting to best match your needs. The " " indicator appears. Two Picture Quality modes...
Instructions - Page 37
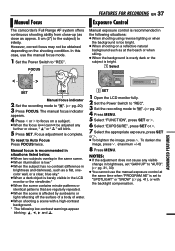
...; pg. 20)
3 Press FOCUS.
NOTES: ● If the adjustment does not cause any further or closer, " " or " " will blink.
5 Press SET. FEATURES FOR RECORDING EN 37
Manual Focus
Exposure Control
The camcorder's Full Range AF system offers continuous shooting ability from close-up (as close as approx. 5 cm (2") to the subject) to in...
Instructions - Page 44
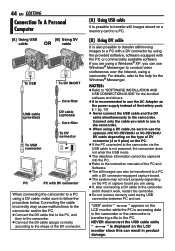
... camcorder is not powered, the camcorder does not enter the USB mode. ● The date/time information cannot be captured into the PC. ● Refer to the instruction manuals of the battery pack. (੬ pg. 13) ● Never connect the USB cable and the DV cable simultaneously to the camcoder and it doesn't work properly depending on a memory card...
Instructions - Page 47

... your nearest JVC dealer for 5 seconds after power is turned on a blank portion of the video you can resume using the camcorder. REFERENCES TAPE END
Appears when the tape ends during recording or playback.
SET DATE/TIME!
● Appears when the date/time is not set. (੬ pg. 15).
● The built-in clock battery has...
Instructions - Page 49

..., use . ... Also refer to become wet. ... make sure the memory card is positioned
properly when inserting. ● While the memory card is inside it to the cleaning cassette's instructions. out of the battery pack.
LCD Monitor
● To prevent damage to excessive humidity or dust. place the camcorder with coarse cloth. ● Be aware of over 40...
Instructions - Page 51
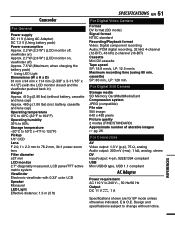
... charging the battery pack) * Using LED Light Dimensions (W x H x D) 61 mm x 94 mm x 114 mm (2-3/8" x 3-11/16" x 4-1/2") (with 0.33" color LCD Speaker Monaural LED Light Effective distance: 1.5 m (5 ft)
SPECIFICATIONS EN 51
For Digital Video Camera
Format DV format (SD mode) Signal format NTSC standard Recording/Playback format Video: Digital component recording Audio: PCM digital recording, 32...
JVC D775U Reviews
We have not received any reviews for JVC yet.