Instruction Manual
Page 2
...radio communications. About the installation place Do not install the projector in a place that cannot support its installation, use ... The safety and operating instructions should use a mount recommended by JVC could fall , causing serious injury to a child or adult...Language for Manuals of Products using HID Lamps (that contains mercury) This product has a High Intensity Discharge (HID) lamp that interference will not occur in ... causing possible injury to defeat the safeguards incorporated into the D-ILA device. IMPORTANT SAFEGUARDS Electrical energy can be followed. - All...
...radio communications. About the installation place Do not install the projector in a place that cannot support its installation, use ... The safety and operating instructions should use a mount recommended by JVC could fall , causing serious injury to a child or adult...Language for Manuals of Products using HID Lamps (that contains mercury) This product has a High Intensity Discharge (HID) lamp that interference will not occur in ... causing possible injury to defeat the safeguards incorporated into the D-ILA device. IMPORTANT SAFEGUARDS Electrical energy can be followed. - All...
Instruction Manual
Page 3
... in fire, electric shock, or other hazards. Upon completion of power supply to your home, consult your product dealer or local power company. - Do not look at doors, ...qualified service personnel. - Adjust only those controls that produce heat. - Do not ceiling-mount the projector to .) For proper ventilation, separate the product from the wall outlet and disconnect the cable system...to lightning and power line surges. - Do not drop, hit, or damage the light-source lamp (lamp unit) in any way. If installation is broken, ask your product dealer. Refer all service ...
... in fire, electric shock, or other hazards. Upon completion of power supply to your home, consult your product dealer or local power company. - Do not look at doors, ...qualified service personnel. - Adjust only those controls that produce heat. - Do not ceiling-mount the projector to .) For proper ventilation, separate the product from the wall outlet and disconnect the cable system...to lightning and power line surges. - Do not drop, hit, or damage the light-source lamp (lamp unit) in any way. If installation is broken, ask your product dealer. Refer all service ...
Instruction Manual
Page 6
...lamp replacement 47 Resetting the lamp time 49 Cleaning and Replacing the Filter 50 Troubleshooting 51 What to do when these messages are displayed .... 53 Warning Indication 55 Specifications 56 The following accessories are packed together with this unit. Connect the connector of this projector... addition, read 'How to use the [SCREEN TRIGGER] terminal cable' on the Control Panel 10 Remote Control Unit 12 Loading Batteries into the Projector 19 Connecting to the screen. Quick Guide ...x 1 Instructions (CD-ROM) ...x 1 Guarantee ...x 1 Power Cord ...x 1 Remote Control (RM...
...lamp replacement 47 Resetting the lamp time 49 Cleaning and Replacing the Filter 50 Troubleshooting 51 What to do when these messages are displayed .... 53 Warning Indication 55 Specifications 56 The following accessories are packed together with this unit. Connect the connector of this projector... addition, read 'How to use the [SCREEN TRIGGER] terminal cable' on the Control Panel 10 Remote Control Unit 12 Loading Batteries into the Projector 19 Connecting to the screen. Quick Guide ...x 1 Instructions (CD-ROM) ...x 1 Guarantee ...x 1 Power Cord ...x 1 Remote Control (RM...
Instruction Manual
Page 8
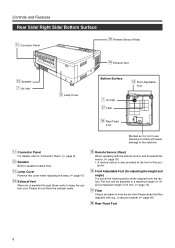
... page 9) w Speaker Built-in from the factory. Please clean the filter regularly with the remote control, aim it towards this cover when replacing the lamp. (☞ page 47) r Exhaust Vent Warm air is set at the front of 31 mm. (☞ page 15) u Filter Cleans air ...jector. Controls and Features Rear Side/ Right Side/ Bottom Surface q Connector Panel t Remote Sensor (Rear) r Exhaust Vent w Speaker 7 Air Inlet e Lamp Cover Bottom Surface y Front Adjustable Foot 7 Air Inlet u Filter i Rear Fixed Foot Blocked as it is also provided at the lowest position when shipped from...
... page 9) w Speaker Built-in from the factory. Please clean the filter regularly with the remote control, aim it towards this cover when replacing the lamp. (☞ page 47) r Exhaust Vent Warm air is set at the front of 31 mm. (☞ page 15) u Filter Cleans air ...jector. Controls and Features Rear Side/ Right Side/ Bottom Surface q Connector Panel t Remote Sensor (Rear) r Exhaust Vent w Speaker 7 Air Inlet e Lamp Cover Bottom Surface y Front Adjustable Foot 7 Air Inlet u Filter i Rear Fixed Foot Blocked as it is also provided at the lowest position when shipped from...
Instruction Manual
Page 10
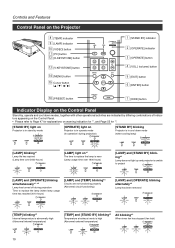
... Indicator Display on the Control Panel Stand-by, operate and cool down mode (when cooling lamp) STAND BY LAMP TEMP OPERATE [LAMP] blinking*1 Lamp life has expired (Lamp time over 2000 hours) STAND BY LAMP TEMP OPERATE [LAMP] light on the Projector 8 [TEMP] indicator 9 [LAMP] indicator p [VIDEO] button q [PC] button w [H-KEYSTONE] button e [V-KEYSTONE] button r [MENU] button t Cursor button y [PRESET...
... Indicator Display on the Control Panel Stand-by, operate and cool down mode (when cooling lamp) STAND BY LAMP TEMP OPERATE [LAMP] blinking*1 Lamp life has expired (Lamp time over 2000 hours) STAND BY LAMP TEMP OPERATE [LAMP] light on the Projector 8 [TEMP] indicator 9 [LAMP] indicator p [VIDEO] button q [PC] button w [H-KEYSTONE] button e [V-KEYSTONE] button r [MENU] button t Cursor button y [PRESET...
Instruction Manual
Page 11
...down mode and finally into stand by the blinking [STAND BY] indicator. It also prevents lamp breakage and shortened lamp life. It is also used for more again, and the projector goes into the cool down mode. Note Please do not block the exhaust vent by standing..." option etc. (☞ page 35) 7 [HIDE] button Use this button to main menu). Blinking : Indicates the lamp has been used when [ENTER] is displayed will not turn the projector on the projector. Please change to resume. (☞ page 29) 8 [TEMP] Indicator Blinking : Indicates the temperature inside the...
...down mode and finally into stand by the blinking [STAND BY] indicator. It also prevents lamp breakage and shortened lamp life. It is also used for more again, and the projector goes into the cool down mode. Note Please do not block the exhaust vent by standing..." option etc. (☞ page 35) 7 [HIDE] button Use this button to main menu). Blinking : Indicates the lamp has been used when [ENTER] is displayed will not turn the projector on the projector. Please change to resume. (☞ page 29) 8 [TEMP] Indicator Blinking : Indicates the temperature inside the...
Instruction Manual
Page 13
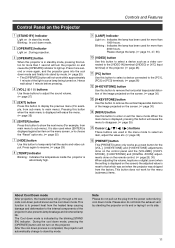
... some inevitable loss of image qual- Controls and Features 1 Remote Control's signal transmitter (☞ page 18) 2 [OPERATE] button When the projector is in the projector memory and stills the picture on the screen. It does not work for approximately 1 minute from main menu to sub menu). Press again to... but it will however be retained in standby mode, pressing this button to show the next hierarchical menu (For example, from when the light-source lamp is turned on the screen. (☞ page 30) t [VOLUME] ª / · button Use these buttons to enter or exit the menu mode....
... some inevitable loss of image qual- Controls and Features 1 Remote Control's signal transmitter (☞ page 18) 2 [OPERATE] button When the projector is in the projector memory and stills the picture on the screen. It does not work for approximately 1 minute from main menu to sub menu). Press again to... but it will however be retained in standby mode, pressing this button to show the next hierarchical menu (For example, from when the light-source lamp is turned on the screen. (☞ page 30) t [VOLUME] ª / · button Use these buttons to enter or exit the menu mode....

Instruction Manual
Page 15
... dimensions, use an air conditioner so that internal and external temperatures are cooled down ). jector. Installing the Projector Precautions for Usage This projector uses a light-source lamp which there is on its side. • Projecting images outside the specified angle. longed exposure will affect the... cause color variation or shorten the lamp life. • Use while blocking the exhaust vents. 300 mm Minimum Space Required 150 mm 300 mm Do not use this projector in large amount of the projector minutely • Lift the projector, rotate the front adjustable foot, and...
... dimensions, use an air conditioner so that internal and external temperatures are cooled down ). jector. Installing the Projector Precautions for Usage This projector uses a light-source lamp which there is on its side. • Projecting images outside the specified angle. longed exposure will affect the... cause color variation or shorten the lamp life. • Use while blocking the exhaust vents. 300 mm Minimum Space Required 150 mm 300 mm Do not use this projector in large amount of the projector minutely • Lift the projector, rotate the front adjustable foot, and...
Instruction Manual
Page 25
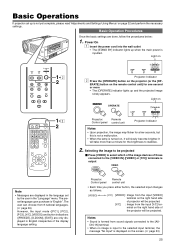
...VIDEO OPERATE W V-KEYSTONE H-KEYSTONE SCREEN DIGITAL ZOOM S FREEZE VOLUME FOCUS QUICK ALIGN. 1-2 2 MENU EXIT ENTER PRESET HIDE LAMP TEMP STAND BY OPERATE Projector: Indicator 2 Press the [OPERATE] button on the screen. (☞ page 53) 25 The preset language upon purchase is... inputted. Light on OPERATE OPERATE STAND BY LAMP TEMP OPERATE Projector: Remote Control panel control unit Projector: Indicator Notes • Upon projection, the image may flicker for the brightness to the [VIDEO IN...
...VIDEO OPERATE W V-KEYSTONE H-KEYSTONE SCREEN DIGITAL ZOOM S FREEZE VOLUME FOCUS QUICK ALIGN. 1-2 2 MENU EXIT ENTER PRESET HIDE LAMP TEMP STAND BY OPERATE Projector: Indicator 2 Press the [OPERATE] button on the screen. (☞ page 53) 25 The preset language upon purchase is... inputted. Light on OPERATE OPERATE STAND BY LAMP TEMP OPERATE Projector: Remote Control panel control unit Projector: Indicator Notes • Upon projection, the image may flicker for the brightness to the [VIDEO IN...
Instruction Manual
Page 27
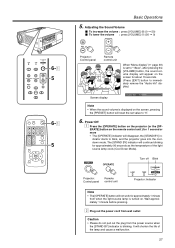
...source when the [STAND BY] indicator is set value to "0". 6. ERATE] button on . OPERATE OPERATE Projector: Control panel Remote control unit Turn off Blink LAMP TEMP STAND BY OPERATE Projector: Indicator Note • The [OPERATE] button will disappear, the [STAND BY] in- Adjusting the Sound... Plug out the power cord from wall outlet Caution • Please do not pull out the plug from when the light-source lamp is displayed on the projector (or the [OP- MENU EXIT 5 ENTER PC VIDEO OPERATE W V-KEYSTONE H-KEYSTONE SCREEN DIGITAL ZOOM S FREEZE VOLUME FOCUS QUICK...
...source when the [STAND BY] indicator is set value to "0". 6. ERATE] button on . OPERATE OPERATE Projector: Control panel Remote control unit Turn off Blink LAMP TEMP STAND BY OPERATE Projector: Indicator Note • The [OPERATE] button will disappear, the [STAND BY] in- Adjusting the Sound... Plug out the power cord from wall outlet Caution • Please do not pull out the plug from when the light-source lamp is displayed on the projector (or the [OP- MENU EXIT 5 ENTER PC VIDEO OPERATE W V-KEYSTONE H-KEYSTONE SCREEN DIGITAL ZOOM S FREEZE VOLUME FOCUS QUICK...
Instruction Manual
Page 32
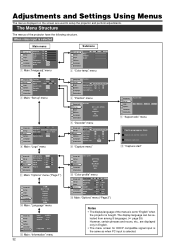
menu Image adj. Set up Logo Options A Language Information Input Switcher Source VIDEO CH.0 NTSC Lamp time 1234 h t Main: "Information" menu Image adj. Set up R GB Logo Options A Language Information Capture menu Menu pos. Set up R GB Logo Options...language can not be selected from among 8 languages. (☞ page 39) However, certain phrases and nouns, etc., are used to "English" when the projector is selected Main menu Image adj. Set up Logo Options A Language Information English Deutsch Español Italiano Français Português r Main: "...
menu Image adj. Set up Logo Options A Language Information Input Switcher Source VIDEO CH.0 NTSC Lamp time 1234 h t Main: "Information" menu Image adj. Set up R GB Logo Options A Language Information Capture menu Menu pos. Set up R GB Logo Options...language can not be selected from among 8 languages. (☞ page 39) However, certain phrases and nouns, etc., are used to "English" when the projector is selected Main menu Image adj. Set up Logo Options A Language Information English Deutsch Español Italiano Français Português r Main: "...

Instruction Manual
Page 33
...ON 19200 1400 HDCP e Main: "Options" menu ("Page 2") Notes • The display language of the menus is set to "English" when the projector is bought. Set up R GB Logo Options A Language Information Color profile HDTV MacRGB NTSC PAL EXIT w "Color profile" menu Image adj. Reset ...Color temp. Set up R GB Logo Options A Language Information Input PC1 Switcher CH.0 Resolution 1280 X 1024 Frequency H 63.98kHz Frequency V 60.02 Hz Lamp time 1234 h t Main: "Information" menu Image adj. menu Image adj. R GB Logo Horiz.disp.pos. 12 Options Vert.disp.pos. 12 A...
...ON 19200 1400 HDCP e Main: "Options" menu ("Page 2") Notes • The display language of the menus is set to "English" when the projector is bought. Set up R GB Logo Options A Language Information Color profile HDTV MacRGB NTSC PAL EXIT w "Color profile" menu Image adj. Reset ...Color temp. Set up R GB Logo Options A Language Information Input PC1 Switcher CH.0 Resolution 1280 X 1024 Frequency H 63.98kHz Frequency V 60.02 Hz Lamp time 1234 h t Main: "Information" menu Image adj. menu Image adj. R GB Logo Horiz.disp.pos. 12 Options Vert.disp.pos. 12 A...

Instruction Manual
Page 34
... 1400 HDCP e Main: "Options" menu ("Page 2") Notes • The display language of the menus is set to "English" when the projector is selected. 34 The display language can be selected from among 8 languages. (☞ page 39) However, certain phrases and nouns, etc.,...: "Set up " menu (When video input is selected) Image adj. Position Set up R GB Logo Options A Language Information Input Switcher PC1 CH.0 Lamp time 1234 h t Main: "Information" menu Submenu Image adj. Set up R GB Logo Options A Language Information Color profile Menu display Line display Flip ...
... 1400 HDCP e Main: "Options" menu ("Page 2") Notes • The display language of the menus is set to "English" when the projector is selected. 34 The display language can be selected from among 8 languages. (☞ page 39) However, certain phrases and nouns, etc.,...: "Set up " menu (When video input is selected) Image adj. Position Set up R GB Logo Options A Language Information Input Switcher PC1 CH.0 Lamp time 1234 h t Main: "Information" menu Submenu Image adj. Set up R GB Logo Options A Language Information Color profile Menu display Line display Flip ...

Instruction Manual
Page 35
.... Press to shift to the "Set up" screen of the selected adjustment item. (Some items are accessed and operated using the following buttons on the projector/remote control: Button Main unit Remote control unit Function MENU MENU Displays the main menu on main ENTER ENTER menu. MENU EXIT ENTER PRESET HIDE... Menu operation button PC VIDEO OPERATE W V-KEYSTONE H-KEYSTONE SCREEN DIGITAL ZOOM S FREEZE VOLUME FOCUS QUICK ALIGN. Adjustments and Settings Using Menus LAMP TEMP STAND BY OPERATE PC VIDEO V-KEYSTONE H-KEYSTONE VOL.
.... Press to shift to the "Set up" screen of the selected adjustment item. (Some items are accessed and operated using the following buttons on the projector/remote control: Button Main unit Remote control unit Function MENU MENU Displays the main menu on main ENTER ENTER menu. MENU EXIT ENTER PRESET HIDE... Menu operation button PC VIDEO OPERATE W V-KEYSTONE H-KEYSTONE SCREEN DIGITAL ZOOM S FREEZE VOLUME FOCUS QUICK ALIGN. Adjustments and Settings Using Menus LAMP TEMP STAND BY OPERATE PC VIDEO V-KEYSTONE H-KEYSTONE VOL.

Instruction Manual
Page 36
... • Adjustment item names displayed in the image adjustment menu against which [ENTER] is indicated is no image signal inputted. Adjustments and Settings Using Menus LAMP PC TEMP VIDEO STAND BY OPERATE MENU 1 V-KEYSTONE H-KEYSTONE VOL. Set up Logo Options A Language Information Contrast 12 Brightness 12 Color 12 Tint 12 Sharpness...
... • Adjustment item names displayed in the image adjustment menu against which [ENTER] is indicated is no image signal inputted. Adjustments and Settings Using Menus LAMP PC TEMP VIDEO STAND BY OPERATE MENU 1 V-KEYSTONE H-KEYSTONE VOL. Set up Logo Options A Language Information Contrast 12 Brightness 12 Color 12 Tint 12 Sharpness...

Instruction Manual
Page 40
... number. Displays the selected switcher number matching the specification of this projector. For details, please check with your authorized dealer. Displays the selected switcher matching the specification of this projector. Displays the selected switcher number matching the specification of the light-source lamp. played correctly. Displays the number of accumulated used "1-10" : switcher...
... number. Displays the selected switcher number matching the specification of this projector. For details, please check with your authorized dealer. Displays the selected switcher matching the specification of this projector. Displays the selected switcher number matching the specification of the light-source lamp. played correctly. Displays the number of accumulated used "1-10" : switcher...

Instruction Manual
Page 41
... ENTER ENTER 3. Image adj. Setting "Aspect ratio" and "Resize" By setting the "Aspect ratio" and "Resize" of the screen. Project the image onto the screen LAMP PC TEMP VIDEO STAND BY OPERATE MENU 2 V-KEYSTONE H-KEYSTONE VOL. Set up " menu appears on the right side of the projected input image, optimum image...
... ENTER ENTER 3. Image adj. Setting "Aspect ratio" and "Resize" By setting the "Aspect ratio" and "Resize" of the screen. Project the image onto the screen LAMP PC TEMP VIDEO STAND BY OPERATE MENU 2 V-KEYSTONE H-KEYSTONE VOL. Set up " menu appears on the right side of the projected input image, optimum image...

Instruction Manual
Page 42
... 4:3 16:9 Zoom 6. Select "Zoom" with the cursor buttons (ᮤ / ᮣ) • Set "Aspect ratio" to "Zoom" for optimum projected image. Setting "Aspect ratio" and "Resize" LAMP PC TEMP VIDEO STAND BY OPERATE MENU 6 V-KEYSTONE H-KEYSTONE VOL.
... 4:3 16:9 Zoom 6. Select "Zoom" with the cursor buttons (ᮤ / ᮣ) • Set "Aspect ratio" to "Zoom" for optimum projected image. Setting "Aspect ratio" and "Resize" LAMP PC TEMP VIDEO STAND BY OPERATE MENU 6 V-KEYSTONE H-KEYSTONE VOL.

Instruction Manual
Page 43
LAMP PC TEMP VIDEO STAND BY OPERATE MENU 2 V-KEYSTONE H-KEYSTONE VOL. Project the image onto the screen 4:3 image recorded in letterbox (black bars above and below ...
LAMP PC TEMP VIDEO STAND BY OPERATE MENU 2 V-KEYSTONE H-KEYSTONE VOL. Project the image onto the screen 4:3 image recorded in letterbox (black bars above and below ...

Instruction Manual
Page 44
... 5 5. pleted • The menu disappears from the screen. Image adj. Press the [MENU] button to "Zoom" for optimum projected image. Setting "Aspect ratio" and "Resize" LAMP PC TEMP VIDEO STAND BY OPERATE MENU 6 V-KEYSTONE H-KEYSTONE VOL. Select "Zoom" with HDCP signal input. "1:1" "Panel" "Aspect" "Zoom" SDTV(4:3) Image loss : No Image loss...
... 5 5. pleted • The menu disappears from the screen. Image adj. Press the [MENU] button to "Zoom" for optimum projected image. Setting "Aspect ratio" and "Resize" LAMP PC TEMP VIDEO STAND BY OPERATE MENU 6 V-KEYSTONE H-KEYSTONE VOL. Select "Zoom" with HDCP signal input. "1:1" "Panel" "Aspect" "Zoom" SDTV(4:3) Image loss : No Image loss...

