
Instruction Manual
Page 2
... adult, and serious damage to insert the plug into the D-ILA device. There is no guarantee that interference will not occur in...Language for Manuals of Products using HID Lamps (that contains mercury) This product has a High Intensity Discharge (HID) lamp that contains a small amount of ...product near a wall outlet where the plug can be determined by JVC could void the user's authority to the manufacturer's instructions, and should...Noise Information Ordinance 3. About the installation place Do not install the projector in accordance with a 3-blade grounding type plug to assure your...
... adult, and serious damage to insert the plug into the D-ILA device. There is no guarantee that interference will not occur in...Language for Manuals of Products using HID Lamps (that contains mercury) This product has a High Intensity Discharge (HID) lamp that contains a small amount of ...product near a wall outlet where the plug can be determined by JVC could void the user's authority to the manufacturer's instructions, and should...Noise Information Ordinance 3. About the installation place Do not install the projector in accordance with a 3-blade grounding type plug to assure your...
Instruction Manual
Page 3
...technician has used by our dealer to install the unit (e.g. For added protection of the projector could be broken by an unqualified person, it . Never spill liquid of power supply to your home, consult your dealer to ensure Safety and EMC. d) If the product does not operate...- Never push objects of power source indicated on other equipment as opening the cabinet while the illumination lamp is the correct type for installation. The light-source lamp used for the projector is turned on bed, sofa, rug, or similar surface. Power cord For United Kingdom For European ...
...technician has used by our dealer to install the unit (e.g. For added protection of the projector could be broken by an unqualified person, it . Never spill liquid of power supply to your home, consult your dealer to ensure Safety and EMC. d) If the product does not operate...- Never push objects of power source indicated on other equipment as opening the cabinet while the illumination lamp is the correct type for installation. The light-source lamp used for the projector is turned on bed, sofa, rug, or similar surface. Power cord For United Kingdom For European ...
Instruction Manual
Page 6
... image to be input into the Remote Control 14 Installing the Projector 15 Precautions for the details. • Replacement lamp (lamp unit) BHL5006-S • Replacement filter Inner filter : LC32058-002A Lower filter : LC32087-002A 6 Consult the installation contractor for lamp replacement 47 Resetting the lamp time 49 Cleaning and Replacing the Filter 50 Troubleshooting 51...
... image to be input into the Remote Control 14 Installing the Projector 15 Precautions for the details. • Replacement lamp (lamp unit) BHL5006-S • Replacement filter Inner filter : LC32058-002A Lower filter : LC32087-002A 6 Consult the installation contractor for lamp replacement 47 Resetting the lamp time 49 Cleaning and Replacing the Filter 50 Troubleshooting 51...
Instruction Manual
Page 8
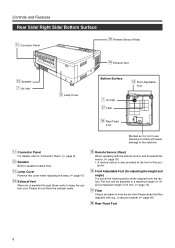
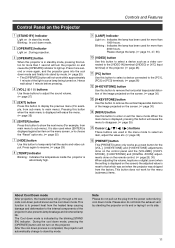
... the machine. Controls and Features Rear Side/ Right Side/ Bottom Surface q Connector Panel t Remote Sensor (Rear) r Exhaust Vent w Speaker 7 Air Inlet e Lamp Cover Bottom Surface y Front Adjustable Foot 7 Air Inlet u Filter i Rear Fixed Foot Blocked as it towards this cover when replacing the... lamp. (☞ page 47) r Exhaust Vent Warm air is expelled through these vents to 'Connector Panel'. (☞ page 9) w Speaker Built-in speaker ...
... the machine. Controls and Features Rear Side/ Right Side/ Bottom Surface q Connector Panel t Remote Sensor (Rear) r Exhaust Vent w Speaker 7 Air Inlet e Lamp Cover Bottom Surface y Front Adjustable Foot 7 Air Inlet u Filter i Rear Fixed Foot Blocked as it towards this cover when replacing the... lamp. (☞ page 47) r Exhaust Vent Warm air is expelled through these vents to 'Connector Panel'. (☞ page 9) w Speaker Built-in speaker ...
Instruction Manual
Page 10
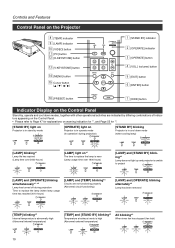
... All blinking*2 When inner fan has stopped (fan lock) STAND BY LAMP TEMP OPERATE Controls and Features Control Panel on *1 The time to replace the lamp is near (Lamp usage time over 2000 hours) STAND BY LAMP TEMP OPERATE [LAMP] light on the Projector 8 [TEMP] indicator 9 [LAMP] indicator p [VIDEO] button q [PC] button w [H-KEYSTONE] button e [V-KEYSTONE] button r [MENU...
... All blinking*2 When inner fan has stopped (fan lock) STAND BY LAMP TEMP OPERATE Controls and Features Control Panel on *1 The time to replace the lamp is near (Lamp usage time over 2000 hours) STAND BY LAMP TEMP OPERATE [LAMP] light on the Projector 8 [TEMP] indicator 9 [LAMP] indicator p [VIDEO] button q [PC] button w [H-KEYSTONE] button e [V-KEYSTONE] button r [MENU...
Instruction Manual
Page 11
...work for the menu (submenu) items. About Cool Down mode After projection, the heated lamp will go through a 90 seconds cool-down period known as the cool down process is completed, the projector will automatically change the lamp. (☞ page 10, 47, 55) p [VIDEO] button Use this button ...to remove the vertical trapezoidal distortion of the image projected on the screen) the adjusted value is abnormally high. 9 [LAMP] Indicator Light on the projector. Pressing this button when the main menu is displayed will erase the menu. (☞ page 35) 6 [ENTER] button Press this...
...work for the menu (submenu) items. About Cool Down mode After projection, the heated lamp will go through a 90 seconds cool-down period known as the cool down process is completed, the projector will automatically change the lamp. (☞ page 10, 47, 55) p [VIDEO] button Use this button ...to remove the vertical trapezoidal distortion of the image projected on the screen) the adjusted value is abnormally high. 9 [LAMP] Indicator Light on the projector. Pressing this button when the main menu is displayed will erase the menu. (☞ page 35) 6 [ENTER] button Press this...
Instruction Manual
Page 13
...button Use this button to select a device such as a reset button for approximately 1 minute from when the light-source lamp is reset to that which was set when the projector was shipped from [PC3] input terminal is received, "QUICK ALIGN..." appears on the screen and disappears when alignment is .... • When input signal from the factory. Controls and Features 1 Remote Control's signal transmitter (☞ page 18) 2 [OPERATE] button When the projector is displayed against the item on the menu screen or to select the "Reset" menu. (☞ page 35) 9 [HIDE] button Use this button ...
...button Use this button to select a device such as a reset button for approximately 1 minute from when the light-source lamp is reset to that which was set when the projector was shipped from [PC3] input terminal is received, "QUICK ALIGN..." appears on the screen and disappears when alignment is .... • When input signal from the factory. Controls and Features 1 Remote Control's signal transmitter (☞ page 18) 2 [OPERATE] button When the projector is displayed against the item on the menu screen or to select the "Reset" menu. (☞ page 35) 9 [HIDE] button Use this button ...

Instruction Manual
Page 15
...adjustable feet at the position where you release the lever. Allow sufficient space around the projector. Extend Foot Lever Shorten 15 ing so could cause color variation or shorten the lamp life. • Use while blocking the exhaust vents. 300 mm Minimum Space Required ... high temperatures when projecting. To retract the foot, push the lever and lower the projector slowly; Installing the Projector Precautions for Usage This projector uses a light-source lamp which may enclose the projector air-tight or block the exhaust vents. Do not use an air conditioner so that...
...adjustable feet at the position where you release the lever. Allow sufficient space around the projector. Extend Foot Lever Shorten 15 ing so could cause color variation or shorten the lamp life. • Use while blocking the exhaust vents. 300 mm Minimum Space Required ... high temperatures when projecting. To retract the foot, push the lever and lower the projector slowly; Installing the Projector Precautions for Usage This projector uses a light-source lamp which may enclose the projector air-tight or block the exhaust vents. Do not use an air conditioner so that...
Instruction Manual
Page 25
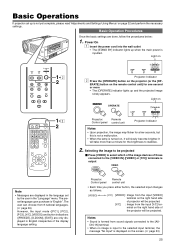
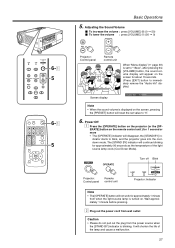
... as follows. [VIDEO] [Y/C] [VIDEO] : Image from the input [VIDEO] terminal on OPERATE OPERATE STAND BY LAMP TEMP OPERATE Projector: Remote Control panel control unit Projector: Indicator Notes • Upon projection, the image may flicker for the brightness to stabilize. 2. It will be ...FOCUS QUICK ALIGN. 1-2 2 MENU EXIT ENTER PRESET HIDE LAMP TEMP STAND BY OPERATE Projector: Indicator 2 Press the [OPERATE] button on LAMP TEMP STAND BY OPERATE PC VIDEO V-KEYSTONE H-KEYSTONE VOL. Basic Operations If projector set by the user in the "Language" menu. ...
... as follows. [VIDEO] [Y/C] [VIDEO] : Image from the input [VIDEO] terminal on OPERATE OPERATE STAND BY LAMP TEMP OPERATE Projector: Remote Control panel control unit Projector: Indicator Notes • Upon projection, the image may flicker for the brightness to stabilize. 2. It will be ...FOCUS QUICK ALIGN. 1-2 2 MENU EXIT ENTER PRESET HIDE LAMP TEMP STAND BY OPERATE Projector: Indicator 2 Press the [OPERATE] button on LAMP TEMP STAND BY OPERATE PC VIDEO V-KEYSTONE H-KEYSTONE VOL. Basic Operations If projector set by the user in the "Language" menu. ...
Instruction Manual
Page 27
... panel Remote control unit Turn off Blink LAMP TEMP STAND BY OPERATE Projector: Indicator Note • The [OPERATE] button will not work for approximately 1 minute from the power source when the [STAND BY] indicator is set to "15sec", ... [OPERATE] button on . dicator starts to immediately remove the "Audio-Vol" display.) Audio-Vol 12 Note • When the sound volume is turned on the projector (or the [OP- The [STAND BY] indicator will continue blinking for 1 second or more • The [OPERATE] indicator will shorten the life of the light...
... panel Remote control unit Turn off Blink LAMP TEMP STAND BY OPERATE Projector: Indicator Note • The [OPERATE] button will not work for approximately 1 minute from the power source when the [STAND BY] indicator is set to "15sec", ... [OPERATE] button on . dicator starts to immediately remove the "Audio-Vol" display.) Audio-Vol 12 Note • When the sound volume is turned on the projector (or the [OP- The [STAND BY] indicator will continue blinking for 1 second or more • The [OPERATE] indicator will shorten the life of the light...
Instruction Manual
Page 32
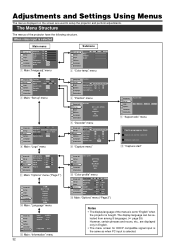
...Color profile HDTV MacRGB NTSC PAL EXIT w "Color profile" menu Image adj. Set up Logo Options A Language Information Input Switcher Source VIDEO CH.0 NTSC Lamp time 1234 h t Main: "Information" menu Image adj. Set up R GB Logo Options A Language Information Capture menu Menu pos. Reset ENTER ENTER...selected. The Menu Structure The menus of the menus is selected Main menu Image adj. When video input is set to setup the projector and perform adjustments. Set up " menu Image adj. menu Submenu Image adj. Set up R GB Logo Options A Language Information ...
...Color profile HDTV MacRGB NTSC PAL EXIT w "Color profile" menu Image adj. Set up Logo Options A Language Information Input Switcher Source VIDEO CH.0 NTSC Lamp time 1234 h t Main: "Information" menu Image adj. Set up R GB Logo Options A Language Information Capture menu Menu pos. Reset ENTER ENTER...selected. The Menu Structure The menus of the menus is selected Main menu Image adj. When video input is set to setup the projector and perform adjustments. Set up " menu Image adj. menu Submenu Image adj. Set up R GB Logo Options A Language Information ...

Instruction Manual
Page 33
... 19200 1400 HDCP e Main: "Options" menu ("Page 2") Notes • The display language of the menus is set to "English" when the projector is bought. R GB Logo Horiz.disp.pos. 12 Options Vert.disp.pos. 12 A Language Horiz.DIST pos. 1 Information 4 "Position" menu ...pos. Set up R GB Logo Options A Language Information Input PC1 Switcher CH.0 Resolution 1280 X 1024 Frequency H 63.98kHz Frequency V 60.02 Hz Lamp time 1234 h t Main: "Information" menu Image adj. Set up R GB Logo Options A Language Information Color profile Menu display Line display Flip H ...
... 19200 1400 HDCP e Main: "Options" menu ("Page 2") Notes • The display language of the menus is set to "English" when the projector is bought. R GB Logo Horiz.disp.pos. 12 Options Vert.disp.pos. 12 A Language Horiz.DIST pos. 1 Information 4 "Position" menu ...pos. Set up R GB Logo Options A Language Information Input PC1 Switcher CH.0 Resolution 1280 X 1024 Frequency H 63.98kHz Frequency V 60.02 Hz Lamp time 1234 h t Main: "Information" menu Image adj. Set up R GB Logo Options A Language Information Color profile Menu display Line display Flip H ...

Instruction Manual
Page 34
...input is the same as when PC input is selected) Image adj. Set up R GB Logo Options A Language Information Input Switcher PC1 CH.0 Lamp time 1234 h t Main: "Information" menu Submenu Image adj. Set up R GB Logo Options A Language Information Position Deinterlace HDTV Aspect ratio ...ON ON 19200 1400 HDCP e Main: "Options" menu ("Page 2") Notes • The display language of the menus is set to "English" when the projector is selected) Image adj. R GB Logo Horiz.disp.pos. 12 Options Vert.disp.pos. 12 A Language Horiz.DIST pos. 1 Information 4 "Position" ...
...input is the same as when PC input is selected) Image adj. Set up R GB Logo Options A Language Information Input Switcher PC1 CH.0 Lamp time 1234 h t Main: "Information" menu Submenu Image adj. Set up R GB Logo Options A Language Information Position Deinterlace HDTV Aspect ratio ...ON ON 19200 1400 HDCP e Main: "Options" menu ("Page 2") Notes • The display language of the menus is set to "English" when the projector is selected) Image adj. R GB Logo Horiz.disp.pos. 12 Options Vert.disp.pos. 12 A Language Horiz.DIST pos. 1 Information 4 "Position" ...

Instruction Manual
Page 35
... not possible for setting) The adjusted value will be reflected to exit the menu mode. ENTER Remote control unit 35 Adjustments and Settings Using Menus LAMP TEMP STAND BY OPERATE PC VIDEO V-KEYSTONE H-KEYSTONE VOL. ENTER Main unit : Select menu items and adjustment items. : Perform setting of the ..., press to the "Set up" screen of the selected adjustment item. (Some items are accessed and operated using the following buttons on the projector/remote control: Button Main unit Remote control unit Function MENU MENU Displays the main menu on main ENTER ENTER menu.
... not possible for setting) The adjusted value will be reflected to exit the menu mode. ENTER Remote control unit 35 Adjustments and Settings Using Menus LAMP TEMP STAND BY OPERATE PC VIDEO V-KEYSTONE H-KEYSTONE VOL. ENTER Main unit : Select menu items and adjustment items. : Perform setting of the ..., press to the "Set up" screen of the selected adjustment item. (Some items are accessed and operated using the following buttons on the projector/remote control: Button Main unit Remote control unit Function MENU MENU Displays the main menu on main ENTER ENTER menu.

Instruction Manual
Page 36
... item • The content of the selected item is displayed on the screen. The menu will disappear from the screen. Adjustments and Settings Using Menus LAMP PC TEMP VIDEO STAND BY OPERATE MENU 1 V-KEYSTONE H-KEYSTONE VOL. MENU EXIT ENTER PRESET HIDE 1 6 3, 5 5 2, 4 36 Image adj. To exit after the adjustment, press the...
... item • The content of the selected item is displayed on the screen. The menu will disappear from the screen. Adjustments and Settings Using Menus LAMP PC TEMP VIDEO STAND BY OPERATE MENU 1 V-KEYSTONE H-KEYSTONE VOL. MENU EXIT ENTER PRESET HIDE 1 6 3, 5 5 2, 4 36 Image adj. To exit after the adjustment, press the...

Instruction Manual
Page 40
... "1-10" : switcher number. played correctly. Displays the number of accumulated used hours of this projector. When no image signal is selected "Input" "Switcher" "Resolution" "Frequency H" "Frequency V" "Lamp time" Displays the computer input ([PC1], [PC2], [PC3]) when projecting. For details, please check with your authorized dealer. When PC input is inputted "Input" "Switcher...
... "1-10" : switcher number. played correctly. Displays the number of accumulated used hours of this projector. When no image signal is selected "Input" "Switcher" "Resolution" "Frequency H" "Frequency V" "Lamp time" Displays the computer input ([PC1], [PC2], [PC3]) when projecting. For details, please check with your authorized dealer. When PC input is inputted "Input" "Switcher...

Instruction Manual
Page 41
... adj. Setting the "Aspect ratio" Set the "Aspect ratio" when image is input from the [VIDEO], [Y/C] or [PC2] terminals. 1. Project the image onto the screen LAMP PC TEMP VIDEO STAND BY OPERATE MENU 2 V-KEYSTONE H-KEYSTONE VOL. Press the cursor buttons to select "Set up" and press [ENTER] or cursor ( ᮣ ) •...
... adj. Setting the "Aspect ratio" Set the "Aspect ratio" when image is input from the [VIDEO], [Y/C] or [PC2] terminals. 1. Project the image onto the screen LAMP PC TEMP VIDEO STAND BY OPERATE MENU 2 V-KEYSTONE H-KEYSTONE VOL. Press the cursor buttons to select "Set up" and press [ENTER] or cursor ( ᮣ ) •...

Instruction Manual
Page 42
Image adj. Setting "Aspect ratio" and "Resize" LAMP PC TEMP VIDEO STAND BY OPERATE MENU 6 V-KEYSTONE H-KEYSTONE VOL. Set up R GB Logo Options A Language Information Aspect ratio 4:3 16:9 Zoom 6. Press the [MENU] button ...
Image adj. Setting "Aspect ratio" and "Resize" LAMP PC TEMP VIDEO STAND BY OPERATE MENU 6 V-KEYSTONE H-KEYSTONE VOL. Set up R GB Logo Options A Language Information Aspect ratio 4:3 16:9 Zoom 6. Press the [MENU] button ...

Instruction Manual
Page 43
Set up R GB Logo Options A Language Information Position Tracking Phase Resize Clamp Sync level ENTER 123 12 ENTER ST BP Low Std High 4. LAMP PC TEMP VIDEO STAND BY OPERATE MENU 2 V-KEYSTONE H-KEYSTONE VOL. Set up R GB Logo Options A Language Information Position Tracking Phase Resize Clamp Sync level ENTER ...
Set up R GB Logo Options A Language Information Position Tracking Phase Resize Clamp Sync level ENTER 123 12 ENTER ST BP Low Std High 4. LAMP PC TEMP VIDEO STAND BY OPERATE MENU 2 V-KEYSTONE H-KEYSTONE VOL. Set up R GB Logo Options A Language Information Position Tracking Phase Resize Clamp Sync level ENTER ...

Instruction Manual
Page 44
... horizontally Image loss : No Aspect ratio : Same Image cannot be largely projected Image loss : No Aspect ratio : Same Optimum image Setting "Aspect ratio" and "Resize" LAMP PC TEMP VIDEO STAND BY OPERATE MENU 6 V-KEYSTONE H-KEYSTONE VOL. pleted • The menu disappears from the screen. MENU EXIT ENTER 5 5. Select "Zoom" with HDCP...
... horizontally Image loss : No Aspect ratio : Same Image cannot be largely projected Image loss : No Aspect ratio : Same Optimum image Setting "Aspect ratio" and "Resize" LAMP PC TEMP VIDEO STAND BY OPERATE MENU 6 V-KEYSTONE H-KEYSTONE VOL. pleted • The menu disappears from the screen. MENU EXIT ENTER 5 5. Select "Zoom" with HDCP...

