Instruction Manual
Page 2
... safety and operating instructions should be hazardous. - The product should be read these materials may cause harmful interference to Part 15 of the FCC Rules. SAFETY PRECAUTIONS IMPORTANT INFORMATION NOTICE (For USA) Language for Manuals of Products using HID Lamps (that contains mercury) This product has a High Intensity Discharge (HID) lamp that cannot support its installation, use and service. Do not project video images with...
... safety and operating instructions should be hazardous. - The product should be read these materials may cause harmful interference to Part 15 of the FCC Rules. SAFETY PRECAUTIONS IMPORTANT INFORMATION NOTICE (For USA) Language for Manuals of Products using HID Lamps (that contains mercury) This product has a High Intensity Discharge (HID) lamp that cannot support its installation, use and service. Do not project video images with...
Instruction Manual
Page 3
... tends to install the unit (e.g. Safety Precaution - Slots and openings in this product is a high pressure mercury lamp. These ensure reliable operation of this product, ask the service technician to perform safety checks to determine that the power cable used in the cabinet are not sure of the type of power supply to be blocked or covered. (The openings should turn off the power of any...
... tends to install the unit (e.g. Safety Precaution - Slots and openings in this product is a high pressure mercury lamp. These ensure reliable operation of this product, ask the service technician to perform safety checks to determine that the power cable used in the cabinet are not sure of the type of power supply to be blocked or covered. (The openings should turn off the power of any...
Instruction Manual
Page 5
... the cabinet Please wipe the cabinet clean with a soft cloth. Use special care when projecting video games or computer program images. How to use the projector after removing the lens cap. When using the projector Please use the [SCREEN TRIGGER] terminal cable ● It may cause short circuit if the supplied [SCREEN TRIGGER] terminal cable is equipped with a screen mode switch function that of the inputted images (e.g. peeling paint): • Do not...
... the cabinet Please wipe the cabinet clean with a soft cloth. Use special care when projecting video games or computer program images. How to use the projector after removing the lens cap. When using the projector Please use the [SCREEN TRIGGER] terminal cable ● It may cause short circuit if the supplied [SCREEN TRIGGER] terminal cable is equipped with a screen mode switch function that of the inputted images (e.g. peeling paint): • Do not...
Instruction Manual
Page 6
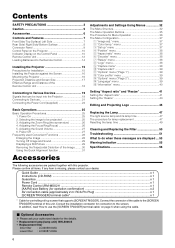
...; Replacement lamp (lamp unit) BHL5006-S • Replacement filter Inner filter : LC32058-002A Lower filter : LC32087-002A 6 Selecting the image to be input into the Remote Control 14 Installing the Projector 15 Precautions for lamp replacement 47 Resetting the lamp time 49 Cleaning and Replacing the Filter 50 Troubleshooting 51 What to the screen. Adjusting the Sound Volume 27 6. Adjusting the Focus Ring(Focus 26 5. Power Off 27 Frequently used Convenient Functions 28 Enlarging the Image 28 Turning Off Image and Sound 29 Displaying a Still Picture 29 Removing...
...; Replacement lamp (lamp unit) BHL5006-S • Replacement filter Inner filter : LC32058-002A Lower filter : LC32087-002A 6 Selecting the image to be input into the Remote Control 14 Installing the Projector 15 Precautions for lamp replacement 47 Resetting the lamp time 49 Cleaning and Replacing the Filter 50 Troubleshooting 51 What to the screen. Adjusting the Sound Volume 27 6. Adjusting the Focus Ring(Focus 26 5. Power Off 27 Frequently used Convenient Functions 28 Enlarging the Image 28 Turning Off Image and Sound 29 Displaying a Still Picture 29 Removing...
Instruction Manual
Page 7
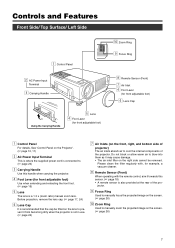
... adjustable foot) 6 Lens Cap 1 Control Panel For details, See 'Control Panel on the screen. (☞ page 26) 7 Do not block or allow warm air to manually zoom the projected image on the Projector'. (☞ page 10, 11) 2 AC Power Input Terminal This is where the supplied power cord is connected to. (☞ page 24) 3 Carrying Handle Use this sensor. (☞ page 18) • A remote sensor is not in use. (☞ page 24) 7 Air...
... adjustable foot) 6 Lens Cap 1 Control Panel For details, See 'Control Panel on the screen. (☞ page 26) 7 Do not block or allow warm air to manually zoom the projected image on the Projector'. (☞ page 10, 11) 2 AC Power Input Terminal This is where the supplied power cord is connected to. (☞ page 24) 3 Carrying Handle Use this sensor. (☞ page 18) • A remote sensor is not in use. (☞ page 24) 7 Air...

Instruction Manual
Page 9
... sync. The projector can also be controlled by the projector speaker. (Audio output for Y/C (S-Video) signals. In this terminal. (☞ page 22) • The menu screen for HDCP compatible signal input is the same as multipurpose video input terminals that supports [SCREEN TRIGGER]. Connect the display output terminal of a video deck, etc. (☞ page 21) 9 [VIDEO] Input Terminal (RCA pin jack) This is an input terminal for vertical sync (V) and horizontal sync (H). 2 [PC1] Input...
... sync. The projector can also be controlled by the projector speaker. (Audio output for Y/C (S-Video) signals. In this terminal. (☞ page 22) • The menu screen for HDCP compatible signal input is the same as multipurpose video input terminals that supports [SCREEN TRIGGER]. Connect the display output terminal of a video deck, etc. (☞ page 21) 9 [VIDEO] Input Terminal (RCA pin jack) This is an input terminal for vertical sync (V) and horizontal sync (H). 2 [PC1] Input...
Instruction Manual
Page 10
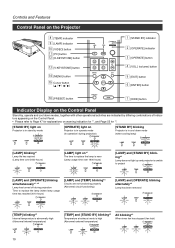
...(fan lock) STAND BY LAMP TEMP OPERATE MENU EXIT ENTER PRESET HIDE 1 [STAND BY] indicator 2 [OPERATE] indicator 3 [OPERATE] button 4 [VOL.] (volume) button 5 [EXIT] button 6 [ENTER] button 7 [HIDE] button Indicator Display on the Control Panel Stand-by, operate and cool down mode (when cooling lamp) STAND BY LAMP TEMP OPERATE [LAMP] blinking*1 Lamp life has expired (Lamp time over 1900 hours) STAND BY LAMP TEMP OPERATE [LAMP] and [STAND BY] blink- Controls and Features Control Panel on Projector is in operate mode (In operation/ during projection Time to replace the lamp...
...(fan lock) STAND BY LAMP TEMP OPERATE MENU EXIT ENTER PRESET HIDE 1 [STAND BY] indicator 2 [OPERATE] indicator 3 [OPERATE] button 4 [VOL.] (volume) button 5 [EXIT] button 6 [ENTER] button 7 [HIDE] button Indicator Display on the Control Panel Stand-by, operate and cool down mode (when cooling lamp) STAND BY LAMP TEMP OPERATE [LAMP] blinking*1 Lamp life has expired (Lamp time over 1900 hours) STAND BY LAMP TEMP OPERATE [LAMP] and [STAND BY] blink- Controls and Features Control Panel on Projector is in operate mode (In operation/ during projection Time to replace the lamp...
Instruction Manual
Page 11
Blinking : Indicates the lamp has been used in standby mode, pressing this button will cause the menu to temporarily halt the audio and video output. When the main menu is displayed, pressing this button for more than 1900 hours. This button does not work within approximately 1 minute of the light-source lamp being turned on the menu screen, or to choose the "Reset" option etc. (☞ page 35) 7 [HIDE] button Use this button to main menu). Note Please...
Blinking : Indicates the lamp has been used in standby mode, pressing this button will cause the menu to temporarily halt the audio and video output. When the main menu is displayed, pressing this button for more than 1900 hours. This button does not work within approximately 1 minute of the light-source lamp being turned on the menu screen, or to choose the "Reset" option etc. (☞ page 35) 7 [HIDE] button Use this button to main menu). Note Please...
Instruction Manual
Page 13
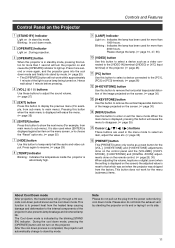
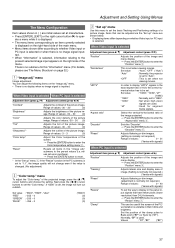
...] input terminal is in the projector memory and stills the picture on the screen) the adjusted value is reset to remove the vertical trapezoidal distortion of image qual- is displayed but it will turn off, cool down and finally enter the standby mode. (☞ page 25) • The [OPERATE] button will not work for the [VOL.], [V-KEYSTONE] and [H-KEYSTONE] adjustments done on the control panel and the [VOLUME], [V-KEYSTONE], [H-KEYSTONE] and [DIGITAL ZOOM] adjustments done...
...] input terminal is in the projector memory and stills the picture on the screen) the adjusted value is reset to remove the vertical trapezoidal distortion of image qual- is displayed but it will turn off, cool down and finally enter the standby mode. (☞ page 25) • The [OPERATE] button will not work for the [VOL.], [V-KEYSTONE] and [H-KEYSTONE] adjustments done on the control panel and the [VOLUME], [V-KEYSTONE], [H-KEYSTONE] and [DIGITAL ZOOM] adjustments done...
Instruction Manual
Page 17
... during installation. The projected image size may vary depending on the width of the range in the table above are provided only as a guide (reference). Installing the Projector Projection Distance and Screen Size • This projector uses 1.3x manual zoom lens for projection. • Although the focusable projection distance is about 1.6 m ~ 12 m, the projection distance recommendable for performance is about 81.7 % that of a 16:9 aspect-ratio screen. Install the projector within this range and adjust the screen size...
... during installation. The projected image size may vary depending on the width of the range in the table above are provided only as a guide (reference). Installing the Projector Projection Distance and Screen Size • This projector uses 1.3x manual zoom lens for projection. • Although the focusable projection distance is about 1.6 m ~ 12 m, the projection distance recommendable for performance is about 81.7 % that of a 16:9 aspect-ratio screen. Install the projector within this range and adjust the screen size...

Instruction Manual
Page 18
... remote control fails to work . Installing the Projector Effective Range and Distance of the Remote Control Unit Ⅵ Using as a wired control unit. • When connected to the remote cable, the supplied remote control's transmitter and the projector's sensor do not function. • Please keep within 7 m. OPERATE ZDIOGOITMAL S H-KEYSTONE SCREEN W VIDEO PC V-KEYSTONE 20˚ 20˚ B 30˚ 30˚ Remote Control Sensor (rear) Projector Projector A 30˚ 30˚ 20˚ 20˚ PC V-KEYSTONE VIDEO VOLUME H-KEYSTONE MENU...
... remote control fails to work . Installing the Projector Effective Range and Distance of the Remote Control Unit Ⅵ Using as a wired control unit. • When connected to the remote cable, the supplied remote control's transmitter and the projector's sensor do not function. • Please keep within 7 m. OPERATE ZDIOGOITMAL S H-KEYSTONE SCREEN W VIDEO PC V-KEYSTONE 20˚ 20˚ B 30˚ 30˚ Remote Control Sensor (rear) Projector Projector A 30˚ 30˚ 20˚ 20˚ PC V-KEYSTONE VIDEO VOLUME H-KEYSTONE MENU...
Instruction Manual
Page 25
...; Messages are done, follow the procedures below: 1. Notes • Sound is input to stabilize. 2. Selecting the image to be projected. The user can choose from sound signals connected to the [AUDIO IN] terminal. • When no image is formed from 8 national languages. (☞ page 39) However, the input mode ([PC1], [PC2], [PC3], [Y/C], [VIDEO]) and button indications ([FREEZE], [D.ZOOM], [EXIT]) are only displayed in the "Language" menu. Light on OPERATE OPERATE STAND BY LAMP TEMP OPERATE Projector: Remote Control panel control...
...; Messages are done, follow the procedures below: 1. Notes • Sound is input to stabilize. 2. Selecting the image to be projected. The user can choose from sound signals connected to the [AUDIO IN] terminal. • When no image is formed from 8 national languages. (☞ page 39) However, the input mode ([PC1], [PC2], [PC3], [Y/C], [VIDEO]) and button indications ([FREEZE], [D.ZOOM], [EXIT]) are only displayed in the "Language" menu. Light on OPERATE OPERATE STAND BY LAMP TEMP OPERATE Projector: Remote Control panel control...
Instruction Manual
Page 32
...; The menu screen for HDCP compatible signal input is the same as when PC input is selected. Adjustments and Settings Using Menus The menus displayed on the screen are displayed only in prog.(approx. 2min) Signal can be captured Reduce capt.size p "Capture start ( - ) 12 12 ( + ) ENTER 9 "Capture menu" Image adj. The Menu Structure The menus of the menus is selected Main menu Image adj. RED GREEN BLUE 6500 HIGH User 2 "Color temp." menu Image adj. Set up R GB...
...; The menu screen for HDCP compatible signal input is the same as when PC input is selected. Adjustments and Settings Using Menus The menus displayed on the screen are displayed only in prog.(approx. 2min) Signal can be captured Reduce capt.size p "Capture start ( - ) 12 12 ( + ) ENTER 9 "Capture menu" Image adj. The Menu Structure The menus of the menus is selected Main menu Image adj. RED GREEN BLUE 6500 HIGH User 2 "Color temp." menu Image adj. Set up R GB...
Instruction Manual
Page 37
... picture image. "Phase" Adjusts flickering or dim images. (setting is normally not required.) Range of image. (Setting is normally not required.) {Varies with signals} When PC input is changed. (No adjustment) 2 "Color temp." Values : "ST", "BP" {"BP"} 37 Range of values: -30 ~ 30 {0} "Color" Adjusts the color density of the projected image, press the cursor buttons and choose the setting. When Video input is set upon purchase). [ Press the [ENTER] button to reset. * In the "Set up " menu Use...
... picture image. "Phase" Adjusts flickering or dim images. (setting is normally not required.) Range of image. (Setting is normally not required.) {Varies with signals} When PC input is changed. (No adjustment) 2 "Color temp." Values : "ST", "BP" {"BP"} 37 Range of values: -30 ~ 30 {0} "Color" Adjusts the color density of the projected image, press the cursor buttons and choose the setting. When Video input is set upon purchase). [ Press the [ENTER] button to reset. * In the "Set up " menu Use...

Instruction Manual
Page 45
... user-set logo. (Factory setting is "ON") • When the D-ILA or user-set logo is displayed after the projector is turned on, pressing the [EXIT] button will delete the logo. • During video signal input, pressing the [EXIT] button on the remote control unit when the menu is set to "Zoom" during video signal input or when "Resize" is not displayed causes the logo to "Zoom" during presentations, etc. 1. MENU EXIT ENTER 3,5 2 4 PC VIDEO OPERATE W V-KEYSTONE H-KEYSTONE SCREEN DIGITAL ZOOM S FREEZE VOLUME FOCUS...
... user-set logo. (Factory setting is "ON") • When the D-ILA or user-set logo is displayed after the projector is turned on, pressing the [EXIT] button will delete the logo. • During video signal input, pressing the [EXIT] button on the remote control unit when the menu is set to "Zoom" during video signal input or when "Resize" is not displayed causes the logo to "Zoom" during presentations, etc. 1. MENU EXIT ENTER 3,5 2 4 PC VIDEO OPERATE W V-KEYSTONE H-KEYSTONE SCREEN DIGITAL ZOOM S FREEZE VOLUME FOCUS...
Instruction Manual
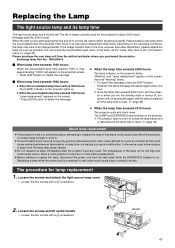
Page 47
... changed earlier. the word "Warning" blinks. • To cancel the message, press the [EXIT] button. Exchange lamp Part No.: BHL5006-S Ⅵ When lamp time exceeds 1000 hours: When the accumulated lamp time reaches 1000, a message indicating "1000h" will appear on the projector blinks. "Warning" and "Lamp replacement" appear on the projector lights up the handle • Loosen the two screws with a ª screwdriver. 2. Also, never attempt to re-use only genuine replacement parts. Replacing a lamp while the power cord...
... changed earlier. the word "Warning" blinks. • To cancel the message, press the [EXIT] button. Exchange lamp Part No.: BHL5006-S Ⅵ When lamp time exceeds 1000 hours: When the accumulated lamp time reaches 1000, a message indicating "1000h" will appear on the projector blinks. "Warning" and "Lamp replacement" appear on the projector lights up the handle • Loosen the two screws with a ª screwdriver. 2. Also, never attempt to re-use only genuine replacement parts. Replacing a lamp while the power cord...
Instruction Manual
Page 49
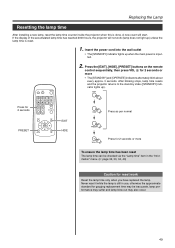
... the lamp is inputted. If the display of the accumulated lamp time has reached 2000 hours, the projector will start. Insert the power cord into the wall outlet • The [STAND BY] indicator lights up when the main power is still in the "Information" menu. (☞ page 32, 33, 34, 40) Caution for 2 seconds PC VIDEO OPERATE W V-KEYSTONE H-KEYSTONE SCREEN DIGITAL ZOOM S FREEZE VOLUME FOCUS QUICK ALIGN. 2. A new count will not work Reset the lamp time only...
... the lamp is inputted. If the display of the accumulated lamp time has reached 2000 hours, the projector will start. Insert the power cord into the wall outlet • The [STAND BY] indicator lights up when the main power is still in the "Information" menu. (☞ page 32, 33, 34, 40) Caution for 2 seconds PC VIDEO OPERATE W V-KEYSTONE H-KEYSTONE SCREEN DIGITAL ZOOM S FREEZE VOLUME FOCUS QUICK ALIGN. 2. A new count will not work Reset the lamp time only...

Instruction Manual
Page 51
..." adjusted correctly? • Adjust "Brightness" using the menu. 37 Is volume level set at minimum? • Adjust volume with the [VIDEO] and [PC] buttons. • Connect devices correctly. 25, 26 21, 22 Are signals being supplied from the main power outlet, insert the filter properly and plug in again. 25, 27, 50 Has the lamp life expired? (Has the lamp time reached 2000 hours?) • After the projector goes...
..." adjusted correctly? • Adjust "Brightness" using the menu. 37 Is volume level set at minimum? • Adjust volume with the [VIDEO] and [PC] buttons. • Connect devices correctly. 25, 26 21, 22 Are signals being supplied from the main power outlet, insert the filter properly and plug in again. 25, 27, 50 Has the lamp life expired? (Has the lamp time reached 2000 hours?) • After the projector goes...
Instruction Manual
Page 54
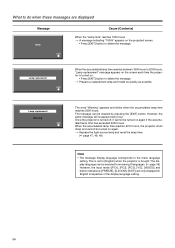
... 39) However, the input mode ([PC1], [PC2], [PC3], [Y/C], [VIDEO]) and button indications ([FREEZE], [D.ZOOM], [EXIT]) are displayed Message 1000h EXIT Cause (Contents) When the "Lamp time" reaches 1000 hours [ A message indicating "1000h" appears on again if the accumulated lamp time has exceeded 2000 hours. Lamp replacement EXIT When the accumulated lamp time reaches between 1900 hours to 2000 hours, "Lamp replacement" message appears on the screen each time the projector is turned on again. [ Replace the light-source lamp and reset the lamp time. (☞ page...
... 39) However, the input mode ([PC1], [PC2], [PC3], [Y/C], [VIDEO]) and button indications ([FREEZE], [D.ZOOM], [EXIT]) are displayed Message 1000h EXIT Cause (Contents) When the "Lamp time" reaches 1000 hours [ A message indicating "1000h" appears on again if the accumulated lamp time has exceeded 2000 hours. Lamp replacement EXIT When the accumulated lamp time reaches between 1900 hours to 2000 hours, "Lamp replacement" message appears on the screen each time the projector is turned on again. [ Replace the light-source lamp and reset the lamp time. (☞ page...
Instruction Manual
Page 55
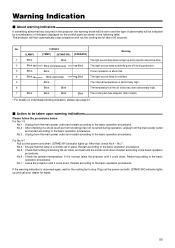
... cooling fan for repair. 55 Blink The internal temperature is misfitted. Blink Blink Blink The cooling fan has stopped. (Fan locked) • For details on the control panel as from knocking) has not occurred during projection. Restart according to the basic operation procedures. Restart according to the basic operation procedures. Restart according to the basic operation procedures. No. [LAMP] 1 Blink 2 Blink 3 Blink 4 Blink 5 6 7 Blink Indicator [TEMP] [STAND BY] [OPERATE] Warning Blink The light-source lamp does not light up and projection cannot...
... cooling fan for repair. 55 Blink The internal temperature is misfitted. Blink Blink Blink The cooling fan has stopped. (Fan locked) • For details on the control panel as from knocking) has not occurred during projection. Restart according to the basic operation procedures. Restart according to the basic operation procedures. Restart according to the basic operation procedures. No. [LAMP] 1 Blink 2 Blink 3 Blink 4 Blink 5 6 7 Blink Indicator [TEMP] [STAND BY] [OPERATE] Warning Blink The light-source lamp does not light up and projection cannot...


