Instruction Manual
Page 1
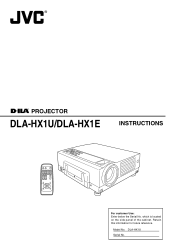
Retain this information for future reference. DLA-HX1U Serial No. Model No. ® ® PROJECTOR DLA-HX1U/DLA-HX1E INSTRUCTIONS PC VIDEO OPERATE W V-KEYSTONE H-KEYSTONE SCREEN DIGITAL ZOOM S FREEZE VOLUME FOCUS QUICK ALIGN. MENU EXIT ENTER PRESET HIDE For customer Use: Enter below the Serial No. which is located on the side panel of the cabinet.
Retain this information for future reference. DLA-HX1U Serial No. Model No. ® ® PROJECTOR DLA-HX1U/DLA-HX1E INSTRUCTIONS PC VIDEO OPERATE W V-KEYSTONE H-KEYSTONE SCREEN DIGITAL ZOOM S FREEZE VOLUME FOCUS QUICK ALIGN. MENU EXIT ENTER PRESET HIDE For customer Use: Enter below the Serial No. which is located on the side panel of the cabinet.

Instruction Manual
Page 2
... the manufacturer. - FCC INFORMATION (U.S.A. ceiver. • Connect the equipment into the D-ILA device. Use special care when projecting video games or computer program images. All warnings on a circuit...reduce the risk of mercury. Refer servicing to high temperature, as they may be - This projector is connected. • Consult the dealer or an experienced radio/TV technician for cleaning. ... Please read be regulated in a place that cannot support its installation, use attachments not recommended by JVC could fall , causing serious injury to a child or adult, and...
... the manufacturer. - FCC INFORMATION (U.S.A. ceiver. • Connect the equipment into the D-ILA device. Use special care when projecting video games or computer program images. All warnings on a circuit...reduce the risk of mercury. Refer servicing to high temperature, as they may be - This projector is connected. • Consult the dealer or an experienced radio/TV technician for cleaning. ... Please read be regulated in a place that cannot support its installation, use attachments not recommended by JVC could fall , causing serious injury to a child or adult, and...
Instruction Manual
Page 3
... rack unless proper ventilation is provided and the manufacturer's instructions have fallen on the label. It should never be sure the service technician has used for the projector is a high pressure mercury lamp. If you are not sure of the type of power supply to install the proper outlet. If you... are unable to insert the plug into the outlet, contact your electrician to your home, consult your country. Do not defeat the safety purpose of the...
... rack unless proper ventilation is provided and the manufacturer's instructions have fallen on the label. It should never be sure the service technician has used for the projector is a high pressure mercury lamp. If you are not sure of the type of power supply to install the proper outlet. If you... are unable to insert the plug into the outlet, contact your electrician to your home, consult your country. Do not defeat the safety purpose of the...
Instruction Manual
Page 4
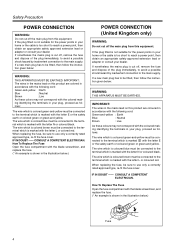
... the letter N or coloured black. When replacing the fuse, be sure to the terminal which is colored green-and-yellow must be connected to use only a correctly rated approved type, re-fit the fuse cover. How To Replace The Fuse Open the fuse compartment with the letter E or ...by inadvertent connection to reach a power point, then obtain an appropriate safety approved extension lead or adapter or consult your home or the cable is too short to be connected to use only a correctly rated approved type, re-fit the fuse cover. The wire which is shown in the illustration below ...
... the letter N or coloured black. When replacing the fuse, be sure to the terminal which is colored green-and-yellow must be connected to use only a correctly rated approved type, re-fit the fuse cover. How To Replace The Fuse Open the fuse compartment with the letter E or ...by inadvertent connection to reach a power point, then obtain an appropriate safety approved extension lead or adapter or consult your home or the cable is too short to be connected to use only a correctly rated approved type, re-fit the fuse cover. The wire which is shown in the illustration below ...
Instruction Manual
Page 5
... care when projecting video games or computer program images. Please bear this unit may break down due to heat. Using the projector ● Remove the Lens Cap when using the cable, connect it to the screen before connecting to this unit outputs a DC +12 V / max. 100 mA signal. The cap...] terminal cable ● It may constitute an infringement of the Copyright Act. 5 Caution About burning-in of the D-ILA device ● Do not allow it to come into the D-ILA device. Care ● Dirt in damage, fire or electrical shock. ● Leave the connection of the room Please avoid...
... care when projecting video games or computer program images. Please bear this unit may break down due to heat. Using the projector ● Remove the Lens Cap when using the cable, connect it to the screen before connecting to this unit outputs a DC +12 V / max. 100 mA signal. The cap...] terminal cable ● It may constitute an infringement of the Copyright Act. 5 Caution About burning-in of the D-ILA device ● Do not allow it to come into the D-ILA device. Care ● Dirt in damage, fire or electrical shock. ● Leave the connection of the room Please avoid...
Instruction Manual
Page 6
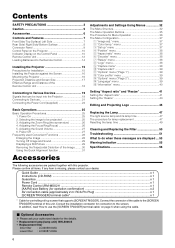
... 7 Front Side/ Top Surface/ Left Side 7 Rear Side/ Right Side/ Bottom Surface 8 Connector Panel 9 Control Panel on the Projector 10 Indicator Display on page 5 when using the cable. Ⅵ Optional Accessories ❈ Please ask your dealer. Adjusting the Zoom Ring (the screen size 26 4. menu 37...a Still Picture 29 Removing the Trapezoidal Distortion of this projector. In addition, read 'How to use the [SCREEN TRIGGER] terminal cable' on the Control Panel 10 Remote Control Unit 12 Loading Batteries into the Projector 19 Connecting to do when these messages are displayed .......
... 7 Front Side/ Top Surface/ Left Side 7 Rear Side/ Right Side/ Bottom Surface 8 Connector Panel 9 Control Panel on the Projector 10 Indicator Display on page 5 when using the cable. Ⅵ Optional Accessories ❈ Please ask your dealer. Adjusting the Zoom Ring (the screen size 26 4. menu 37...a Still Picture 29 Removing the Trapezoidal Distortion of this projector. In addition, read 'How to use the [SCREEN TRIGGER] terminal cable' on the Control Panel 10 Remote Control Unit 12 Loading Batteries into the Projector 19 Connecting to do when these messages are displayed .......
Instruction Manual
Page 7
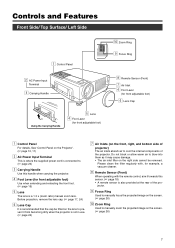
...air inlet filter on the right side cannot be fitted on the lens to prevent it towards this handle when carrying the projector. 4 Foot Lever (for front adjustable foot) Use when extending and retracting the front foot. (☞ page 15) 5 Lens The lens is connected to cool the internal...cap. (☞ page 17, 24) 6 Lens Cap It is also provided at the rear of the projector. Controls and Features Front Side/ Top Surface/ Left Side 1 Control Panel 2 AC Power Input Terminal 3 Carrying Handle Using the Carrying Handle 5 Lens 4 Foot Lever (for front adjustable foot) p Zoom Ring 9 Focus Ring ...
...air inlet filter on the right side cannot be fitted on the lens to prevent it towards this handle when carrying the projector. 4 Foot Lever (for front adjustable foot) Use when extending and retracting the front foot. (☞ page 15) 5 Lens The lens is connected to cool the internal...cap. (☞ page 17, 24) 6 Lens Cap It is also provided at the rear of the projector. Controls and Features Front Side/ Top Surface/ Left Side 1 Control Panel 2 AC Power Input Terminal 3 Carrying Handle Using the Carrying Handle 5 Lens 4 Foot Lever (for front adjustable foot) p Zoom Ring 9 Focus Ring ...
Instruction Manual
Page 8
... control, aim it forcibly will cause damage to keep the system cool. y Front Adjustable Foot (for adjusting the height and angle) It is not in use. The foot can be adjusted to 'Connector Panel'. (☞ page 9) w Speaker Built-in from the factory. q Connector Panel For details, refer to a maximum angle of...
... control, aim it forcibly will cause damage to keep the system cool. y Front Adjustable Foot (for adjusting the height and angle) It is not in use. The foot can be adjusted to 'Connector Panel'. (☞ page 9) w Speaker Built-in from the factory. q Connector Panel For details, refer to a maximum angle of...

Instruction Manual
Page 9
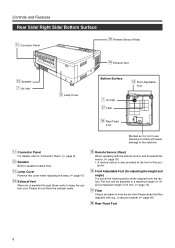
...signals: analog RGB signals, vertical sync (V) signals, and horizontal sync (H) signals/ composite signals (Cs). More than one projector can be connected, please use the conversion adapter (sold . The priority order is H/V>Cs. • When computer signals are input, the uppermost edge ...VIDEO] or [Y/C]. Devices which have component signal output terminals can also be connected. This terminal can be used to connect an external sensor to the projector. In this case, please use separate sync signals for vertical sync (V) and horizontal sync (H). 2 [PC1] Input terminal (D-sub 3 ...
...signals: analog RGB signals, vertical sync (V) signals, and horizontal sync (H) signals/ composite signals (Cs). More than one projector can be connected, please use the conversion adapter (sold . The priority order is H/V>Cs. • When computer signals are input, the uppermost edge ...VIDEO] or [Y/C]. Devices which have component signal output terminals can also be connected. This terminal can be used to connect an external sensor to the projector. In this case, please use separate sync signals for vertical sync (V) and horizontal sync (H). 2 [PC1] Input terminal (D-sub 3 ...
Instruction Manual
Page 11
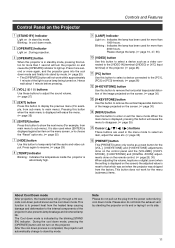
...the screen) the adjusted value is to prevent heat from main menu to that which was set when the projector was shipped from the factory. Blinking : Indicates the lamp has been used in standby mode, pressing this button to display the previous menu (For example, from the power outlet ... go through a 90 seconds cool-down period known as a video connected to the [VIDEO IN] terminal ([VIDEO] or [Y/C] Input terminal) of the projector. (☞ page 25) q [PC] button Use this button to select a device connected to the [PC1], [PC2] or [PC3] terminals. (☞ page 26) w [H-KEYSTONE] button...
...the screen) the adjusted value is to prevent heat from main menu to that which was set when the projector was shipped from the factory. Blinking : Indicates the lamp has been used in standby mode, pressing this button to display the previous menu (For example, from the power outlet ... go through a 90 seconds cool-down period known as a video connected to the [VIDEO IN] terminal ([VIDEO] or [Y/C] Input terminal) of the projector. (☞ page 25) q [PC] button Use this button to select a device connected to the [PC1], [PC2] or [PC3] terminals. (☞ page 26) w [H-KEYSTONE] button...
Instruction Manual
Page 13
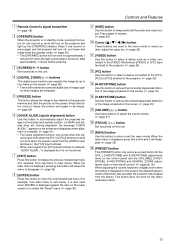
... to freeze the picture and again to de-freeze. (☞ page 29) 6 [QUICK ALIGN.] (quick alignment) button Use this button to that which was set when the projector was shipped from when the light-source lamp is turned on. nal is complete. (☞ page 31) • The... IN] terminal ([VIDEO] or [Y/C] Input terminal) of the projector. (☞ page 25) w [PC] button Use this button to select a device connected to the [PC1], [PC2] or [PC3] terminal of the projector. (☞ page 26) e [H-KEYSTONE] button Use this button to remove the horizontal trapezoidal distortion of the image projected...
... to freeze the picture and again to de-freeze. (☞ page 29) 6 [QUICK ALIGN.] (quick alignment) button Use this button to that which was set when the projector was shipped from when the light-source lamp is turned on. nal is complete. (☞ page 31) • The... IN] terminal ([VIDEO] or [Y/C] Input terminal) of the projector. (☞ page 25) w [PC] button Use this button to select a device connected to the [PC1], [PC2] or [PC3] terminal of the projector. (☞ page 26) e [H-KEYSTONE] button Use this button to remove the horizontal trapezoidal distortion of the image projected...
Instruction Manual
Page 14
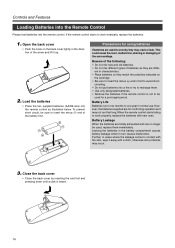
...could cause fire, burn, malfunction, staining or damaging of the arrow and lift it away with new ones. However, the batteries supplied are used for six months to recharge them immediately. circuiting. • Do not put batteries into a fire or try to one year in turn ... the batteries with a cloth, otherwise skin problems may occur. 3. Leaving the batteries in the battery compartment causes battery leakage which in normal use. If the remote control starts to work erratically, replace the batteries. 1. Further, in first to insert the minus · end of batteries...
...could cause fire, burn, malfunction, staining or damaging of the arrow and lift it away with new ones. However, the batteries supplied are used for six months to recharge them immediately. circuiting. • Do not put batteries into a fire or try to one year in turn ... the batteries with a cloth, otherwise skin problems may occur. 3. Leaving the batteries in the battery compartment causes battery leakage which in normal use. If the remote control starts to work erratically, replace the batteries. 1. Further, in first to insert the minus · end of batteries...

Instruction Manual
Page 15
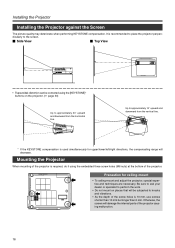
... the exhaust vents. ing places. longed exposure will affect the projector. Adjusting the level of the projector • While pushing the lever upward, raise the pro- Installing the Projector Precautions for Usage This projector uses a light-source lamp which may result in the follow- tion... Where temperature is enclosed in a space of the following properly when installing the projector. Do not use this projector in fire or malfunction. • Projecting images while the projector is level. Extend Foot Lever Shorten 15 After soiling, removing grease/dirt totally...
... the exhaust vents. ing places. longed exposure will affect the projector. Adjusting the level of the projector • While pushing the lever upward, raise the pro- Installing the Projector Precautions for Usage This projector uses a light-source lamp which may result in the follow- tion... Where temperature is enclosed in a space of the following properly when installing the projector. Do not use this projector in fire or malfunction. • Projecting images while the projector is level. Extend Foot Lever Shorten 15 After soiling, removing grease/dirt totally...
Instruction Manual
Page 16
... work. • Do not mount on the projector. (☞ page 30) Up to approximately 10° upward and downward from the horizontal line. Mounting the Projector When mounting of the projector. Otherwise, the screws will be corrected using the embedded three screw holes (M6 nuts) at... the bottom of the projector is used simultaneously for ceiling-mount • To ceiling-mount and adjust...
... work. • Do not mount on the projector. (☞ page 30) Up to approximately 10° upward and downward from the horizontal line. Mounting the Projector When mounting of the projector. Otherwise, the screws will be corrected using the embedded three screw holes (M6 nuts) at... the bottom of the projector is used simultaneously for ceiling-mount • To ceiling-mount and adjust...
Instruction Manual
Page 17
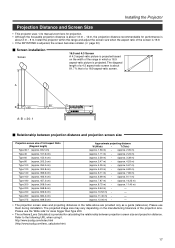
... Distance and Screen Size • This projector uses 1.3x manual zoom lens for projection. • Although the focusable ...the range in the table above are provided only as a guide (reference). Please use them during installation. Install the projector within this range and adjust the screen size when the aspect ratio of the screen .... A B 90˚ 90˚ A:B = 30:1 Ⅵ Relationship between projection screen size and projection distance. Please use the 'Wide side' for sizes bigger than Type 200. • The software [Lens Calculator] is provided for performance is...
... Distance and Screen Size • This projector uses 1.3x manual zoom lens for projection. • Although the focusable ...the range in the table above are provided only as a guide (reference). Please use them during installation. Install the projector within this range and adjust the screen size when the aspect ratio of the screen .... A B 90˚ 90˚ A:B = 30:1 Ⅵ Relationship between projection screen size and projection distance. Please use the 'Wide side' for sizes bigger than Type 200. • The software [Lens Calculator] is provided for performance is...

Instruction Manual
Page 18
... connecting a separately sold remote control (RM-M3010) is about 7 m for direct reception. Installing the Projector Effective Range and Distance of the Remote Control Unit Ⅵ Using as a wireless remote control unit The operable distance of the remote control unit is equivalent to the [... batteries. • When either the remote control unit or projector alone is no equivalent to the projector. The operable distance of the projector. Please check the cable connection. • When a remote cable is used , effective range and distance may decrease. Warranty is not ...
... connecting a separately sold remote control (RM-M3010) is about 7 m for direct reception. Installing the Projector Effective Range and Distance of the Remote Control Unit Ⅵ Using as a wireless remote control unit The operable distance of the remote control unit is equivalent to the [... batteries. • When either the remote control unit or projector alone is no equivalent to the projector. The operable distance of the projector. Please check the cable connection. • When a remote cable is used , effective range and distance may decrease. Warranty is not ...
Instruction Manual
Page 19
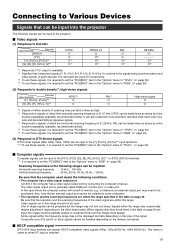
...39) (2) Responds to be projected but the image may not turn out sharp. Connecting to Various Devices Signals that can be input into the projector The following signals can be inputted. The decoders are input, the image could appear. PAL can be made twice as dense by a line...signals cannot be handled depending on the type of range signals can be input to the projector. Ⅵ Video signals (1) Response to signals of the video signal are within this range should not be used meets the following ranges can be purchased. Horizontal scanning frequency : 15 kHz ~ 120...
...39) (2) Responds to be projected but the image may not turn out sharp. Connecting to Various Devices Signals that can be input into the projector The following signals can be inputted. The decoders are input, the image could appear. PAL can be made twice as dense by a line...signals cannot be handled depending on the type of range signals can be input to the projector. Ⅵ Video signals (1) Response to signals of the video signal are within this range should not be used meets the following ranges can be purchased. Horizontal scanning frequency : 15 kHz ~ 120...
Instruction Manual
Page 20
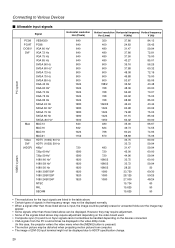
... erased or unwanted folds-over the image may appear. • Some signals other than those listed above may require adjustment depending on the video board used. • Composite sync (Cs) and G on Sync signals cannot sometimes be handled depending on the devices connected. • VGA signals from the... PC could at times be displayed in the video 480p mode. (In this case, the projector enters the video menu when the [MENU] button is pressed.) • The motion picture may require adjustment. • Some of [DVI-D] input ...
... erased or unwanted folds-over the image may appear. • Some signals other than those listed above may require adjustment depending on the video board used. • Composite sync (Cs) and G on Sync signals cannot sometimes be handled depending on the devices connected. • VGA signals from the... PC could at times be displayed in the video 480p mode. (In this case, the projector enters the video menu when the [MENU] button is pressed.) • The motion picture may require adjustment. • Some of [DVI-D] input ...
Instruction Manual
Page 21
... the device. Ⅵ Connecting to Video Devices • Thoroughly read the manual that comes with much jitter is used, the "PC2(BNC)" item in TBC. • Use of an extension cable to connect a video device and the projector could cause image deterioration or projection failure. • When a signal with each video device. •...
... the device. Ⅵ Connecting to Video Devices • Thoroughly read the manual that comes with much jitter is used, the "PC2(BNC)" item in TBC. • Use of an extension cable to connect a video device and the projector could cause image deterioration or projection failure. • When a signal with each video device. •...

Instruction Manual
Page 22
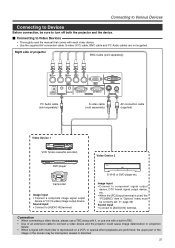
... To [PC1] To [DVI] DVI PC3 PC1 SCREEN REMOTE TRIGGER AUDIO IN RS-232C OUT RS-232C IN CONTROL Right side of projector Y/C VIDEO VIDEO IN To monitor connector Notebook Type To monitor connector ❈ There are some notebook type computers that come with the computer... used , "PC2(BNC)" must be selected from the "Options" menu. (☞ page 39) • When connecting an audio output terminal such as a computer sound source to the projector, connect to the [AUDIO IN] terminal using the separately available audio cable. • ...
... To [PC1] To [DVI] DVI PC3 PC1 SCREEN REMOTE TRIGGER AUDIO IN RS-232C OUT RS-232C IN CONTROL Right side of projector Y/C VIDEO VIDEO IN To monitor connector Notebook Type To monitor connector ❈ There are some notebook type computers that come with the computer... used , "PC2(BNC)" must be selected from the "Options" menu. (☞ page 39) • When connecting an audio output terminal such as a computer sound source to the projector, connect to the [AUDIO IN] terminal using the separately available audio cable. • ...