Instruction Manual
Page 1
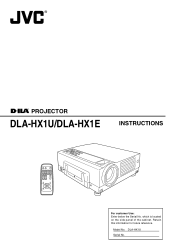
which is located on the side panel of the cabinet. Retain this information for future reference. Model No. DLA-HX1U Serial No. ® ® PROJECTOR DLA-HX1U/DLA-HX1E INSTRUCTIONS PC VIDEO OPERATE W V-KEYSTONE H-KEYSTONE SCREEN DIGITAL ZOOM S FREEZE VOLUME FOCUS QUICK ALIGN. MENU EXIT ENTER PRESET HIDE For customer Use: Enter below the Serial No.
which is located on the side panel of the cabinet. Retain this information for future reference. Model No. DLA-HX1U Serial No. ® ® PROJECTOR DLA-HX1U/DLA-HX1E INSTRUCTIONS PC VIDEO OPERATE W V-KEYSTONE H-KEYSTONE SCREEN DIGITAL ZOOM S FREEZE VOLUME FOCUS QUICK ALIGN. MENU EXIT ENTER PRESET HIDE For customer Use: Enter below the Serial No.

Instruction Manual
Page 2
...FCC rule. All the safety and operating instructions should use a mount recommended by JVC could void the user's authority to radio communications. All operating instructions should be ...possible injury to environmental considerations. Disposal of these Important Safeguards carefully before cleaning. This projector is no guarantee that contains a small amount of mercury. only) CAUTION: Changes or...as this product from a low temperature to defeat the safeguards incorporated into the D-ILA device. Do not use immediately after moving from the wall outlet before use ...
...FCC rule. All the safety and operating instructions should use a mount recommended by JVC could void the user's authority to radio communications. All operating instructions should be ...possible injury to environmental considerations. Disposal of these Important Safeguards carefully before cleaning. This projector is no guarantee that contains a small amount of mercury. only) CAUTION: Changes or...as this product from a low temperature to defeat the safeguards incorporated into the D-ILA device. Do not use immediately after moving from the wall outlet before use ...
Instruction Manual
Page 3
...is provided and the manufacturer's instructions have fallen on bed, sofa, rug, or similar surface. These ensure reliable operation of the projector could be blocked by the vibration, possibly causing it to fall or overturn, which could result in fire, electric shock, or ... may expose you are provided for installation. For example, cloth, paper, matches, aerosol cans or gas lighters that are unable to your home, consult your dealer to qualified service personnel. - Power cord For United Kingdom For European continent countries Power cord Power supply voltage: AC...
...is provided and the manufacturer's instructions have fallen on bed, sofa, rug, or similar surface. These ensure reliable operation of the projector could be blocked by the vibration, possibly causing it to fall or overturn, which could result in fire, electric shock, or ... may expose you are provided for installation. For example, cloth, paper, matches, aerosol cans or gas lighters that are unable to your home, consult your dealer to qualified service personnel. - Power cord For United Kingdom For European continent countries Power cord Power supply voltage: AC...
Instruction Manual
Page 5
...The video image could be tired. Please bear this unit may constitute an infringement of the Copyright Act. 5 Caution About burning-in of the D-ILA device ● Do not allow it damages easily. There is dark. ● Do not view the screen continually for a long time Looking... damage, fire or electrical shock. ● Leave the connection of the inputted images (e.g. Using the screen mode switch function • This projector is used directly. It will result in damage, fire or electrical shock. Do not project video images with a screen mode switch function that...
...The video image could be tired. Please bear this unit may constitute an infringement of the Copyright Act. 5 Caution About burning-in of the D-ILA device ● Do not allow it damages easily. There is dark. ● Do not view the screen continually for a long time Looking... damage, fire or electrical shock. ● Leave the connection of the inputted images (e.g. Using the screen mode switch function • This projector is used directly. It will result in damage, fire or electrical shock. Do not project video images with a screen mode switch function that...
Instruction Manual
Page 6
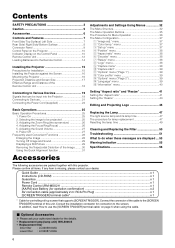
... Cleaning and Replacing the Filter 50 Troubleshooting 51 What to the screen. In addition, read 'How to be input into the Projector 19 Connecting to the [SCREEN TRIGGER] terminal of the Remote Control Unit 18 Connecting to Various Devices 19 Signals that supports [... 6 Controls and Features 7 Front Side/ Top Surface/ Left Side 7 Rear Side/ Right Side/ Bottom Surface 8 Connector Panel 9 Control Panel on the Projector 10 Indicator Display on page 5 when using the cable. Ⅵ Optional Accessories ❈ Please ask your dealer. Connect the connector of the Image ......... ...
... Cleaning and Replacing the Filter 50 Troubleshooting 51 What to the screen. In addition, read 'How to be input into the Projector 19 Connecting to the [SCREEN TRIGGER] terminal of the Remote Control Unit 18 Connecting to Various Devices 19 Signals that supports [... 6 Controls and Features 7 Front Side/ Top Surface/ Left Side 7 Rear Side/ Right Side/ Bottom Surface 8 Connector Panel 9 Control Panel on the Projector 10 Indicator Display on page 5 when using the cable. Ⅵ Optional Accessories ❈ Please ask your dealer. Connect the connector of the Image ......... ...
Instruction Manual
Page 7
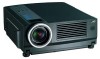
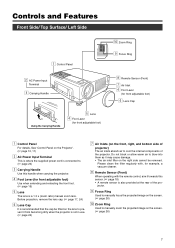
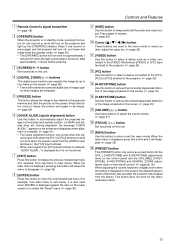
... to manually zoom the projected image on the right side cannot be fitted on the lens to prevent it towards this handle when carrying the projector. 4 Foot Lever (for front adjustable foot) Use when extending and retracting the front foot. (☞ page 15) 5 Lens The lens is a 1.3 x (zoom ratio... of the pro- Before projection, remove the lens cap. (☞ page 17, 24) 6 Lens Cap It is also provided at the rear of the projector. Please clean the filter regularly with, for example, a vacuum cleaner. 8 Remote Sensor (Front) When operating with the remote control, aim it from becoming ...
... to manually zoom the projected image on the right side cannot be fitted on the lens to prevent it towards this handle when carrying the projector. 4 Foot Lever (for front adjustable foot) Use when extending and retracting the front foot. (☞ page 15) 5 Lens The lens is a 1.3 x (zoom ratio... of the pro- Before projection, remove the lens cap. (☞ page 17, 24) 6 Lens Cap It is also provided at the rear of the projector. Please clean the filter regularly with, for example, a vacuum cleaner. 8 Remote Sensor (Front) When operating with the remote control, aim it from becoming ...

Instruction Manual
Page 9
... be controlled using the supplied cable, read 'How to external sync. Connect the audio output terminal of the computer to be connected. More than one projector can be connected, please use the [SCREEN TRIGGER] terminal cable' on page 5. 5 [AUDIO IN] (audio) Terminal (mini jack) This is a composite ... signal output for controlling roll-up screen that allow input of the image may appear to bow if the sync signal input is to this projector is monaural.) 6 [REMOTE] Terminal (stereo mini jack) When the remote control is an input terminal dedicated to [PC1], [PC2], [PC3], [...
... be controlled using the supplied cable, read 'How to external sync. Connect the audio output terminal of the computer to be connected. More than one projector can be connected, please use the [SCREEN TRIGGER] terminal cable' on page 5. 5 [AUDIO IN] (audio) Terminal (mini jack) This is a composite ... signal output for controlling roll-up screen that allow input of the image may appear to bow if the sync signal input is to this projector is monaural.) 6 [REMOTE] Terminal (stereo mini jack) When the remote control is an input terminal dedicated to [PC1], [PC2], [PC3], [...
Instruction Manual
Page 10
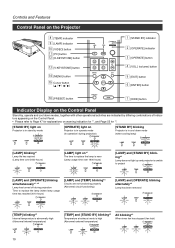
...) STAND BY LAMP TEMP OPERATE [LAMP] blinking*1 Lamp life has expired (Lamp time over 2000 hours) STAND BY LAMP TEMP OPERATE [LAMP] light on the Projector 8 [TEMP] indicator 9 [LAMP] indicator p [VIDEO] button q [PC] button w [H-KEYSTONE] button e [V-KEYSTONE] button r [MENU] button t ...Cursor button y [PRESET] button LAMP TEMP STAND BY OPERATE PC VIDEO V-KEYSTONE H-KEYSTONE VOL. ing*2 Lamp does not light up and projector is unable to project STAND BY LAMP TEMP OPERATE [LAMP] and [OPERATE] blinking simultaneously*1, *2 Lamp has turned off during projection) STAND ...
...) STAND BY LAMP TEMP OPERATE [LAMP] blinking*1 Lamp life has expired (Lamp time over 2000 hours) STAND BY LAMP TEMP OPERATE [LAMP] light on the Projector 8 [TEMP] indicator 9 [LAMP] indicator p [VIDEO] button q [PC] button w [H-KEYSTONE] button e [V-KEYSTONE] button r [MENU] button t ...Cursor button y [PRESET] button LAMP TEMP STAND BY OPERATE PC VIDEO V-KEYSTONE H-KEYSTONE VOL. ing*2 Lamp does not light up and projector is unable to project STAND BY LAMP TEMP OPERATE [LAMP] and [OPERATE] blinking simultaneously*1, *2 Lamp has turned off during projection) STAND ...
Instruction Manual
Page 11
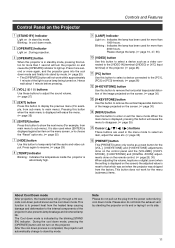
... button for more than 2000 hours. Please change to resume. (☞ page 29) 8 [TEMP] Indicator Blinking : Indicates the temperature inside the projector is abnormally high. 9 [LAMP] Indicator Light on : Indicates the lamp has been used in standby mode, pressing this button to light up. ... not work within approximately 1 minute of the light-source lamp being turned on. Note Please do not block the exhaust vent by standing the projector on its side. 11 It also prevents lamp breakage and shortened lamp life. Blinking : In cool down mode. 2 [OPERATE] Indicator Light ...
... button for more than 2000 hours. Please change to resume. (☞ page 29) 8 [TEMP] Indicator Blinking : Indicates the temperature inside the projector is abnormally high. 9 [LAMP] Indicator Light on : Indicates the lamp has been used in standby mode, pressing this button to light up. ... not work within approximately 1 minute of the light-source lamp being turned on. Note Please do not block the exhaust vent by standing the projector on its side. 11 It also prevents lamp breakage and shortened lamp life. Blinking : In cool down mode. 2 [OPERATE] Indicator Light ...
Instruction Manual
Page 13
...enter the standby mode. (☞ page 25) • The [OPERATE] button will not work for one second or more again and the projector will turn on the projector and light up to four times on the screen. (☞ page 28) • There will disappear. (☞ page 35) i [...170; / · button Use these buttons to sub menu). Controls and Features 1 Remote Control's signal transmitter (☞ page 18) 2 [OPERATE] button When the projector is in standby mode, pressing this button for approximately 1 minute from when the light-source lamp is turned on. ity when images are used when...
...enter the standby mode. (☞ page 25) • The [OPERATE] button will not work for one second or more again and the projector will turn on the projector and light up to four times on the screen. (☞ page 28) • There will disappear. (☞ page 35) i [...170; / · button Use these buttons to sub menu). Controls and Features 1 Remote Control's signal transmitter (☞ page 18) 2 [OPERATE] button When the projector is in standby mode, pressing this button for approximately 1 minute from when the light-source lamp is turned on. ity when images are used when...

Instruction Manual
Page 15
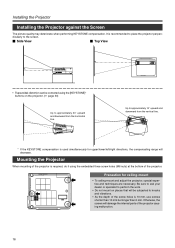
...by taking in large amount of air. Precaution for Installation Please read the following ways as a carpet or cushion • Where the projector may be subjected to direct sunlight • Where temperature is smoke and grease Even where smoke and grease levels are the same. 150... NOT use an air conditioner so that internal and external temperatures are minimal, pro- The maximum extension is fixed at the bottom of the projector. Ⅵ Vertical angle adjustment range +6˚ Front Adjustable Foot Adjusting the vertical angle of the following dimensions, use it is on its ...
...by taking in large amount of air. Precaution for Installation Please read the following ways as a carpet or cushion • Where the projector may be subjected to direct sunlight • Where temperature is smoke and grease Even where smoke and grease levels are the same. 150... NOT use an air conditioner so that internal and external temperatures are minimal, pro- The maximum extension is fixed at the bottom of the projector. Ⅵ Vertical angle adjustment range +6˚ Front Adjustable Foot Adjusting the vertical angle of the following dimensions, use it is on its ...
Instruction Manual
Page 16
... Ⅵ Side View Ⅵ Top View • Trapezoidal-distortion can be subjected to knocks and vibrations. • As the depth of the projector. Be sure to ask your dealer or specialist to perform the work. • Do not mount on places that will damage the internal parts of... the projector is used simultaneously for ceiling-mount • To ceiling-mount and adjust the projector, special expertise and techniques are necessary. Up to approximately 30° upward and downward from the ...
... Ⅵ Side View Ⅵ Top View • Trapezoidal-distortion can be subjected to knocks and vibrations. • As the depth of the projector. Be sure to ask your dealer or specialist to perform the work. • Do not mount on places that will damage the internal parts of... the projector is used simultaneously for ceiling-mount • To ceiling-mount and adjust the projector, special expertise and techniques are necessary. Up to approximately 30° upward and downward from the ...
Instruction Manual
Page 17
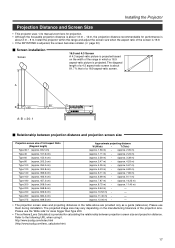
... Distance and Screen Size • This projector uses 1.3x manual zoom lens for projection. • Although the focusable projection distance is about 1.6 m ~ 12 m, the projection distance recommendable for calculating the relationship between ...projection distance and projection screen size Projection screen size of the range in the table above are provided only as a guide (reference). Install the projector within this range and adjust the screen size when the aspect ratio of the screen is 16:9. • If the KEYSTONE is adjusted, the screen...
... Distance and Screen Size • This projector uses 1.3x manual zoom lens for projection. • Although the focusable projection distance is about 1.6 m ~ 12 m, the projection distance recommendable for calculating the relationship between ...projection distance and projection screen size Projection screen size of the range in the table above are provided only as a guide (reference). Install the projector within this range and adjust the screen size when the aspect ratio of the screen is 16:9. • If the KEYSTONE is adjusted, the screen...

Instruction Manual
Page 18
...FREEZE Wired remote control (sold separately) RM-M3010 Remote Cable (sold separately) QAM0081-001 (approx. 3 m) QAM0247-001 (approx. 15 m) Projector PRESET MENU ❈ The [ESCAPE] button on the supplied remote control unit. Please check the cable connection. • When a remote cable...Unit Ⅵ Using as a wired control unit. • When connected to the remote cable, the supplied remote control's transmitter and the projector's sensor do not function. • Please keep within 7 m. FREEZE W PRESET HIDE ENTER MENU FOCUS S SCREEN OPERATE ZDOIOGIMTAL EXIT QUICK ...
...FREEZE Wired remote control (sold separately) RM-M3010 Remote Cable (sold separately) QAM0081-001 (approx. 3 m) QAM0247-001 (approx. 15 m) Projector PRESET MENU ❈ The [ESCAPE] button on the supplied remote control unit. Please check the cable connection. • When a remote cable...Unit Ⅵ Using as a wired control unit. • When connected to the remote cable, the supplied remote control's transmitter and the projector's sensor do not function. • Please keep within 7 m. FREEZE W PRESET HIDE ENTER MENU FOCUS S SCREEN OPERATE ZDOIOGIMTAL EXIT QUICK ...
Instruction Manual
Page 19
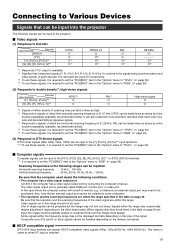
Connecting to Various Devices Signals that can be input into the projector The following signals can be made twice as dense by a line doubler (separately available: recommended article). *8: To use these signals, it is required to set ... signals DTV-format signals (480i, 480p, 720p, 1080i) can be projected but the image may not turn out sharp. NTSC can be input to the projector. Ⅵ Video signals (1) Response to double density*5, high-vision signals. It can also respond to fully-specified, decoded wide-clear-vision signals and decoded 525p...
Connecting to Various Devices Signals that can be input into the projector The following signals can be made twice as dense by a line doubler (separately available: recommended article). *8: To use these signals, it is required to set ... signals DTV-format signals (480i, 480p, 720p, 1080i) can be projected but the image may not turn out sharp. NTSC can be input to the projector. Ⅵ Video signals (1) Response to double density*5, high-vision signals. It can also respond to fully-specified, decoded wide-clear-vision signals and decoded 525p...
Instruction Manual
Page 20
...; When a signal other than those listed above is input, the image could at times be displayed in the video 480p mode. (In this case, the projector enters the video menu when the [MENU] button is pressed.) • The motion picture may be distorted when projecting motion picture from the PC could...
...; When a signal other than those listed above is input, the image could at times be displayed in the video 480p mode. (In this case, the projector enters the video menu when the [MENU] button is pressed.) • The motion picture may be distorted when projecting motion picture from the PC could...
Instruction Manual
Page 21
Right side of projector BNC Cable (sold separately) R PR/CR GY B PB/CB H/CS V PC2 PC1 DVI PC3 SCREEN REMOTE TRIGGER AUDIO IN RS-232C OUT RS-232C IN ... or DVD player etc. Connecting to Various Devices Connecting to Devices Before connection, be sure to turn off both the projector and the device. Ⅵ Connecting to connect a video device and the projector could cause image deterioration or projection failure. • When a signal with much jitter is used, the "PC2(BNC)" item...
Right side of projector BNC Cable (sold separately) R PR/CR GY B PB/CB H/CS V PC2 PC1 DVI PC3 SCREEN REMOTE TRIGGER AUDIO IN RS-232C OUT RS-232C IN ... or DVD player etc. Connecting to Various Devices Connecting to Devices Before connection, be sure to turn off both the projector and the device. Ⅵ Connecting to connect a video device and the projector could cause image deterioration or projection failure. • When a signal with much jitter is used, the "PC2(BNC)" item...

Instruction Manual
Page 22
... PC2 To [PC1] To [DVI] DVI PC3 PC1 SCREEN REMOTE TRIGGER AUDIO IN RS-232C OUT RS-232C IN CONTROL Right side of projector Y/C VIDEO VIDEO IN To monitor connector Notebook Type To monitor connector ❈ There are some notebook type computers that come with the computer used...selected from the "Options" menu. (☞ page 39) • When connecting an audio output terminal such as a computer sound source to the projector, connect to the [AUDIO IN] terminal using the separately available audio cable. • When connecting to Computers • Thoroughly read the manuals that...
... PC2 To [PC1] To [DVI] DVI PC3 PC1 SCREEN REMOTE TRIGGER AUDIO IN RS-232C OUT RS-232C IN CONTROL Right side of projector Y/C VIDEO VIDEO IN To monitor connector Notebook Type To monitor connector ❈ There are some notebook type computers that come with the computer used...selected from the "Options" menu. (☞ page 39) • When connecting an audio output terminal such as a computer sound source to the projector, connect to the [AUDIO IN] terminal using the separately available audio cable. • When connecting to Computers • Thoroughly read the manuals that...

Instruction Manual
Page 23
... separately) (Cross cable) Connection for controlling more than one computer. Connecting to Various Devices Ⅵ Control from us if needed. • For more than one projector By using the [CONTROL] terminal, more information, please contact your authorized dealer. R PR/CR GY B PB/CB H/CS V PC2 PC1 SCREEN REMOTE TRIGGER AUDIO IN...
... separately) (Cross cable) Connection for controlling more than one computer. Connecting to Various Devices Ⅵ Control from us if needed. • For more than one projector By using the [CONTROL] terminal, more information, please contact your authorized dealer. R PR/CR GY B PB/CB H/CS V PC2 PC1 SCREEN REMOTE TRIGGER AUDIO IN...
Instruction Manual
Page 24
..., remove the power plug from that which is not in - Also, do not put terminal of the projector is high, please insert the power plug directly into a wall outlet. ● When not using the projector, remove the Lens Cap • Be sure to fit the lens cap on , heat, or stretch the... the main plug of the supplied power cord into the wall outlet (e.g.) Cautions Against Fire and Electric Shock ● Since the power requirement of the projector 2. put a heavy object on when the projector is indicated. ● Do not cut, tear or modify the power cords. Lens Cap 24
..., remove the power plug from that which is not in - Also, do not put terminal of the projector is high, please insert the power plug directly into a wall outlet. ● When not using the projector, remove the Lens Cap • Be sure to fit the lens cap on , heat, or stretch the... the main plug of the supplied power cord into the wall outlet (e.g.) Cautions Against Fire and Electric Shock ● Since the power requirement of the projector 2. put a heavy object on when the projector is indicated. ● Do not cut, tear or modify the power cords. Lens Cap 24


