
User Manual
Page 1
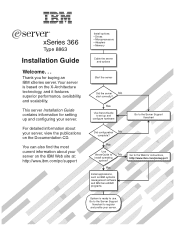
xSeries 366 Type 8863 Installation Guide Welcome. . . Yes Install applications, such as IBM systems management software and IBM ServeRAID programs Go to set up and configuring your server. Yes Use ServerGuide to the Web for buying an IBM xSeries server. For detailed information about your server, view the publications on the X-Architecture technology, and it features superior performance, availability, and scalability...
xSeries 366 Type 8863 Installation Guide Welcome. . . Yes Install applications, such as IBM systems management software and IBM ServeRAID programs Go to set up and configuring your server. Yes Use ServerGuide to the Web for buying an IBM xSeries server. For detailed information about your server, view the publications on the X-Architecture technology, and it features superior performance, availability, and scalability...

User Manual
Page 2
... verify that all optional devices you installed are on the ServerProven list. You can view the ServerProven list at http://www.ibm.com/pc/support/ Yes Hardware Problem solved? Server Support Server working Yes properly? No Use the troubleshooting information provided with your computer. No Flash the latest levels of the problem and...
... verify that all optional devices you installed are on the ServerProven list. You can view the ServerProven list at http://www.ibm.com/pc/support/ Yes Hardware Problem solved? Server Support Server working Yes properly? No Use the troubleshooting information provided with your computer. No Flash the latest levels of the problem and...
User Manual
Page 5
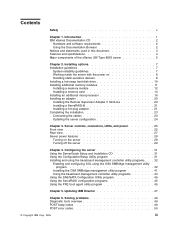
Introduction 1 IBM xSeries Documentation CD 2 Hardware and software requirements 2 Using the Documentation Browser 2 Notices and statements used in this document 3 Features and specifications 4 Major components of the xSeries 366 Type 8863 server 5 Chapter 2. Configuring the server 31 Using the ServerGuide Setup and ... beep codes 49 POST error codes 50 © Copyright IBM Corp. 2005 iii Contents Safety v Chapter 1. Server controls, connectors, LEDs, and power 25 Front view 25 Rear view 27 Server power features 28 Turning on 8 Handling static-sensitive devices ...
Introduction 1 IBM xSeries Documentation CD 2 Hardware and software requirements 2 Using the Documentation Browser 2 Notices and statements used in this document 3 Features and specifications 4 Major components of the xSeries 366 Type 8863 server 5 Chapter 2. Configuring the server 31 Using the ServerGuide Setup and ... beep codes 49 POST error codes 50 © Copyright IBM Corp. 2005 iii Contents Safety v Chapter 1. Server controls, connectors, LEDs, and power 25 Front view 25 Rear view 27 Server power features 28 Turning on 8 Handling static-sensitive devices ...
User Manual
Page 8
vi IBM xSeries 366 Type 8863: Installation Guide Läs säkerhetsinformationen innan du installerar den här produkten. Antes de instalar este producto, lea la información de seguridad. For example, if a caution statement begins with the server or optional device before performing the instructions. Read any additional safety information that comes with a number 1, translations for that...
vi IBM xSeries 366 Type 8863: Installation Guide Läs säkerhetsinformationen innan du installerar den här produkten. Antes de instalar este producto, lea la información de seguridad. For example, if a caution statement begins with the server or optional device before performing the instructions. Read any additional safety information that comes with a number 1, translations for that...

User Manual
Page 13
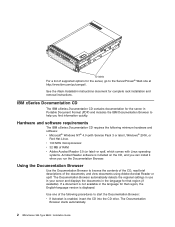
... by topic section, click Publications. 3. Product name Machine type Model number Serial number IBM xSeries 366 server Eserver 8863 The model number and serial number are in the following illustration. © Copyright IBM Corp. 2005 1 The server comes with IBM. This document contains information about the server in the User's Guide on the lower-right front of the bezel and...
... by topic section, click Publications. 3. Product name Machine type Model number Serial number IBM xSeries 366 server Eserver 8863 The model number and serial number are in the following illustration. © Copyright IBM Corp. 2005 1 The server comes with IBM. This document contains information about the server in the User's Guide on the lower-right front of the bezel and...
User Manual
Page 14
... the CD into the CD drive. The Documentation Browser starts automatically. 2 IBM xSeries 366 Type 8863: Installation Guide The Documentation Browser automatically detects the regional settings in use in your server and displays the documents in Portable Document Format (PDF) and includes the IBM Documentation Browser to start the Documentation Browser: v If Autostart is displayed. Use...
... the CD into the CD drive. The Documentation Browser starts automatically. 2 IBM xSeries 366 Type 8863: Installation Guide The Documentation Browser automatically detects the regional settings in use in your server and displays the documents in Portable Document Format (PDF) and includes the IBM Documentation Browser to start the Documentation Browser: v If Autostart is displayed. Use...

User Manual
Page 15
.... Click a document to view it . The following command from the /mnt/cdrom directory: sh runlinux.sh Select the server from the Product menu. Click Help for the server. Introduction 3 If you are used in which is on the IBM xSeries Documentation CD. An attention notice is numbered for reference to programs, devices, or data.
.... Click a document to view it . The following command from the /mnt/cdrom directory: sh runlinux.sh Select the server from the Product menu. Click Help for the server. Introduction 3 If you are used in which is on the IBM xSeries Documentation CD. An attention notice is numbered for reference to programs, devices, or data.
User Manual
Page 16
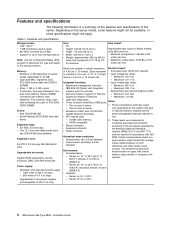
...) II, SDRAM v Sizes: 1 GB or 2 GB in v ATI 7000-M video use. - 16 MB video memory - Power consumption and heat output - One on front of server vary depending on server model, expandable to 80% 4 IBM xSeries 366 Type 8863: Installation Guide Table 1. Maximum: 127 V ac Integrated functions: v Input voltage high range: v Baseboard management controller - Two on the...
...) II, SDRAM v Sizes: 1 GB or 2 GB in v ATI 7000-M video use. - 16 MB video memory - Power consumption and heat output - One on front of server vary depending on server model, expandable to 80% 4 IBM xSeries 366 Type 8863: Installation Guide Table 1. Maximum: 127 V ac Integrated functions: v Input voltage high range: v Baseboard management controller - Two on the...
User Manual
Page 17
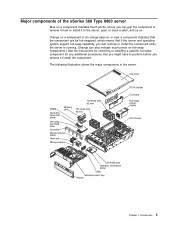
...Chapter 1. The following illustration shows the major components in the server, open or close a latch, and so on a component indicates touch points, where you remove or install the component. Introduction 5 Major components of the xSeries 366 Type 8863 server Blue on . Orange on a component or an orange ...label on or near a component indicates that the component can be hot-swapped, which means that if the server and operating system support hot-swap capability, ...
...Chapter 1. The following illustration shows the major components in the server, open or close a latch, and so on a component indicates touch points, where you remove or install the component. Introduction 5 Major components of the xSeries 366 Type 8863 server Blue on . Orange on a component or an orange ...label on or near a component indicates that the component can be hot-swapped, which means that if the server and operating system support hot-swap capability, ...
User Manual
Page 19
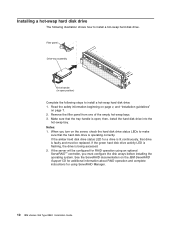
...hot-swapped, which means that if the server and operating system support hot-swap capability, you can remove or install the component while the server is running. (Orange can grip the component to disk drives. Make sure that begins on the IBM xSeries Documentation CD. Use a slow lifting force.... Chapter 2. Installing options This chapter provides basic instructions for the server, see the User's Guide on page v and the guidelines in the area where you...
...hot-swapped, which means that if the server and operating system support hot-swap capability, you can remove or install the component while the server is running. (Orange can grip the component to disk drives. Make sure that begins on the IBM xSeries Documentation CD. Use a slow lifting force.... Chapter 2. Installing options This chapter provides basic instructions for the server, see the User's Guide on page v and the guidelines in the area where you...
User Manual
Page 20
.... Follow these guidelines when you . Working inside the server with the server cover removed might cause the server to hang inside the server; v There is available. v Remove items from electrostatic discharge, observe the following precautions: v Limit your forearms. Button long-sleeved shirts before turning on . 8 IBM xSeries 366 Type 8863: Installation Guide v The use an electrostatic-discharge wrist...
.... Follow these guidelines when you . Working inside the server with the server cover removed might cause the server to hang inside the server; v There is available. v Remove items from electrostatic discharge, observe the following precautions: v Limit your forearms. Button long-sleeved shirts before turning on . 8 IBM xSeries 366 Type 8863: Installation Guide v The use an electrostatic-discharge wrist...
User Manual
Page 21
... exposed circuitry. v While the device is necessary to an unpainted metal part on a metal surface. Do not place the device on the server cover or on the outside of the server for at least 2 seconds. Chapter 2. v Take additional care when handling devices during cold weather. v Do not leave the device where others... edges or its static-protective package, touch it to set down the device, put it back into its package and install it directly into the server without setting down the device.
... exposed circuitry. v While the device is necessary to an unpainted metal part on a metal surface. Do not place the device on the server cover or on the outside of the server for at least 2 seconds. Chapter 2. v Take additional care when handling devices during cold weather. v Do not leave the device where others... edges or its static-protective package, touch it to set down the device, put it back into its package and install it directly into the server without setting down the device.
User Manual
Page 22
...handle is operating correctly. If the server will be replaced. Remove the filler panel from one of the empty hot-swap bays. 3. When you must be configured for RAID operation using ServeRAID Manager. 10 IBM xSeries 366 Type 8863: Installation Guide See the ServeRAID ...documentation on page 7. 2. Read the safety information beginning on page v, and "Installation guidelines" on the IBM ServeRAID Support CD for additional information about RAID operation...
...handle is operating correctly. If the server will be replaced. Remove the filler panel from one of the empty hot-swap bays. 3. When you must be configured for RAID operation using ServeRAID Manager. 10 IBM xSeries 366 Type 8863: Installation Guide See the ServeRAID ...documentation on page 7. 2. Read the safety information beginning on page v, and "Installation guidelines" on the IBM ServeRAID Support CD for additional information about RAID operation...
User Manual
Page 23
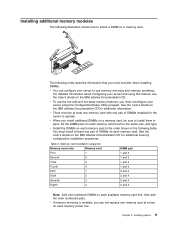
Installing additional memory modules The following table. See the User's Guide on the IBM xSeries Documentation CD for additional memory configuration installation sequences. v When you install additional DIMMs on a memory card. v Install the DIMMs on each memory card in the ...'s Guide on each available memory card first, then add the even numbered pairs. All the DIMM pairs on the IBM xSeries Documentation CD. See the User's Guide on the IBM xSeries Documentation CD for the server to each memory card must be sure to install them in the following illustration shows how to use the...
Installing additional memory modules The following table. See the User's Guide on the IBM xSeries Documentation CD for additional memory configuration installation sequences. v When you install additional DIMMs on a memory card. v Install the DIMMs on each memory card in the ...'s Guide on each available memory card first, then add the even numbered pairs. All the DIMM pairs on the IBM xSeries Documentation CD. See the User's Guide on the IBM xSeries Documentation CD for the server to each memory card must be sure to install them in the following illustration shows how to use the...
User Manual
Page 24
...result in the loss of data. If you are not hot-swapping a DIMM, turn off , it to impact any components or structures inside the server with a DIMM is detected, light path diagnostics will guide you can remove the memory card to install additional memory modules: 1. If you are ...inside the server. Error LED: When this LED is lit, it indicates that the Memory Hot-Swap Enabled LED is enabled. Attention: When moving the memory card, do not allow it indicates that power is removed from the port and that hot-swap memory is lit. 12 IBM xSeries 366 Type 8863: Installation...
...result in the loss of data. If you are not hot-swapping a DIMM, turn off , it to impact any components or structures inside the server with a DIMM is detected, light path diagnostics will guide you can remove the memory card to install additional memory modules: 1. If you are ...inside the server. Error LED: When this LED is lit, it indicates that the Memory Hot-Swap Enabled LED is enabled. Attention: When moving the memory card, do not allow it indicates that power is removed from the port and that hot-swap memory is lit. 12 IBM xSeries 366 Type 8863: Installation...
User Manual
Page 25
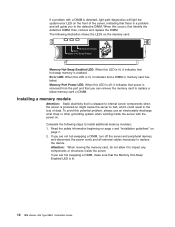
While holding the retention levers open and close the clips gently. 5. Place the memory card on each end of the server. Attention: To avoid breaking the DIMM retaining clips or damaging the DIMM connectors, open , lift the memory card out of the memory card. a. Chapter ... DIMM from the package. 7. Installing options 13 Turn the DIMM so that contains the DIMM to any unpainted metal surface on the top of the server. 4. b. Open the memory card retention levers ( 1 and 2 ) on the outside of the DIMM connector. 6. Remove the memory card. Touch the static-protective package...
While holding the retention levers open and close the clips gently. 5. Place the memory card on each end of the server. Attention: To avoid breaking the DIMM retaining clips or damaging the DIMM connectors, open , lift the memory card out of the memory card. a. Chapter ... DIMM from the package. 7. Installing options 13 Turn the DIMM so that contains the DIMM to any unpainted metal surface on the top of the server. 4. b. Open the memory card retention levers ( 1 and 2 ) on the outside of the DIMM connector. 6. Remove the memory card. Touch the static-protective package...
User Manual
Page 26
... DIMM with the power on page 7. 2. The retaining clips snap into the memory card connector. 14 IBM xSeries 366 Type 8863: Installation Guide open . To avoid this potential problem, always use an electrostatic-discharge wrist strap or other grounding system when working inside the server with the slots at the ends of the DIMM simultaneously.
... DIMM with the power on page 7. 2. The retaining clips snap into the memory card connector. 14 IBM xSeries 366 Type 8863: Installation Guide open . To avoid this potential problem, always use an electrostatic-discharge wrist strap or other grounding system when working inside the server with the slots at the ends of the DIMM simultaneously.
User Manual
Page 28
... these devices, see "Handling static-sensitive devices" on page 7. 2. Read the safety information beginning on page v and "Installation guidelines" on page 8. 16 IBM xSeries 366 Type 8863: Installation Guide Remove the server cover and bezel. Installing an additional microprocessor The following notes describe information that might be connected to the USB port on the front...
... these devices, see "Handling static-sensitive devices" on page 7. 2. Read the safety information beginning on page v and "Installation guidelines" on page 8. 16 IBM xSeries 366 Type 8863: Installation Guide Remove the server cover and bezel. Installing an additional microprocessor The following notes describe information that might be connected to the USB port on the front...
User Manual
Page 29
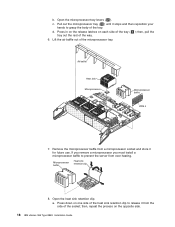
Open the microprocessor-tray release latch ( 1 ). Remove the microprocessor tray: a. Remove all memory cards from the server 4. Microprocessor-tray release latch Air baffle Microprocessor-tray lever Microprocessor-tray retention latch (both sides of tray) Microprocessor-tray lever Chapter 2. Installing options 17 DCAC 3. Remove all fans from the server. 5.
Open the microprocessor-tray release latch ( 1 ). Remove the microprocessor tray: a. Remove all memory cards from the server 4. Microprocessor-tray release latch Air baffle Microprocessor-tray lever Microprocessor-tray retention latch (both sides of tray) Microprocessor-tray lever Chapter 2. Installing options 17 DCAC 3. Remove all fans from the server. 5.
User Manual
Page 30
... of the tray. Pull out the microprocessor tray ( 3 ) until it for future use. Press in on the release latches on the opposite side. 18 IBM xSeries 366 Type 8863: Installation Guide Press down on one side of the socket; Lift the air baffle out of the way. 6. Open the heat sink retention clip. a. then... side of the heat sink retention clip to release it from a microprocessor socket and store it stops and then reposition your hands to prevent the server from over heating. Microprocessor baffle Heat sink retention clip 8.
... of the tray. Pull out the microprocessor tray ( 3 ) until it for future use. Press in on the release latches on the opposite side. 18 IBM xSeries 366 Type 8863: Installation Guide Press down on one side of the socket; Lift the air baffle out of the way. 6. Open the heat sink retention clip. a. then... side of the heat sink retention clip to release it from a microprocessor socket and store it stops and then reposition your hands to prevent the server from over heating. Microprocessor baffle Heat sink retention clip 8.


