User Manual
Page 1
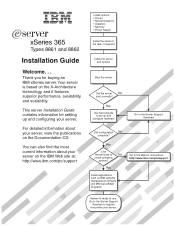
...Power Supply Install the server in the rack, if required Cable the server and options Start the server Did the server No start correctly? Yes Install applications, such as IBM systems management software and IBM ServeRAID programs Go to the Server Support flowchart Did ...server, view the publications on the Documentation CD. Go to the Server Support flowchart to set up and configuring your server. Yes Use ServerGuide to register and profile your server. Yes Use ServerGuide to use. Your server is ready to No install operating system? xSeries 365 Types 8861 and 8862...
...Power Supply Install the server in the rack, if required Cable the server and options Start the server Did the server No start correctly? Yes Install applications, such as IBM systems management software and IBM ServeRAID programs Go to the Server Support flowchart Did ...server, view the publications on the Documentation CD. Go to the Server Support flowchart to set up and configuring your server. Yes Use ServerGuide to register and profile your server. Yes Use ServerGuide to use. Your server is ready to No install operating system? xSeries 365 Types 8861 and 8862...

User Manual
Page 2
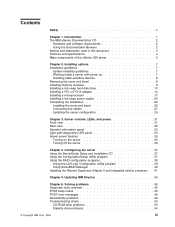
.../pc/support/ Yes Hardware Problem solved? You can download this code at http://www.ibm.com/pc/compat/ Problem Yes solved? No Use the troubleshooting information provided with your computer. Server Support Server working Yes properly? No Hardware or Software software problem? No Flash the latest levels of the problem and the action...
.../pc/support/ Yes Hardware Problem solved? You can download this code at http://www.ibm.com/pc/compat/ Problem Yes solved? No Use the troubleshooting information provided with your computer. Server Support Server working Yes properly? No Hardware or Software software problem? No Flash the latest levels of the problem and the action...
User Manual
Page 5
... statements used in this document 3 Features and specifications 4 Major components of the xSeries 365 server 5 Chapter 2. Updating IBM Director 43 Chapter 6. Contents Safety v Chapter 1. Installing options 7 Installation guidelines 7 System reliability guidelines 7 Working inside a server with power on the server 35 Turning off the server 36 Chapter 4. Solving problems 45 Diagnostic tools overview 45 POST beep codes 45...
... statements used in this document 3 Features and specifications 4 Major components of the xSeries 365 server 5 Chapter 2. Updating IBM Director 43 Chapter 6. Contents Safety v Chapter 1. Installing options 7 Installation guidelines 7 System reliability guidelines 7 Working inside a server with power on the server 35 Turning off the server 36 Chapter 4. Solving problems 45 Diagnostic tools overview 45 POST beep codes 45...

User Manual
Page 9
... outlet. Important: All caution and danger statements in this documentation begin with a number 1, translations for that caution statement appear in the IBM Safety Information book under statement 1. For example, if a caution statement begins with a number. Be sure to properly wired outlets any ...to devices. 3. Safety vii v When possible, use one hand only to cross reference an English caution or danger statement with your server or optional device before you open the device covers, unless instructed otherwise in the following table when installing, moving, or opening covers...
... outlet. Important: All caution and danger statements in this documentation begin with a number 1, translations for that caution statement appear in the IBM Safety Information book under statement 1. For example, if a caution statement begins with a number. Be sure to properly wired outlets any ...to devices. 3. Safety vii v When possible, use one hand only to cross reference an English caution or danger statement with your server or optional device before you open the device covers, unless instructed otherwise in the following table when installing, moving, or opening covers...

User Manual
Page 13
...installing some options v Solving problems Your server might be updated occasionally to include information about your server. On the ″Online publications″ page, in your IBM® Eserver xSeries® 365 Type 8861 or Type 8862 server and basic instructions for updated documentation and...or technical updates might be available to help you register your server with your server in the following table. Product name Machine type Model number Serial number IBM xSeries 365 server Eserver 8861 or 8862 The model number and serial number are in the Option ...
...installing some options v Solving problems Your server might be updated occasionally to include information about your server. On the ″Online publications″ page, in your IBM® Eserver xSeries® 365 Type 8861 or Type 8862 server and basic instructions for updated documentation and...or technical updates might be available to help you register your server with your server in the following table. Product name Machine type Model number Serial number IBM xSeries 365 server Eserver 8861 or 8862 The model number and serial number are in the Option ...
User Manual
Page 14
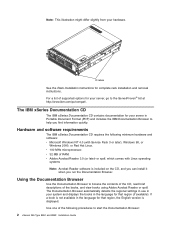
... to help you run the Documentation Browser. Note: This illustration might differ slightly from your server, go to the ServerProven® list at http://www.ibm.com/pc/compat/. xSeries 365 ID labels See the Rack Installation Instructions for your hardware. v 32 MB of the books.... Use one of supported options for complete rack installation and removal instructions. Hardware and software requirements The IBM xSeries Documentation CD requires the following procedures to start the Documentation Browser: 2 xSeries 365 Type 8861 and 8862: Installation Guide v 100 MHz microprocessor.
... to help you run the Documentation Browser. Note: This illustration might differ slightly from your server, go to the ServerProven® list at http://www.ibm.com/pc/compat/. xSeries 365 ID labels See the Rack Installation Instructions for your hardware. v 32 MB of the books.... Use one of supported options for complete rack installation and removal instructions. Hardware and software requirements The IBM xSeries Documentation CD requires the following procedures to start the Documentation Browser: 2 xSeries 365 Type 8861 and 8862: Installation Guide v 100 MHz microprocessor.

User Manual
Page 15
... potentially hazardous procedure step or situation. Introduction 3 Click Help for detailed information about using Red Hat Linux, insert the CD into your server. Notices and statements used in the Search field and click Search. The following command from the /mnt/cdrom directory: sh runLinux.sh... Select your CD-ROM drive; An attention notice is on the IBM xSeries Documentation CD. v If Autostart is disabled or is the drive letter of a potentially lethal or extremely hazardous procedure step or situation. ...
... potentially hazardous procedure step or situation. Introduction 3 Click Help for detailed information about using Red Hat Linux, insert the CD into your server. Notices and statements used in the Search field and click Search. The following command from the /mnt/cdrom directory: sh runLinux.sh... Select your CD-ROM drive; An attention notice is on the IBM xSeries Documentation CD. v If Autostart is disabled or is the drive letter of a potentially lethal or extremely hazardous procedure step or situation. ...
User Manual
Page 16
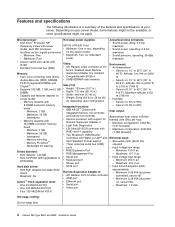
...I /O controller. Maximum: 1.2 kVA v Four 133 MHZ/64-bit PCI-X Hot-swap cooling: Six hot-swap fans 4 xSeries 365 Type 8861 and 8862: Installation Guide Minimum: One v Maximum: Two, for Remote Supervisor Adapter II v Light Path Diagnostics v LSI Ultra320 SCSI controller...8 MB SDRAM video memory Environment: v Air temperature: - Server on your server. Altitude: 0 to 80% 8-DIMM-connector memory board - Server on , server idle) - Maximum: 32 GB - Interleaved - Redundant bit steering Integrated functions: v IBM XA-32™ Chipset with integrated memory, I/O controller, and...
...I /O controller. Maximum: 1.2 kVA v Four 133 MHZ/64-bit PCI-X Hot-swap cooling: Six hot-swap fans 4 xSeries 365 Type 8861 and 8862: Installation Guide Minimum: One v Maximum: Two, for Remote Supervisor Adapter II v Light Path Diagnostics v LSI Ultra320 SCSI controller...8 MB SDRAM video memory Environment: v Air temperature: - Server on your server. Altitude: 0 to 80% 8-DIMM-connector memory board - Server on , server idle) - Maximum: 32 GB - Interleaved - Redundant bit steering Integrated functions: v IBM XA-32™ Chipset with integrated memory, I/O controller, and...
User Manual
Page 17
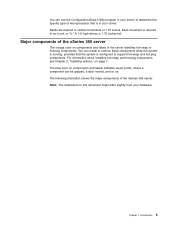
... hot-swap or hot-plug components. Major components of the xSeries 365 server The orange color on components and labels in vertical increments of 1.75 inches. Chapter 1. Note: The illustrations in your hardware. A 1-U-high device is ... install or remove these components while the system is running, provided that is in this document might differ slightly from your server. The following illustration shows the major components of the xSeries 365 server. Each increment is referred to as a unit, or "U." Introduction 5 For information about installing hot-swap and hot-plug ...
... hot-swap or hot-plug components. Major components of the xSeries 365 server The orange color on components and labels in vertical increments of 1.75 inches. Chapter 1. Note: The illustrations in your hardware. A 1-U-high device is ... install or remove these components while the system is running, provided that is in this document might differ slightly from your server. The following illustration shows the major components of the xSeries 365 server. Each increment is referred to as a unit, or "U." Introduction 5 For information about installing hot-swap and hot-plug ...

User Manual
Page 19
... baffle or a microprocessor and heat sink at all important data before you work properly. Installation guidelines Before you need to turn off the server to disk drives. v For a list of the drive bays has a drive or a filler panel and electromagnetic compatibility (EMC) shield installed... hot-plug Universal Serial Bus (USB) devices. See the instructions in it is turned on and the cover is turned on the IBM xSeries Documentation CD. v You do not need more than 2 minutes. Installing options This chapter provides basic instructions for more detailed instructions, ...
... baffle or a microprocessor and heat sink at all important data before you work properly. Installation guidelines Before you need to turn off the server to disk drives. v For a list of the drive bays has a drive or a filler panel and electromagnetic compatibility (EMC) shield installed... hot-plug Universal Serial Bus (USB) devices. See the instructions in it is turned on and the cover is turned on the IBM xSeries Documentation CD. v You do not need more than 2 minutes. Installing options This chapter provides basic instructions for more detailed instructions, ...

User Manual
Page 20
... at least 2 seconds. v While the device is necessary to install them. Do not place the device on your server cover or on page 7. 8 xSeries 365 Type 8861 and 8862: Installation Guide v Do not allow your necktie or scarf to build up around you lean over it by its edges or its static-...protective package. v Handle the device carefully, holding it . If it back into the server without setting down the device, put ...
... at least 2 seconds. v While the device is necessary to install them. Do not place the device on your server cover or on page 7. 8 xSeries 365 Type 8861 and 8862: Installation Guide v Do not allow your necktie or scarf to build up around you lean over it by its edges or its static-...protective package. v Handle the device carefully, holding it . If it back into the server without setting down the device, put ...
User Manual
Page 21
... latch Bezel xSeries 365 3. Attention: For proper cooling and airflow, replace the top cover before turning on the bezel retention tabs and pull the top of the bezel. Installing memory modules The following notes describe the types of dual inline memory modules (DIMMs) that your server by replacing ...cassette, the DIMM connectors are arranged in .). See the ServerProven list at http://www.ibm.com/pc/compat/ for a list of the memory cassette. Lift the cover-release latch. Lift the cover off the server. 4. The server supports 512 MB, 1 GB, and 2 GB DIMMs. See the ServerProven list at...
... latch Bezel xSeries 365 3. Attention: For proper cooling and airflow, replace the top cover before turning on the bezel retention tabs and pull the top of the bezel. Installing memory modules The following notes describe the types of dual inline memory modules (DIMMs) that your server by replacing ...cassette, the DIMM connectors are arranged in .). See the ServerProven list at http://www.ibm.com/pc/compat/ for a list of the memory cassette. Lift the cover-release latch. Lift the cover off the server. 4. The server supports 512 MB, 1 GB, and 2 GB DIMMs. See the ServerProven list at...

User Manual
Page 22
... your server by creating a mirror of the data in memory port 1 and storing it in quads, or groups of the same type, capacity, and speed. in mirrored mode, install DIMMs in memory port 2. Each pair or quad must have DIMMs of memory in the following memory ports: 10 xSeries 365 Type 8861 and 8862...
... your server by creating a mirror of the data in memory port 1 and storing it in quads, or groups of the same type, capacity, and speed. in mirrored mode, install DIMMs in memory port 2. Each pair or quad must have DIMMs of memory in the following memory ports: 10 xSeries 365 Type 8861 and 8862...

User Manual
Page 23
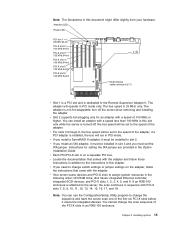
Complete the following steps to install DIMMs: 1. Installing options 11 Review the safety information beginning on page v, "Installation guidelines" on page 7, and the documentation that the memory configuration has changed. 8-DIMM memory board Bank 1 Bank 2 Bank 3 Bank 4 Port 2 16-DIMM memory board Bank 1 Bank 3 Port 1 Bank 5 Bank 7 Bank 2 Bank 4 Bank 6 Bank 8 Port 2 Port 1 v When you restart the server after adding or removing a pair or quad of DIMMs, the server displays a message that comes with the DIMMs. Chapter 2.
Complete the following steps to install DIMMs: 1. Installing options 11 Review the safety information beginning on page v, "Installation guidelines" on page 7, and the documentation that the memory configuration has changed. 8-DIMM memory board Bank 1 Bank 2 Bank 3 Bank 4 Port 2 16-DIMM memory board Bank 1 Bank 3 Port 1 Bank 5 Bank 7 Bank 2 Bank 4 Bank 6 Bank 8 Port 2 Port 1 v When you restart the server after adding or removing a pair or quad of DIMMs, the server displays a message that comes with the DIMMs. Chapter 2.

User Manual
Page 24
Open the two DIMM access doors on the top of the DIMM connector. 12 xSeries 365 Type 8861 and 8862: Installation Guide Open the retaining clip on page 8). 2. Remove the top cover (see "Removing the cover and bezel" on each end of the memory cassette. 4. DCAC PS2 PS1 3. Turn off the server and peripheral devices, and disconnect the power cords and all external cables.
Open the two DIMM access doors on the top of the DIMM connector. 12 xSeries 365 Type 8861 and 8862: Installation Guide Open the retaining clip on page 8). 2. Remove the top cover (see "Removing the cover and bezel" on each end of the memory cassette. 4. DCAC PS2 PS1 3. Turn off the server and peripheral devices, and disconnect the power cords and all external cables.

User Manual
Page 25
...to install or remove, do so now; Make sure that the drive is in a tray, which connects directly into the connector. 6. If your server supports and other options to six 26 mm (1-inch), 3.5-inch, hot-swap hard disk drives in an 8-DIMM-connector memory board. Inspect the drive ...tray for any signs of hard disk drives that your server has an optional RAID adapter installed, see the documentation that you install a hot-swap hard disk drive, take the following actions: - The backplane ...
...to install or remove, do so now; Make sure that the drive is in a tray, which connects directly into the connector. 6. If your server supports and other options to six 26 mm (1-inch), 3.5-inch, hot-swap hard disk drives in an 8-DIMM-connector memory board. Inspect the drive ...tray for any signs of hard disk drives that your server has an optional RAID adapter installed, see the documentation that you install a hot-swap hard disk drive, take the following actions: - The backplane ...

User Manual
Page 26
... hot-pluggable. Attention: To maintain proper system cooling, do so now; otherwise, go to "Completing the installation" on the I/O board. 14 xSeries 365 Type 8861 and 8862: Installation Guide Turn off the server before removing or replacing the Remote Supervisor Adapter II. v The following notes describe the types of adapters that comes with the...
... hot-pluggable. Attention: To maintain proper system cooling, do so now; otherwise, go to "Completing the installation" on the I/O board. 14 xSeries 365 Type 8861 and 8862: Installation Guide Turn off the server before removing or replacing the Remote Supervisor Adapter II. v The following notes describe the types of adapters that comes with the...
User Manual
Page 27
...8, 9, 10, 11, 12, 13, 14, 15, 16, 17, and 18. Chapter 2. Installing options 15 the bus speed will run in this slot only while the server is installed, the bus will be set to change switch settings or jumper settings on a separate PCI bus. if a PCI adapter is turned off the... on the adapter, follow those instructions in this document might differ slightly from your hardware. You can use the Configuration/Setup Utility program to the server, the scan continues in sequence with a speed less than 100 MHz in PCI mode. v Locate the documentation that comes with the adapter and ...
...8, 9, 10, 11, 12, 13, 14, 15, 16, 17, and 18. Chapter 2. Installing options 15 the bus speed will run in this slot only while the server is installed, the bus will be set to change switch settings or jumper settings on a separate PCI bus. if a PCI adapter is turned off the... on the adapter, follow those instructions in this document might differ slightly from your hardware. You can use the Configuration/Setup Utility program to the server, the scan continues in sequence with a speed less than 100 MHz in PCI mode. v Locate the documentation that comes with the adapter and ...

User Manual
Page 28
... to install a new adapter, make sure that comes with the adapter. Review the safety information beginning on page v and "Installation guidelines" on the IBM xSeries Documentation CD. 1. B6) * Both sides are assigned in the following steps to install a PCI/PCI-X adapter. v If you can purchase a ... to the applicable connector. No recabling is not hot-pluggable, turn off the server and peripheral devices, and disconnect the power cords and all external cables. 16 xSeries 365 Type 8861 and 8862: Installation Guide then, route the cable to the external SCSI device and connect ...
... to install a new adapter, make sure that comes with the adapter. Review the safety information beginning on page v and "Installation guidelines" on the IBM xSeries Documentation CD. 1. B6) * Both sides are assigned in the following steps to install a PCI/PCI-X adapter. v If you can purchase a ... to the applicable connector. No recabling is not hot-pluggable, turn off the server and peripheral devices, and disconnect the power cords and all external cables. 16 xSeries 365 Type 8861 and 8862: Installation Guide then, route the cable to the external SCSI device and connect ...

User Manual
Page 29
...the microprocessor tray and supports up to four microprocessors. This enhances performance for database and point-of one microprocessor, the server can distribute the processing load among the microprocessors. The Chapter 2. With SMP, certain operating systems and application programs can...have other applications. Install the adapter as a symmetric multiprocessing (SMP) server. 3. Remove the server cover (see "Removing the cover and bezel" on the microprocessor board in the server: v The server comes with your adapter for instructions for setting jumpers or switches and for...
...the microprocessor tray and supports up to four microprocessors. This enhances performance for database and point-of one microprocessor, the server can distribute the processing load among the microprocessors. The Chapter 2. With SMP, certain operating systems and application programs can...have other applications. Install the adapter as a symmetric multiprocessing (SMP) server. 3. Remove the server cover (see "Removing the cover and bezel" on the microprocessor board in the server: v The server comes with your adapter for instructions for setting jumpers or switches and for...


