User Manual
Page 2
...be connected to a mains socket outlet with the apparatus. NO USER SERVICEABLE PARTS INSIDE. Install in the operating instructions unless you are for use . A polarized plug has two blades with the manufacturer's instructions. 8) Do not install ...operable during lightning storms or when unused for replacement of the obsolete outlet. 10) Protect the power cord from being walked on the apparatus. 16)The mains plug or appliance inlet is used , use attachments/accessories specified by the manufacturer. 12) Use only with the cart, stand, tripod, bracket, or table specified by qualified service...
...be connected to a mains socket outlet with the apparatus. NO USER SERVICEABLE PARTS INSIDE. Install in the operating instructions unless you are for use . A polarized plug has two blades with the manufacturer's instructions. 8) Do not install ...operable during lightning storms or when unused for replacement of the obsolete outlet. 10) Protect the power cord from being walked on the apparatus. 16)The mains plug or appliance inlet is used , use attachments/accessories specified by the manufacturer. 12) Use only with the cart, stand, tripod, bracket, or table specified by qualified service...
User Manual
Page 5
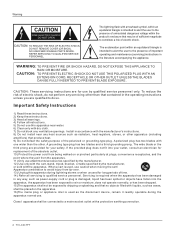
... External A/V Source Setup 11 Co nn ec ti ng a D VD p la ye r 11 Connecting a DTV(digital TV 12 Connecting digital audio output 12 Co nn ec ti ng a c om pu te r 13 Monitor Out Setup 14 HD MI a nd D VI i np ut 14 Cable sample 15 Connecting Headphones 16 Power source 16 Removing the table stand and installing a wall mount bracket 17 Operation Switching On/Off the TV set 18 Choose the Menu Language 18 Choose the input source 18 Channel Menu Channel Scan...
... External A/V Source Setup 11 Co nn ec ti ng a D VD p la ye r 11 Connecting a DTV(digital TV 12 Connecting digital audio output 12 Co nn ec ti ng a c om pu te r 13 Monitor Out Setup 14 HD MI a nd D VI i np ut 14 Cable sample 15 Connecting Headphones 16 Power source 16 Removing the table stand and installing a wall mount bracket 17 Operation Switching On/Off the TV set 18 Choose the Menu Language 18 Choose the input source 18 Channel Menu Channel Scan...
User Manual
Page 7
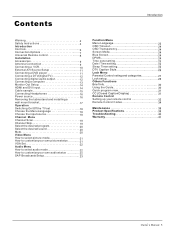
.... 7 Digital Audio Output: Connect digital audio from the S-Video signal source these jacks. 12 S-VIDEO IN: Connect the S-Video cable from an external signal source to the TV, either directly or through your cable box. 15 Headphone jack : Headphone audio output terminal. Connection Options Introduction Back panel controls HL26R,HL32R,HL40R,HL42R,HL42T,HL47T HDMI IN 2 1 VGA IN VGA AUDIO COMPONENT IN OPTICAL OUT AV OUT VGA 2 Y Pb Pr L-AUDIO- R 1 VIDEO L-AUDIO- NOTE: In standby mode, these ports will not work. 8 VIDEO Out: Connect the second TV or monitor to...
.... 7 Digital Audio Output: Connect digital audio from the S-Video signal source these jacks. 12 S-VIDEO IN: Connect the S-Video cable from an external signal source to the TV, either directly or through your cable box. 15 Headphone jack : Headphone audio output terminal. Connection Options Introduction Back panel controls HL26R,HL32R,HL40R,HL42R,HL42T,HL47T HDMI IN 2 1 VGA IN VGA AUDIO COMPONENT IN OPTICAL OUT AV OUT VGA 2 Y Pb Pr L-AUDIO- R 1 VIDEO L-AUDIO- NOTE: In standby mode, these ports will not work. 8 VIDEO Out: Connect the second TV or monitor to...
User Manual
Page 8
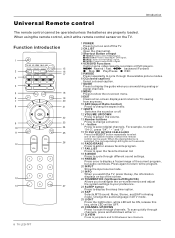
.../DVD Functions Control some video cassette recorders or DVD players. / Rewind / Fast / backward /Forward Stop Play/Pause REC 5 P.MODE Press repeatedly to cycle through the available picture modes. 6 CC(closed caption) Select a closed caption. 7 GUIDE Press to display the guide when you are properly loaded. Change the audio language in DTV mode. 25 LIGHT Press the light button, white LED will be ON, release this key, white LED will be operated unless the batteries are watching analog or digital channels. 8 MENU...
.../DVD Functions Control some video cassette recorders or DVD players. / Rewind / Fast / backward /Forward Stop Play/Pause REC 5 P.MODE Press repeatedly to cycle through the available picture modes. 6 CC(closed caption) Select a closed caption. 7 GUIDE Press to display the guide when you are properly loaded. Change the audio language in DTV mode. 25 LIGHT Press the light button, white LED will be ON, release this key, white LED will be operated unless the batteries are watching analog or digital channels. 8 MENU...
User Manual
Page 9
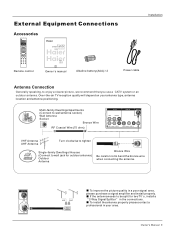
Q.VIEW Remote control TFT-LCD TV OWNER'S MANUAL Please READ this manual carefully before operating your TV, and retain it for outdoor antenna) Outdoor Antenna Bronze Wire Be careful not to enjoy a clearer picture, we recommend that you use a CATV system or an outdoor antenna .Over-the-air TV reception quality will depend on your area. Multi-family Dwellings/Apartments (Connect to be split for two TV`s, install a 2-Way Signal Splitter...
Q.VIEW Remote control TFT-LCD TV OWNER'S MANUAL Please READ this manual carefully before operating your TV, and retain it for outdoor antenna) Outdoor Antenna Bronze Wire Be careful not to enjoy a clearer picture, we recommend that you use a CATV system or an outdoor antenna .Over-the-air TV reception quality will depend on your area. Multi-family Dwellings/Apartments (Connect to be split for two TV`s, install a 2-Way Signal Splitter...
User Manual
Page 10
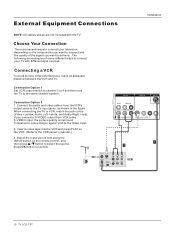
Connection Option 1 Set VCR output switch to channel 3 or 4 and then tune the TV to the Video input. 2. compared to connecting a regular VCR to the same channel number. Insert a video tape into the VCR and press PLAY on the remote control, and then press / button to select the source, press OK button to confirm. Select the input source with using the INPUT button on the VCR. (Refer to the VCR owner`s manual.) 3. R S-VIDEO L-AUDIO- Connecting a VCR To avoid picture noise...
Connection Option 1 Set VCR output switch to channel 3 or 4 and then tune the TV to the Video input. 2. compared to connecting a regular VCR to the same channel number. Insert a video tape into the VCR and press PLAY on the remote control, and then press / button to select the source, press OK button to confirm. Select the input source with using the INPUT button on the VCR. (Refer to the VCR owner`s manual.) 3. R S-VIDEO L-AUDIO- Connecting a VCR To avoid picture noise...
User Manual
Page 11
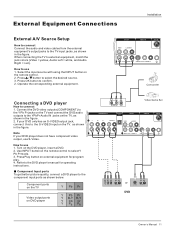
... Play button on the remote control. 2. How to use 1. R 1 VIDEO L-AUDIO- R How to use 1. R S-VIDEO L-AUDIO- as shown below. Turn on DVD player Y Pb Pr Y B-Y R-Y Y Cb Cr Y PB PR Owner s Manual 11 Component Input ports To get better picture quality, connect a DVD player to the component input ports as shown in the figure. External Equipment Connections Installation External A/V Source Setup How to connect Connect the audio and video cables from the external equipment's output jacks to the TV input jacks, as shown in the figure. 2. R VIDEO L-AUDIO R Video Game...
... Play button on the remote control. 2. How to use 1. R 1 VIDEO L-AUDIO- R How to use 1. R S-VIDEO L-AUDIO- as shown below. Turn on DVD player Y Pb Pr Y B-Y R-Y Y Cb Cr Y PB PR Owner s Manual 11 Component Input ports To get better picture quality, connect a DVD player to the component input ports as shown in the figure. External Equipment Connections Installation External A/V Source Setup How to connect Connect the audio and video cables from the external equipment's output jacks to the TV input jacks, as shown in the figure. 2. R VIDEO L-AUDIO R Video Game...
User Manual
Page 12
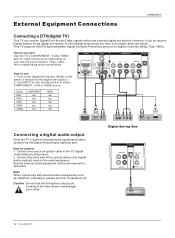
... owner`s manual for video connections, depending on the digital set -top box or other end of an optical cable to connect Use the TV`s COMPONENT , VGA or HDMI jack for the digital set-top box.) 2. See the external audio equipment instruction manual for Digital Contents (480p,720p,1080i). Caution: Do not look into the optical output port. Digital Set-top Box OPTICAL OUT L-AUDIO- R 1 VIDEO 12 TV LCD-TFT This TV supports HDCP (High-bandwidth Digital Contents Protection) protocol for operation. Use INPUT on the remote control to the digital audio (optical) input on the audio...
... owner`s manual for video connections, depending on the digital set -top box or other end of an optical cable to connect Use the TV`s COMPONENT , VGA or HDMI jack for the digital set-top box.) 2. See the external audio equipment instruction manual for Digital Contents (480p,720p,1080i). Caution: Do not look into the optical output port. Digital Set-top Box OPTICAL OUT L-AUDIO- R 1 VIDEO 12 TV LCD-TFT This TV supports HDCP (High-bandwidth Digital Contents Protection) protocol for operation. Use INPUT on the remote control to the digital audio (optical) input on the audio...

User Manual
Page 13
... output analog and digital RGB simultaneously, connect only one of the VGA graphic card cannot be noise associated with the resolution, vertical pattern, contrast or brightness in VGAmode. R L- R Owner s Manual 13 Note 1.Use aDVI cable. 2.Avoid keepinga fixed imageon theTV's screen fora long periodof time.The fixed image may be changed,change therefresh rate to either VGAIN or HDMI IN todisplay the VGAon theTV. To get the best picture...
... output analog and digital RGB simultaneously, connect only one of the VGA graphic card cannot be noise associated with the resolution, vertical pattern, contrast or brightness in VGAmode. R L- R Owner s Manual 13 Note 1.Use aDVI cable. 2.Avoid keepinga fixed imageon theTV's screen fora long periodof time.The fixed image may be changed,change therefresh rate to either VGAIN or HDMI IN todisplay the VGAon theTV. To get the best picture...
User Manual
Page 14
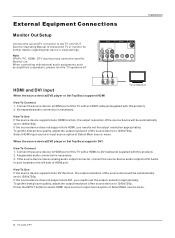
...External Equipment Connections Monitor Out Setup Connect the second TV or monitor to 1280x720p. See the Operating Manual of HDMI port. If the source device does not support Auto HDMI, you need to 1280x720p. A separated audio connection is necessary. To get the best picture quality, adjust the output resolution of Select Main source menu. 14 TV LCD-TFT Select HDMI input source in input source option of the source device to set the output resolution appropriately. When the source device(DVD player or Set Top Box) supports DVI How To Connect 1. R S-VIDEO L-AUDIO...
...External Equipment Connections Monitor Out Setup Connect the second TV or monitor to 1280x720p. See the Operating Manual of HDMI port. If the source device does not support Auto HDMI, you need to 1280x720p. A separated audio connection is necessary. To get the best picture quality, adjust the output resolution of Select Main source menu. 14 TV LCD-TFT Select HDMI input source in input source option of the source device to set the output resolution appropriately. When the source device(DVD player or Set Top Box) supports DVI How To Connect 1. R S-VIDEO L-AUDIO...
User Manual
Page 18
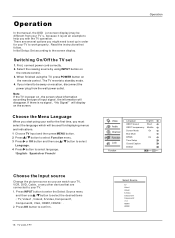
... power plug from your TV`s, because it is no signal , No Signal will display on the screen. English Spanish or French Operation Video Audio Channel Function Lock Function Language English OSD Timeout Short OSD Transparency Middle Screen Mode On Blue Mute DPMS On Time Setup Closed Caption Default / Select EXIT Back Choose the Input source Change the picture source so you can watch your TV, VCR, DVD, Cable , or any other devices that follow. Switching On/Off the TV set...
... power plug from your TV`s, because it is no signal , No Signal will display on the screen. English Spanish or French Operation Video Audio Channel Function Lock Function Language English OSD Timeout Short OSD Transparency Middle Screen Mode On Blue Mute DPMS On Time Setup Closed Caption Default / Select EXIT Back Choose the Input source Change the picture source so you can watch your TV, VCR, DVD, Cable , or any other devices that follow. Switching On/Off the TV set...

User Manual
Page 19
... cable TV (NTSC,QAM modulated) channels available in the channel number or select by list. Channel with a check icon is a skipped channel. 1 Press MENU button and then use / button to select Channel menu. 2 Press button and then use buttons on the TV to select Channel Skip. 3. Operation Video Audio Channel Function Lock Tuner Channel Scan Channel Skip Antenna Channel OK Scan / Select EXIT Back Video Audio Channel Function Lock Status: Scanning Analog channels: Digital Channels: 19 0 64% Antenna Channel Scan EXIT Cancel Video Audio Channel Function Lock Tuner Mode Channel...
... cable TV (NTSC,QAM modulated) channels available in the channel number or select by list. Channel with a check icon is a skipped channel. 1 Press MENU button and then use / button to select Channel menu. 2 Press button and then use buttons on the TV to select Channel Skip. 3. Operation Video Audio Channel Function Lock Tuner Channel Scan Channel Skip Antenna Channel OK Scan / Select EXIT Back Video Audio Channel Function Lock Status: Scanning Analog channels: Digital Channels: 19 0 64% Antenna Channel Scan EXIT Cancel Video Audio Channel Function Lock Tuner Mode Channel...
User Manual
Page 21
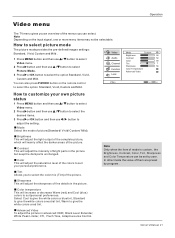
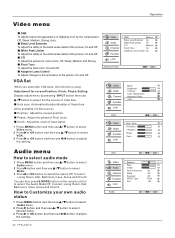
... be set by program . Mode Select the mode of the picture. Brightness This will adjust the light output of the colors to suit your own picture status 1 Press MENU button and then use / button to select Video menu. 2 Press button and then use / button to select the desired items. 3 Press or OK button and then use / button to select Picture Mode. 3 Press or OK button to give the white colors a red tint. Note Depending on the remote control to adjust the setting...
... be set by program . Mode Select the mode of the picture. Brightness This will adjust the light output of the colors to suit your own picture status 1 Press MENU button and then use / button to select Video menu. 2 Press button and then use / button to select the desired items. 3 Press or OK button and then use / button to select Picture Mode. 3 Press or OK button to give the white colors a red tint. Note Depending on the remote control to adjust the setting...
User Manual
Page 22
... Church. Position : Adjust the screen position. Phase : Adjust the phase of digitizing error by pressing INPUT button then use / button to select Mode. 3 Press or OK button to adjust the setting. CTI To adjust the picture for screen Position, Clock, Phase, Setting Display adjust menu by the compression: Off, Weak, Medium, Strong, Auto. Adaptive Luma Control To adjust changes in VGA source). Adjustment for color errors: Off, Weak, Medium and Strong. Video Audio Channel Function Lock DNR Medium Black Level Extender On White Peak Limiter...
... Church. Position : Adjust the screen position. Phase : Adjust the phase of digitizing error by pressing INPUT button then use / button to select Mode. 3 Press or OK button to adjust the setting. CTI To adjust the picture for screen Position, Clock, Phase, Setting Display adjust menu by the compression: Off, Weak, Medium, Strong, Auto. Adaptive Luma Control To adjust changes in VGA source). Adjustment for color errors: Off, Weak, Medium and Strong. Video Audio Channel Function Lock DNR Medium Black Level Extender On White Peak Limiter...

User Manual
Page 23
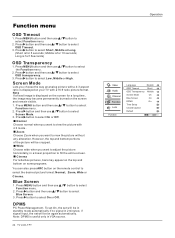
... On Time Setup Closed Caption Default / Select EXIT Back Owner s Manual 23 Audio menu Balance Adjust to increase or decrease lower-pitched sounds. even though Stereo or SAP has been selected. Function menu Menu Language When you start using your desired MTS mode in a Analog channel. 1. Sound Surround To turn the simulated surround sound on the digital signal, select them with the SAP button. 2. Bass Adjust to emphasize left or right speaker balance. Mode To adjust the audio mode...
... On Time Setup Closed Caption Default / Select EXIT Back Owner s Manual 23 Audio menu Balance Adjust to increase or decrease lower-pitched sounds. even though Stereo or SAP has been selected. Function menu Menu Language When you start using your desired MTS mode in a Analog channel. 1. Sound Surround To turn the simulated surround sound on the digital signal, select them with the SAP button. 2. Bass Adjust to emphasize left or right speaker balance. Mode To adjust the audio mode...
User Manual
Page 24
... ARC button on your TV with a 4:3 aspect ratio is useful only in VGA source. 24 TV LCD-TFT Operation Video Audio Channel Function Lock Function Language English OSD Timeout Short OSD Transparency Middle Screen Mode On Blue Screen On DPMS On Time Setup Closed Caption Default / Select EXIT Back Press button to select Function menu. 2. Press MENU button and then use / button to select Function menu. 2. Press button and then use / button to select Blue Screen. 3. Note: DPMS is displayed on the remote control...
... ARC button on your TV with a 4:3 aspect ratio is useful only in VGA source. 24 TV LCD-TFT Operation Video Audio Channel Function Lock Function Language English OSD Timeout Short OSD Transparency Middle Screen Mode On Blue Screen On DPMS On Time Setup Closed Caption Default / Select EXIT Back Press button to select Function menu. 2. Press MENU button and then use / button to select Function menu. 2. Press button and then use / button to select Blue Screen. 3. Note: DPMS is displayed on the remote control...
User Manual
Page 28
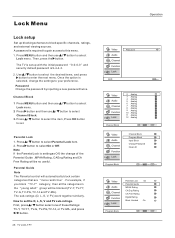
... specific channels, ratings, and external viewing sources. Channel Block 1 Press MENU button and then use / button to select Lock menu. 2 Press button and then use / button to this menu. 1. How to your preference. Lock Menu Lock setup Set up with the initial password 0-0-0-0 and security default password is selected, change of these Ratings: TV-Y, TV-Y7, TV-G, TV-PG,TV-14, or TV-MA , and press / button. 28 TV LCD-TFT Operation Video Audio Channel Function Lock Password Lock EXIT Back Video Audio Channel Function Lock 2 Analog 3 Analog 4 Analog 5 Analog 6 Analog 7 Analog 8 Analog...
... specific channels, ratings, and external viewing sources. Channel Block 1 Press MENU button and then use / button to select Lock menu. 2 Press button and then use / button to this menu. 1. How to your preference. Lock Menu Lock setup Set up with the initial password 0-0-0-0 and security default password is selected, change of these Ratings: TV-Y, TV-Y7, TV-G, TV-PG,TV-14, or TV-MA , and press / button. 28 TV LCD-TFT Operation Video Audio Channel Function Lock Password Lock EXIT Back Video Audio Channel Function Lock 2 Analog 3 Analog 4 Analog 5 Analog 6 Analog 7 Analog 8 Analog...
User Manual
Page 32
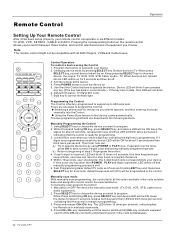
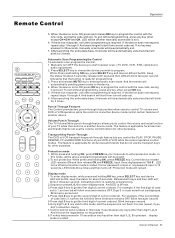
... in current mode.). CH- Default device is : TV DVD VCR STB Cable Audio - Device LED will not blink. 6. Using the Power Scan feature to 600 code sets. key. To manually-scan program the control: 1. Default init status: TV/Haier 001 code. 7. Programming the Control The Control is in the code set database). 32 TV LCD-TFT While Press and holding EXIT key and then press SELECT key for the device you wish to program. 2. Pressing the corresponding button on for programming. 3. Keep...
... in current mode.). CH- Default device is : TV DVD VCR STB Cable Audio - Device LED will not blink. 6. Using the Power Scan feature to 600 code sets. key. To manually-scan program the control: 1. Default init status: TV/Haier 001 code. 7. Programming the Control The Control is in the code set database). 32 TV LCD-TFT While Press and holding EXIT key and then press SELECT key for the device you wish to program. 2. Pressing the corresponding button on for programming. 3. Keep...
User Manual
Page 33
... manually scan mode is ended. Blink twice per second. 6.Only digit 1, 2, 3 are valid in this mode. Blink twice per second. 4.Press digit 2 key to get the first digit of current code set . You can be regarded as no key pressed. 8.If no further programming is required. And this mode, all the above programming methods will not be automatically exit. 7. Remote Control Operation TV DVD VCR SETBOX CABLE AUDIO SELECT CH.LIST FAV.LIST...
... manually scan mode is ended. Blink twice per second. 6.Only digit 1, 2, 3 are valid in this mode. Blink twice per second. 4.Press digit 2 key to get the first digit of current code set . You can be regarded as no key pressed. 8.If no further programming is required. And this mode, all the above programming methods will not be automatically exit. 7. Remote Control Operation TV DVD VCR SETBOX CABLE AUDIO SELECT CH.LIST FAV.LIST...

User Manual
Page 40
... by Fine Tune and Manual Scan. Press INPUT button to change signal input to Page 22 for color adjust. Note: Do not leave the television with some or all pictures Horizontal/vertical bars or picture shaking Television out of power supply is below 750hpa, the picture on the LCD screen may become permanently burned. Verify if electricity is resulted from power supply and, 10 seconds later, connect the television to see if...
... by Fine Tune and Manual Scan. Press INPUT button to change signal input to Page 22 for color adjust. Note: Do not leave the television with some or all pictures Horizontal/vertical bars or picture shaking Television out of power supply is below 750hpa, the picture on the LCD screen may become permanently burned. Verify if electricity is resulted from power supply and, 10 seconds later, connect the television to see if...


