
User Manual
Page 1
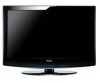
TFT-LCD TV OWNER'S MANUAL Please READ this manual carefully before operating your TV, and retain it for future reference. MODELS: HL26R HL37T HL32R HL42T HL40R HL47T HL42R HL52T
TFT-LCD TV OWNER'S MANUAL Please READ this manual carefully before operating your TV, and retain it for future reference. MODELS: HL26R HL37T HL32R HL42T HL40R HL47T HL42R HL52T
User Manual
Page 2
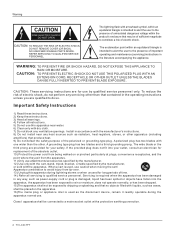
... instructions. 2) Keep these instructions. 3) Heed all warnings. 4) Follow all servicing to the presence of electric shock. ! A polarized plug has two blades with a protective earthing connection. 2 TV LCD-TFT If the provided plug does not fit into the apparatus, the apparatus has been exposed to rain or moisture, does not operate normally, or...
... instructions. 2) Keep these instructions. 3) Heed all warnings. 4) Follow all servicing to the presence of electric shock. ! A polarized plug has two blades with a protective earthing connection. 2 TV LCD-TFT If the provided plug does not fit into the apparatus, the apparatus has been exposed to rain or moisture, does not operate normally, or...
User Manual
Page 3
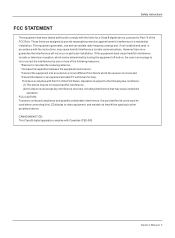
This equipment generates, use and can be not cause harmful interference. (2) this LCD display to video equipment; This device compiles with Part 15 of the following two conditions: (1) This device may cause harmful interference to radio communications. Operation ... with the instructions, may be determined by one or more of the FCC Rules. However there is connected. *Consult the dealer or an experienced radio/TV technician for a Class B digital device, pursuant to correct the interference by turning the equipment off and on, the user is encourage to try to Part...
This equipment generates, use and can be not cause harmful interference. (2) this LCD display to video equipment; This device compiles with Part 15 of the following two conditions: (1) This device may cause harmful interference to radio communications. Operation ... with the instructions, may be determined by one or more of the FCC Rules. However there is connected. *Consult the dealer or an experienced radio/TV technician for a Class B digital device, pursuant to correct the interference by turning the equipment off and on, the user is encourage to try to Part...
User Manual
Page 4
Remember to obtain warranty service. 4 TV LCD-TFT Model number serial number Date of purchase Staple your receipt to -use of the unit. You will guide you for purchasing the Haier product. Safety Instructions SAVE THESE INSTRUCTIONS Thank you in back of your manual. They are on label in getting the best use manual will need it to record the model and serial number. This easy-to your product.
Remember to obtain warranty service. 4 TV LCD-TFT Model number serial number Date of purchase Staple your receipt to -use of the unit. You will guide you for purchasing the Haier product. Safety Instructions SAVE THESE INSTRUCTIONS Thank you in back of your manual. They are on label in getting the best use manual will need it to record the model and serial number. This easy-to your product.
User Manual
Page 5
... s 9 Antenna Connection 9 Co nn ec ti ng a V CR 10 External A/V Source Setup 11 Co nn ec ti ng a D VD p la ye r 11 Connecting a DTV(digital TV 12 Connecting digital audio output 12 Co nn ec ti ng a c om pu te r 13 Monitor Out Setup 14 HD MI a nd D VI i np ut... 14 Cable sample 15 Connecting Headphones 16 Power source 16 Removing the table stand and installing a wall mount bracket 17 Operation Switching On/Off the TV set 18 Choose the Menu Language 18 Choose the input source 18 Channel Menu Channel Scan 19 Ch an ne l Sk ip 19 Se le...
... s 9 Antenna Connection 9 Co nn ec ti ng a V CR 10 External A/V Source Setup 11 Co nn ec ti ng a D VD p la ye r 11 Connecting a DTV(digital TV 12 Connecting digital audio output 12 Co nn ec ti ng a c om pu te r 13 Monitor Out Setup 14 HD MI a nd D VI i np ut... 14 Cable sample 15 Connecting Headphones 16 Power source 16 Removing the table stand and installing a wall mount bracket 17 Operation Switching On/Off the TV set 18 Choose the Menu Language 18 Choose the input source 18 Channel Menu Channel Scan 19 Ch an ne l Sk ip 19 Se le...
User Manual
Page 6
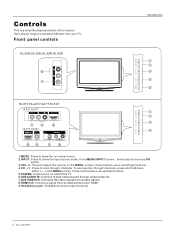
... and hold down buttons. 5.POWER: Press to turn on -screen menu. 2.INPUT: Press to HDMI. 9.Headphone jack : Headphone audio output terminal. 6 TV LCD-TFT In the MENU screen, these buttons serve as up/down either +/- . CH+ CH- POWER HL37T,HL42T,HL47T,HL52T HL42T,HL47T MENU INPUT VOL+ ... representation of front panel. To scan quickly through channels. HL37T,HL52T HDMI3 IN VIDEO2 IN VIDEO L - AUDIO - Front panel controls HL26R,HL32R,HL40R,HL42R Introduction MENU INPUT VOL+ VOL- Here shown may be somewhat different from an external device to show the on and off the...
... and hold down buttons. 5.POWER: Press to turn on -screen menu. 2.INPUT: Press to HDMI. 9.Headphone jack : Headphone audio output terminal. 6 TV LCD-TFT In the MENU screen, these buttons serve as up/down either +/- . CH+ CH- POWER HL37T,HL42T,HL47T,HL52T HL42T,HL47T MENU INPUT VOL+ ... representation of front panel. To scan quickly through channels. HL37T,HL52T HDMI3 IN VIDEO2 IN VIDEO L - AUDIO - Front panel controls HL26R,HL32R,HL40R,HL42R Introduction MENU INPUT VOL+ VOL- Here shown may be somewhat different from an external device to show the on and off the...
User Manual
Page 7
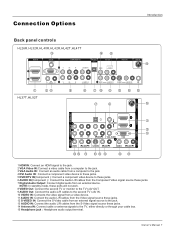
...to the jack. 4 DVI Audio IN: Connect a component video device to these jacks. 5 DVD/DTV IN(Component ): Connect a component video device to the TV, either directly or through your cable box. 15 Headphone jack : Headphone audio output terminal. Owner s Manual 7 R 1 VIDEO L-AUDIO- NOTE: In standby mode... - R S-VIDEO L-AUDIO- R VIDEO L-AUDIO-R VIDEO IN ANT IN L- R 1 Y Pb Pr AUDIO L-AUDIO- Connection Options Introduction Back panel controls HL26R,HL32R,HL40R,HL42R,HL42T,HL47T HDMI IN 2 1 VGA IN VGA AUDIO COMPONENT IN OPTICAL OUT AV OUT VGA 2 Y Pb Pr L-AUDIO-
...to the jack. 4 DVI Audio IN: Connect a component video device to these jacks. 5 DVD/DTV IN(Component ): Connect a component video device to the TV, either directly or through your cable box. 15 Headphone jack : Headphone audio output terminal. Owner s Manual 7 R 1 VIDEO L-AUDIO- NOTE: In standby mode... - R S-VIDEO L-AUDIO- R VIDEO L-AUDIO-R VIDEO IN ANT IN L- R 1 Y Pb Pr AUDIO L-AUDIO- Connection Options Introduction Back panel controls HL26R,HL32R,HL40R,HL42R,HL42T,HL47T HDMI IN 2 1 VGA IN VGA AUDIO COMPONENT IN OPTICAL OUT AV OUT VGA 2 Y Pb Pr L-AUDIO-
User Manual
Page 8
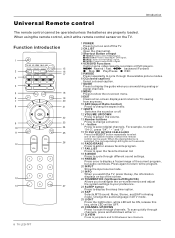
... language in Analog mode. PAGE-: Press to scan through different sound settings. 19 FREEZE Press once to enter TODAY signal; Function introduction TV DVD VCR SETBOX CABLE AUDIO SELECT CH.LIST FAV.LIST ADD/ERASE TODAY NEXT DAY PAGE- signal; To scan quickly through the available .../DOWN Press to adjust the volume. 13 Number buttons Press to change a channel. 14 button Press to jump back and forth between two channels. 8 TV LCD-TFT PAGE+: Press to enter PAGE+ signal. 4 VCR/DVD Functions Control some video cassette recorders or DVD players. / Rewind / Fast / backward /...
... language in Analog mode. PAGE-: Press to scan through different sound settings. 19 FREEZE Press once to enter TODAY signal; Function introduction TV DVD VCR SETBOX CABLE AUDIO SELECT CH.LIST FAV.LIST ADD/ERASE TODAY NEXT DAY PAGE- signal; To scan quickly through the available .../DOWN Press to adjust the volume. 13 Number buttons Press to change a channel. 14 button Press to jump back and forth between two channels. 8 TV LCD-TFT PAGE+: Press to enter PAGE+ signal. 4 VCR/DVD Functions Control some video cassette recorders or DVD players. / Rewind / Fast / backward /...
User Manual
Page 9
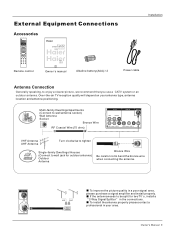
...HL32R HL42T HL40R HL47T HL42R HL52T Owner`s manual Alkaline battery(AAA) 2 Power cable Installation Antenna Connection Generally speaking, to be split for future reference. If the antenna needs to enjoy a clearer picture, we recommend that you use a CATV system or an outdoor antenna .Over-the-air TV...INFO OK MUTE EXIT ARC SAP SLEEP VOL+ CH+ VOL- Q.VIEW Remote control TFT-LCD TV OWNER'S MANUAL Please READ this manual carefully before operating your TV, and retain it for two TV`s, install a 2-Way Signal Splitter in a poor signal area, please purchase a signal amplifier...
...HL32R HL42T HL40R HL47T HL42R HL52T Owner`s manual Alkaline battery(AAA) 2 Power cable Installation Antenna Connection Generally speaking, to be split for future reference. If the antenna needs to enjoy a clearer picture, we recommend that you use a CATV system or an outdoor antenna .Over-the-air TV...INFO OK MUTE EXIT ARC SAP SLEEP VOL+ CH+ VOL- Q.VIEW Remote control TFT-LCD TV OWNER'S MANUAL Please READ this manual carefully before operating your TV, and retain it for two TV`s, install a 2-Way Signal Splitter in a poor signal area, please purchase a signal amplifier...
User Manual
Page 10
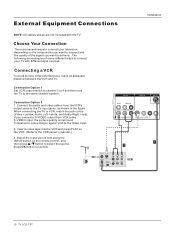
... INPUT button on the remote control, and then press / button to select the source, press OK button to confirm. Select the input source with the TV. R S-VIDEO L-AUDIO- AV OUT VIDEO L-AUDIO-R VIDEO IN ANT IN 1 VIDEO L-AUDIO- Connection Option 2 1. compared to connecting a regular VCR ...to the same channel number. R 10 TV LCD-TFT If you want to connect and the quality of some different ways to connect your television, depending on the VCR. (Refer to the S-...
... INPUT button on the remote control, and then press / button to select the source, press OK button to confirm. Select the input source with the TV. R S-VIDEO L-AUDIO- AV OUT VIDEO L-AUDIO-R VIDEO IN ANT IN 1 VIDEO L-AUDIO- Connection Option 2 1. compared to connecting a regular VCR ...to the same channel number. R 10 TV LCD-TFT If you want to connect and the quality of some different ways to connect your television, depending on the VCR. (Refer to the S-...
User Manual
Page 11
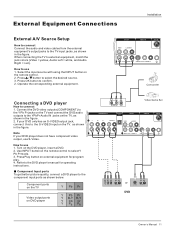
...OUT AV OUT Pb Pr L-AUDIO- Turn on the remote control. 2. R Camcorder Connecting a DVD player How to the YPbPr Audio IN jacks on the TV and connect the DVD audio outputs to connect 1. as shown in the figure. How to confirm. 2. Press OK button to use 1. R S-VIDEO L-AUDIO... output jacks to external equipment, match the jack colors (Video = yellow, Audio Left = white, and Audio Right = red). When connecting the TV to the TV input jacks, as shown in the figure. 2. AV OUT VIDEO L-AUDIO-R VIDEO IN ANT IN 1 VIDEO L-AUDIO- Use INPUT button on the...
...OUT AV OUT Pb Pr L-AUDIO- Turn on the remote control. 2. R Camcorder Connecting a DVD player How to the YPbPr Audio IN jacks on the TV and connect the DVD audio outputs to connect 1. as shown in the figure. How to confirm. 2. Press OK button to use 1. R S-VIDEO L-AUDIO... output jacks to external equipment, match the jack colors (Video = yellow, Audio Left = white, and Audio Right = red). When connecting the TV to the TV input jacks, as shown in the figure. 2. AV OUT VIDEO L-AUDIO-R VIDEO IN ANT IN 1 VIDEO L-AUDIO- Use INPUT button on the...
User Manual
Page 12
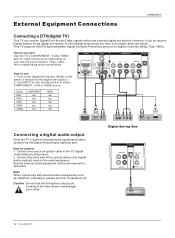
... Over-the-air/Cable signals without an external digital set -top box or other end of an optical cable to connect Use the TV`s COMPONENT , VGA or HDMI jack for video connections, depending on the audio equipment. Use INPUT on the remote control to external ...with external audio equipments, such as shown below. R 1 Y Pb Pr L-AUDIO- AUDIO - Then, make the corresponding audio connections. R 1 VIDEO 12 TV LCD-TFT How to the TV Digital Audio(Optical) Output port. 2. Connect the other digital external device, refer to the figure as amplifers or speakers, please turn the...
... Over-the-air/Cable signals without an external digital set -top box or other end of an optical cable to connect Use the TV`s COMPONENT , VGA or HDMI jack for video connections, depending on the audio equipment. Use INPUT on the remote control to external ...with external audio equipments, such as shown below. R 1 Y Pb Pr L-AUDIO- AUDIO - Then, make the corresponding audio connections. R 1 VIDEO 12 TV LCD-TFT How to the TV Digital Audio(Optical) Output port. 2. Connect the other digital external device, refer to the figure as amplifers or speakers, please turn the...

User Manual
Page 13
... VGAIN or HDMI IN todisplay the VGAon theTV. Turnon the computer a nd theTV. 2. Use theTV`s VGAor DVI (DigitalVisual Interface)AudioIN port foraudio connections, dependingon your TV. How touse 1. If the refresh rate of either VGAor HDMI ; (theother mode isset to 1024x768 . 2. Ifusing asound card,adjust the VGA sound as required.
... VGAIN or HDMI IN todisplay the VGAon theTV. Turnon the computer a nd theTV. 2. Use theTV`s VGAor DVI (DigitalVisual Interface)AudioIN port foraudio connections, dependingon your TV. How touse 1. If the refresh rate of either VGAor HDMI ; (theother mode isset to 1024x768 . 2. Ifusing asound card,adjust the VGA sound as required.
User Manual
Page 14
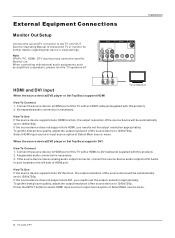
... source option of HDMI port. Press the INPUT button to set to 1280x720p. See the Operating Manual of Select Main source menu. 14 TV LCD-TFT Note YPbPr, PC, HDMI, DTV input sources cannot be automatically set the output resolution appropriately. When connecting with this product). 2....input settings. R S-VIDEO L-AUDIO- No separated audio connection is necessary. 3. Select HDMI input source in input source option of the second TV or monitor for Monitor out. If the source device has an analog audio output connector, connect the source device audio output to 1280x720p. Connect...
... source option of HDMI port. Press the INPUT button to set to 1280x720p. See the Operating Manual of Select Main source menu. 14 TV LCD-TFT Note YPbPr, PC, HDMI, DTV input sources cannot be automatically set the output resolution appropriately. When connecting with this product). 2....input settings. R S-VIDEO L-AUDIO- No separated audio connection is necessary. 3. Select HDMI input source in input source option of the second TV or monitor for Monitor out. If the source device has an analog audio output connector, connect the source device audio output to 1280x720p. Connect...
User Manual
Page 16
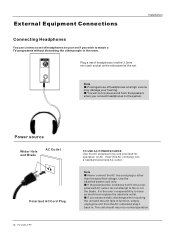
...Plug a set of headphones into a standard polarized AC outlet. Power source Wider Hole and Blade AC Outlet Polarized AC Cord Plug 16 TV LCD-TFT TO USE AC POWER SOURCE Use the AC polarized line cord provided for operation on the side panel of headphones at a high...have an electrician replace the obsolete outlet. It is the user`s responsibility to other people in . The unit should return to watch a TV programme without disturbing the other than the specified voltage. External Equipment Connections Installation Connecting Headphones You can connect a set of headphones to your ...
...Plug a set of headphones into a standard polarized AC outlet. Power source Wider Hole and Blade AC Outlet Polarized AC Cord Plug 16 TV LCD-TFT TO USE AC POWER SOURCE Use the AC polarized line cord provided for operation on the side panel of headphones at a high...have an electrician replace the obsolete outlet. It is the user`s responsibility to other people in . The unit should return to watch a TV programme without disturbing the other than the specified voltage. External Equipment Connections Installation Connecting Headphones You can connect a set of headphones to your ...
User Manual
Page 17
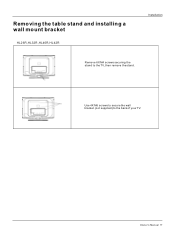
Removing the table stand and installing a wall mount bracket HL26R,HL32R,HL40R,HL42R Installation Remove 6X M4 screws securing the stand to the back of your TV. Owner s Manual 17 Use 4X M6 screws to secure the wall bracket (not supplied) to the TV, then remove the stand.
Removing the table stand and installing a wall mount bracket HL26R,HL32R,HL40R,HL42R Installation Remove 6X M4 screws securing the stand to the back of your TV. Owner s Manual 17 Use 4X M6 screws to secure the wall bracket (not supplied) to the TV, then remove the stand.
User Manual
Page 18
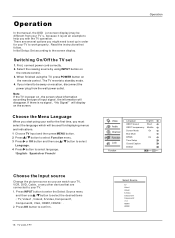
...: Set according to select language. Press OK button to standby mode. 4. The TV reverts to confirm . 18 TV LCD-TFT Select Source TV Video1 Video2 S-Video Component1 Component2 VGA HDMI1 HDMI2 Note If the TV in order for displaying menus and indications. 1 Choose TV Input and then press MENU button. 2 Press / button to select Function menu...
...: Set according to select language. Press OK button to standby mode. 4. The TV reverts to confirm . 18 TV LCD-TFT Select Source TV Video1 Video2 S-Video Component1 Component2 VGA HDMI1 HDMI2 Note If the TV in order for displaying menus and indications. 1 Choose TV Input and then press MENU button. 2 Press / button to select Function menu...

User Manual
Page 19
...to toggle between and . You can be only operated in the channel number or select by list. Note The Channel menu will search for antenna TV (NTSC and ATSC) channels available in your local area. Channel Scan 1 Press MENU button and then use / button to select Channel menu. ... and then use / button to select Channel menu. 2 Press button and then use buttons on the TV to set channel is selected, the TV will detect antenna signals and will search for cable TV (NTSC,QAM modulated) channels available in your Area. Note When Antenna is explained. Channel menu This...
...to toggle between and . You can be only operated in the channel number or select by list. Note The Channel menu will search for antenna TV (NTSC and ATSC) channels available in your local area. Channel Scan 1 Press MENU button and then use / button to select Channel menu. ... and then use / button to select Channel menu. 2 Press button and then use buttons on the TV to set channel is selected, the TV will detect antenna signals and will search for cable TV (NTSC,QAM modulated) channels available in your Area. Note When Antenna is explained. Channel menu This...
User Manual
Page 20
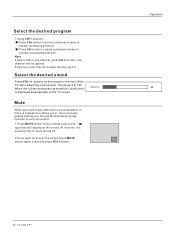
Press CH- Volume Mute When you need to pay attention to select a channel number in number increasing direction. Operation 20 TV LCD-TFT Select the desired sound Press VOL-/+ buttons on one channel, press CH+/- Select the desired program 1 Using CH+/- The range is ON on ... recover the sound, press MUTE button again or directly press VOL+ button. Note If skip is 0~100. buttons. button, the channel will display on the TV screen. button to a conversation, or there is a telephone calling you or there are pressed the volume level is very convenient. 1 Press MUTE button on...
Press CH- Volume Mute When you need to pay attention to select a channel number in number increasing direction. Operation 20 TV LCD-TFT Select the desired sound Press VOL-/+ buttons on one channel, press CH+/- Select the desired program 1 Using CH+/- The range is ON on ... recover the sound, press MUTE button again or directly press VOL+ button. Note If skip is 0~100. buttons. button, the channel will display on the TV screen. button to a conversation, or there is a telephone calling you or there are pressed the volume level is very convenient. 1 Press MUTE button on...
User Manual
Page 21
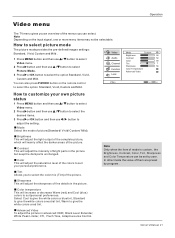
... and then use / button to select Picture Mode. 3 Press or OK button to select the color mix (Tint) of the picture. Operation Video menu The TV menu gives you an overview of the menus you to select the option Standard, Vivid, Custom and Mild.
... and then use / button to select Picture Mode. 3 Press or OK button to select the color mix (Tint) of the picture. Operation Video menu The TV menu gives you an overview of the menus you to select the option Standard, Vivid, Custom and Mild.


