
User Manual
Page 1
TFT-LCD TV OWNER'S MANUAL Please READ this manual carefully before operating your TV, and retain it for future reference. MODELS: HL26R HL37T HL32R HL42T HL40R HL47T HL42R HL52T
TFT-LCD TV OWNER'S MANUAL Please READ this manual carefully before operating your TV, and retain it for future reference. MODELS: HL26R HL37T HL32R HL42T HL40R HL47T HL42R HL52T
User Manual
Page 2
... exclamation point within the product's enclosure that no objects filled with the manufacturer's instructions. 8) Do not install near water. 6) Clean only with a protective earthing connection. 2 TV LCD-TFT
... exclamation point within the product's enclosure that no objects filled with the manufacturer's instructions. 8) Do not install near water. 6) Clean only with a protective earthing connection. 2 TV LCD-TFT
User Manual
Page 3
... between the equipment and receiver. *Connect the equipment into an outlet on , the user is connected. *Consult the dealer or an experienced radio/TV technician for a Class B digital device, pursuant to Part 15 of the FCC Rule. CANADIAN NOTICE: This Class B digital apparatus compiles with Canadian... ICES-003. This equipment generates, use and can be not cause harmful interference. (2) this LCD display to video equipment; Safety Instructions FCC STATEMENT This equipment has been tested and found to comply with the limits for help.
... between the equipment and receiver. *Connect the equipment into an outlet on , the user is connected. *Consult the dealer or an experienced radio/TV technician for a Class B digital device, pursuant to Part 15 of the FCC Rule. CANADIAN NOTICE: This Class B digital apparatus compiles with Canadian... ICES-003. This equipment generates, use and can be not cause harmful interference. (2) this LCD display to video equipment; Safety Instructions FCC STATEMENT This equipment has been tested and found to comply with the limits for help.
User Manual
Page 4
Remember to your manual. Model number serial number Date of purchase Staple your product. They are on label in getting the best use manual will guide you for purchasing the Haier product. This easy-to obtain warranty service. 4 TV LCD-TFT You will need it to -use of your receipt to record the model and serial number. Safety Instructions SAVE THESE INSTRUCTIONS Thank you in back of the unit.
Remember to your manual. Model number serial number Date of purchase Staple your product. They are on label in getting the best use manual will guide you for purchasing the Haier product. This easy-to obtain warranty service. 4 TV LCD-TFT You will need it to -use of your receipt to record the model and serial number. Safety Instructions SAVE THESE INSTRUCTIONS Thank you in back of the unit.
User Manual
Page 5
... s 9 Antenna Connection 9 Co nn ec ti ng a V CR 10 External A/V Source Setup 11 Co nn ec ti ng a D VD p la ye r 11 Connecting a DTV(digital TV 12 Connecting digital audio output 12 Co nn ec ti ng a c om pu te r 13 Monitor Out Setup 14 HD MI a nd D VI i np ut... 14 Cable sample 15 Connecting Headphones 16 Power source 16 Removing the table stand and installing a wall mount bracket 17 Operation Switching On/Off the TV set 18 Choose the Menu Language 18 Choose the input source 18 Channel Menu Channel Scan 19 Ch an ne l Sk ip 19 Se le...
... s 9 Antenna Connection 9 Co nn ec ti ng a V CR 10 External A/V Source Setup 11 Co nn ec ti ng a D VD p la ye r 11 Connecting a DTV(digital TV 12 Connecting digital audio output 12 Co nn ec ti ng a c om pu te r 13 Monitor Out Setup 14 HD MI a nd D VI i np ut... 14 Cable sample 15 Connecting Headphones 16 Power source 16 Removing the table stand and installing a wall mount bracket 17 Operation Switching On/Off the TV set 18 Choose the Menu Language 18 Choose the input source 18 Channel Menu Channel Scan 19 Ch an ne l Sk ip 19 Se le...
User Manual
Page 6
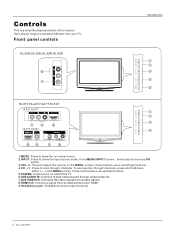
... from an external device. 7.AV2 VIDEO IN: Connects the video signal from a video device. 8.HDMI3 IN: Connect a signal from your TV. Front panel controls HL26R,HL32R,HL40R,HL42R Introduction MENU INPUT VOL+ VOL- AUDIO - HL37T,HL52T HDMI3 IN VIDEO2 IN VIDEO L - Here shown may be somewhat different... input source mode. R 1.MENU: Press to show the on and off the TV. 6.AV2 AUDIO IN: Connect to scan through channels, press and hold down buttons. 5.POWER: Press to turn on -screen menu. 2.INPUT: Press to HDMI. 9.Headphone jack : Headphone audio output terminal. 6 TV LCD-TFT CH+ CH-
... from an external device. 7.AV2 VIDEO IN: Connects the video signal from a video device. 8.HDMI3 IN: Connect a signal from your TV. Front panel controls HL26R,HL32R,HL40R,HL42R Introduction MENU INPUT VOL+ VOL- AUDIO - HL37T,HL52T HDMI3 IN VIDEO2 IN VIDEO L - Here shown may be somewhat different... input source mode. R 1.MENU: Press to show the on and off the TV. 6.AV2 AUDIO IN: Connect to scan through channels, press and hold down buttons. 5.POWER: Press to turn on -screen menu. 2.INPUT: Press to HDMI. 9.Headphone jack : Headphone audio output terminal. 6 TV LCD-TFT CH+ CH-
User Manual
Page 7
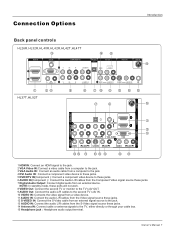
... Output: Connect digital audio from the S-Video signal source these jacks. 12 S-VIDEO IN: Connect the S-Video cable from an external signal source to the TV, either directly or through your cable box. 15 Headphone jack : Headphone audio output terminal. R 1 Y Pb Pr AUDIO L-AUDIO- R 1 VIDEO L-...signals to the jack. 13 AUDIO IN: Connect the audio L/R cables from an external device. Connection Options Introduction Back panel controls HL26R,HL32R,HL40R,HL42R,HL42T,HL47T HDMI IN 2 1 VGA IN VGA AUDIO COMPONENT IN OPTICAL OUT AV OUT VGA 2 Y Pb Pr L-AUDIO- DVI -...
... Output: Connect digital audio from the S-Video signal source these jacks. 12 S-VIDEO IN: Connect the S-Video cable from an external signal source to the TV, either directly or through your cable box. 15 Headphone jack : Headphone audio output terminal. R 1 Y Pb Pr AUDIO L-AUDIO- R 1 VIDEO L-...signals to the jack. 13 AUDIO IN: Connect the audio L/R cables from an external device. Connection Options Introduction Back panel controls HL26R,HL32R,HL40R,HL42R,HL42T,HL47T HDMI IN 2 1 VGA IN VGA AUDIO COMPONENT IN OPTICAL OUT AV OUT VGA 2 Y Pb Pr L-AUDIO- DVI -...
User Manual
Page 8
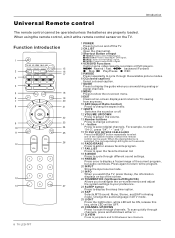
...but audio continues. Change the audio language in which the remote control can be used. For example, to enter "54-3", press "54", " " and "3". 15 TV DVD VCR SETBOX CABLE AUDIO Press the SELECT button repeatedly to select one of Input TODAY: Press to jump back and forth between two channels.... 8 TV LCD-TFT Press again to return to the program. 20 INPUT Show the input source mode. 21 INFO When you watch the TV, press the key, the information displays on top of the screen. 22 THUMBSTICK (...
...but audio continues. Change the audio language in which the remote control can be used. For example, to enter "54-3", press "54", " " and "3". 15 TV DVD VCR SETBOX CABLE AUDIO Press the SELECT button repeatedly to select one of Input TODAY: Press to jump back and forth between two channels.... 8 TV LCD-TFT Press again to return to the program. 20 INPUT Show the input source mode. 21 INFO When you watch the TV, press the key, the information displays on top of the screen. 22 THUMBSTICK (...
User Manual
Page 9
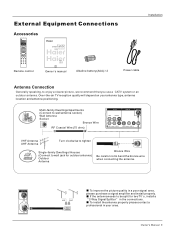
... HL26R HL37T HL32R HL42T HL40R ...we recommend that you use a CATV system or an outdoor antenna .Over-the-air TV reception quality will depend on your antenna type, antenna location and antenna positioning. CH- ...- R S-VIDEO L-AUDIO- ANT IN To improve the picture quality in your TV, and retain it for two TV`s, install a 2-Way Signal Splitter in the connections. Multi-family Dwellings/Apartments (... signal amplifier and install properly. External Equipment Connections Accessories TV DVD VCR SETBOX CABLE AUDIO SELECT CH.LIST FAV.LIST ADD/ERASE TODAY NEXT DAY...
... HL26R HL37T HL32R HL42T HL40R ...we recommend that you use a CATV system or an outdoor antenna .Over-the-air TV reception quality will depend on your antenna type, antenna location and antenna positioning. CH- ...- R S-VIDEO L-AUDIO- ANT IN To improve the picture quality in your TV, and retain it for two TV`s, install a 2-Way Signal Splitter in the connections. Multi-family Dwellings/Apartments (... signal amplifier and install properly. External Equipment Connections Accessories TV DVD VCR SETBOX CABLE AUDIO SELECT CH.LIST FAV.LIST ADD/ERASE TODAY NEXT DAY...
User Manual
Page 10
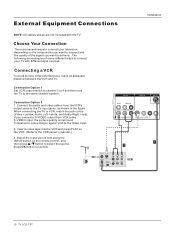
...S-VIDEO input, the picture quality is improved; R S-VIDEO L-AUDIO- Choose Your Connection There are several ways to connect your TV with the TV. R 10 TV LCD-TFT External Equipment Connections Installation NOTE: All cables shown are examples of the signal you connect a S-VIDEO output from the VCR... ways to the Video input. 2. Connecting a VCR To avoid picture noise (interference), leave an adequate distance between the VCR and TV. compared to connecting a regular VCR to connect your television, depending on the remote control, and then press / button to select the...
...S-VIDEO input, the picture quality is improved; R S-VIDEO L-AUDIO- Choose Your Connection There are several ways to connect your TV with the TV. R 10 TV LCD-TFT External Equipment Connections Installation NOTE: All cables shown are examples of the signal you connect a S-VIDEO output from the VCR... ways to the Video input. 2. Connecting a VCR To avoid picture noise (interference), leave an adequate distance between the VCR and TV. compared to connecting a regular VCR to connect your television, depending on the remote control, and then press / button to select the...
User Manual
Page 11
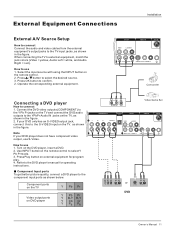
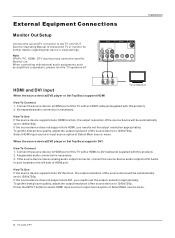
...ANT IN 1 VIDEO L-AUDIO- Connect the DVD video outputs (COMPONENT) to the Y Pb Pr jacks on the TV and connect the DVD audio outputs to the YPbPr Audio IN jacks on the TV. R 1 VIDEO L-AUDIO- as shown in the figure. Component Input ports To get better picture quality, connect a... the input source with using the INPUT button on DVD player Y Pb Pr Y B-Y R-Y Y Cb Cr Y PB PR Owner s Manual 11 When connecting the TV to select the desired source. 3. Press OK button to use 1. COMPONENT IN OPTICAL OUT AV OUT Pb Pr L-AUDIO- R How to confirm. 2. External Equipment ...
...ANT IN 1 VIDEO L-AUDIO- Connect the DVD video outputs (COMPONENT) to the Y Pb Pr jacks on the TV and connect the DVD audio outputs to the YPbPr Audio IN jacks on the TV. R 1 VIDEO L-AUDIO- as shown in the figure. Component Input ports To get better picture quality, connect a... the input source with using the INPUT button on DVD player Y Pb Pr Y B-Y R-Y Y Cb Cr Y PB PR Owner s Manual 11 When connecting the TV to select the desired source. 3. Press OK button to use 1. COMPONENT IN OPTICAL OUT AV OUT Pb Pr L-AUDIO- R How to confirm. 2. External Equipment ...
User Manual
Page 12
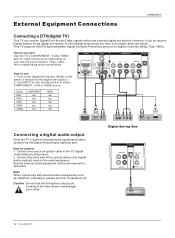
...or HDMI source. Looking at the laser beam may damage your set -top box.) 2. R 1 VIDEO 12 TV LCD-TFT External Equipment Connections Installation Connecting a DTV(digital TV) This TV can receive Digital Over-the-air/Cable signals without an external digital set -top box or other end of ... for Digital Contents (480p,720p,1080i). R VIDEO OUT L-AUDIO- Turn on your vision. R HDMI Connecting a digital audio output Send the TV`s audio to the owner`s manual for video connections, depending on the digital set-top box. (Refer to external audio equipment (stereo system) ...
...or HDMI source. Looking at the laser beam may damage your set -top box.) 2. R 1 VIDEO 12 TV LCD-TFT External Equipment Connections Installation Connecting a DTV(digital TV) This TV can receive Digital Over-the-air/Cable signals without an external digital set -top box or other end of ... for Digital Contents (480p,720p,1080i). R VIDEO OUT L-AUDIO- Turn on your vision. R HDMI Connecting a digital audio output Send the TV`s audio to the owner`s manual for video connections, depending on the digital set-top box. (Refer to external audio equipment (stereo system) ...

User Manual
Page 13
...- R Owner s Manual 13 How touse 1. External Equipment Connections Installation Connecting a computer How toconnect 1. Use theTV`s VGAor DVI (DigitalVisual Interface)AudioIN port foraudio connections, dependingon your TV. If noiseis present, changethe VGAmode to another rate or adjust the brightness and contrast on your computer connector. R L- If the refresh rate of either VGAor...
...- R Owner s Manual 13 How touse 1. External Equipment Connections Installation Connecting a computer How toconnect 1. Use theTV`s VGAor DVI (DigitalVisual Interface)AudioIN port foraudio connections, dependingon your TV. If noiseis present, changethe VGAmode to another rate or adjust the brightness and contrast on your computer connector. R L- If the refresh rate of either VGAor...
User Manual
Page 14
... used for further details regarding that device`s input settings. Select HDMI input source in input source option of Select Main source menu. 14 TV LCD-TFT A separated audio connection is necessary. R S-VIDEO L-AUDIO- If the source device does not support Auto DVI, you need to ...1280x720p. Press the INPUT button to -DVI cable(not supplied with external audio equipments, such as amplifiers or speakers, please turn the TV speakers off. Note YPbPr, PC, HDMI, DTV input sources cannot be automatically set the output resolution appropriately. Connect the source device to...
... used for further details regarding that device`s input settings. Select HDMI input source in input source option of Select Main source menu. 14 TV LCD-TFT A separated audio connection is necessary. R S-VIDEO L-AUDIO- If the source device does not support Auto DVI, you need to ...1280x720p. Press the INPUT button to -DVI cable(not supplied with external audio equipments, such as amplifiers or speakers, please turn the TV speakers off. Note YPbPr, PC, HDMI, DTV input sources cannot be automatically set the output resolution appropriately. Connect the source device to...
User Manual
Page 16
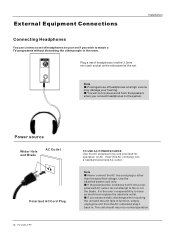
... Installation Connecting Headphones You can connect a set of the set. Power source Wider Hole and Blade AC Outlet Polarized AC Cord Plug 16 TV LCD-TFT TO USE AC POWER SOURCE Use the AC polarized line cord provided for operation on the side panel of headphones to your hearing. Insert... may damage your set of headphones into the 3.5mm mini-jack socket on AC. Note Never connect the AC line cord plug to watch a TV programme without disturbing the other than the specified voltage. If you cause a static discharge when touching the unit and the unit fails to function,...
... Installation Connecting Headphones You can connect a set of the set. Power source Wider Hole and Blade AC Outlet Polarized AC Cord Plug 16 TV LCD-TFT TO USE AC POWER SOURCE Use the AC polarized line cord provided for operation on the side panel of headphones to your hearing. Insert... may damage your set of headphones into the 3.5mm mini-jack socket on AC. Note Never connect the AC line cord plug to watch a TV programme without disturbing the other than the specified voltage. If you cause a static discharge when touching the unit and the unit fails to function,...
User Manual
Page 17
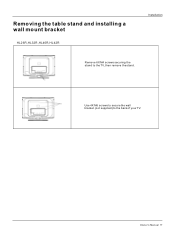
Owner s Manual 17 Use 4X M6 screws to secure the wall bracket (not supplied) to the TV, then remove the stand. Removing the table stand and installing a wall mount bracket HL26R,HL32R,HL40R,HL42R Installation Remove 6X M4 screws securing the stand to the back of your TV.
Owner s Manual 17 Use 4X M6 screws to secure the wall bracket (not supplied) to the TV, then remove the stand. Removing the table stand and installing a wall mount bracket HL26R,HL32R,HL40R,HL42R Installation Remove 6X M4 screws securing the stand to the back of your TV.
User Manual
Page 18
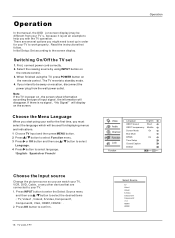
...example to be used for the first time, you start using your TV, VCR, DVD, Cable , or any other devices that follow. Initial Setup: Set according to confirm . 18 TV LCD-TFT Select Source TV Video1 Video2 S-Video Component1 Component2 VGA HDMI1 HDMI2 Switching On/Off the... TV set for displaying menus and indications. 1 Choose TV Input and then press MENU button. 2 Press / button to select Function ...
...example to be used for the first time, you start using your TV, VCR, DVD, Cable , or any other devices that follow. Initial Setup: Set according to confirm . 18 TV LCD-TFT Select Source TV Video1 Video2 S-Video Component1 Component2 VGA HDMI1 HDMI2 Switching On/Off the... TV set for displaying menus and indications. 1 Choose TV Input and then press MENU button. 2 Press / button to select Function ...

User Manual
Page 19
... button to start searching. 6 To cancel searching, press EXIT button. Note When Antenna is selected, the TV will detect antenna signals and will search for cable TV (NTSC,QAM modulated) channels available in normal TV mode. You can be only operated in your local area. When Cable is selected, the... Skip A skip channel is skipped when using CH+ and CHbutton to toggle between and . Note The Channel menu will search for antenna TV (NTSC and ATSC) channels available in the channel number or select by list. Default un-scanned analog channels are respectively Channel Scan, Channel Skip...
... button to start searching. 6 To cancel searching, press EXIT button. Note When Antenna is selected, the TV will detect antenna signals and will search for cable TV (NTSC,QAM modulated) channels available in normal TV mode. You can be only operated in your local area. When Cable is selected, the... Skip A skip channel is skipped when using CH+ and CHbutton to toggle between and . Note The Channel menu will search for antenna TV (NTSC and ATSC) channels available in the channel number or select by list. Default un-scanned analog channels are respectively Channel Scan, Channel Skip...
User Manual
Page 20
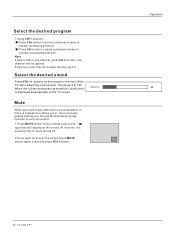
... directly,eg:2-0. button, the channel will display on the remote or the front of the TV set is turned off. 2 If you , the sound elimination (mute) function is ON on the TV screen. buttons. Operation 20 TV LCD-TFT When the volume buttons are some guests visiting you want to adjust the volume level...
... directly,eg:2-0. button, the channel will display on the remote or the front of the TV set is turned off. 2 If you , the sound elimination (mute) function is ON on the TV screen. buttons. Operation 20 TV LCD-TFT When the volume buttons are some guests visiting you want to adjust the volume level...
User Manual
Page 21
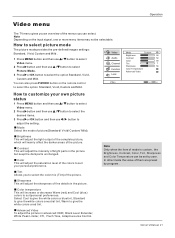
... will mainly affect the darker areas of the picture. Tint Allows you to select the color mix (Tint) of the picture. Operation Video menu The TV menu gives you an overview of the colors to suit your own picture status 1 Press MENU button and then use / button to select Video menu...
... will mainly affect the darker areas of the picture. Tint Allows you to select the color mix (Tint) of the picture. Operation Video menu The TV menu gives you an overview of the colors to suit your own picture status 1 Press MENU button and then use / button to select Video menu...


