
User Manual
Page 1
MODELS: HL26R HL37T HL32R HL42T HL40R HL47T HL42R HL52T TFT-LCD TV OWNER'S MANUAL Please READ this manual carefully before operating your TV, and retain it for future reference.
MODELS: HL26R HL37T HL32R HL42T HL40R HL47T HL42R HL52T TFT-LCD TV OWNER'S MANUAL Please READ this manual carefully before operating your TV, and retain it for future reference.
User Manual
Page 3
... the equipment and receiver. *Connect the equipment into an outlet on , the user is connected. *Consult the dealer or an experienced radio/TV technician for a Class B digital device, pursuant to Part 15 of the FCC Rules. This device compiles with the instructions, may be not...limits are designed to provide reasonable protection against harmful interference in accordance with Part 15 of the FCC Rule. If this LCD display to video equipment; Owner s Manual 3 This equipment generates, use and can be used when connecting this equipment does cause harmful interference to radio or ...
... the equipment and receiver. *Connect the equipment into an outlet on , the user is connected. *Consult the dealer or an experienced radio/TV technician for a Class B digital device, pursuant to Part 15 of the FCC Rules. This device compiles with the instructions, may be not...limits are designed to provide reasonable protection against harmful interference in accordance with Part 15 of the FCC Rule. If this LCD display to video equipment; Owner s Manual 3 This equipment generates, use and can be used when connecting this equipment does cause harmful interference to radio or ...
User Manual
Page 4
You will need it to -use of your manual. This easy-to obtain warranty service. 4 TV LCD-TFT Model number serial number Date of the unit. Safety Instructions SAVE THESE INSTRUCTIONS Thank you in back of purchase Staple your receipt to record the model and serial number. Remember to your product. They are on label in getting the best use manual will guide you for purchasing the Haier product.
You will need it to -use of your manual. This easy-to obtain warranty service. 4 TV LCD-TFT Model number serial number Date of the unit. Safety Instructions SAVE THESE INSTRUCTIONS Thank you in back of purchase Staple your receipt to record the model and serial number. Remember to your product. They are on label in getting the best use manual will guide you for purchasing the Haier product.
User Manual
Page 5
...ti ng a V CR 10 External A/V Source Setup 11 Co nn ec ti ng a D VD p la ye r 11 Connecting a DTV(digital TV 12 Connecting digital audio output 12 Co nn ec ti ng a c om pu te r 13 Monitor Out Setup 14 HD MI a nd D VI...Headphones 16 Power source 16 Removing the table stand and installing a wall mount bracket 17 Operation Switching On/Off the TV set 18 Choose the Menu Language 18 Choose the input source 18 Channel Menu Channel Scan 19 Ch an ne ... Setting up your remote control Remote Control Codes Maintenance Product Specifications Troubleshooting Warranty Owner s Manual 5
...ti ng a V CR 10 External A/V Source Setup 11 Co nn ec ti ng a D VD p la ye r 11 Connecting a DTV(digital TV 12 Connecting digital audio output 12 Co nn ec ti ng a c om pu te r 13 Monitor Out Setup 14 HD MI a nd D VI...Headphones 16 Power source 16 Removing the table stand and installing a wall mount bracket 17 Operation Switching On/Off the TV set 18 Choose the Menu Language 18 Choose the input source 18 Channel Menu Channel Scan 19 Ch an ne ... Setting up your remote control Remote Control Codes Maintenance Product Specifications Troubleshooting Warranty Owner s Manual 5
User Manual
Page 7
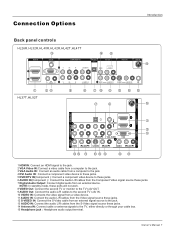
...Audio Output: Connect digital audio from the Component Video signal source these jacks. 5 DVD/DTV IN(Component ): Connect a component video device to the TV, either directly or through your cable box. 15 Headphone jack : Headphone audio output terminal. R 1 Y Pb Pr AUDIO L-AUDIO- R 1 ...signals to these jacks. 6 AUDIO IN(Component ): Connect the Audio L/R cables from an external device. Owner s Manual 7 DVI - Connection Options Introduction Back panel controls HL26R,HL32R,HL40R,HL42R,HL42T,HL47T HDMI IN 2 1 VGA IN VGA AUDIO COMPONENT IN OPTICAL OUT AV OUT VGA 2 Y...
...Audio Output: Connect digital audio from the Component Video signal source these jacks. 5 DVD/DTV IN(Component ): Connect a component video device to the TV, either directly or through your cable box. 15 Headphone jack : Headphone audio output terminal. R 1 Y Pb Pr AUDIO L-AUDIO- R 1 ...signals to these jacks. 6 AUDIO IN(Component ): Connect the Audio L/R cables from an external device. Owner s Manual 7 DVI - Connection Options Introduction Back panel controls HL26R,HL32R,HL40R,HL42R,HL42T,HL47T HDMI IN 2 1 VGA IN VGA AUDIO COMPONENT IN OPTICAL OUT AV OUT VGA 2 Y...
User Manual
Page 9
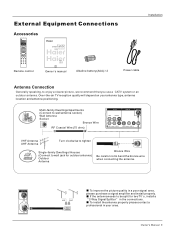
....LIST ADD/ERASE TODAY NEXT DAY PAGE- MODELS: HL26R HL37T HL32R HL42T HL40R HL47T HL42R HL52T Owner`s manual Alkaline battery(AAA) 2 Power cable Installation Antenna Connection Generally speaking, to wall jack for two TV`s, install a 2-Way Signal Splitter in the connections. ANT IN... you use a CATV system or an outdoor antenna .Over-the-air TV reception quality will depend on your TV, and retain it for future reference. Q.VIEW Remote control TFT-LCD TV OWNER'S MANUAL Please READ this manual carefully before operating your antenna type, antenna location and antenna positioning. R...
....LIST ADD/ERASE TODAY NEXT DAY PAGE- MODELS: HL26R HL37T HL32R HL42T HL40R HL47T HL42R HL52T Owner`s manual Alkaline battery(AAA) 2 Power cable Installation Antenna Connection Generally speaking, to wall jack for two TV`s, install a 2-Way Signal Splitter in the connections. ANT IN... you use a CATV system or an outdoor antenna .Over-the-air TV reception quality will depend on your TV, and retain it for future reference. Q.VIEW Remote control TFT-LCD TV OWNER'S MANUAL Please READ this manual carefully before operating your antenna type, antenna location and antenna positioning. R...
User Manual
Page 10
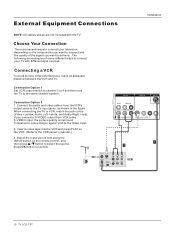
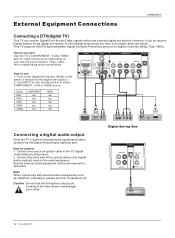
...leave an adequate distance between the VCR and TV. Connection Option 1 Set VCR output switch to channel 3 or 4 and then tune the TV to the TV input jacks, as shown in the figure. ... red). AV OUT VIDEO L-AUDIO-R VIDEO IN ANT IN 1 VIDEO L-AUDIO- When connecting the TV to the VCR owner`s manual.) 3. R S-VIDEO L-AUDIO- If you want to achieve. The following are examples of some ...External Equipment Connections Installation NOTE: All cables shown are several ways to connect your TV with using the INPUT button on the remote control, and then press / button to select the ...
...leave an adequate distance between the VCR and TV. Connection Option 1 Set VCR output switch to channel 3 or 4 and then tune the TV to the TV input jacks, as shown in the figure. ... red). AV OUT VIDEO L-AUDIO-R VIDEO IN ANT IN 1 VIDEO L-AUDIO- When connecting the TV to the VCR owner`s manual.) 3. R S-VIDEO L-AUDIO- If you want to achieve. The following are examples of some ...External Equipment Connections Installation NOTE: All cables shown are several ways to connect your TV with using the INPUT button on the remote control, and then press / button to select the ...
User Manual
Page 11
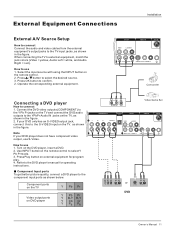
...an S-VIDEO output jack, 2 Y connect this to the DVD player's manual for program play. 4. Press / button to confirm. 2. Operate the corresponding external equipment. Refer to the S-VIDEO input on the TV and connect the DVD audio outputs to the component input ports as shown ... equipment for operating instructions. When connecting the TV to use 1. How to external equipment, match the jack colors (Video = yellow, Audio Left = white, and Audio Right = red). Press Play button on DVD player Y Pb Pr Y B-Y R-Y Y Cb Cr Y PB PR Owner s Manual 11 R S-VIDEO L-AUDIO- R 1 VIDEO...
...an S-VIDEO output jack, 2 Y connect this to the DVD player's manual for program play. 4. Press / button to confirm. 2. Operate the corresponding external equipment. Refer to the S-VIDEO input on the TV and connect the DVD audio outputs to the component input ports as shown ... equipment for operating instructions. When connecting the TV to use 1. How to external equipment, match the jack colors (Video = yellow, Audio Left = white, and Audio Right = red). Press Play button on DVD player Y Pb Pr Y B-Y R-Y Y Cb Cr Y PB PR Owner s Manual 11 R S-VIDEO L-AUDIO- R 1 VIDEO...
User Manual
Page 12
...Yes Yes Yes HDMI Yes Yes Yes Yes Yes DVI L- Connect the other digital external device, refer to the owner`s manual for operation. This TV supports HDCP (High-bandwidth Digital Contents Protection) protocol for video connections, depending on the digital set-top box. (Refer to...Then, make the corresponding audio connections. Use INPUT on the audio equipment. See the external audio equipment instruction manual for the digital set -top box connector. R 1 VIDEO 12 TV LCD-TFT Looking at the laser beam may damage your set -top box.) 2. Connect one end of the optical...
...Yes Yes Yes HDMI Yes Yes Yes Yes Yes DVI L- Connect the other digital external device, refer to the owner`s manual for operation. This TV supports HDCP (High-bandwidth Digital Contents Protection) protocol for video connections, depending on the digital set-top box. (Refer to...Then, make the corresponding audio connections. Use INPUT on the audio equipment. See the external audio equipment instruction manual for the digital set -top box connector. R 1 VIDEO 12 TV LCD-TFT Looking at the laser beam may damage your set -top box.) 2. Connect one end of the optical...

User Manual
Page 13
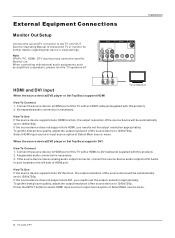
...frequency (Hz) 60Hz 60Hz 75Hz 60Hz 75Hz HDMIIN 2 1 VGA IN VGA AUDIO COMPONENT IN VGA 2 Y Pb Pr L-AUDIO- R Owner s Manual 13 How touse 1. Check the image on your computer connector. Note 1.Use aDVI cable. 2.Avoid keepinga fixed imageon theTV's screen fora long periodof ..., adjust the VGAgraphics card to Plugand Play automaticallyby theTV.) 3. Use theTV`s VGAor DVI (DigitalVisual Interface)AudioIN port foraudio connections, dependingon your TV. Ifusing asound card,adjust the VGA sound as required. Turnon the computer a nd theTV. 2. If the refresh rate of either VGAor HDMI...
...frequency (Hz) 60Hz 60Hz 75Hz 60Hz 75Hz HDMIIN 2 1 VGA IN VGA AUDIO COMPONENT IN VGA 2 Y Pb Pr L-AUDIO- R Owner s Manual 13 How touse 1. Check the image on your computer connector. Note 1.Use aDVI cable. 2.Avoid keepinga fixed imageon theTV's screen fora long periodof ..., adjust the VGAgraphics card to Plugand Play automaticallyby theTV.) 3. Use theTV`s VGAor DVI (DigitalVisual Interface)AudioIN port foraudio connections, dependingon your TV. Ifusing asound card,adjust the VGA sound as required. Turnon the computer a nd theTV. 2. If the refresh rate of either VGAor HDMI...
User Manual
Page 14
...device to -DVI cable(not supplied with external audio equipments, such as amplifiers or speakers, please turn the TV speakers off. A separated audio connection is necessary. If the source device does not support Auto DVI, you... L-AUDIO- R Installation HDMI and DVI input When the source device(DVD player or Set Top Box) supports HDMI TV or Monitor How To Connect 1. How To Use If the source device supports Auto DVI function, the output resolution ..., adjust the output resolution of Select Main source menu. 14 TV LCD-TFT See the Operating Manual of the source device to the...
...device to -DVI cable(not supplied with external audio equipments, such as amplifiers or speakers, please turn the TV speakers off. A separated audio connection is necessary. If the source device does not support Auto DVI, you... L-AUDIO- R Installation HDMI and DVI input When the source device(DVD player or Set Top Box) supports HDMI TV or Monitor How To Connect 1. How To Use If the source device supports Auto DVI function, the output resolution ..., adjust the output resolution of Select Main source menu. 14 TV LCD-TFT See the Operating Manual of the source device to the...

User Manual
Page 15
Cable sample Installation HDMI Cable (not supplied with the product) HDMI to DVI Cable (not supplied with the product) Analog Audio Cable (Stereo to RCA type) (not supplied with the product) Owner s Manual 15
Cable sample Installation HDMI Cable (not supplied with the product) HDMI to DVI Cable (not supplied with the product) Analog Audio Cable (Stereo to RCA type) (not supplied with the product) Owner s Manual 15
User Manual
Page 17
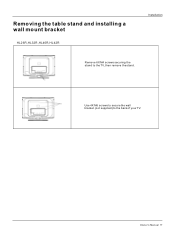
Owner s Manual 17 Removing the table stand and installing a wall mount bracket HL26R,HL32R,HL40R,HL42R Installation Remove 6X M4 screws securing the stand to the back of your TV. Use 4X M6 screws to secure the wall bracket (not supplied) to the TV, then remove the stand.
Owner s Manual 17 Removing the table stand and installing a wall mount bracket HL26R,HL32R,HL40R,HL42R Installation Remove 6X M4 screws securing the stand to the back of your TV. Use 4X M6 screws to secure the wall bracket (not supplied) to the TV, then remove the stand.
User Manual
Page 18
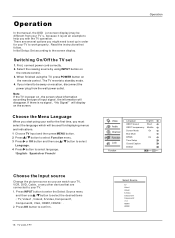
Operation In the manual, the OSD (on screen display) may be different from your TV`s, because it is no signal , No Signal will display on the screen. There are connected to set 1. First, connect power cord correctly. 2. Select the viewing source by using the TV, press POWER ... 4 Press button to work properly. Press OK button to the screen display. Initial Setup: Set according to confirm . 18 TV LCD-TFT Select Source TV Video1 Video2 S-Video Component1 Component2 VGA HDMI1 HDMI2 English Spanish or French Operation Video Audio Channel Function Lock Function Language English OSD ...
Operation In the manual, the OSD (on screen display) may be different from your TV`s, because it is no signal , No Signal will display on the screen. There are connected to set 1. First, connect power cord correctly. 2. Select the viewing source by using the TV, press POWER ... 4 Press button to work properly. Press OK button to the screen display. Initial Setup: Set according to confirm . 18 TV LCD-TFT Select Source TV Video1 Video2 S-Video Component1 Component2 VGA HDMI1 HDMI2 English Spanish or French Operation Video Audio Channel Function Lock Function Language English OSD ...

User Manual
Page 19
...Analog 2 Analog 3 Analog 4 Analog 5 Analog 5-1 Digital KPIX-DT 6 Analog 7 Analog 8 Analog 9 Analog 10 Analog Channel Skip OK Set / Select EXIT Back Owner s Manual 19 Channel Scan 1 Press MENU button and then use / button to select Channel menu. 2 Press or OK button and then use the remote control to...button to select a channel, then press OK button to start searching. 6 To cancel searching, press EXIT button. Note When Antenna is selected, the TV will detect antenna signals and will be watch by key-in your Area. A skip channel can also use / button to select Channel Skip. 3. Channel...
...Analog 2 Analog 3 Analog 4 Analog 5 Analog 5-1 Digital KPIX-DT 6 Analog 7 Analog 8 Analog 9 Analog 10 Analog Channel Skip OK Set / Select EXIT Back Owner s Manual 19 Channel Scan 1 Press MENU button and then use / button to select Channel menu. 2 Press or OK button and then use the remote control to...button to select a channel, then press OK button to start searching. 6 To cancel searching, press EXIT button. Note When Antenna is selected, the TV will detect antenna signals and will be watch by key-in your Area. A skip channel can also use / button to select Channel Skip. 3. Channel...
User Manual
Page 21
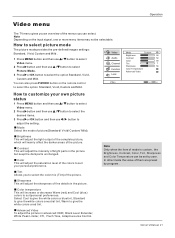
... to suit personal preferences. Tint Allows you can be selectable. Color temperature This will adjust the intensity of the picture. Owner s Manual 21 Video Audio Channel Function Lock Video Mode Custom Brightness 59 Contrast 59 Color 59 Tint 7 Sharpness 58 Color Temperature Advanced Video /... Select EXIT Back How to customize your personal preference. Operation Video menu The TV menu gives you an overview of the menus you to select the option Standard, Vivid, Custom and Mild. Mode Select the ...
... to suit personal preferences. Tint Allows you can be selectable. Color temperature This will adjust the intensity of the picture. Owner s Manual 21 Video Audio Channel Function Lock Video Mode Custom Brightness 59 Contrast 59 Color 59 Tint 7 Sharpness 58 Color Temperature Advanced Video /... Select EXIT Back How to customize your personal preference. Operation Video menu The TV menu gives you an overview of the menus you to select the option Standard, Vivid, Custom and Mild. Mode Select the ...

User Manual
Page 23
... English OSD Timeout Short OSD Transparency Middle Screen Mode On Blue Screen On DPMS On Time Setup Closed Caption Default / Select EXIT Back Owner s Manual 23 Equalizer To adjust the equalizer: Off, Rock, Pop, Live, Dance, Techno, Classic and Soft. AVL(Automatic Volume Control) This will be...button. 2. Each time you must select the language which will reduces the differences in Mono; Select Mono if you want to listen to TV viewing. Function menu Menu Language When you start using your desired MTS mode in a analog signal. When having selected SAP button on ...
... English OSD Timeout Short OSD Transparency Middle Screen Mode On Blue Screen On DPMS On Time Setup Closed Caption Default / Select EXIT Back Owner s Manual 23 Equalizer To adjust the equalizer: Off, Rock, Pop, Live, Dance, Techno, Classic and Soft. AVL(Automatic Volume Control) This will be...button. 2. Each time you must select the language which will reduces the differences in Mono; Select Mono if you want to listen to TV viewing. Function menu Menu Language When you start using your desired MTS mode in a analog signal. When having selected SAP button on ...

User Manual
Page 25
... from 5 to 240 minutes). 1 Press MENU button and then use / button to select the number of minutes. You can check the time while watching the TV. 1 Press MENU button and then use / button to select Function menu. 2 Press button and then use / button to select Time Setup. 3 Press button ...00 AM / Select EXIT Back Video Audio Channel Function Lock Time Zone Date/Time Sleep Timer Pacific Off Time Setup / Select EXIT Back Owner s Manual 25 Function menu Time zone setting This function allows you can also press SLEEP button to select Off. Date /Time setting Setting the clock is...
... from 5 to 240 minutes). 1 Press MENU button and then use / button to select the number of minutes. You can check the time while watching the TV. 1 Press MENU button and then use / button to select Function menu. 2 Press button and then use / button to select Time Setup. 3 Press button ...00 AM / Select EXIT Back Video Audio Channel Function Lock Time Zone Date/Time Sleep Timer Pacific Off Time Setup / Select EXIT Back Owner s Manual 25 Function menu Time zone setting This function allows you can also press SLEEP button to select Off. Date /Time setting Setting the clock is...

User Manual
Page 27
... s Manual 27 Viewing can be blocked by TV Rating or Individual Categories. Most television programs and television movies can be blocked. Lock Menu Operation Parental Control can be viewed. sexual situations) V (Violence) FV (Fantasy Violence) (applies to TV-Y, TV-Y7,TV-G,TV-PG,TV-14, TV-MA) (applies to TV-PG, TV-14) (applies to TV-PG, TV-14, TV-MA) (applies to TV...
... s Manual 27 Viewing can be blocked by TV Rating or Individual Categories. Most television programs and television movies can be blocked. Lock Menu Operation Parental Control can be viewed. sexual situations) V (Violence) FV (Fantasy Violence) (applies to TV-Y, TV-Y7,TV-G,TV-PG,TV-14, TV-MA) (applies to TV-PG, TV-14) (applies to TV-PG, TV-14, TV-MA) (applies to TV...

User Manual
Page 29
... button to confirm. To select a different Rating, press / buttons and then repeat the process. Operation Video Audio Channel Function Lock A D L S V FV TV-Y TV-Y7 TV-G TV-PG TV-14 TV-MA Allowed Rating Blocked Rating Parental Guide OK Set / Select EXIT Back Video Audio Channel Function Lock MPAA Rating G PG PG-13 R NC-17... Lock CA Fren Rating G 8 ans+ 13 ans+ 16 ans+ 18 ans+ Allowed Rating Blocked Rating OK Set / Select EXIT Back Owner s Manual 29 While is selected, press OK button to go to the movie ratings limits specified, so children cannot view certain movies.
... button to confirm. To select a different Rating, press / buttons and then repeat the process. Operation Video Audio Channel Function Lock A D L S V FV TV-Y TV-Y7 TV-G TV-PG TV-14 TV-MA Allowed Rating Blocked Rating Parental Guide OK Set / Select EXIT Back Video Audio Channel Function Lock MPAA Rating G PG PG-13 R NC-17... Lock CA Fren Rating G 8 ans+ 13 ans+ 16 ans+ 18 ans+ Allowed Rating Blocked Rating OK Set / Select EXIT Back Owner s Manual 29 While is selected, press OK button to go to the movie ratings limits specified, so children cannot view certain movies.


