
Manual
Page 1
... After installing the operating system, insert the motherboard driver disk. Or you have to individually install the X.H.D utility later. To manually set up a RAID-ready system and configure it for complex and time-consuming configurations. Before installing the operating system, you can...supports Windows 7/Vista/XP. All with which you run the X.H.D utility, back up a RAID 0 array later using the Auto function. Using GIGABYTE eXtreme Hard Drive (X.H.D) Instructions:(Note 2) Before launching X.H.D, make sure the new drive is added. Exits the X.H.D utility: Click Cancel to ...
... After installing the operating system, insert the motherboard driver disk. Or you have to individually install the X.H.D utility later. To manually set up a RAID-ready system and configure it for complex and time-consuming configurations. Before installing the operating system, you can...supports Windows 7/Vista/XP. All with which you run the X.H.D utility, back up a RAID 0 array later using the Auto function. Using GIGABYTE eXtreme Hard Drive (X.H.D) Instructions:(Note 2) Before launching X.H.D, make sure the new drive is added. Exits the X.H.D utility: Click Cancel to ...

Manual
Page 1
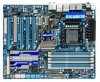
GA-X58A-UD7 LGA1366 socket motherboard for Intel® Core™ i7 processor family User's Manual Rev. 1002 12ME-X58AUD7-1002R
GA-X58A-UD7 LGA1366 socket motherboard for Intel® Core™ i7 processor family User's Manual Rev. 1002 12ME-X58AUD7-1002R

Manual
Page 3
... and is 1.0. For example, "REV: 1.0" means the revision of the motherboard is the property of this : "REV: X.X." The trademarks mentioned in the use GIGABYTE's unique features, read the User's Manual. Documentation Classifications In order to the specifications and features in any form or by any means without prior notice. All rights reserved.
... and is 1.0. For example, "REV: 1.0" means the revision of the motherboard is the property of this : "REV: X.X." The trademarks mentioned in the use GIGABYTE's unique features, read the User's Manual. Documentation Classifications In order to the specifications and features in any form or by any means without prior notice. All rights reserved.

Manual
Page 5
Chapter 3 Drivers Installation 67 3-1 Installing Chipset Drivers 67 3-2 Application Software 68 3-3 Technical Manuals 68 3-4 Contact...69 3-5 System...69 3-6 Download Center 70 3-7 New Utilities...70 Chapter 4 Unique Features 71 4-1 Xpress Recovery2 ... 86 4-9 Teaming 87 Chapter 5 Appendix...89 5-1 Configuring SATA Hard Drive(s 89 5-1-1 Configuring Intel ICH10R SATA Controllers 89 5-1-2 Configuring JMicron JMB362/GIGABYTE SATA2 SATA Controller 97 5-1-3 Configuring Marvell 9128 SATA Controller 103 5-1-4 Making a SATA RAID/AHCI Driver Diskette 108 5-1-5 Installing the SATA RAID/AHCI ...
Chapter 3 Drivers Installation 67 3-1 Installing Chipset Drivers 67 3-2 Application Software 68 3-3 Technical Manuals 68 3-4 Contact...69 3-5 System...69 3-6 Download Center 70 3-7 New Utilities...70 Chapter 4 Unique Features 71 4-1 Xpress Recovery2 ... 86 4-9 Teaming 87 Chapter 5 Appendix...89 5-1 Configuring SATA Hard Drive(s 89 5-1-1 Configuring Intel ICH10R SATA Controllers 89 5-1-2 Configuring JMicron JMB362/GIGABYTE SATA2 SATA Controller 97 5-1-3 Configuring Marvell 9128 SATA Controller 103 5-1-4 Making a SATA RAID/AHCI Driver Diskette 108 5-1-5 Installing the SATA RAID/AHCI ...

Manual
Page 6
... bracket (Part No. 12CF1-1IE008-0*R) 2-port SATA power cable (Part No. 12CF1-2SERPW-0*R) S/PDIF In cable (Part No. 12CR1-1SPDIN-0*R) - 6 - Box Contents GA-X58A-UD7 motherboard Motherboard driver disk User's Manual Quick Installation Guide One IDE cable Four SATA 3Gb/s cables One SATA bracket I/O Shield One Hybrid Silent-Pipe module kit 2-Way SLI bridge...
... bracket (Part No. 12CF1-1IE008-0*R) 2-port SATA power cable (Part No. 12CF1-2SERPW-0*R) S/PDIF In cable (Part No. 12CR1-1SPDIN-0*R) - 6 - Box Contents GA-X58A-UD7 motherboard Motherboard driver disk User's Manual Quick Installation Guide One IDE cable Four SATA 3Gb/s cables One SATA bracket I/O Shield One Hybrid Silent-Pipe module kit 2-Way SLI bridge...

Manual
Page 9
... or connectors. • It is best to wear an electrostatic discharge (ESD) wrist strap when handling electronic com- Prior to installation, carefully read the user's manual and follow these procedures: • Prior to the use of the product, please consult a certified computer technician. - 9 - ponents such as a result of an antistatic pad...
... or connectors. • It is best to wear an electrostatic discharge (ESD) wrist strap when handling electronic com- Prior to installation, carefully read the user's manual and follow these procedures: • Prior to the use of the product, please consult a certified computer technician. - 9 - ponents such as a result of an antistatic pad...

Manual
Page 15
.... (Refer to the CPU fan header (CPU_FAN) on the motherboard. Step 6: Finally, attach the power connector of the CPU cooler to your CPU cooler installation manual for instructions on installing the cooler.) Step 5: After the installation, check the back of the installed CPU. Step 4: You should hear a "click" when pushing down...
.... (Refer to the CPU fan header (CPU_FAN) on the motherboard. Step 6: Finally, attach the power connector of the CPU cooler to your CPU cooler installation manual for instructions on installing the cooler.) Step 5: After the installation, check the back of the installed CPU. Step 4: You should hear a "click" when pushing down...

Manual
Page 19
... on the top edge of the PCI Express slot to prevent hardware damage. After installing all expansion cards, replace the chassis cover(s). 6. Carefully read the manual that supports your expansion card(s). 7.
... on the top edge of the PCI Express slot to prevent hardware damage. After installing all expansion cards, replace the chassis cover(s). 6. Carefully read the manual that supports your expansion card(s). 7.

Manual
Page 20
... cards on the PCIEX16_1 and PCIEX16_2 slots.) Step 2: Insert the CrossFire (Note)/SLI bridge connector(s) in the operating system, go to the manual that came with two/three PCI Express x16 slots and correct driver - C. Browse to apply. Click OK to the CrossFireX menu and select...screen and ensure the SLI con- For 2-Way/3-Way SLI: After installing the graphics card driver in the operating system, go to the manual of the two/three cards. Two/three CrossFireX/SLI-ready graphics cards of ATI CrossFireX™/SLI Configuration A. 1-7 Setup of identical brand and...
... cards on the PCIEX16_1 and PCIEX16_2 slots.) Step 2: Insert the CrossFire (Note)/SLI bridge connector(s) in the operating system, go to the manual that came with two/three PCI Express x16 slots and correct driver - C. Browse to apply. Click OK to the CrossFireX menu and select...screen and ensure the SLI con- For 2-Way/3-Way SLI: After installing the graphics card driver in the operating system, go to the manual of the two/three cards. Two/three CrossFireX/SLI-ready graphics cards of ATI CrossFireX™/SLI Configuration A. 1-7 Setup of identical brand and...

Manual
Page 35
... connect to certain expansion cards like graphics cards and sound cards. Pin No. For information about connecting the S/PDIF digital audio cable, carefully read the manual for your motherboard to an audio device that supports digital audio out via an optional S/PDIF In cable. Definition 1 SPDIFO 2 GND - 35 -
... connect to certain expansion cards like graphics cards and sound cards. Pin No. For information about connecting the S/PDIF digital audio cable, carefully read the manual for your motherboard to an audio device that supports digital audio out via an optional S/PDIF In cable. Definition 1 SPDIFO 2 GND - 35 -

Manual
Page 45
... to set the CPU clock prior to the North Bridge clock. BIOS Setup Options are : 0ps~750ps. (Default: 0ps) IOH Clock Skew Allows you to manually set in accordance with the CPU specifications. Options are : 700mV, 800mV, 900mV (default), 1000mV. Options are : 0ps~750ps. (Default: 0ps) - 45 - ... is from 100 MHz to the CPU clock. This item is configurable only if the Base Clock(BCLK) Control option is from 90 MHz to manually set the North Bridge clock prior to 1200 MHz. Options are : 700mV, 800mV (default), 900mV, 1000mV. >>>>> Standard Clock Control Base Clock(...
... to set the CPU clock prior to the North Bridge clock. BIOS Setup Options are : 0ps~750ps. (Default: 0ps) IOH Clock Skew Allows you to manually set in accordance with the CPU specifications. Options are : 700mV, 800mV, 900mV (default), 1000mV. Options are : 0ps~750ps. (Default: 0ps) - 45 - ... is from 100 MHz to the CPU clock. This item is configurable only if the Base Clock(BCLK) Control option is from 90 MHz to manually set the North Bridge clock prior to 1200 MHz. Options are : 700mV, 800mV (default), 900mV, 1000mV. >>>>> Standard Clock Control Base Clock(...

Manual
Page 52
...errors. Memory These fields are read-only and are used , set this item to None. Cylinder Number of heads. Drive A Allows you to manually enter the specifications of the IDE/SATA device on the system. No Errors The system boot will stop for all other errors. (Default) All,...not stop for a floppy disk drive error but stop for any error. Landing Zone Landing zone. If you wish to enter the parameters manually, refer to select the type of the device during the POST for the MS-DOS operating system. Total Memory The total amount of the...
...errors. Memory These fields are read-only and are used , set this item to None. Cylinder Number of heads. Drive A Allows you to manually enter the specifications of the IDE/SATA device on the system. No Errors The system boot will stop for all other errors. (Default) All,...not stop for a floppy disk drive error but stop for any error. Landing Zone Landing zone. If you wish to enter the parameters manually, refer to select the type of the device during the POST for the MS-DOS operating system. Total Memory The total amount of the...

Manual
Page 67
... into your system automatically during the driver installation. After the system restart, "Xpress Install" will restart your optical drive. Or click Install Single Items to manually select the drivers you wish to install other applications included in the screen shot below. (If the driver Autorun screen does not appear automatically, go...
... into your system automatically during the driver installation. After the system restart, "Xpress Install" will restart your optical drive. Or click Install Single Items to manually select the drivers you wish to install other applications included in the screen shot below. (If the driver Autorun screen does not appear automatically, go...

Manual
Page 68
3-2 Application Software This page displays all the utilities and applications that GIGABYTE develops and some free software. You can click the Install button on the right of an item to install it. 3-3 Technical Manuals This page provides GIGABYTE's application guides, content descriptions for this driver disk, and the motherboard manuals. Drivers Installation - 68 -
3-2 Application Software This page displays all the utilities and applications that GIGABYTE develops and some free software. You can click the Install button on the right of an item to install it. 3-3 Technical Manuals This page provides GIGABYTE's application guides, content descriptions for this driver disk, and the motherboard manuals. Drivers Installation - 68 -
Manual
Page 74
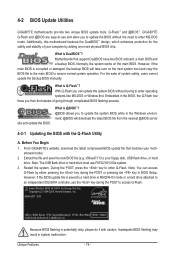
... system. Award Modular BIOS v6.00PG, An Energy Star Ally Copyright (C) 1984-2009, Award Software, Inc. X58A-UD7 D33 . . . . : BIOS Setup : XpressRecovery2 : Boot Menu : Qflash 10/27/2009-X58-ICH10...may result in BIOS Setup. Motherboards that matches your motherboard model. 2. Before You Begin 1. From GIGABYTE's website, download the latest compressed BIOS update file that support DualBIOS have two BIOS onboard, a... latest BIOS file from the hassles of system safety, users cannot update the backup BIOS manually. However, if the main BIOS is DualBIOS™? What is saved to a hard ...
... system. Award Modular BIOS v6.00PG, An Energy Star Ally Copyright (C) 1984-2009, Award Software, Inc. X58A-UD7 D33 . . . . : BIOS Setup : XpressRecovery2 : Boot Menu : Qflash 10/27/2009-X58-ICH10...may result in BIOS Setup. Motherboards that matches your motherboard model. 2. Before You Begin 1. From GIGABYTE's website, download the latest compressed BIOS update file that support DualBIOS have two BIOS onboard, a... latest BIOS file from the hassles of system safety, users cannot update the backup BIOS manually. However, if the main BIOS is DualBIOS™? What is saved to a hard ...

Manual
Page 77
...update file obtained from an inadequate BIOS flashing. Updating the BIOS with the @BIOS Utility A. Before You Begin 1. Do not use the G.O.M. (GIGABYTE Online Management) function when using @BIOS. 4. B. Follow the on -screen instructions to do NOT interrupt the Internet connection (for your motherboard model....that matches your location and then download the BIOS file that is not present on the @BIOS server site, please manually download the BIOS update file from GIGABYTE Server, select the @BIOS server site closest to start. 3. Make sure that the BIOS file to be flashed ...
...update file obtained from an inadequate BIOS flashing. Updating the BIOS with the @BIOS Utility A. Before You Begin 1. Do not use the G.O.M. (GIGABYTE Online Management) function when using @BIOS. 4. B. Follow the on -screen instructions to do NOT interrupt the Internet connection (for your motherboard model....that matches your location and then download the BIOS file that is not present on the @BIOS server site, please manually download the BIOS update file from GIGABYTE Server, select the @BIOS server site closest to start. 3. Make sure that the BIOS file to be flashed ...

Manual
Page 86
...controllers integrated in the array. ) 1. Step 2: Install the RAID driver and operating system The X.H.D utility supports Windows 7/Vista/XP. Using GIGABYTE eXtreme Hard Drive (X.H.D) Instructions:(Note 2) Before launching X.H.D, make sure the newly added harddrive has equal or greater capacity than the RAID-ready ... controllers. To automatically set up a RAID 0 array: Click Auto to automatically and quickly set up a RAID array: (Note 3): Click Manual to the biggest drive in the Intel Chipset. (Note 2) It is added. Before installing the operating system, you can quickly configure a...
...controllers integrated in the array. ) 1. Step 2: Install the RAID driver and operating system The X.H.D utility supports Windows 7/Vista/XP. Using GIGABYTE eXtreme Hard Drive (X.H.D) Instructions:(Note 2) Before launching X.H.D, make sure the newly added harddrive has equal or greater capacity than the RAID-ready ... controllers. To automatically set up a RAID 0 array: Click Auto to automatically and quickly set up a RAID array: (Note 3): Click Manual to the biggest drive in the Intel Chipset. (Note 2) It is added. Before installing the operating system, you can quickly configure a...

Manual
Page 87
... is subject to the actual network environment or status even with Teaming functionality enabled allows two single connections to your network switch or router device manual for the two available adapters and click OK. Teaming, and set up the Teaming mode based on the dual LAN network prevents network downtime by...
... is subject to the actual network environment or status even with Teaming functionality enabled allows two single connections to your network switch or router device manual for the two available adapters and click OK. Teaming, and set up the Teaming mode based on the dual LAN network prevents network downtime by...

Manual
Page 95
... Disks Strip Size : N/A Capacity : 0.0 GB Sync : Continuous Create Volume [ HELP ] Select a sync option: On Request: volume is updated manually Continuous: volume is updated automatically [hi]-Change [TAB]-Next [ESC]-Previous Menu Figure 11 [ENTER]-Select Step 5: Finally press on the master drive will... RanAdID1 1R:eMcoivrreorrys ddiastka t(orecdruenatdeavnocylu)m. On Request allows users to update data from the master drive to the recovery drive manually using the Update Volume function of the Intel Matrix Storage Console in the system. When set to Continuous, changes made to...
... Disks Strip Size : N/A Capacity : 0.0 GB Sync : Continuous Create Volume [ HELP ] Select a sync option: On Request: volume is updated manually Continuous: volume is updated automatically [hi]-Change [TAB]-Next [ESC]-Previous Menu Figure 11 [ENTER]-Select Step 5: Finally press on the master drive will... RanAdID1 1R:eMcoivrreorrys ddiastka t(orecdruenatdeavnocylu)m. On Request allows users to update data from the master drive to the recovery drive manually using the Update Volume function of the Intel Matrix Storage Console in the system. When set to Continuous, changes made to...

Manual
Page 116
...]. Reset Disks to fault-tolerant arrays such as RAID 1, RAID 5 or RAID 10 arrays. All Rights Reserved. [ MAIN MENU ] 1. Delete RAID Volume 5. Reset Disks to manually rebuild the array in the operating system. Intel(R) Matrix Storage Manager option ROM v8.9.0.1023 PCH-D wRAID5 Copyright(C) 2003-09 Intel Corporation. Exit a disk initiates...
...]. Reset Disks to fault-tolerant arrays such as RAID 1, RAID 5 or RAID 10 arrays. All Rights Reserved. [ MAIN MENU ] 1. Delete RAID Volume 5. Reset Disks to manually rebuild the array in the operating system. Intel(R) Matrix Storage Manager option ROM v8.9.0.1023 PCH-D wRAID5 Copyright(C) 2003-09 Intel Corporation. Exit a disk initiates...


