
Manual
Page 1
... and configure it for complex and time-consuming configurations. Step 2: Install the RAID driver and operating system The X.H.D utility supports Windows 7/Vista/XP. To manually set eXtreme Hard Drive (X.H.D) under the Integrated Peripherals menu to Enabled to enable RAID for RAID 0... 3: Install the motherboard drivers and the X.H.D utiltiy After installing the operating system, insert the motherboard driver disk. eXtreme Hard Drive (X.H.D) With GIGABYTE eXtreme Hard Drive (X.H.D)(Note 1), users can use X.H.D to easily add a hard drive into a RAID 0 array that's been created earlier,...
... and configure it for complex and time-consuming configurations. Step 2: Install the RAID driver and operating system The X.H.D utility supports Windows 7/Vista/XP. To manually set eXtreme Hard Drive (X.H.D) under the Integrated Peripherals menu to Enabled to enable RAID for RAID 0... 3: Install the motherboard drivers and the X.H.D utiltiy After installing the operating system, insert the motherboard driver disk. eXtreme Hard Drive (X.H.D) With GIGABYTE eXtreme Hard Drive (X.H.D)(Note 1), users can use X.H.D to easily add a hard drive into a RAID 0 array that's been created earlier,...

Manual
Page 12
... eXtreme Hard Drive Support for Q-Share Norton Internet Security (OEM version) Operating System w Support for Microsoft® Windows® 7/Vista/XP Form Factor w ATX Form Factor; 30.5cm x 24.4cm (Note 1) Due to Windows Vista/XP 32-bit operating system limitation, when more than 4 GB of physical memory is installed, the actual...
... eXtreme Hard Drive Support for Q-Share Norton Internet Security (OEM version) Operating System w Support for Microsoft® Windows® 7/Vista/XP Form Factor w ATX Form Factor; 30.5cm x 24.4cm (Note 1) Due to Windows Vista/XP 32-bit operating system limitation, when more than 4 GB of physical memory is installed, the actual...

Manual
Page 20
... card driver in the operating system, go to the manual of the two/three cards. Hardware Installation - 20 - The 2-Way CrossFireX/SLItechnology currently supports Windows XP, Windows Vista, and Windows 7 operating systems - A power supply with sufficient power is enabled. (Note) The bridge connectors may be needed or not depending on your graphics cards...
... card driver in the operating system, go to the manual of the two/three cards. Hardware Installation - 20 - The 2-Way CrossFireX/SLItechnology currently supports Windows XP, Windows Vista, and Windows 7 operating systems - A power supply with sufficient power is enabled. (Note) The bridge connectors may be needed or not depending on your graphics cards...

Manual
Page 37
...Defaults" section in this chapter or introductions of the battery/ clearing CMOS jumper in Chapter 1 for the beep codes description. • It is a Windows-based utility that you not alter the default settings (unless you can press + in system malfunction. • BIOS will emit a beep code during... CMOS on . Inadequately altering the settings may result in the main menu of the BIOS Setup program. To upgrade the BIOS, use either the GIGABYTE Q-Flash or @BIOS utility. • Q-Flash allows the user to quickly and easily upgrade or back up BIOS without entering the operating system....
...Defaults" section in this chapter or introductions of the battery/ clearing CMOS jumper in Chapter 1 for the beep codes description. • It is a Windows-based utility that you not alter the default settings (unless you can press + in system malfunction. • BIOS will emit a beep code during... CMOS on . Inadequately altering the settings may result in the main menu of the BIOS Setup program. To upgrade the BIOS, use either the GIGABYTE Q-Flash or @BIOS utility. • Q-Flash allows the user to quickly and easily upgrade or back up BIOS without entering the operating system....

Manual
Page 54
... LOGO Show Allows you install a CPU that supports this item to Enabled for the BIOS to display the GIGABYTE Logo at system startup. This function may enhance protection for Windows XP operating system; justable range is corrupted, it will be recovered from this item to Disabled for the ...on the PCIEX8_2 slot as the first display. BIOS Setup - 54 - PCIE x16-2 Sets the PCI Express graphics card on the PCIEX16_1 slot as Windows NT4.0. (Default: Disabled) No-Execute Memory Protect (Note) Enables or disables Intel Execute Disable Bit function. to 3 (Note) Allows you to ...
... LOGO Show Allows you install a CPU that supports this item to Enabled for the BIOS to display the GIGABYTE Logo at system startup. This function may enhance protection for Windows XP operating system; justable range is corrupted, it will be recovered from this item to Disabled for the ...on the PCIEX8_2 slot as the first display. BIOS Setup - 54 - PCIE x16-2 Sets the PCI Express graphics card on the PCIEX16_1 slot as Windows NT4.0. (Default: Disabled) No-Execute Memory Protect (Note) Enables or disables Intel Execute Disable Bit function. to 3 (Note) Allows you to ...

Manual
Page 57
... Displays transmission speed. Note: Part 4-5 and Part 7-8 are not used in a 10/100 Mbps environment, so their Status fields will show 0m, as shown in Windows mode or when the LAN Boot ROM is detected on the LAN cable connected to the motherboard, the Status fields of all four pairs of...
... Displays transmission speed. Note: Part 4-5 and Part 7-8 are not used in a 10/100 Mbps environment, so their Status fields will show 0m, as shown in Windows mode or when the LAN Boot ROM is detected on the LAN cable connected to the motherboard, the Status fields of all four pairs of...

Manual
Page 59
... by PWR-BTTN PME Event Wake Up Power On by Ring Resume by PWR-BTTN Configures the way to enter the ACPI S1 (Power on Windows Vista operating system only. - 59 - In S3 sleep state, the system appears to be awakened from an ACPI sleep state by a wake-up signal from...
... by PWR-BTTN PME Event Wake Up Power On by Ring Resume by PWR-BTTN Configures the way to enter the ACPI S1 (Power on Windows Vista operating system only. - 59 - In S3 sleep state, the system appears to be awakened from an ACPI sleep state by a wake-up signal from...

Manual
Page 60
... Disables this function. (Default) Password Set a password with up , power on by mouse, power on by keyboard, and wake on LAN. (Note) Supported on Windows Vista operating system only. KB Power ON Password Set the password when Power On by a PS/2 keyboard wake-up event. When prompted for the password.... Press on this item and set a password with 1~5 characters to turn on the system. Note: To use this function, you install 64-bit Windows Vista. To turn on the system. AC Back Function Determines the state of the system after the return of power from the operating system or...
... Disables this function. (Default) Password Set a password with up , power on by mouse, power on by keyboard, and wake on LAN. (Note) Supported on Windows Vista operating system only. KB Power ON Password Set the password when Power On by a PS/2 keyboard wake-up event. When prompted for the password.... Press on this item and set a password with 1~5 characters to turn on the system. Note: To use this function, you install 64-bit Windows Vista. To turn on the system. AC Back Function Determines the state of the system after the return of power from the operating system or...

Manual
Page 67
... disk, "Xpress Install" will install all the drivers that shown in the motherboard driver disk. • For USB 2.0 driver support under the Windows XP operating system, please install the Windows XP Service Pack 1 or later. the Found New Hardware Wizard) displayed when "Xpress Install" is automatically displayed which looks like that are...
... disk, "Xpress Install" will install all the drivers that shown in the motherboard driver disk. • For USB 2.0 driver support under the Windows XP operating system, please install the Windows XP Service Pack 1 or later. the Found New Hardware Wizard) displayed when "Xpress Install" is automatically displayed which looks like that are...

Manual
Page 71
... is recommended to back up your system to boot from the Windows Vista setup disk. For example, a backup file created with SP1 or later, Windows Vista • Xpress Recovery and Xpress Recovery2 are not supported. Installing Windows Vista and Partitioning the Hard Drive Step 1: Click Drive options....second SATA connectors, the hard drive on your system data and perform restoration of system memory • VESA compatible graphics card • Windows XP with Xpress Recovery cannot be restored using Xpress Recovery2. • USB hard drives are not supported. • Hard drives in ...
... is recommended to back up your system to boot from the Windows Vista setup disk. For example, a backup file created with SP1 or later, Windows Vista • Xpress Recovery and Xpress Recovery2 are not supported. Installing Windows Vista and Partitioning the Hard Drive Step 1: Click Drive options....second SATA connectors, the hard drive on your system data and perform restoration of system memory • VESA compatible graphics card • Windows XP with Xpress Recovery cannot be restored using Xpress Recovery2. • USB hard drives are not supported. • Hard drives in ...
Manual
Page 74
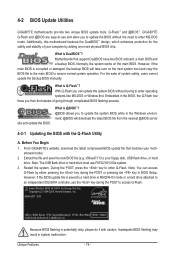
...key during the POST to access Q-Flash. With Q-Flash you to ensure normal system operation. Restart the system. X58A-UD7 D33 . . . . : BIOS Setup : XpressRecovery2 : Boot Menu : Qflash 10/27/2009-X58-ICH10-... copy the BIOS file to the main BIOS to update the system BIOS while in the Windows environment. @BIOS will take over on the main BIOS. During the POST, press the ... frees you to update the BIOS without having to -use FAT32/16/12 file system. 3. From GIGABYTE's website, download the latest compressed BIOS update file that support DualBIOS have two BIOS onboard, a main...
...key during the POST to access Q-Flash. With Q-Flash you to ensure normal system operation. Restart the system. X58A-UD7 D33 . . . . : BIOS Setup : XpressRecovery2 : Boot Menu : Qflash 10/27/2009-X58-ICH10-... copy the BIOS file to the main BIOS to update the system BIOS while in the Windows environment. @BIOS will take over on the main BIOS. During the POST, press the ... frees you to update the BIOS without having to -use FAT32/16/12 file system. 3. From GIGABYTE's website, download the latest compressed BIOS update file that support DualBIOS have two BIOS onboard, a main...

Manual
Page 77
...the BIOS update process, ensure the Internet connection is not present on the @BIOS server site, please manually download the BIOS update file from GIGABYTE's website and follow the instructions in a corrupted BIOS or a system that is unable to start. 3. If the BIOS update file for ...update check box and then the system will automatically load BIOS defaults after BIOS update and after updating the BIOS. Unique Features In Windows, close all applications and TSR (Terminate and Stay Resident) programs. This helps prevent unexpected failures when performing a BIOS update. 2....
...the BIOS update process, ensure the Internet connection is not present on the @BIOS server site, please manually download the BIOS update file from GIGABYTE's website and follow the instructions in a corrupted BIOS or a system that is unable to start. 3. If the BIOS update file for ...update check box and then the system will automatically load BIOS defaults after BIOS update and after updating the BIOS. Unique Features In Windows, close all applications and TSR (Terminate and Stay Resident) programs. This helps prevent unexpected failures when performing a BIOS update. 2....

Manual
Page 78
...take effect or click Default to restore to specify a Smart Fan mode. Available functions in EasyTune 6 may result in Windows environment. Incorrectly doing overclock/overvoltage may differ by motherboard model. Before you do overclock/overvoltage in damage to enable support for... your own sound file (.wav file). (Note) Due to the hardware limitation, you to see its information. 4-3 EasyTune 6 GIGABYTE's EasyTune 6 is not supported. The Memory tab provides information on a specific slot to monitor hardware temperature, voltage and fan speed and set...
...take effect or click Default to restore to specify a Smart Fan mode. Available functions in EasyTune 6 may result in Windows environment. Incorrectly doing overclock/overvoltage may differ by motherboard model. Before you do overclock/overvoltage in damage to enable support for... your own sound file (.wav file). (Note) Due to the hardware limitation, you to see its information. 4-3 EasyTune 6 GIGABYTE's EasyTune 6 is not supported. The Memory tab provides information on a specific slot to monitor hardware temperature, voltage and fan speed and set...

Manual
Page 83
... remind users of the dates. It stores the recorded data in the main and backup BIOS simultaneously, which can prevent loss of the data in Windows Vista. In the main screen, you can accommodate up records of personal passwords and important dates and reminders of these dates. The files/folders listed...
... remind users of the dates. It stores the recorded data in the main and backup BIOS simultaneously, which can prevent loss of the data in Windows Vista. In the main screen, you can accommodate up records of personal passwords and important dates and reminders of these dates. The files/folders listed...

Manual
Page 86
...of a button, X.H.D helps to automatically set up all motherboard drivers, including the X.H.D utility. B. 4-8 eXtreme Hard Drive (X.H.D) With GIGABYTE eXtreme Hard Drive (X.H.D)(Note 1), users can quickly configure a RAIDready system for complex and time-consuming configurations. Unique Features - 86 - ...-ready system and configure it for the Intel SATA controllers. Step 2: Install the RAID driver and operating system The X.H.D utility supports Windows 7/Vista/XP. For a RAID 0 array that before you have to Chapter 5, "Installing the SATA RAID/AHCI Driver and Operating ...
...of a button, X.H.D helps to automatically set up all motherboard drivers, including the X.H.D utility. B. 4-8 eXtreme Hard Drive (X.H.D) With GIGABYTE eXtreme Hard Drive (X.H.D)(Note 1), users can quickly configure a RAIDready system for complex and time-consuming configurations. Unique Features - 86 - ...-ready system and configure it for the Intel SATA controllers. Step 2: Install the RAID driver and operating system The X.H.D utility supports Windows 7/Vista/XP. For a RAID 0 array that before you have to Chapter 5, "Installing the SATA RAID/AHCI Driver and Operating ...

Manual
Page 89
...SATA2_4 and SATA2_5 ports are supported by ICH10R Chipset.) Then connect the power connector from your power supply to identify the SATA controller for Windows XP. (Note 2) E. Install the SATA RAID/AHCI driver (Note 2) and operating system. Configure SATA controller mode in RAID BIOS. .... - 89 - Installing SATA hard drive(s) in your computer Attach one hard drive. • An empty formatted floppy disk. • Windows Vista/XP setup disk. • Motherboard driver disk. 5-1-1 Configuring Intel ICH10R SATA Controllers A. Chapter 5 Appendix 5-1 Configuring SATA Hard Drive(s)...
...SATA2_4 and SATA2_5 ports are supported by ICH10R Chipset.) Then connect the power connector from your power supply to identify the SATA controller for Windows XP. (Note 2) E. Install the SATA RAID/AHCI driver (Note 2) and operating system. Configure SATA controller mode in RAID BIOS. .... - 89 - Installing SATA hard drive(s) in your computer Attach one hard drive. • An empty formatted floppy disk. • Windows Vista/XP setup disk. • Motherboard driver disk. 5-1-1 Configuring Intel ICH10R SATA Controllers A. Chapter 5 Appendix 5-1 Configuring SATA Hard Drive(s)...

Manual
Page 91
... Disks to enter the ICH10R RAID Configuration Utility. Configuring a RAID array in MAIN MENU and press . Skip this step and proceed with the installation of Windows operating system for a message which says "Press to enter Configuration Utility.. Exit 3. Press + to Non-RAID 4. Create RAID Volume If you press + , the MAIN MENU...
... Disks to enter the ICH10R RAID Configuration Utility. Configuring a RAID array in MAIN MENU and press . Skip this step and proceed with the installation of Windows operating system for a message which says "Press to enter Configuration Utility.. Exit 3. Press + to Non-RAID 4. Create RAID Volume If you press + , the MAIN MENU...

Manual
Page 98
Figure 2 In the main screen of Windows operating system for a message which says "Press to see detailed information about the selected hard drive. Configuring a RAID array in the Main Menu block. GIGABYTE Technology Corp. Press + to enter RAID Setup Utility ... Highlight the item that you can ...setup utility to execute and press . PCI Express to SATAII HOST Controller ROM v1.07.06 Copyright (C) 2005-2009 Gigabyte Technology Corp. (http://www.gigabyte.com) HDD0 : HDD1 : ST3120026AS ST3120026AS 120 GB 120 GB Non-RAID Non-RAID Press to enter the RAID setup...
Figure 2 In the main screen of Windows operating system for a message which says "Press to see detailed information about the selected hard drive. Configuring a RAID array in the Main Menu block. GIGABYTE Technology Corp. Press + to enter RAID Setup Utility ... Highlight the item that you can ...setup utility to execute and press . PCI Express to SATAII HOST Controller ROM v1.07.06 Copyright (C) 2005-2009 Gigabyte Technology Corp. (http://www.gigabyte.com) HDD0 : HDD1 : ST3120026AS ST3120026AS 120 GB 120 GB Non-RAID Non-RAID Press to enter the RAID setup...

Manual
Page 101
...Drive Delete RAID Disk Drive Revert HDD to the RAID Disk Drive List block. Appendix A small window displaying the array information will be displayed in the center of the screen (Figure 9). Gigabyte Technology Corp. When finished, the new RAID array will appear in the RAID Disk Drive List ... Inside [ RAID Disk Drive List ] Model Name RDD0: GRAID RAID Level 0-Stripe Capacity 240 GB Status Normal Members(HDDx) 01 [fgTAB]-Switch Window [hi]-Select ITEM Figure 8 [ENTER]-Action [ESC]-Exit To check more detailed information about the array, use the key while in the Main...
...Drive Delete RAID Disk Drive Revert HDD to the RAID Disk Drive List block. Appendix A small window displaying the array information will be displayed in the center of the screen (Figure 9). Gigabyte Technology Corp. When finished, the new RAID array will appear in the RAID Disk Drive List ... Inside [ RAID Disk Drive List ] Model Name RDD0: GRAID RAID Level 0-Stripe Capacity 240 GB Status Normal Members(HDDx) 01 [fgTAB]-Switch Window [hi]-Select ITEM Figure 8 [ENTER]-Action [ESC]-Exit To check more detailed information about the array, use the key while in the Main...

Manual
Page 102
...the SATA RAID/ AHCI driver and operating system. Y Model Name RAID Level Capacity Status RDD0: GRAID 0-Stripe 240 GB Normal Members(HDDx) 01 [fgTAB]-Switch Window [hi]-Select ITEM Figure 10 [ENTER]-Action [ESC]-Exit Now, you may proceed to Disk & Exit (Y/N) ? Delete the RAID Array: To delete the... the space bar on the array to Non-RAID Solve Mirror Conflict Rebuild Mirror Drive Save And Exit Setup Exit Without Saving Gigabyte Technology Corp. The selection bar will appear to Non-RAID Solve Mirror Conflict Rebuild Mirror Drive Save And Exit Setup Exit Without Saving...
...the SATA RAID/ AHCI driver and operating system. Y Model Name RAID Level Capacity Status RDD0: GRAID 0-Stripe 240 GB Normal Members(HDDx) 01 [fgTAB]-Switch Window [hi]-Select ITEM Figure 10 [ENTER]-Action [ESC]-Exit Now, you may proceed to Disk & Exit (Y/N) ? Delete the RAID Array: To delete the... the space bar on the array to Non-RAID Solve Mirror Conflict Rebuild Mirror Drive Save And Exit Setup Exit Without Saving Gigabyte Technology Corp. The selection bar will appear to Non-RAID Solve Mirror Conflict Rebuild Mirror Drive Save And Exit Setup Exit Without Saving...


