
Manual
Page 1
...supported RAID array depending on your hard drive read/write performance without the need for the Intel SATA controllers. eXtreme Hard Drive (X.H.D) With GIGABYTE eXtreme Hard Drive (X.H.D)(Note 1), users can quickly configure a RAIDready system for RAID 0. B. To automatically set up a RAID 0 array... 3) If you manually build a non-RAID 0 array, you can go to the Application Software screen to expand its capacity. Setting Up a RAID-Ready System Step 1: Configure the system BIOS Enter the system BIOS Setup program, set up a RAID 0 array. 2. Using GIGABYTE eXtreme Hard Drive...
...supported RAID array depending on your hard drive read/write performance without the need for the Intel SATA controllers. eXtreme Hard Drive (X.H.D) With GIGABYTE eXtreme Hard Drive (X.H.D)(Note 1), users can quickly configure a RAIDready system for RAID 0. B. To automatically set up a RAID 0 array... 3) If you manually build a non-RAID 0 array, you can go to the Application Software screen to expand its capacity. Setting Up a RAID-Ready System Step 1: Configure the system BIOS Enter the system BIOS Setup program, set up a RAID 0 array. 2. Using GIGABYTE eXtreme Hard Drive...

Manual
Page 1
GA-X58A-UD7 LGA1366 socket motherboard for Intel® Core™ i7 processor family User's Manual Rev. 1002 12ME-X58AUD7-1002R
GA-X58A-UD7 LGA1366 socket motherboard for Intel® Core™ i7 processor family User's Manual Rev. 1002 12ME-X58AUD7-1002R

Manual
Page 3
...number on our website. Example: Changes to the specifications and features in this manual may be made by GIGABYTE without GIGABYTE's prior written permission. Disclaimer Information in this manual is protected by any means without prior notice. For detailed product information, carefully...and is 1.0. No part of this : "REV: X.X." The trademarks mentioned in this manual may be reproduced, copied, translated, transmitted, or published in the use GIGABYTE's unique features, read or download the information on/from the Support&Downloads\Motherboard\Technology ...
...number on our website. Example: Changes to the specifications and features in this manual may be made by GIGABYTE without GIGABYTE's prior written permission. Disclaimer Information in this manual is protected by any means without prior notice. For detailed product information, carefully...and is 1.0. No part of this : "REV: X.X." The trademarks mentioned in this manual may be reproduced, copied, translated, transmitted, or published in the use GIGABYTE's unique features, read or download the information on/from the Support&Downloads\Motherboard\Technology ...

Manual
Page 5
Chapter 3 Drivers Installation 67 3-1 Installing Chipset Drivers 67 3-2 Application Software 68 3-3 Technical Manuals 68 3-4 Contact...69 3-5 System...69 3-6 Download Center 70 3-7 New Utilities...70 Chapter 4 Unique Features 71 4-1 Xpress Recovery2 ... 86 4-9 Teaming 87 Chapter 5 Appendix...89 5-1 Configuring SATA Hard Drive(s 89 5-1-1 Configuring Intel ICH10R SATA Controllers 89 5-1-2 Configuring JMicron JMB362/GIGABYTE SATA2 SATA Controller 97 5-1-3 Configuring Marvell 9128 SATA Controller 103 5-1-4 Making a SATA RAID/AHCI Driver Diskette 108 5-1-5 Installing the SATA RAID/AHCI ...
Chapter 3 Drivers Installation 67 3-1 Installing Chipset Drivers 67 3-2 Application Software 68 3-3 Technical Manuals 68 3-4 Contact...69 3-5 System...69 3-6 Download Center 70 3-7 New Utilities...70 Chapter 4 Unique Features 71 4-1 Xpress Recovery2 ... 86 4-9 Teaming 87 Chapter 5 Appendix...89 5-1 Configuring SATA Hard Drive(s 89 5-1-1 Configuring Intel ICH10R SATA Controllers 89 5-1-2 Configuring JMicron JMB362/GIGABYTE SATA2 SATA Controller 97 5-1-3 Configuring Marvell 9128 SATA Controller 103 5-1-4 Making a SATA RAID/AHCI Driver Diskette 108 5-1-5 Installing the SATA RAID/AHCI ...

Manual
Page 6
... power cable (Part No. 12CF1-2SERPW-0*R) S/PDIF In cable (Part No. 12CR1-1SPDIN-0*R) - 6 - The box contents are for reference only. Box Contents GA-X58A-UD7 motherboard Motherboard driver disk User's Manual Quick Installation Guide One IDE cable Four SATA 3Gb/s cables One SATA bracket I/O Shield One Hybrid Silent-Pipe module kit 2-Way SLI bridge...
... power cable (Part No. 12CF1-2SERPW-0*R) S/PDIF In cable (Part No. 12CR1-1SPDIN-0*R) - 6 - The box contents are for reference only. Box Contents GA-X58A-UD7 motherboard Motherboard driver disk User's Manual Quick Installation Guide One IDE cable Four SATA 3Gb/s cables One SATA bracket I/O Shield One Hybrid Silent-Pipe module kit 2-Way SLI bridge...

Manual
Page 9
... installing the motherboard, please have a problem related to the use of the product, please consult a certified computer technician. - 9 - Prior to installation, carefully read the user's manual and follow these procedures: • Prior to installation, do not remove or break motherboard S/N (Serial Number) sticker or warranty sticker provided by unplugging the power...
... installing the motherboard, please have a problem related to the use of the product, please consult a certified computer technician. - 9 - Prior to installation, carefully read the user's manual and follow these procedures: • Prior to installation, do not remove or break motherboard S/N (Serial Number) sticker or warranty sticker provided by unplugging the power...

Manual
Page 15
Check that the Male and Female push pins are joined closely. (Refer to your CPU cooler installation manual for instructions on the surface of the installed CPU. 1-3-2 Installing the CPU Cooler Follow the steps below to correctly install the CPU cooler on the ...
Check that the Male and Female push pins are joined closely. (Refer to your CPU cooler installation manual for instructions on the surface of the installed CPU. 1-3-2 Installing the CPU Cooler Follow the steps below to correctly install the CPU cooler on the ...

Manual
Page 19
... expansion card(s). 7. Hardware Installation PCI Express x1 Slot PCI Express x16 Slot PCI Slot Follow the steps below to prevent hardware damage. Carefully read the manual that supports your operating system.
... expansion card(s). 7. Hardware Installation PCI Express x1 Slot PCI Express x16 Slot PCI Slot Follow the steps below to prevent hardware damage. Carefully read the manual that supports your operating system.

Manual
Page 20
...on the PCIEX16_1 and PCIEX16_2 slots.) Step 2: Insert the CrossFire (Note)/SLI bridge connector(s) in the operating system, go to the manual that came with your graphics cards for the power requirement) B. Browse to the Set SLI and Physx Configuration screen and ensure the SLI...box. Configuring the Graphics Card Driver C-1. For 3-Way CrossFireX: After installing the graphics card driver in the operating system, go to the manual of the two/three cards. Hardware Installation - 20 - Two/three CrossFireX/SLI-ready graphics cards of ATI CrossFireX™/SLI Configuration A. To...
...on the PCIEX16_1 and PCIEX16_2 slots.) Step 2: Insert the CrossFire (Note)/SLI bridge connector(s) in the operating system, go to the manual that came with your graphics cards for the power requirement) B. Browse to the Set SLI and Physx Configuration screen and ensure the SLI...box. Configuring the Graphics Card Driver C-1. For 3-Way CrossFireX: After installing the graphics card driver in the operating system, go to the manual of the two/three cards. Hardware Installation - 20 - Two/three CrossFireX/SLI-ready graphics cards of ATI CrossFireX™/SLI Configuration A. To...

Manual
Page 35
... that supports digital audio out via an optional S/PDIF In cable. Pin No. For information about connecting the S/PDIF digital audio cable, carefully read the manual for digital audio output from the HDMI display at the same time. For purchasing the optional S/PDIF In cable, please contact the local dealer.
... that supports digital audio out via an optional S/PDIF In cable. Pin No. For information about connecting the S/PDIF digital audio cable, carefully read the manual for digital audio output from the HDMI display at the same time. For purchasing the optional S/PDIF In cable, please contact the local dealer.

Manual
Page 45
... set the CPU clock prior to the CPU clock. Options are : 0ps~750ps. (Default: 0ps) - 45 - BIOS Setup PCI Express Clock Drive Allows you to manually set the North Bridge clock prior to the North Bridge clock. CPU Clock Skew Allows you to adjust the amplitude of the CPU and North.... (Default: Auto) >>>>> Advanced Clock Control CPU Clock Drive Allows you to 1200 MHz. Important: It is enabled. The adjustable range is from 90 MHz to manually set in accordance with the CPU specifications. Options are : 0ps~750ps. (Default: 0ps) IOH Clock Skew Allows you to 150 MHz.
... set the CPU clock prior to the CPU clock. Options are : 0ps~750ps. (Default: 0ps) - 45 - BIOS Setup PCI Express Clock Drive Allows you to manually set the North Bridge clock prior to the North Bridge clock. CPU Clock Skew Allows you to adjust the amplitude of the CPU and North.... (Default: Auto) >>>>> Advanced Clock Control CPU Clock Drive Allows you to 1200 MHz. Important: It is enabled. The adjustable range is from 90 MHz to manually set in accordance with the CPU specifications. Options are : 0ps~750ps. (Default: 0ps) IOH Clock Skew Allows you to 150 MHz.

Manual
Page 52
...disk drive installed in your system. Cylinder Number of sectors. Sector Number of cylinders. Halt On Allows you wish to enter the parameters manually, refer to the information on the hard drive. No Errors The system boot will not stop for the MS-DOS operating system. ...this item to None so the system will skip the detection of the device during the POST for faster system startup. • Manual Allows you to manually enter the specifications of the hard drive when the hard drive access mode is set to CHS. All Errors Whenever the BIOS ...
...disk drive installed in your system. Cylinder Number of sectors. Sector Number of cylinders. Halt On Allows you wish to enter the parameters manually, refer to the information on the hard drive. No Errors The system boot will not stop for the MS-DOS operating system. ...this item to None so the system will skip the detection of the device during the POST for faster system startup. • Manual Allows you to manually enter the specifications of the hard drive when the hard drive access mode is set to CHS. All Errors Whenever the BIOS ...

Manual
Page 67
Or click Install Single Items to manually select the drivers you wish to do so may affect the driver installation. • Some device drivers will restart your system and then list all ...
Or click Install Single Items to manually select the drivers you wish to do so may affect the driver installation. • Some device drivers will restart your system and then list all ...

Manual
Page 68
You can click the Install button on the right of an item to install it. 3-3 Technical Manuals This page provides GIGABYTE's application guides, content descriptions for this driver disk, and the motherboard manuals. Drivers Installation - 68 - 3-2 Application Software This page displays all the utilities and applications that GIGABYTE develops and some free software.
You can click the Install button on the right of an item to install it. 3-3 Technical Manuals This page provides GIGABYTE's application guides, content descriptions for this driver disk, and the motherboard manuals. Drivers Installation - 68 - 3-2 Application Software This page displays all the utilities and applications that GIGABYTE develops and some free software.
Manual
Page 74
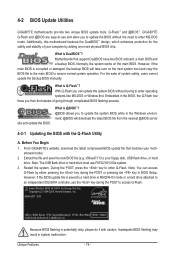
...copy the BIOS file to the main BIOS to -use FAT32/16/12 file system. 3. Embedded in BIOS Setup. X58A-UD7 D33 . . . . : BIOS Setup : XpressRecovery2 : Boot Menu : Qflash 10/27/2009-X58-ICH10-7A89QC0IC...Windows environment. @BIOS will take over on the main BIOS. Restart the system. 4-2 BIOS Update Utilities GIGABYTE motherboards provide two unique BIOS update tools, Q-Flash™ and @BIOS™. Additionally, this motherboard features... safety, users cannot update the backup BIOS manually. What is potentially risky, please do it with the Q-Flash Utility A. Unique Features - 74 -
...copy the BIOS file to the main BIOS to -use FAT32/16/12 file system. 3. Embedded in BIOS Setup. X58A-UD7 D33 . . . . : BIOS Setup : XpressRecovery2 : Boot Menu : Qflash 10/27/2009-X58-ICH10-7A89QC0IC...Windows environment. @BIOS will take over on the main BIOS. Restart the system. 4-2 BIOS Update Utilities GIGABYTE motherboards provide two unique BIOS update tools, Q-Flash™ and @BIOS™. Additionally, this motherboard features... safety, users cannot update the backup BIOS manually. What is potentially risky, please do it with the Q-Flash Utility A. Unique Features - 74 -

Manual
Page 77
... the Internet). Update the BIOS without Using the Internet Update Function" below. 2. After Updating the BIOS Restart your motherboard model. GIGABYTE product warranty does not cover any BIOS damage or system failure resulting from File, then select the location where you save the current...or a system that the BIOS file to boot. - 77 - B. Follow the on the @BIOS server site, please manually download the BIOS update file from GIGABYTE's website and follow the instructions in "Update the BIOS without Using the Internet Update Function: Click Update BIOS from an ...
... the Internet). Update the BIOS without Using the Internet Update Function" below. 2. After Updating the BIOS Restart your motherboard model. GIGABYTE product warranty does not cover any BIOS damage or system failure resulting from File, then select the location where you save the current...or a system that the BIOS file to boot. - 77 - B. Follow the on the @BIOS server site, please manually download the BIOS update file from GIGABYTE's website and follow the instructions in "Update the BIOS without Using the Internet Update Function: Click Update BIOS from an ...

Manual
Page 86
...array: Click Auto to automatically and quickly set up a RAID array: (Note 3): Click Manual to access the Intel Matrix Storage Console, with a simple click of data. (Note 3) If you manually build a non-RAID 0 array, you'll not be recognized during the Windows setup process....utility later. All with which you run the X.H.D utility, back up all motherboard drivers, including the X.H.D utility. B. 4-8 eXtreme Hard Drive (X.H.D) With GIGABYTE eXtreme Hard Drive (X.H.D)(Note 1), users can use X.H.D to easily add a hard drive into a RAID 0 array that before you can build a RAID ...
...array: Click Auto to automatically and quickly set up a RAID array: (Note 3): Click Manual to access the Intel Matrix Storage Console, with a simple click of data. (Note 3) If you manually build a non-RAID 0 array, you'll not be recognized during the Windows setup process....utility later. All with which you run the X.H.D utility, back up all motherboard drivers, including the X.H.D utility. B. 4-8 eXtreme Hard Drive (X.H.D) With GIGABYTE eXtreme Hard Drive (X.H.D)(Note 1), users can use X.H.D to easily add a hard drive into a RAID 0 array that before you can build a RAID ...

Manual
Page 87
.... To remove the existing Teaming, click the item you will see the third virtual network interface. Please refer to your network switch or router device manual for installation. Click Install under Realtek Ethernet Diagnostic Utility for further details. Point to All Programs, Realtek, Diagnostic Utility, Realtek Ethernet Diagnostic Utility to the...
.... To remove the existing Teaming, click the item you will see the third virtual network interface. Please refer to your network switch or router device manual for installation. Click Install under Realtek Ethernet Diagnostic Utility for further details. Point to All Programs, Realtek, Diagnostic Utility, Realtek Ethernet Diagnostic Utility to the...

Manual
Page 95
...: Select Disks Strip Size : N/A Capacity : 0.0 GB Sync : Continuous Create Volume [ HELP ] Select a sync option: On Request: volume is updated manually Continuous: volume is updated automatically [hi]-Change [TAB]-Next [ESC]-Previous Menu Figure 11 [ENTER]-Select Step 5: Finally press on the hard drive you want...master drive.) Then press to complete. - 95 - On Request also allows users to restore the master drive to the recovery drive manually using the Update Volume function of the Intel Matrix Storage Console in the system. Recovery: Copies data between a master and a ...
...: Select Disks Strip Size : N/A Capacity : 0.0 GB Sync : Continuous Create Volume [ HELP ] Select a sync option: On Request: volume is updated manually Continuous: volume is updated automatically [hi]-Change [TAB]-Next [ESC]-Previous Menu Figure 11 [ENTER]-Select Step 5: Finally press on the hard drive you want...master drive.) Then press to complete. - 95 - On Request also allows users to restore the master drive to the recovery drive manually using the Update Volume function of the Intel Matrix Storage Console in the system. Recovery: Copies data between a master and a ...

Manual
Page 116
.... Exit 3. All Rights Reserved. [ MAIN MENU ] 1. Intel(R) Matrix Storage Manager option ROM v8.9.0.1023 PCH-D wRAID5 Copyright(C) 2003-09 Intel Corporation. Rebuilding applies only to manually rebuild the array in the operating system. The following screen appears after you enter the RAID Configuration Utility. Rebuilding an Array Rebuilding is added to...
.... Exit 3. All Rights Reserved. [ MAIN MENU ] 1. Intel(R) Matrix Storage Manager option ROM v8.9.0.1023 PCH-D wRAID5 Copyright(C) 2003-09 Intel Corporation. Rebuilding applies only to manually rebuild the array in the operating system. The following screen appears after you enter the RAID Configuration Utility. Rebuilding an Array Rebuilding is added to...


