

Owner's Manual
Page 1
... and UL 325 Safety Requirements. Please call us: 1-800-35-GENIE (354-3643) www.geniecompany.com Please have Model information ready when calling. 3531835447 TABLE OF CONTENTS Safety Information 2 Important Installation Instructions 2 Safety Features 2 Pre-installation Checklist 3 Garage Door Opener Assembly 9 Record Data (for 8' Doors Included Wall Control MUST be Properly Set to Operation of...
... and UL 325 Safety Requirements. Please call us: 1-800-35-GENIE (354-3643) www.geniecompany.com Please have Model information ready when calling. 3531835447 TABLE OF CONTENTS Safety Information 2 Important Installation Instructions 2 Safety Features 2 Pre-installation Checklist 3 Garage Door Opener Assembly 9 Record Data (for 8' Doors Included Wall Control MUST be Properly Set to Operation of...

Owner's Manual
Page 2
.... Mount the emergency release knob 6 feet above the floor. If you have garage door related questions or do not understand an instruction, call 1-800-35-GENIE or visit www.geniecompany.com Install the emergency release tag on you reading and ...understanding the information in this manual. SAFETY INFORMATION Garage Doors are heavy objects that has a broken spring. each, are not pinched or near moving objects, springs under high tension and electric opening , that reverses the door...
.... Mount the emergency release knob 6 feet above the floor. If you have garage door related questions or do not understand an instruction, call 1-800-35-GENIE or visit www.geniecompany.com Install the emergency release tag on you reading and ...understanding the information in this manual. SAFETY INFORMATION Garage Doors are heavy objects that has a broken spring. each, are not pinched or near moving objects, springs under high tension and electric opening , that reverses the door...

Owner's Manual
Page 3
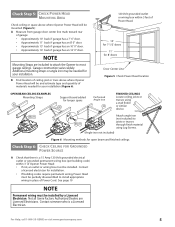
... is less than slight movement Figure 1 Checking door balance means door is "lightweight" (made with an automatic Garage Door Balance Detection System. If your garage door. NOTE The Excelerator Opener is designed for repairs and adjustments SECTIONAL DOOR, TORSION SPRINGS SECTIONAL DOOR, EXTENSION SPRINGS ONE-PIECE DOOR, TRACKLESS to door mechanism. PRE-INSTALLATION CHECKLIST This Opener includes parts and supplies needed to install...
... is less than slight movement Figure 1 Checking door balance means door is "lightweight" (made with an automatic Garage Door Balance Detection System. If your garage door. NOTE The Excelerator Opener is designed for repairs and adjustments SECTIONAL DOOR, TORSION SPRINGS SECTIONAL DOOR, EXTENSION SPRINGS ONE-PIECE DOOR, TRACKLESS to door mechanism. PRE-INSTALLATION CHECKLIST This Opener includes parts and supplies needed to install...

Owner's Manual
Page 4
...NOTE • For both types of Header Bracket will be installed here. - Bottom of doors: - For one-piece doors, add 6" to open the garage door. B If your door height is in your rail is not at 1-800-35-GENIE. If the ceiling in the way, place the Header Bracket avove the spring. Do Not ...move the door spring. Rail Extension for a stud or a solid header at your mark: (If checking a ...
...NOTE • For both types of Header Bracket will be installed here. - Bottom of doors: - For one-piece doors, add 6" to open the garage door. B If your door height is in your rail is not at 1-800-35-GENIE. If the ceiling in the way, place the Header Bracket avove the spring. Do Not ...move the door spring. Rail Extension for a stud or a solid header at your mark: (If checking a ...
Owner's Manual
Page 5
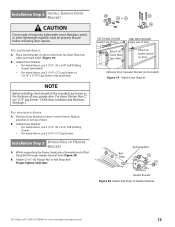
..., call 1-800-35-GENIE or visit www.geniecompany.com 5 Check Step 5: CHECK POWER HEAD MOUNTING AREA Check ceiling or space above where Opener Power Head will be needed for your installation. NOTE Mounting Straps are Licensed Electricians. Additional mounting straps or angle iron may be mounted (Figure 5): A Measure from garage door center line mark...
..., call 1-800-35-GENIE or visit www.geniecompany.com 5 Check Step 5: CHECK POWER HEAD MOUNTING AREA Check ceiling or space above where Opener Power Head will be needed for your installation. NOTE Mounting Straps are Licensed Electricians. Additional mounting straps or angle iron may be mounted (Figure 5): A Measure from garage door center line mark...

Owner's Manual
Page 6
...® Sensor Mounting Bracket Extensions (dealer) ❐ Garage door opener reinforcement bracket (dealer) ❐ Garage door frame reinforcement brackets, screws, bracing or reinforcement kits (dealer) ❐ Lag Screws (11/4") for a wood door less than 2" thick (store) ❐ Electrical outlet and/or wiring (supplied by a licensed electrician) ❐ Excelerator Extension Kit (for 8' garage doors) (store) ❐ Sufficient angle iron or...
...® Sensor Mounting Bracket Extensions (dealer) ❐ Garage door opener reinforcement bracket (dealer) ❐ Garage door frame reinforcement brackets, screws, bracing or reinforcement kits (dealer) ❐ Lag Screws (11/4") for a wood door less than 2" thick (store) ❐ Electrical outlet and/or wiring (supplied by a licensed electrician) ❐ Excelerator Extension Kit (for 8' garage doors) (store) ❐ Sufficient angle iron or...

Owner's Manual
Page 9
...Retaining Clip 10 Figure 11 Attach Middle Rail Section For Help, call 1-800-35-GENIE or visit www.geniecompany.com 9 E If you have a 1-piece rail unit, skip Assembly Step 2. Finger-tighten until the Opener is needed, attach it per instructions supplied with 2 (1/4"-20) (yellow) Hex ...Slip on both ends. D Connect first Rail Section to Opener Power Head. Assembly Step C2H: INSTALL REMAINING RAIL SECTIONS A Arrange arrows on a flat level surface. GARAGE DOOR OPENER ASSEMBLY Assembly Step C1H: CONNECT RAIL TO POWER HEAD OPEN BLUE PARTS BAG A Turn Power Head upside down and place...
...Retaining Clip 10 Figure 11 Attach Middle Rail Section For Help, call 1-800-35-GENIE or visit www.geniecompany.com 9 E If you have a 1-piece rail unit, skip Assembly Step 2. Finger-tighten until the Opener is needed, attach it per instructions supplied with 2 (1/4"-20) (yellow) Hex ...Slip on both ends. D Connect first Rail Section to Opener Power Head. Assembly Step C2H: INSTALL REMAINING RAIL SECTIONS A Arrange arrows on a flat level surface. GARAGE DOOR OPENER ASSEMBLY Assembly Step C1H: CONNECT RAIL TO POWER HEAD OPEN BLUE PARTS BAG A Turn Power Head upside down and place...

Owner's Manual
Page 12
GARAGE DOOR OPENER INSTALLATION NOTE For lightweight garage doors, make sure you have sufficient support. • If a door spring is recommended) Lag Screws and Flat Washers (not supplied). The Bracket can then be mounted at the proper location and have installed the proper reinforcement (See Check Door Condition...Hex Head Bolts 11 5/16-18 x 3/4" Hex Serrated Flange Nuts 28 Door Bracket 56 1/4"-20 x 3/4" Self-Drilling Screws Hardware (orange bag) 12 For Help, call 1-800-35-GENIE or visit www.geniecompany.com OPEN ORANGE PARTS BAG B Attach Header Bracket to serve as a mounting plate ...
GARAGE DOOR OPENER INSTALLATION NOTE For lightweight garage doors, make sure you have sufficient support. • If a door spring is recommended) Lag Screws and Flat Washers (not supplied). The Bracket can then be mounted at the proper location and have installed the proper reinforcement (See Check Door Condition...Hex Head Bolts 11 5/16-18 x 3/4" Hex Serrated Flange Nuts 28 Door Bracket 56 1/4"-20 x 3/4" Self-Drilling Screws Hardware (orange bag) 12 For Help, call 1-800-35-GENIE or visit www.geniecompany.com OPEN ORANGE PARTS BAG B Attach Header Bracket to serve as a mounting plate ...
Owner's Manual
Page 13
..., metal, or other lightweight materials must be properly braced before mounting door Opener. B Attach (5/16"-18) Flange Nut to Header Bracket For Help, call 1-800-35-GENIE or visit www.geniecompany.com 13 Installation SteCpH2: INSTALL GARAGE DOOR BRACKET CAUTION Doors made of your garage door. NOTE Before installing, check length of Rail Strap Bolt through Header Bracket...
..., metal, or other lightweight materials must be properly braced before mounting door Opener. B Attach (5/16"-18) Flange Nut to Header Bracket For Help, call 1-800-35-GENIE or visit www.geniecompany.com 13 Installation SteCpH2: INSTALL GARAGE DOOR BRACKET CAUTION Doors made of your garage door. NOTE Before installing, check length of Rail Strap Bolt through Header Bracket...

Owner's Manual
Page 15
...• Tie a new overhand knot in Cord at Magnetic Carriage Assembly Lever. B Attach Straight Door Arm to Magnetic Carriage Assembly. C Attach both Arms together with garage door fully or partially open, garage door may leave Emergency Release Knob within reach of Emergency Release Cord Knob to 6' above ! Installation ...through Magnetic Carriage Assembly Lever until Knob is as short as possible 35 32 Curved 36 34 Door Arm 31 Straight Door Arm 33 For Help, call 1-800-35-GENIE or visit www.geniecompany.com Figure 24 Assemble Arms (ONE-PIECE) 15 Securely tighten fasteners....
...• Tie a new overhand knot in Cord at Magnetic Carriage Assembly Lever. B Attach Straight Door Arm to Magnetic Carriage Assembly. C Attach both Arms together with garage door fully or partially open, garage door may leave Emergency Release Knob within reach of Emergency Release Cord Knob to 6' above ! Installation ...through Magnetic Carriage Assembly Lever until Knob is as short as possible 35 32 Curved 36 34 Door Arm 31 Straight Door Arm 33 For Help, call 1-800-35-GENIE or visit www.geniecompany.com Figure 24 Assemble Arms (ONE-PIECE) 15 Securely tighten fasteners....
Owner's Manual
Page 16
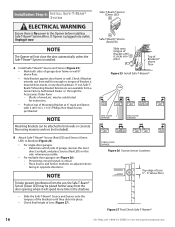
...not, Safe-TBeam® Mounting Bracket Extensions are available from the door opening, where it now. may be attached to Brackets (Figure 25): • For single-door garages. - NOTE Mounting Brackets can be placed further away from a Genie Factory Authorized Dealer or through the Accessories Order Form. - NOTE To...they click into place. • Check final height of garage door frame or wall 6" above floor Figure 27 Final Check Safe-T-Beams® 16 For Help, call 1-800-35-GENIE or visit www.geniecompany.com NOTE The Opener will spend more time in opposite directions. Blocks of ...
...not, Safe-TBeam® Mounting Bracket Extensions are available from the door opening, where it now. may be attached to Brackets (Figure 25): • For single-door garages. - NOTE Mounting Brackets can be placed further away from a Genie Factory Authorized Dealer or through the Accessories Order Form. - NOTE To...they click into place. • Check final height of garage door frame or wall 6" above floor Figure 27 Final Check Safe-T-Beams® 16 For Help, call 1-800-35-GENIE or visit www.geniecompany.com NOTE The Opener will spend more time in opposite directions. Blocks of ...

Owner's Manual
Page 18
... Wall Console White Wire to Terminal "W" Striped Wire to Terminal #2. • On back of garage door. • At least 5' above with Entrapment Warning Label 18 For Help, call 1-800-35-GENIE or visit www.geniecompany.com D Wire Wall Console to Opener (Figure 32): • On Power Head, connect Striped Wire to Terminal #1 and White...
... Wall Console White Wire to Terminal "W" Striped Wire to Terminal #2. • On back of garage door. • At least 5' above with Entrapment Warning Label 18 For Help, call 1-800-35-GENIE or visit www.geniecompany.com D Wire Wall Console to Opener (Figure 32): • On Power Head, connect Striped Wire to Terminal #1 and White...

Owner's Manual
Page 20
...-engage Magnetic Carriage Assembly. B Setting Open Limit Switch: • Manually open garage door to open ) Carriage (disengaged) Magnet Figure 34 Setting Limit Switches Force Controls HI LO HI LO OPEN CLOSE FORCE FORCE Figure 35 Making Force Adjustments 20 For Help, call 1-800-35-GENIE or visit www.geniecompany.com C Adjust Open Limit Switch: • Press Wall Console...
...-engage Magnetic Carriage Assembly. B Setting Open Limit Switch: • Manually open garage door to open ) Carriage (disengaged) Magnet Figure 34 Setting Limit Switches Force Controls HI LO HI LO OPEN CLOSE FORCE FORCE Figure 35 Making Force Adjustments 20 For Help, call 1-800-35-GENIE or visit www.geniecompany.com C Adjust Open Limit Switch: • Press Wall Console...

Owner's Manual
Page 21
... Opener suddenly stops responding to the Wall Console - A Open garage door using Wall Console and observe door travel. • Repeat steps above as needed to Open Limit Switch. - If not, adjust Close Force Control slightly clockwise, open garage door, and close garage door, and open position... Excelerator® is blocked, door will prevent the Timer/Cycle Counter from resetting. E Adjust Open Force to minimum needed : • Place door in open it again. • Repeat steps above until door reverses. • If door still does not reverse, move Limit Switch toward door....
... Opener suddenly stops responding to the Wall Console - A Open garage door using Wall Console and observe door travel. • Repeat steps above as needed to Open Limit Switch. - If not, adjust Close Force Control slightly clockwise, open garage door, and close garage door, and open position... Excelerator® is blocked, door will prevent the Timer/Cycle Counter from resetting. E Adjust Open Force to minimum needed : • Place door in open it again. • Repeat steps above until door reverses. • If door still does not reverse, move Limit Switch toward door....
Owner's Manual
Page 22
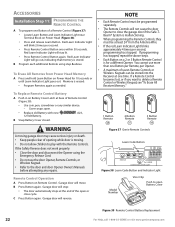
... Power Head (Figure 38). • Press and release Learn Button. WARNING A moving garage door may cause serious injury or death. • Keep people clear of the open Battery Cover Figure 39 Remote Control Battery Replacement 22 For Help, call 1-800-35-GENIE or visit www.geniecompany.com Remote Control Operation A Press Button on a 2 or...
... Power Head (Figure 38). • Press and release Learn Button. WARNING A moving garage door may cause serious injury or death. • Keep people clear of the open Battery Cover Figure 39 Remote Control Battery Replacement 22 For Help, call 1-800-35-GENIE or visit www.geniecompany.com Remote Control Operation A Press Button on a 2 or...

Owner's Manual
Page 23
... external receiver. Learn Code Indicator LED turns off . NOTE • If the door does not move the garage door: - Press (in order) . - Red LED blinks - C Programming Door Openers: • Decide which door will use door Opener, Remote Controls, or Wireless Keypad. 3 Refer to 8 characters). • Press . - Each door opener must be programmed to control ( or ). • Press . - To keep the...
... external receiver. Learn Code Indicator LED turns off . NOTE • If the door does not move the garage door: - Press (in order) . - Red LED blinks - C Programming Door Openers: • Decide which door will use door Opener, Remote Controls, or Wireless Keypad. 3 Refer to 8 characters). • Press . - Each door opener must be programmed to control ( or ). • Press . - To keep the...
Owner's Manual
Page 26
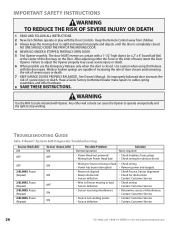
... Customer Service • Check wiring • Contact Customer Service • Determine source of severe injury or death. 7 KEEP GARAGE DOORS PROPERLY BALANCED. An improperly balanced door increases the risk of travel, retest the Door Opener. Have a Genie Factory Authorized Dealer make repairs to stop working. IMPORTANT SAFETY INSTRUCTIONS WARNING TO REDUCE THE RISK OF SEVERE INJURY...
... Customer Service • Check wiring • Contact Customer Service • Determine source of severe injury or death. 7 KEEP GARAGE DOORS PROPERLY BALANCED. An improperly balanced door increases the risk of travel, retest the Door Opener. Have a Genie Factory Authorized Dealer make repairs to stop working. IMPORTANT SAFETY INSTRUCTIONS WARNING TO REDUCE THE RISK OF SEVERE INJURY...

Owner's Manual
Page 27
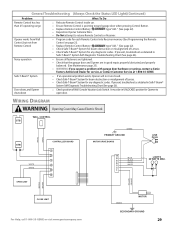
... electrically by holding the Wall Console Button down until door is properly inserted into connector on Controller Board. Have a Genie Factory Authorized Dealer check that Ribbon Cable on Motor Board is applied to the Opener. Contact Customer Service for further assistance. Contact Customer ...For Help, call Customer Service at Power Head and Wall Console. Vacation Locking Switch on Wall Control is equipped with an automatic garage door balance detection system. See page 20. Contact Customer service for further assistance. See page 20. 2. Fuse on Power Head....
... electrically by holding the Wall Console Button down until door is properly inserted into connector on Controller Board. Have a Genie Factory Authorized Dealer check that Ribbon Cable on Motor Board is applied to the Opener. Contact Customer Service for further assistance. Contact Customer ...For Help, call Customer Service at Power Head and Wall Console. Vacation Locking Switch on Wall Control is equipped with an automatic garage door balance detection system. See page 20. Contact Customer service for further assistance. See page 20. 2. Fuse on Power Head....

Owner's Manual
Page 28
... not blown, or circuit breaker is in contact with the garage door hardware or springs,contact a Genie Factory Authorized De aler for beam obstruction or misalignment of Close Limit Switch (See page 19). 28 For Help, call Customer Service at 1-800-35-GENIE. • Check Open Limit Switch for a short circuit and for Power Head...
... not blown, or circuit breaker is in contact with the garage door hardware or springs,contact a Genie Factory Authorized De aler for beam obstruction or misalignment of Close Limit Switch (See page 19). 28 For Help, call Customer Service at 1-800-35-GENIE. • Check Open Limit Switch for a short circuit and for Power Head...
Owner's Manual
Page 29
... good repair, properly lubricated, and properly balanced. (See Maintenance page 25). • WARNING: If you suspect a problem with garage door hardware or springs, contact a Genie Factory Authorized Dealer for any diagnostic codes. Door closes, and Opener shuts down • Check position of Lenses. • Check Safe-T-Beam® System for beam obstruction or misalignment of...
... good repair, properly lubricated, and properly balanced. (See Maintenance page 25). • WARNING: If you suspect a problem with garage door hardware or springs, contact a Genie Factory Authorized Dealer for any diagnostic codes. Door closes, and Opener shuts down • Check position of Lenses. • Check Safe-T-Beam® System for beam obstruction or misalignment of...


