
Network Installation Guide
Page 2
Then follow the steps in "Install Software" on page 23. 2 Before You Begin Before You Begin Make sure you 're setting up a wireless network, go to use on a network. Do one of the following: ■ If you're installing the printer for use the printer on ...the network, follow the instructions in this guide to set up the printer for the first time, see "Choose Your Connection Type" on page 3. ■ If you installed ink cartridges and loaded paper as described...
Then follow the steps in "Install Software" on page 23. 2 Before You Begin Before You Begin Make sure you 're setting up a wireless network, go to use on a network. Do one of the following: ■ If you're installing the printer for use the printer on ...the network, follow the instructions in this guide to set up the printer for the first time, see "Choose Your Connection Type" on page 3. ■ If you installed ink cartridges and loaded paper as described...
Network Installation Guide
Page 4
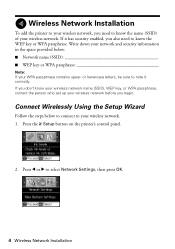
... F Setup button on the printer's control panel. 2. If you don't know your wireless network name (SSID), WEP key, or WPA passphrase, contact the person who set up your wireless network before you need to know the name (SSID) of your wireless network. Press l or r to select Network... Settings, then press OK. 4 Wireless Network Installation or lowercase letters, be sure to note it has security enabled, you also need to know the WEP key ...
... F Setup button on the printer's control panel. 2. If you don't know your wireless network name (SSID), WEP key, or WPA passphrase, contact the person who set up your wireless network before you need to know the name (SSID) of your wireless network. Press l or r to select Network... Settings, then press OK. 4 Wireless Network Installation or lowercase letters, be sure to note it has security enabled, you also need to know the WEP key ...

Network Installation Guide
Page 7
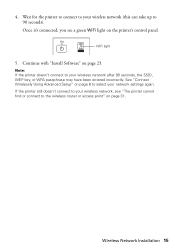
... point" on page 4 to select your wireless network after 90 seconds, the WEP key or WPA passphrase may have verified that the settings are correct, press OK to save the settings and return to the Network Settings menu. 11. Once it's connected, you see a screen like this can take up to your network... printer to connect to change. 10. Continue with "Install Software" on the printer's control panel. If the printer still doesn't connect to exit the Network Settings Menu. 12. See "Connect Wirelessly Using the Setup Wizard" on page 31. WiFi light 13. When you see the...
... point" on page 4 to select your wireless network after 90 seconds, the WEP key or WPA passphrase may have verified that the settings are correct, press OK to save the settings and return to the Network Settings menu. 11. Once it's connected, you see a screen like this can take up to your network... printer to connect to change. 10. Continue with "Install Software" on the printer's control panel. If the printer still doesn't connect to exit the Network Settings Menu. 12. See "Connect Wirelessly Using the Setup Wizard" on page 31. WiFi light 13. When you see the...
Network Installation Guide
Page 8
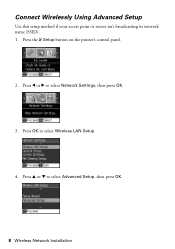
Press l or r to select Wireless LAN Setup. 4. Press OK to select Network Settings, then press OK. 3. Press the F Setup button on the printer's control panel. 2. Press u or d to select Advanced Setup, then press OK. 8 Wireless Network Installation Connect Wirelessly Using Advanced Setup Use this setup method if your access point or router isn't broadcasting its network name (SSID). 1.
Press l or r to select Wireless LAN Setup. 4. Press OK to select Network Settings, then press OK. 3. Press the F Setup button on the printer's control panel. 2. Press u or d to select Advanced Setup, then press OK. 8 Wireless Network Installation Connect Wirelessly Using Advanced Setup Use this setup method if your access point or router isn't broadcasting its network name (SSID). 1.
Network Installation Guide
Page 11
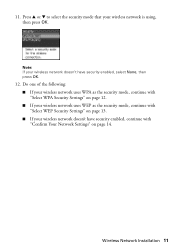
... page 12. ■ If your wireless network uses WEP as the security mode, continue with "Confirm Your Network Settings" on page 13. ■ If your wireless network doesn't have security enabled, select None, then press OK. 12. Wireless Network Installation 11 Press u or d to ...select the security mode that your wireless network doesn't have security enabled, continue with "Select WEP Security Settings" on page 14. Note: If your wireless network is using, then press OK. 11.
... page 12. ■ If your wireless network uses WEP as the security mode, continue with "Confirm Your Network Settings" on page 13. ■ If your wireless network doesn't have security enabled, select None, then press OK. 12. Wireless Network Installation 11 Press u or d to ...select the security mode that your wireless network doesn't have security enabled, continue with "Select WEP Security Settings" on page 14. Note: If your wireless network is using, then press OK. 11.
Network Installation Guide
Page 12
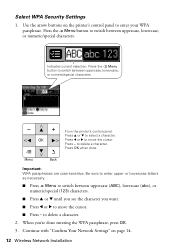
... 14. 12 Wireless Network Installation Press - Important: WPA passphrases are case-sensitive. to enter upper- Be sure to delete a character. Continue with "Confirm Your Network Settings" on the printer's control panel to move the cursor. Select WPA Security...
... 14. 12 Wireless Network Installation Press - Important: WPA passphrases are case-sensitive. to enter upper- Be sure to delete a character. Continue with "Confirm Your Network Settings" on the printer's control panel to move the cursor. Select WPA Security...
Network Installation Guide
Page 13
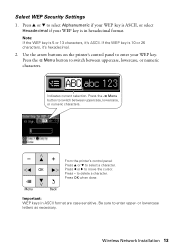
... Hexadecimal if your WEP key. Press l or r to delete a character. Press the x Menu button to switch between uppercase, lowercase, or numeric characters. Select WEP Security Settings 1. Press the x Menu button to switch between uppercase, lowercase, or numeric characters.
... Hexadecimal if your WEP key. Press l or r to delete a character. Press the x Menu button to switch between uppercase, lowercase, or numeric characters. Select WEP Security Settings 1. Press the x Menu button to switch between uppercase, lowercase, or numeric characters.
Network Installation Guide
Page 14
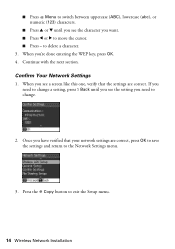
.... When you see a screen like this one, verify that your network settings are correct. Press the r Copy button to delete a character. 3. Once you 're done entering the WEP key, press OK. 4. Confirm Your Network Settings 1. ■ Press x Menu to switch between uppercase (ABC), lowercase... (abc), or numeric (123) characters. ■ Press u or d until you see the setting you want. ■ Press l or r to move the cursor. ■...
.... When you see a screen like this one, verify that your network settings are correct. Press the r Copy button to delete a character. 3. Once you 're done entering the WEP key, press OK. 4. Confirm Your Network Settings 1. ■ Press x Menu to switch between uppercase (ABC), lowercase... (abc), or numeric (123) characters. ■ Press u or d until you see the setting you want. ■ Press l or r to move the cursor. ■...
Network Installation Guide
Page 15
... Installation 15 Once it's connected, you see "The printer cannot find or connect to the wireless router or access point" on page 8 to your network settings again. Note: If the printer doesn't connect to select your wireless network after 90 seconds, the SSID, WEP key, or WPA passphrase may have been...
... Installation 15 Once it's connected, you see "The printer cannot find or connect to the wireless router or access point" on page 8 to your network settings again. Note: If the printer doesn't connect to select your wireless network after 90 seconds, the SSID, WEP key, or WPA passphrase may have been...

Network Installation Guide
Page 16
... computer is connected to a network with an Ethernet cable, you need to a network with an Ethernet cable, you cannot set up your printer this setup method if you want to select Network Settings, then press OK. 3. Press the F Setup button on page 22 to select Wireless LAN Setup. 16 Wireless Network Installation... Setup Wizard" on page 4 or "Wired (Ethernet) Installation" on the printer's control panel. 2. Create an Ad-Hoc Wireless Connection Use this way. Press OK to set up your computer's Ethernet cable.
... computer is connected to a network with an Ethernet cable, you need to a network with an Ethernet cable, you cannot set up your printer this setup method if you want to select Network Settings, then press OK. 3. Press the F Setup button on page 22 to select Wireless LAN Setup. 16 Wireless Network Installation... Setup Wizard" on page 4 or "Wired (Ethernet) Installation" on the printer's control panel. 2. Create an Ad-Hoc Wireless Connection Use this way. Press OK to set up your computer's Ethernet cable.
Network Installation Guide
Page 19
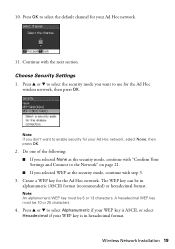
... step 3. 3. Create a WEP key for the Ad Hoc wireless network, then press OK. A hexadecimal WEP key must be 5 or 13 characters. Choose Security Settings 1. The WEP key can be 10 or 25 characters. 4. Note: An alphanumeric WEP key must be in hexadecimal format. Press OK to use for the...network. 11. Wireless Network Installation 19 Note: If you selected WEP as the security mode, continue with the next section. Continue with "Confirm Your Settings and Connect to the Network" on page 21. ■ If you don't want to select the default channel for your Ad Hoc network, ...
... step 3. 3. Create a WEP key for the Ad Hoc wireless network, then press OK. A hexadecimal WEP key must be 5 or 13 characters. Choose Security Settings 1. The WEP key can be 10 or 25 characters. 4. Note: An alphanumeric WEP key must be in hexadecimal format. Press OK to use for the...network. 11. Wireless Network Installation 19 Note: If you selected WEP as the security mode, continue with the next section. Continue with "Confirm Your Settings and Connect to the Network" on page 21. ■ If you don't want to select the default channel for your Ad Hoc network, ...
Network Installation Guide
Page 21
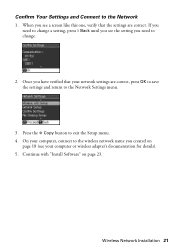
... screen like this one, verify that your network settings are correct. Press the r Copy button to the Network 1. Continue with "Install Software" on page 18 (see the setting you created on page 23. If you need to the Network Settings menu. 3. On your computer or wireless adapter...'s documentation for details). 5. When you have verified that the settings are correct, press OK to save the settings and return to change a setting, press y Back until you see your computer...
... screen like this one, verify that your network settings are correct. Press the r Copy button to the Network 1. Continue with "Install Software" on page 18 (see the setting you created on page 23. If you need to the Network Settings menu. 3. On your computer or wireless adapter...'s documentation for details). 5. When you have verified that the settings are correct, press OK to save the settings and return to change a setting, press y Back until you see your computer...

Network Installation Guide
Page 22
...) Installation 1. Press the F Setup button on your printer. 2. Connect an Ethernet network cable to any available LAN port on the printer's control panel, select Network Settings > Wireless LAN Setup > Advanced Setup > Disable Wireless LAN. Continue with the next section to disable the wireless adapter using the printer's control panel. Connect the...
...) Installation 1. Press the F Setup button on your printer. 2. Connect an Ethernet network cable to any available LAN port on the printer's control panel, select Network Settings > Wireless LAN Setup > Advanced Setup > Disable Wireless LAN. Continue with the next section to disable the wireless adapter using the printer's control panel. Connect the...
Network Installation Guide
Page 27
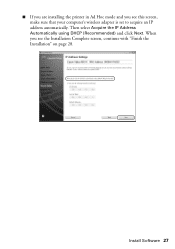
When you see the Installation Complete screen, continue with "Finish the Installation" on page 28. ■ If you are installing the printer in Ad Hoc mode and you see this screen, make sure that your computer's wireless adapter is set to acquire an IP address automatically. Then select Acquire the IP Address Automatically using DHCP (Recommended) and click Next. Install Software 27
When you see the Installation Complete screen, continue with "Finish the Installation" on page 28. ■ If you are installing the printer in Ad Hoc mode and you see this screen, make sure that your computer's wireless adapter is set to acquire an IP address automatically. Then select Acquire the IP Address Automatically using DHCP (Recommended) and click Next. Install Software 27
Network Installation Guide
Page 31
...access point with your computer or another device to confirm that it is working correctly. ■ Make sure that it is set on page 4 to select your network settings again. ■ The printer is using your product on a network, check these sections for instructions on the router or access... point. If your wireless router or access point has wireless security enabled, you have problems setting up or using . ■ If the printer doesn't connect to your wireless network, the WEP key or WPA passphrase may have been entered...
...access point with your computer or another device to confirm that it is working correctly. ■ Make sure that it is set on page 4 to select your network settings again. ■ The printer is using your product on a network, check these sections for instructions on the router or access... point. If your wireless router or access point has wireless security enabled, you have problems setting up or using . ■ If the printer doesn't connect to your wireless network, the WEP key or WPA passphrase may have been entered...
Network Installation Guide
Page 32
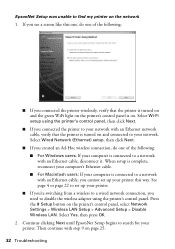
.... ■ If you see a screen like this way. See page 4 or page 22 to set up your printer. EpsonNet Setup was unable to find my printer on the printer's control panel, select Network Settings > Wireless LAN Setup > Advanced Setup > Disable Wireless LAN. Press the F Setup button on the... network 1. Select Yes, then press OK. 2. Then continue with an Ethernet cable, you cannot set up your printer this one, do one of the following : ■ If you created an Ad-Hoc wireless connection, do one of the following : ...
.... ■ If you see a screen like this way. See page 4 or page 22 to set up your printer. EpsonNet Setup was unable to find my printer on the printer's control panel, select Network Settings > Wireless LAN Setup > Advanced Setup > Disable Wireless LAN. Press the F Setup button on the... network 1. Select Yes, then press OK. 2. Then continue with an Ethernet cable, you cannot set up your printer this one, do one of the following : ■ If you created an Ad-Hoc wireless connection, do one of the following : ...
Network Installation Guide
Page 33
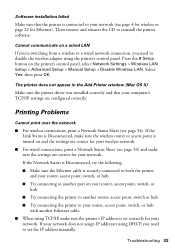
... LAN If you're switching from a wireless to a wired network connection, you need to disable the wireless adapter using TCP/IP, make sure the settings are correct for your network. Select Yes, then press OK. Troubleshooting 33 If your network (see page 4 for wireless or page 22 for your..., try the following: ■ Make sure the Ethernet cable is connected to your network does not assign IP addresses using DHCP, you need to set correctly for your wireless network. ■ For wired connections, print a Network Status Sheet (see page 34). The printer does not appear in the...
... LAN If you're switching from a wireless to a wired network connection, you need to disable the wireless adapter using TCP/IP, make sure the settings are correct for your network. Select Yes, then press OK. Troubleshooting 33 If your network (see page 4 for wireless or page 22 for your..., try the following: ■ Make sure the Ethernet cable is connected to your network does not assign IP addresses using DHCP, you need to set correctly for your wireless network. ■ For wired connections, print a Network Status Sheet (see page 34). The printer does not appear in the...
Network Installation Guide
Page 34
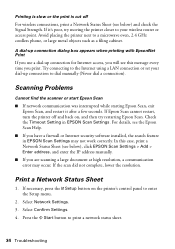
...oven, 2.4 GHz cordless phone, or large metal objects such as a filing cabinet. If it after a few seconds. Check the Timeout Setting in EPSON Scan Settings may occur. Try connecting to enter the Setup menu. 2. If necessary, press the F Setup button on , and then try moving the... for Internet access, you will see below ) and check the Signal Strength. Print a Network Status Sheet 1. Select Network Settings. 3. For details, see below ), click EPSON Scan Settings > Add > Enter address, and enter the IP address manually. ■ If you print. In this case, print ...
...oven, 2.4 GHz cordless phone, or large metal objects such as a filing cabinet. If it after a few seconds. Check the Timeout Setting in EPSON Scan Settings may occur. Try connecting to enter the Setup menu. 2. If necessary, press the F Setup button on , and then try moving the... for Internet access, you will see below ) and check the Signal Strength. Print a Network Status Sheet 1. Select Network Settings. 3. For details, see below ), click EPSON Scan Settings > Add > Enter address, and enter the IP address manually. ■ If you print. In this case, print ...

Product Brochure
Page 1
red-eye removal, automatic photo restoration, Automatic Photo Correction, and more accurate color • Standard ink set included - instantly reduce and enlarge copies 25 - 400% • Manual two-sided printing2 - includes one touch; share one printer with one... your PC and printer, wirelessly • Fastest print speeds in -One Epson Stylus® NX515 Print | Copy | Scan | Photo | Wi-Fi® Smart. get sharp documents and photos with one 69 Black ink cartridge and three 69 color ink cartridges Simple. make multiple copies (1 - 99) with precision detail and...
red-eye removal, automatic photo restoration, Automatic Photo Correction, and more accurate color • Standard ink set included - instantly reduce and enlarge copies 25 - 400% • Manual two-sided printing2 - includes one touch; share one printer with one... your PC and printer, wirelessly • Fastest print speeds in -One Epson Stylus® NX515 Print | Copy | Scan | Photo | Wi-Fi® Smart. get sharp documents and photos with one 69 Black ink cartridge and three 69 color ink cartridges Simple. make multiple copies (1 - 99) with precision detail and...

Product Brochure
Page 2
...Resolution 2400 dpi Hardware Resolution 2400 x 2400 dpi Maximum Resolution 9600 x 9600 dpi interpolated Scanner Bit Depth 48-bit color, Scan 24-bit output Copy Settings Color, Black/White, Draft, Normal Copy Quantity 1 - 99 (PC-free) Maximum Copy Size 8.5" x 11" ... Better Products for both black and color printing. DURABrite is a registered trademark and PhotoEnhance is a trademark of Seiko Epson Corporation. Copyright 2009 Epson America, Inc. Epson Stylus NX515 Print | Copy | Scan | Photo | Wi-Fi Specifications Printing Technology 4-color (CMYK) drop-on accelerated testing ...
...Resolution 2400 dpi Hardware Resolution 2400 x 2400 dpi Maximum Resolution 9600 x 9600 dpi interpolated Scanner Bit Depth 48-bit color, Scan 24-bit output Copy Settings Color, Black/White, Draft, Normal Copy Quantity 1 - 99 (PC-free) Maximum Copy Size 8.5" x 11" ... Better Products for both black and color printing. DURABrite is a registered trademark and PhotoEnhance is a trademark of Seiko Epson Corporation. Copyright 2009 Epson America, Inc. Epson Stylus NX515 Print | Copy | Scan | Photo | Wi-Fi Specifications Printing Technology 4-color (CMYK) drop-on accelerated testing ...


