
Product Brochure
Page 2
...dpi Maximum Print Speed† Black 32 ppm Color 15 ppm Laser Quality Print Speed† Black 4.4 ppm Color 2.1 ppm Maximum Copy Speed† Black 32 cpm Color 9 cpm Scanner Type Color flatbed Photoelectric Device Color CIS line sensor Optical Resolution 1200 dpi Hardware ...is a trademark of your paper supply with text patterns in these marks. Epson Stylus NX215 Print | Copy | Scan | Photo Specifications Printing Technology 4-color (CMYK) drop-on plain paper. and Canada Epson Stylus NX215 all-in-one, instruction booklet, CD-ROM containing all rights in Draft...
...dpi Maximum Print Speed† Black 32 ppm Color 15 ppm Laser Quality Print Speed† Black 4.4 ppm Color 2.1 ppm Maximum Copy Speed† Black 32 cpm Color 9 cpm Scanner Type Color flatbed Photoelectric Device Color CIS line sensor Optical Resolution 1200 dpi Hardware ...is a trademark of your paper supply with text patterns in these marks. Epson Stylus NX215 Print | Copy | Scan | Photo Specifications Printing Technology 4-color (CMYK) drop-on plain paper. and Canada Epson Stylus NX215 all-in-one, instruction booklet, CD-ROM containing all rights in Draft...

Quick Guide
Page 9
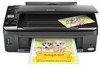
Placing the Original on the Glass 1. Copying a Document or Photo 9 Close the cover gently so you don't move the original. Open the document cover and place your originals correctly on the scanner glass and make color or black-and-white copies. Copying a Document or Photo Follow the instructions in this section to position your original face-down on the scanner glass, with the top facing into the front right corner. 2.
Placing the Original on the Glass 1. Copying a Document or Photo 9 Close the cover gently so you don't move the original. Open the document cover and place your originals correctly on the scanner glass and make color or black-and-white copies. Copying a Document or Photo Follow the instructions in this section to position your original face-down on the scanner glass, with the top facing into the front right corner. 2.

Quick Guide
Page 10
...type Start copying To print more than 1 copy, press + or - To cancel copying, press y Stop/Clear Settings. or A4-size plain paper or Epson special paper just like you would on plain paper, hold down x Start until the P On light starts flashing. Tip: To make a quick draft copy...5. Or you 're finished, press the Copy button again. 8. Press the Copy button to select Color or B&W copies. 7. Place your original document on your paper). Press the P On button to turn on the scanner glass (see page 5). 3. Press the paper size button, if necessary, to select Letter Size Plain ...
...type Start copying To print more than 1 copy, press + or - To cancel copying, press y Stop/Clear Settings. or A4-size plain paper or Epson special paper just like you would on plain paper, hold down x Start until the P On light starts flashing. Tip: To make a quick draft copy...5. Or you 're finished, press the Copy button again. 8. Press the Copy button to select Color or B&W copies. 7. Place your original document on your paper). Press the P On button to turn on the scanner glass (see page 5). 3. Press the paper size button, if necessary, to select Letter Size Plain ...

Quick Guide
Page 11
...black-and-white. 1. You can also convert color photos to enter copy mode. 5. To print more than 1 copy, press + or - Press l or r to select 4"× 6" Photo Paper. 9. To cancel copying, press y Stop/Clear Settings. Load 4 × 6-inch Epson photo paper in the sheet feeder (see ...Epson photo paper (various types available) for instant photo reprints. to select the number (up to begin copying. Or you 're finished, press the Copy button again. 8. Copying a Photo You can press l or r to select Auto (to automatically size the image to turn on your original photo on the scanner...
...black-and-white. 1. You can also convert color photos to enter copy mode. 5. To print more than 1 copy, press + or - Press l or r to select 4"× 6" Photo Paper. 9. To cancel copying, press y Stop/Clear Settings. Load 4 × 6-inch Epson photo paper in the sheet feeder (see ...Epson photo paper (various types available) for instant photo reprints. to select the number (up to begin copying. Or you 're finished, press the Copy button again. 8. Copying a Photo You can press l or r to select Auto (to automatically size the image to turn on your original photo on the scanner...

Quick Guide
Page 15
... Photos From the Index Sheet Once you have printed an index sheet, you can select the photos you want to print. these could damage the scanner glass. The most recent photos are printed on your memory card. To print one circle beneath each photo you want to fill in the circles.... 1. Use a dark pen or pencil to print (see the next section). Then you can mark the photos you want to 30 photos per page. Your Epson printer automatically prints them on the sheet and scanning the sheet. Load several sheets of all the photos on the first index sheet, up to...
... Photos From the Index Sheet Once you have printed an index sheet, you can select the photos you want to print. these could damage the scanner glass. The most recent photos are printed on your memory card. To print one circle beneath each photo you want to fill in the circles.... 1. Use a dark pen or pencil to print (see the next section). Then you can mark the photos you want to 30 photos per page. Your Epson printer automatically prints them on the sheet and scanning the sheet. Load several sheets of all the photos on the first index sheet, up to...
Quick Guide
Page 32
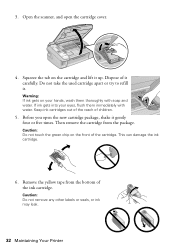
... with soap and water. Before you open the cartridge cover. 4. This can damage the ink cartridge. 6. Remove the yellow tape from the package. Open the scanner, and open the new cartridge package, shake it . Keep ink cartridges out of the reach of it up. Dispose of children. 5. 3.
... with soap and water. Before you open the cartridge cover. 4. This can damage the ink cartridge. 6. Remove the yellow tape from the package. Open the scanner, and open the new cartridge package, shake it . Keep ink cartridges out of the reach of it up. Dispose of children. 5. 3.
Quick Guide
Page 33
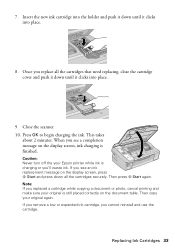
... clicks into place. 8. Replacing Ink Cartridges 33 Once you see a completion message on the document table. Close the scanner. 10. If you replace all the cartridges securely. Caution: Never turn off the your Epson printer while ink is still placed correctly on the display screen, ink charging is finished. This takes about...
... clicks into place. 8. Replacing Ink Cartridges 33 Once you see a completion message on the document table. Close the scanner. 10. If you replace all the cartridges securely. Caution: Never turn off the your Epson printer while ink is still placed correctly on the display screen, ink charging is finished. This takes about...
Quick Guide
Page 35
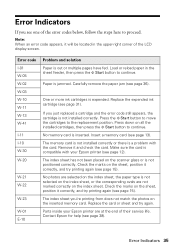
...cartridges is not positioned correctly. Press the x Start button to move the cartridges to continue. The index sheet has not been placed on the scanner glass or is expended. Check the marks on the sheet, position it correctly, and try printing again (see page 15). The index sheet you...just replaced a cartridge and the error code still appears, the cartridge is not installed correctly. Error Indicators 35 Paper is a problem with your Epson printer are at the end of their service life. The memory card is not installed correctly or there is jammed. Check the marks on ...
...cartridges is not positioned correctly. Press the x Start button to move the cartridges to continue. The index sheet has not been placed on the scanner glass or is expended. Check the marks on the sheet, position it correctly, and try printing again (see page 15). The index sheet you...just replaced a cartridge and the error code still appears, the cartridge is not installed correctly. Error Indicators 35 Paper is a problem with your Epson printer are at the end of their service life. The memory card is not installed correctly or there is jammed. Check the marks on ...

Quick Guide
Page 37
... time. If paper is jammed, follow these solutions: ■ Make sure the document is placed flat against the document table glass and your on-screen Epson Information Center for instructions. ■ The ink cartridges may need to clean the print head (see page 29). ■ If paper is stuck inside,... in the image, clean the document table glass with the copy or print quality, try these steps: 1. Open the scanner, remove the jammed paper and torn pieces, close the scanner, and turn off your printer software (see if the print head needs cleaning. ■ Clean the print head as ...
... time. If paper is jammed, follow these solutions: ■ Make sure the document is placed flat against the document table glass and your on-screen Epson Information Center for instructions. ■ The ink cartridges may need to clean the print head (see page 29). ■ If paper is stuck inside,... in the image, clean the document table glass with the copy or print quality, try these steps: 1. Open the scanner, remove the jammed paper and torn pieces, close the scanner, and turn off your printer software (see if the print head needs cleaning. ■ Clean the print head as ...

Quick Guide
Page 39
... dust. ■ Leave enough room around the printer for a long period, unplug the power cord from the wall. ■ Do not open the scanner section while the NX210 Series is copying, printing, or scanning. ■ Do not spill liquid on the printer. It will not operate properly if it...can be easily unplugged. ■ If you won't be using the printer for sufficient ventilation. Notices 39 Notices Important Safety Instructions Before using your Epson printer. ■ Use only the type of power source indicated on the printer label. ■ Use only the power cord that comes with the...
... dust. ■ Leave enough room around the printer for a long period, unplug the power cord from the wall. ■ Do not open the scanner section while the NX210 Series is copying, printing, or scanning. ■ Do not spill liquid on the printer. It will not operate properly if it...can be easily unplugged. ■ If you won't be using the printer for sufficient ventilation. Notices 39 Notices Important Safety Instructions Before using your Epson printer. ■ Use only the type of power source indicated on the printer label. ■ Use only the power cord that comes with the...

Start Here
Page 2
Press or to select to select your LCD display screen from each color. Caution: Do not remove any other seals or the cartridge may leak. 4 Insert the cartridges in the holder for each cartridge. 3 Select your language You can change the language that appears on your language, then press Start. 1/4 4 Install ink cartridges Note: Do not load paper yet. 1 Lift up the scanner, then open the cartridge cover. 2 Shake the ink cartridges gently 4 or 5 times, then unpack them. 3 Remove only the yellow tape from English to French, Spanish, or Portuguese.
Press or to select to select your LCD display screen from each color. Caution: Do not remove any other seals or the cartridge may leak. 4 Insert the cartridges in the holder for each cartridge. 3 Select your language You can change the language that appears on your language, then press Start. 1/4 4 Install ink cartridges Note: Do not load paper yet. 1 Lift up the scanner, then open the cartridge cover. 2 Shake the ink cartridges gently 4 or 5 times, then unpack them. 3 Remove only the yellow tape from English to French, Spanish, or Portuguese.

Start Here
Page 3
..., pull out the extensions, and raise the stopper. Note: Do not raise the stopper for priming the printer. Press down until it clicks. 7 Lower the scanner. 8 Press the Start button to charge the ink. 5 Press each cartridge down until it clicks. 6 Close the cartridge cover. Charging takes about 2 minutes...
..., pull out the extensions, and raise the stopper. Note: Do not raise the stopper for priming the printer. Press down until it clicks. 7 Lower the scanner. 8 Press the Start button to charge the ink. 5 Press each cartridge down until it clicks. 6 Close the cartridge cover. Charging takes about 2 minutes...


