
Technical Brief (Impact Printers)
Page 1
... topics, related to all begin with FX, LX, or DFX Twenty-four pin printers all EPSON impact printers: Functionality M Printing technology M Control code/emulation M Paper handling M SmartPark™ settings Versatility M Flexible interfacing M Built-in fonts M Computer-based set-up Reliability M Ribbon quality M Ribbon cartridge reliability M Total Print Volume vs. An impact printer has several advantages over any other type...
... topics, related to all begin with FX, LX, or DFX Twenty-four pin printers all EPSON impact printers: Functionality M Printing technology M Control code/emulation M Paper handling M SmartPark™ settings Versatility M Flexible interfacing M Built-in fonts M Computer-based set-up Reliability M Ribbon quality M Ribbon cartridge reliability M Total Print Volume vs. An impact printer has several advantages over any other type...

Technical Brief (Impact Printers)
Page 6
... Competitive design with the print head assembly unit. Technical Brief-Multimedia projectors Page 6 Reliability-Ribbon quality EPSON brand impact printer ribbons are ... L L L Available in many competitive printers move with every printer Adds profit to every sale 5 Reliability-Ribbon cartridge reliability Most EPSON impact printers use and extreme temperature changes L L Easy to sell with the print head, and therefore has a longer life...
... Competitive design with the print head assembly unit. Technical Brief-Multimedia projectors Page 6 Reliability-Ribbon quality EPSON brand impact printer ribbons are ... L L L Available in many competitive printers move with every printer Adds profit to every sale 5 Reliability-Ribbon cartridge reliability Most EPSON impact printers use and extreme temperature changes L L Easy to sell with the print head, and therefore has a longer life...
Product Information Guide
Page 1
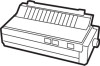
... sets Epson Extended Graphics characters set FX-850 FX-1050 7.2 to 10.1" (182-257mm) 7.2 to 14.4"(162-366mm) 4 to 10" (101-254 mm) 4 to 16" (101-406.4 mm) 6.5" or 9.5" 6.5" or 9.5' 2.5" or 4.0* 2.5" or 4.0" Paper Length: Printable area: Single sheet 7.2 to 14.3 inches (182 to 4 sheets including the original. Cross-head screwdriver Platen knob q-3 d- Y .: f Ribbon cartridge Printer Specifications...
... sets Epson Extended Graphics characters set FX-850 FX-1050 7.2 to 10.1" (182-257mm) 7.2 to 14.4"(162-366mm) 4 to 10" (101-254 mm) 4 to 16" (101-406.4 mm) 6.5" or 9.5" 6.5" or 9.5' 2.5" or 4.0* 2.5" or 4.0" Paper Length: Printable area: Single sheet 7.2 to 14.3 inches (182 to 4 sheets including the original. Cross-head screwdriver Platen knob q-3 d- Y .: f Ribbon cartridge Printer Specifications...
Product Support Bulletin(s)
Page 5
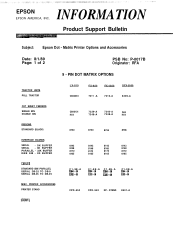
EPSON INFORMATION EPSON AMERICA, INC. PIN DOT MATRIX OPTIONS TRACTOR UNITS PULL TRACTOR LX-810 C800061 FX-850 FX-1050 DFX-5000 7311 -A 7312-A 8309-A CUT SHEET FEEDERS SINGLE BIN DOUBLE BIN RIBBONS STANDARD (BLACK) INTERFACE BOARDS SERIAL - OK BUFFER SERIAL - 8K BUFFER ...PARALLEL - 32K BUFFER IEEE 488 - 8K BUFFER CABLES STANDARD IBM PARALLEL SERlAL DB-25 TO DB-9 SERIAL DB-25 TO DB-25 MISC. PRINTER ACCESSORIES PRINTER...
EPSON INFORMATION EPSON AMERICA, INC. PIN DOT MATRIX OPTIONS TRACTOR UNITS PULL TRACTOR LX-810 C800061 FX-850 FX-1050 DFX-5000 7311 -A 7312-A 8309-A CUT SHEET FEEDERS SINGLE BIN DOUBLE BIN RIBBONS STANDARD (BLACK) INTERFACE BOARDS SERIAL - OK BUFFER SERIAL - 8K BUFFER ...PARALLEL - 32K BUFFER IEEE 488 - 8K BUFFER CABLES STANDARD IBM PARALLEL SERlAL DB-25 TO DB-9 SERIAL DB-25 TO DB-25 MISC. PRINTER ACCESSORIES PRINTER...
User Manual
Page 5
5 Maintenance 5-1 Cleaning the Printer 5-2 Replacing the Ribbon 5-3 Transporting the Printer 5-6 6 Troubleshooting 6-1 Problems and Solutions 6-2 Data Dump Mode 6-5 7 Using Printer Options 7-1 The Cut Sheet Feeder 7-2 The Pull Tractor 7-15 Interface Boards 7-22 8 Command Summary 8-1 Commands in Numerical Order 8-4 Epson (ESC/P) Commands 8-8 IBM Emulation Mode Commands 8-41 Appendix A: Technical Specifications A-1 Printer Specifications A-2 Interface Specifications A-5 Initialization A- 8 Appendix B: Tables B-1 Proportional Width...
5 Maintenance 5-1 Cleaning the Printer 5-2 Replacing the Ribbon 5-3 Transporting the Printer 5-6 6 Troubleshooting 6-1 Problems and Solutions 6-2 Data Dump Mode 6-5 7 Using Printer Options 7-1 The Cut Sheet Feeder 7-2 The Pull Tractor 7-15 Interface Boards 7-22 8 Command Summary 8-1 Commands in Numerical Order 8-4 Epson (ESC/P) Commands 8-8 IBM Emulation Mode Commands 8-41 Appendix A: Technical Specifications A-1 Printer Specifications A-2 Interface Specifications A-5 Initialization A- 8 Appendix B: Tables B-1 Proportional Width...

User Manual
Page 9
Chapter 1 Setting Up the Printer Unpacking the Printer 1-2 Removing the protective materials 1-3 Choosing a Place for the Printer 1-5 Assembling the Printer 1-6 Installing the platen knob 1-6 Installing the ribbon cartridge 1-8 Attaching the paper guide 1-11 Testing the Printer 1-12 Plugging in the printer 1-13 Loading a sheet of paper 1-13 Running the self test 1-16 Connecting the Printer to Your Computer 1-18 Connecting the parallel interface cable 1-18 Setting Up the Printer l-l
Chapter 1 Setting Up the Printer Unpacking the Printer 1-2 Removing the protective materials 1-3 Choosing a Place for the Printer 1-5 Assembling the Printer 1-6 Installing the platen knob 1-6 Installing the ribbon cartridge 1-8 Attaching the paper guide 1-11 Testing the Printer 1-12 Plugging in the printer 1-13 Loading a sheet of paper 1-13 Running the self test 1-16 Connecting the Printer to Your Computer 1-18 Connecting the parallel interface cable 1-18 Setting Up the Printer l-l

User Manual
Page 14
... to direct sunlight, excessive heat, moisture, or dust. Installing the platen knob The first step in setting up the printer is turned off before using electrical outlets that might disturb the power supply. However, in both your computer's memory and your...an indentation in the white foam packing material. 1-6 Setting Up the Printer You should never need only do the following: l Install the platen knob l Install the ribbon cartridge l Attach the paper guide. Assembling the Printer To assemble the printer, you need to install the platen knob. Accidental disruption of cordless ...
... to direct sunlight, excessive heat, moisture, or dust. Installing the platen knob The first step in setting up the printer is turned off before using electrical outlets that might disturb the power supply. However, in both your computer's memory and your...an indentation in the white foam packing material. 1-6 Setting Up the Printer You should never need only do the following: l Install the platen knob l Install the ribbon cartridge l Attach the paper guide. Assembling the Printer To assemble the printer, you need to install the platen knob. Accidental disruption of cordless ...

User Manual
Page 16
Caution: Never move the print head while the printer is turned on because this can damage the printer. Remove the ribbon cartridge from its box and remove the plastic wrapper. 1-8 Setting Up the Printer Installing the ribbon cartridge Follow these steps to the middle of the printer. Also, if you have been using the printer, the print head may be hot; let it cool for a few minutes before touching it. 2. Slide the print head to install the ribbon cartridge: 1.
Caution: Never move the print head while the printer is turned on because this can damage the printer. Remove the ribbon cartridge from its box and remove the plastic wrapper. 1-8 Setting Up the Printer Installing the ribbon cartridge Follow these steps to the middle of the printer. Also, if you have been using the printer, the print head may be hot; let it cool for a few minutes before touching it. 2. Slide the print head to install the ribbon cartridge: 1.

User Manual
Page 17
Hold the ribbon cartridge by its handles and push it easier to be sure the hooks are properly inserted. Setting Up the Printer 1-9 Turn the ribbon-tightening knob in the center of the ribbon cartridge.) Press lightly on both sides of the arrow. 3. This removes any excess slack in the ribbon and makes it firmly down into position, making sure the plastic hooks fit into the printer. (The FX-850 has only one handle in the direction of the cartridge to install. 4.
Hold the ribbon cartridge by its handles and push it easier to be sure the hooks are properly inserted. Setting Up the Printer 1-9 Turn the ribbon-tightening knob in the center of the ribbon cartridge.) Press lightly on both sides of the arrow. 3. This removes any excess slack in the ribbon and makes it firmly down into position, making sure the plastic hooks fit into the printer. (The FX-850 has only one handle in the direction of the cartridge to install. 4.

User Manual
Page 18
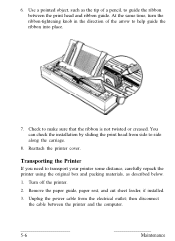
Slide the print head from side to side to help feed the ribbon into place. 6. Use a pointed object, such as the tip of a pencil, to guide the ribbon between the print head and ribbon guide while you turn the ribbontightening knob to make sure the ribbon is not twisted or creased. 1-10 Setting: Up the Printer 5. Also make sure it moves smoothly.
Slide the print head from side to side to help feed the ribbon into place. 6. Use a pointed object, such as the tip of a pencil, to guide the ribbon between the print head and ribbon guide while you turn the ribbontightening knob to make sure the ribbon is not twisted or creased. 1-10 Setting: Up the Printer 5. Also make sure it moves smoothly.

User Manual
Page 74
... to use the software. The quickest and easiest way to print graphics on your monitor and then give a command to send the image to the printer. With such programs you need to use a commercial graphics program. The print head has nine pins. If, on . Using Software and Graphics 4-9 As..., numbers, or symbols. Each time a pin fires, it strikes the inked ribbon and presses it against the paper to understand how the FX prints graphics, read on the other hand, you need to know about how the FX's print head works. If you use commercial software that produces graphics, all you...
... to use the software. The quickest and easiest way to print graphics on your monitor and then give a command to send the image to the printer. With such programs you need to use a commercial graphics program. The print head has nine pins. If, on . Using Software and Graphics 4-9 As..., numbers, or symbols. Each time a pin fires, it strikes the inked ribbon and presses it against the paper to understand how the FX prints graphics, read on the other hand, you need to know about how the FX's print head works. If you use commercial software that produces graphics, all you...

User Manual
Page 92
Chapter 5 Maintenance Cleaning the Printer 5-2 Replacing the Ribbon 5-3 Transporting the Printer 5-6 Maintenance 5-1
Chapter 5 Maintenance Cleaning the Printer 5-2 Replacing the Ribbon 5-3 Transporting the Printer 5-6 Maintenance 5-1
User Manual
Page 94
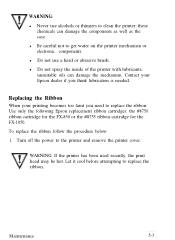
... not to replace the ribbon. Use only the following Epson replacement ribbon cartridges: the #8750 ribbon cartridge for the FX-850 or the #8755 ribbon cartridge for the FX-1050. WARNING: If the printer has been used recently, the print head may be hot. l Do not use alcohols or thinners to the printer and remove the printer cover. unsuitable oils can...
... not to replace the ribbon. Use only the following Epson replacement ribbon cartridges: the #8750 ribbon cartridge for the FX-850 or the #8755 ribbon cartridge for the FX-1050. WARNING: If the printer has been used recently, the print head may be hot. l Do not use alcohols or thinners to the printer and remove the printer cover. unsuitable oils can...

User Manual
Page 95
Slide the print head to the middle of the printer. 3. Remove the old ribbon cartridge by grasping the black fin-like handles (two on the FX-1050, and one on the FX-850) and lifting the cartridge straight up and out of the printer. 5-4 Maintenance 2.
Slide the print head to the middle of the printer. 3. Remove the old ribbon cartridge by grasping the black fin-like handles (two on the FX-1050, and one on the FX-850) and lifting the cartridge straight up and out of the printer. 5-4 Maintenance 2.

User Manual
Page 96
Unwrap the new ribbon, and turn the ribbon-tightening knob in the direction of the arrow to remove excess slack. 5. Maintenance 5-5 4. Hold the new ribbon cartridge by the fin-like handle(s), and firmly insert it into place, making sure that the plastic hooks fit into the slots as shown below.
Unwrap the new ribbon, and turn the ribbon-tightening knob in the direction of the arrow to remove excess slack. 5. Maintenance 5-5 4. Hold the new ribbon cartridge by the fin-like handle(s), and firmly insert it into place, making sure that the plastic hooks fit into the slots as shown below.
User Manual
Page 97
..., and cut sheet feeder, if installed. 3. Check to guide the ribbon between the printer and the computer. 5-6 Maintenance Turn off the printer. 2. Use a pointed object, such as described below. 1. Transporting the Printer If you need to transport your printer some distance, carefully repack the printer using the original box and packing materials, as the tip of...
..., and cut sheet feeder, if installed. 3. Check to guide the ribbon between the printer and the computer. 5-6 Maintenance Turn off the printer. 2. Use a pointed object, such as described below. 1. Transporting the Printer If you need to transport your printer some distance, carefully repack the printer using the original box and packing materials, as the tip of...
User Manual
Page 98
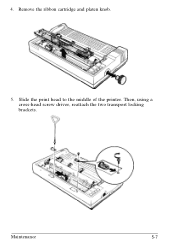
Remove the ribbon cartridge and platen knob. 5. Slide the print head to the middle of the printer. 4. Maintenance 5-7 Then, using a cross-head screw driver, reattach the two transport locking brackets.
Remove the ribbon cartridge and platen knob. 5. Slide the print head to the middle of the printer. 4. Maintenance 5-7 Then, using a cross-head screw driver, reattach the two transport locking brackets.
User Manual
Page 101
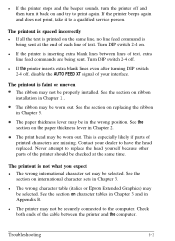
... you may be jammed. If the self test does not work, contact your Epson dealer. At the back of communication problems between the printer and the computer. See the section on replacing the ribbon in and that the electrical outlet is on the data dump mode. This mode...on , check to the computer. l Be sure the printer is connected securely to see that the printer is fully plugged in Chapter 5. 6-2 Troubleshooting Check both ends of paper. The printer stops printing l The printer may be out of the cable between the printer and the computer. l The ribbon may be jammed.
... you may be jammed. If the self test does not work, contact your Epson dealer. At the back of communication problems between the printer and the computer. See the section on replacing the ribbon in and that the electrical outlet is on the data dump mode. This mode...on , check to the computer. l Be sure the printer is connected securely to see that the printer is fully plugged in Chapter 5. 6-2 Troubleshooting Check both ends of paper. The printer stops printing l The printer may be out of the cable between the printer and the computer. l The ribbon may be jammed.
User Manual
Page 102
... lever in Chapter 3. Turn DIP switch 2-4 on replacing the ribbon in Chapter 1. See the section on . l The printer may be worn out. l If the printer is inserting extra blank lines between the printer and the computer. l If the printer inserts extra blank lines even after turning DIP switch 2-4 off ...person. The paper thickness lever may be securely connected to print again. Contact your interface. l The wrong character table (italics or Epson Extended Graphics) may not be checked at the end of each line of text, extra line feed commands are missing. See the section...
... lever in Chapter 3. Turn DIP switch 2-4 on replacing the ribbon in Chapter 1. See the section on . l The printer may be worn out. l If the printer is inserting extra blank lines between the printer and the computer. l If the printer inserts extra blank lines even after turning DIP switch 2-4 off ...person. The paper thickness lever may be securely connected to print again. Contact your interface. l The wrong character table (italics or Epson Extended Graphics) may not be checked at the end of each line of text, extra line feed commands are missing. See the section...

User Manual
Page 129
Remove the printer cover, paper guide, ribbon cartridge, and any installed options. 3. WARNING: High voltage is present inside the front center of the components can be destroyed by static electricity built up in your body. 2. Also, do not touch contacts on . Remove the screw located inside the printer when the power is unplugged... to the single sheet position. 4. Remove the platen knob and push the paper release lever back to remove the upper case unless the printer is turned off and the power cord is on the printer's circuit board because many of the upper case. 7-24 Using...
Remove the printer cover, paper guide, ribbon cartridge, and any installed options. 3. WARNING: High voltage is present inside the front center of the components can be destroyed by static electricity built up in your body. 2. Also, do not touch contacts on . Remove the screw located inside the printer when the power is unplugged... to the single sheet position. 4. Remove the platen knob and push the paper release lever back to remove the upper case unless the printer is turned off and the power cord is on the printer's circuit board because many of the upper case. 7-24 Using...


