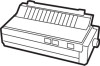
Technical Brief (Impact Printers)
Page 2
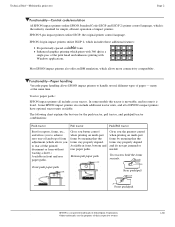
... Push/Pull tractor Best for simple, efficient operation of the print head and enhances printing with Windows applications. Bottom pull paper path Gives you to handle several different types of EPSON's impact printers have optional tractor units available. LL Functionality-Paper handling Versatile paper handling allows EPSON impact printers to tear off and top of form adjustment (which allows...
... Push/Pull tractor Best for simple, efficient operation of the print head and enhances printing with Windows applications. Bottom pull paper path Gives you to handle several different types of EPSON's impact printers have optional tractor units available. LL Functionality-Paper handling Versatile paper handling allows EPSON impact printers to tear off and top of form adjustment (which allows...

Technical Brief (Impact Printers)
Page 6
... carriage reduces the wear and tear on the print head EPSON Sales Training EPSON is a registered trademark of Seiko Epson Corporation. 1/00 Other trademarks are the property of the print head = First Character = 2,000,000 th Character vs. Technical Brief-Multimedia projectors Page 6 Reliability-Ribbon quality EPSON brand impact printer ribbons are ... EPSON's stationary ribbon cartridge offers the following benefits: L L The...
... carriage reduces the wear and tear on the print head EPSON Sales Training EPSON is a registered trademark of Seiko Epson Corporation. 1/00 Other trademarks are the property of the print head = First Character = 2,000,000 th Character vs. Technical Brief-Multimedia projectors Page 6 Reliability-Ribbon quality EPSON brand impact printer ribbons are ... EPSON's stationary ribbon cartridge offers the following benefits: L L The...
Technical Brief (Impact Printers)
Page 7
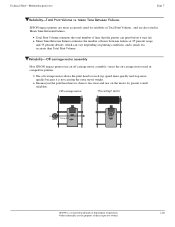
...depending on -carriage motor used in Total Print Volume, and are more quickly because it may fail. LL Reliability-Off-carriage motor assembly Most EPSON impact printers use an off -carriage motor allows the print head to reach top speed more quickly and stop... more accurately rated for greater overall reliability. Technical Brief-Multimedia projectors Page 7 Reliability-Total Print Volume vs. Off-carriage motor On-...
...depending on -carriage motor used in Total Print Volume, and are more quickly because it may fail. LL Reliability-Off-carriage motor assembly Most EPSON impact printers use an off -carriage motor allows the print head to reach top speed more quickly and stop... more accurately rated for greater overall reliability. Technical Brief-Multimedia projectors Page 7 Reliability-Total Print Volume vs. Off-carriage motor On-...
Product Information Guide
Page 1
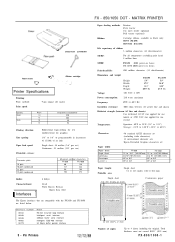
... parallel interface 9 - Pin Printers FX - 850/1050 DOT - Total thickness must not exceed 0.012" (0.32 mm) FX-850/1050-1 Depth: Weight: 120 VAC ± 10% FX-850 5.9" 17.9" 14.2" 20.9 lbs FX-1050 5.9" 24.8" 14.2" 27.5 lbs Power consumption: 120 watts maximum Frequency: 49.5 to 4 sheets including the original. Y .: f Ribbon cartridge Printer Specifications Printing Print method: Print speed: 9-pin impact dot matrix Quality...
... parallel interface 9 - Pin Printers FX - 850/1050 DOT - Total thickness must not exceed 0.012" (0.32 mm) FX-850/1050-1 Depth: Weight: 120 VAC ± 10% FX-850 5.9" 17.9" 14.2" 20.9 lbs FX-1050 5.9" 24.8" 14.2" 27.5 lbs Power consumption: 120 watts maximum Frequency: 49.5 to 4 sheets including the original. Y .: f Ribbon cartridge Printer Specifications Printing Print method: Print speed: 9-pin impact dot matrix Quality...

User Manual
Page 11
Setting Up the Printer 1-3 After removing these items, store them with the other packaging material. 1 Remove the printer cover. 2. Remove the print head protector. Removing the protective materials The printer is protected during shipping by two locking tabs and a print head protector. These protective items must be removed before you turn on the printer.
Setting Up the Printer 1-3 After removing these items, store them with the other packaging material. 1 Remove the printer cover. 2. Remove the print head protector. Removing the protective materials The printer is protected during shipping by two locking tabs and a print head protector. These protective items must be removed before you turn on the printer.
User Manual
Page 12
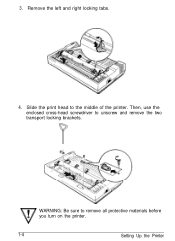
WARNING: Be sure to the middle of the printer. 3. Slide the print head to remove all protective materials before you turn on the printer. 1-4 Setting Up the Printer Then, use the enclosed cross-head screwdriver to unscrew and remove the two transport locking brackets. Remove the left and right locking tabs. 4.
WARNING: Be sure to the middle of the printer. 3. Slide the print head to remove all protective materials before you turn on the printer. 1-4 Setting Up the Printer Then, use the enclosed cross-head screwdriver to unscrew and remove the two transport locking brackets. Remove the left and right locking tabs. 4.

User Manual
Page 16
Slide the print head to install the ribbon cartridge: 1. Caution: Never move the print head while the printer is turned on because this can damage the printer. Also, if you have been using the printer, the print head may be hot; let it cool for a few minutes before touching it. 2. Remove the ribbon cartridge from its box and remove the plastic wrapper. 1-8 Setting Up the Printer Installing the ribbon cartridge Follow these steps to the middle of the printer.
Slide the print head to install the ribbon cartridge: 1. Caution: Never move the print head while the printer is turned on because this can damage the printer. Also, if you have been using the printer, the print head may be hot; let it cool for a few minutes before touching it. 2. Remove the ribbon cartridge from its box and remove the plastic wrapper. 1-8 Setting Up the Printer Installing the ribbon cartridge Follow these steps to the middle of the printer.

User Manual
Page 18
Also make sure it moves smoothly. Slide the print head from side to side to help feed the ribbon into place. 6. Use a pointed object, such as the tip of a pencil, to guide the ribbon between the print head and ribbon guide while you turn the ribbontightening knob to make sure the ribbon is not twisted or creased. 1-10 Setting: Up the Printer 5.
Also make sure it moves smoothly. Slide the print head from side to side to help feed the ribbon into place. 6. Use a pointed object, such as the tip of a pencil, to guide the ribbon between the print head and ribbon guide while you turn the ribbontightening knob to make sure the ribbon is not twisted or creased. 1-10 Setting: Up the Printer 5.
User Manual
Page 21
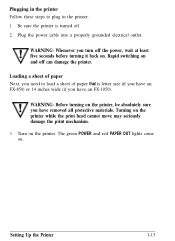
... Whenever you have an FX-1050). WARNING: Before turning on the printer, be absolutely sure you turn off the power, wait at least five seconds before turning it back on. Rapid switching on the printer. Turn on and off . 2. Setting Up the Printer 1-13 Plugging in the printer Follow these steps to ...and red PAPER OUT lights come on the printer while the print head cannot move may seriously damage the print mechanism. 1. Turning on . Plug the power cable into a properly grounded electrical outlet. Be sure the printer is letter size (if you have an FX-850) or 14 inches wide (if you...
... Whenever you have an FX-1050). WARNING: Before turning on the printer, be absolutely sure you turn off the power, wait at least five seconds before turning it back on. Rapid switching on the printer. Turn on and off . 2. Setting Up the Printer 1-13 Plugging in the printer Follow these steps to ...and red PAPER OUT lights come on the printer while the print head cannot move may seriously damage the print mechanism. 1. Turning on . Plug the power cable into a properly grounded electrical outlet. Be sure the printer is letter size (if you have an FX-850) or 14 inches wide (if you...
User Manual
Page 24
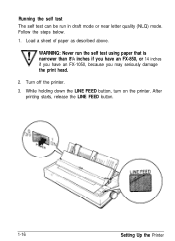
Load a sheet of paper as described above. WARNING: Never run in draft mode or near letter quality (NLQ) mode. Follow the steps below. 1. After printing starts, release the LINE FEED button. 1-16 Setting Up the Printer While holding down the LINE FEED button, turn on the printer. Turn off the printer. 3. Running the self test The self test can be run the self test using paper that is narrower than 8¼ inches if you have an FX-850, or 14 inches if you have an FX-1050, because you may seriously damage the print head. 2.
Load a sheet of paper as described above. WARNING: Never run in draft mode or near letter quality (NLQ) mode. Follow the steps below. 1. After printing starts, release the LINE FEED button. 1-16 Setting Up the Printer While holding down the LINE FEED button, turn on the printer. Turn off the printer. 3. Running the self test The self test can be run the self test using paper that is narrower than 8¼ inches if you have an FX-850, or 14 inches if you have an FX-1050, because you may seriously damage the print head. 2.

User Manual
Page 45
... To accommodate various thicknesses of paper, the FX printer is equipped with the optional cut sheet feeder. WARNING: If you are identified by a scale on the printer frame next to adjust the paper thickness setting. When you move the paper release lever to touch the print head because it may be careful not to the...
... To accommodate various thicknesses of paper, the FX printer is equipped with the optional cut sheet feeder. WARNING: If you are identified by a scale on the printer frame next to adjust the paper thickness setting. When you move the paper release lever to touch the print head because it may be careful not to the...

User Manual
Page 46
...of the paper. See page 2-20 and Appendix A for selecting the right paper thickness lever position to printing on anything thicker than 2 can damage the print head. It gives you general guidelines for more than four parts including the original. forms, labels, or ...thick paper can shorten the life of paper, see the table below. Note: Multi-part forms should have no more about the printable area of envelopes, multi-part 717. Multi-part forms Your printer...
...of the paper. See page 2-20 and Appendix A for selecting the right paper thickness lever position to printing on anything thicker than 2 can damage the print head. It gives you general guidelines for more than four parts including the original. forms, labels, or ...thick paper can shorten the life of paper, see the table below. Note: Multi-part forms should have no more about the printable area of envelopes, multi-part 717. Multi-part forms Your printer...

User Manual
Page 62
... right of text. This is the same as the print head moves across the paper, with the second printed slightly to obtain even more fully formed characters. 3-14 Using the Printer Another mode for large amounts of the first. Because of doublehigh printing. In emphasized mode, the FX prints each character twice as a fivespace margin using double...
... right of text. This is the same as the print head moves across the paper, with the second printed slightly to obtain even more fully formed characters. 3-14 Using the Printer Another mode for large amounts of the first. Because of doublehigh printing. In emphasized mode, the FX prints each character twice as a fivespace margin using double...

User Manual
Page 66
Chapter 4 Using Software and Graphics Using the FX with Application Programs 4-2 Using printer selection menus 4-2 A quick test 4- 3 Using word processors 4-3 Using spreadsheets 4-3 Using graphics software 4-5 Computer-Printer Communication 4-5 Escape sequences 4-6 Printer commands 4-6 Using the Command Summary 4-7 Sending printer commands from within your software program 4-7 Dot Graphics 4-8 The print head 4-9 Pinlabels 4-10 Graphics commands 4-11 Graphics programming 4-12 User-Defined Characters 4-19 Defining your own characters 4-20 Using Software and Graphics 4-1
Chapter 4 Using Software and Graphics Using the FX with Application Programs 4-2 Using printer selection menus 4-2 A quick test 4- 3 Using word processors 4-3 Using spreadsheets 4-3 Using graphics software 4-5 Computer-Printer Communication 4-5 Escape sequences 4-6 Printer commands 4-6 Using the Command Summary 4-7 Sending printer commands from within your software program 4-7 Dot Graphics 4-8 The print head 4-9 Pinlabels 4-10 Graphics commands 4-11 Graphics programming 4-12 User-Defined Characters 4-19 Defining your own characters 4-20 Using Software and Graphics 4-1

User Manual
Page 74
... and presses it against the paper to the printer. As the head moves across the page, electrical impulses cause the pins to fire. The print head To understand dot graphics you wish to do your printer is how to use commercial software that produces ...print head moves across the paper, the pins fire time after time in different patterns to produce letters, numbers, or symbols. The quickest and easiest way to print graphics on your own programming or merely wish to understand how the FX prints graphics, read on. With such programs you need to know about how the FX's print head...
... and presses it against the paper to the printer. As the head moves across the page, electrical impulses cause the pins to fire. The print head To understand dot graphics you wish to do your printer is how to use commercial software that produces ...print head moves across the paper, the pins fire time after time in different patterns to produce letters, numbers, or symbols. The quickest and easiest way to print graphics on your own programming or merely wish to understand how the FX prints graphics, read on. With such programs you need to know about how the FX's print head...

User Manual
Page 75
... spacing must send codes for dot patterns, one pass. In fact, you can print finely detailed graphic images made up of the 256 possible patterns you want. The FX also forms its main graphics mode the FX prints one column of dots for each column. With a change in line spacing, the...page or even an entire line with text. The print head is made up of this section. Each pass of the print head prints one line, then advances the paper and prints another, just as the ones at 4-10 Using Software and Graphics The printer prints one piece of dots you have to text because ...
... spacing must send codes for dot patterns, one pass. In fact, you can print finely detailed graphic images made up of the 256 possible patterns you want. The FX also forms its main graphics mode the FX prints one column of dots for each column. With a change in line spacing, the...page or even an entire line with text. The print head is made up of this section. Each pass of the print head prints one line, then advances the paper and prints another, just as the ones at 4-10 Using Software and Graphics The printer prints one piece of dots you have to text because ...

User Manual
Page 80
... all nine pins. This command is not necessary for any of the eight-pin graphics modes: ESC *. The four most uses, but you must be printed in .) 1 I 60 120 I none 4 Plotter (1:1) none 5 CRT II none 6 Double-density plotter none 7 *Adjacent dots cannot be issued before n1...Chapter 8. In two modes, high-speed double-density and quadruple-density, the print head cannot print two consecutive dots with the same pin, so it Using Software and Graphics 4-15 There is to reset the printer to give the proportions of graphics, the graphics command must send the code ...
... all nine pins. This command is not necessary for any of the eight-pin graphics modes: ESC *. The four most uses, but you must be printed in .) 1 I 60 120 I none 4 Plotter (1:1) none 5 CRT II none 6 Double-density plotter none 7 *Adjacent dots cannot be issued before n1...Chapter 8. In two modes, high-speed double-density and quadruple-density, the print head cannot print two consecutive dots with the same pin, so it Using Software and Graphics 4-15 There is to reset the printer to give the proportions of graphics, the graphics command must send the code ...
User Manual
Page 94
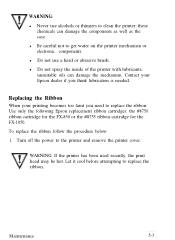
...print head may be hot. Maintenance 5-3 l Do not spray the inside of the printer with lubricants; Replacing the Ribbon When your Epson dealer if you need to replace the ribbon. WARNING: l Never use a hard or abrasive brush. Use only the following Epson replacement ribbon cartridges: the #8750 ribbon cartridge for the FX...-850 or the #8755 ribbon cartridge for the FX-1050. Turn off the power to get water on the printer mechanism or electronic components. l Do not ...
...print head may be hot. Maintenance 5-3 l Do not spray the inside of the printer with lubricants; Replacing the Ribbon When your Epson dealer if you need to replace the ribbon. WARNING: l Never use a hard or abrasive brush. Use only the following Epson replacement ribbon cartridges: the #8750 ribbon cartridge for the FX...-850 or the #8755 ribbon cartridge for the FX-1050. Turn off the power to get water on the printer mechanism or electronic components. l Do not ...

User Manual
Page 95
Slide the print head to the middle of the printer. 3. Remove the old ribbon cartridge by grasping the black fin-like handles (two on the FX-1050, and one on the FX-850) and lifting the cartridge straight up and out of the printer. 5-4 Maintenance 2.
Slide the print head to the middle of the printer. 3. Remove the old ribbon cartridge by grasping the black fin-like handles (two on the FX-1050, and one on the FX-850) and lifting the cartridge straight up and out of the printer. 5-4 Maintenance 2.
User Manual
Page 97
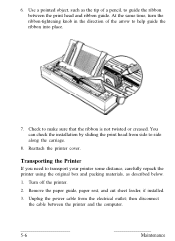
then disconnect the cable between the print head and ribbon guide. Remove the paper guide, paper rest, and cut sheet feeder, if installed. 3. At the same time, turn the ribbon-tightening knob in ... sure that the ribbon is not twisted or creased. You can check the installation by sliding the print head from the electrical outlet; Transporting the Printer If you need to transport your printer some distance, carefully repack the printer using the original box and packing materials, as the tip of the arrow to side along...
then disconnect the cable between the print head and ribbon guide. Remove the paper guide, paper rest, and cut sheet feeder, if installed. 3. At the same time, turn the ribbon-tightening knob in ... sure that the ribbon is not twisted or creased. You can check the installation by sliding the print head from the electrical outlet; Transporting the Printer If you need to transport your printer some distance, carefully repack the printer using the original box and packing materials, as the tip of the arrow to side along...


