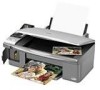
Product Information Guide
Page 2
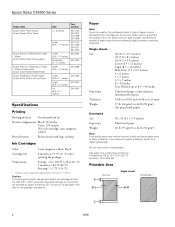
... with logic seeking Ink Cartridges Color Cyan, magenta, yellow, black Cartridge life 6 months at 77 °F (25 °C) after opening the package Temperature Storage: -4 to 104 °F (-20 to 40 °C) 1 month at 104 °F (40 °C) Freezing*: 3.2 °F (-16 °C) * Ink thaws and is usable after approximately 3 hours at any time, Epson cannot guarantee the...
... with logic seeking Ink Cartridges Color Cyan, magenta, yellow, black Cartridge life 6 months at 77 °F (25 °C) after opening the package Temperature Storage: -4 to 104 °F (-20 to 40 °C) 1 month at 104 °F (40 °C) Freezing*: 3.2 °F (-16 °C) * Ink thaws and is usable after approximately 3 hours at any time, Epson cannot guarantee the...
Product Information Guide
Page 3
...pixels Document size Scanning resolution Output resolution Scanning speed Image data Interface Light source Flatbed color CIS 10,200 × 14,040 pixels at 1200 dpi 216 × 297...envelopes. Before printing large jobs using the borderless setting, print a single sheet to 85% RH (without the ink cartridges Electrical Input voltage Rated frequency Rated current Power consumption 90 to 132 V 50 to 60 Hz 0.4 A (0.7 ... side down. D The minimum bottom margin is 0.78" (20 mm) for envelopes. Epson Stylus CX6000 Series * When printing with Micro Step (sub scan) 48 bits (input) 24 bits ...
...pixels Document size Scanning resolution Output resolution Scanning speed Image data Interface Light source Flatbed color CIS 10,200 × 14,040 pixels at 1200 dpi 216 × 297...envelopes. Before printing large jobs using the borderless setting, print a single sheet to 85% RH (without the ink cartridges Electrical Input voltage Rated frequency Rated current Power consumption 90 to 132 V 50 to 60 Hz 0.4 A (0.7 ... side down. D The minimum bottom margin is 0.78" (20 mm) for envelopes. Epson Stylus CX6000 Series * When printing with Micro Step (sub scan) 48 bits (input) 24 bits ...
Product Information Guide
Page 13
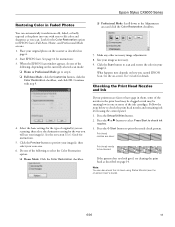
...Mode: go to be running low in one of the ink cartridges. What happens next depends on -screen User's Guide for the way you scan. Note: You can automatically transform an old, faded, or badly exposed color photo into one of the following , depending on the scanner...5. Place your scan area. 6. Do one with step 9. 4. Press the Setup/Utilities button. 2. Look for details. Start EPSON Scan. Epson Stylus CX6000 Series Restoring Color in Faded Photos You can also check the ink level using the control panel. 1. See the on page 14. Press the x Start button to check...
...Mode: go to be running low in one of the ink cartridges. What happens next depends on -screen User's Guide for the way you scan. Note: You can automatically transform an old, faded, or badly exposed color photo into one of the following , depending on the scanner...5. Place your scan area. 6. Do one with step 9. 4. Press the Setup/Utilities button. 2. Look for details. Start EPSON Scan. Epson Stylus CX6000 Series Restoring Color in Faded Photos You can also check the ink level using the control panel. 1. See the on page 14. Press the x Start button to check...
Product Information Guide
Page 14
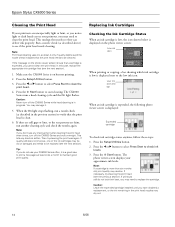
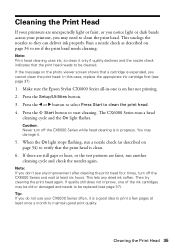
... the Setup/Utilities button. 3. Replacing Ink Cartridges Checking the Ink Cartridge Status When an ink cartridge is low, the icon shown below is displayed on the photo viewer screen: Low ink icon When printing or copying, a bar showing which ink cartridge is low is displayed: Expended cartridge To check ink cartridge status anytime, follow these steps: 1. Epson Stylus CX6000 Series Cleaning the Print Head If...
... the Setup/Utilities button. 3. Replacing Ink Cartridges Checking the Ink Cartridge Status When an ink cartridge is low, the icon shown below is displayed on the photo viewer screen: Low ink icon When printing or copying, a bar showing which ink cartridge is low is displayed: Expended cartridge To check ink cartridge status anytime, follow these steps: 1. Epson Stylus CX6000 Series Cleaning the Print Head If...
Product Information Guide
Page 15
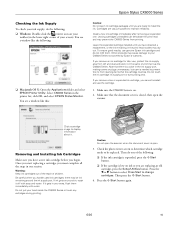
...: ❏ If the ink cartridge is expended, press the x Start button. ❏ If the cartridge is needed to your CX6000 Series not covered by Epson's warranty. Select CX6000 Series in one . Cartridges are replacing an old cartridge, press the Setup/Utilities button. Click a cartridge image to install the ink. Epson Stylus CX6000 Series Checking the Ink Supply To check your ink supply, do the following...
...: ❏ If the ink cartridge is expended, press the x Start button. ❏ If the cartridge is needed to your CX6000 Series not covered by Epson's warranty. Select CX6000 Series in one . Cartridges are replacing an old cartridge, press the Setup/Utilities button. Click a cartridge image to install the ink. Epson Stylus CX6000 Series Checking the Ink Supply To check your ink supply, do the following...
Product Information Guide
Page 16
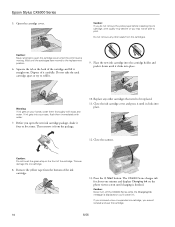
... it four or five times. If you removed a low or expended ink cartridge, you 'll waste ink. Epson Stylus CX6000 Series 5. Caution: Never attempt to open the new ink cartridge package, shake it straight out. Dispose of the cartridge. Before you may not be replaced. 11. Close the ink cartridge cover and press it until it carefully. Close the scanner. The...
... it four or five times. If you removed a low or expended ink cartridge, you 'll waste ink. Epson Stylus CX6000 Series 5. Caution: Never attempt to open the new ink cartridge package, shake it straight out. Dispose of the cartridge. Before you may not be replaced. 11. Close the ink cartridge cover and press it until it carefully. Close the scanner. The...
Product Information Guide
Page 17
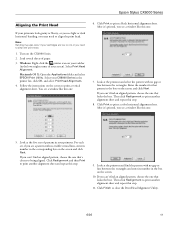
...then Print to print another alignment sheet and repeat this one that pattern in the box on ink or you may need to clean the print head. 1. Look at the printout and select ...its number in the lower right corner of paper. 3. Note: Banding may also occur if your cartridges are low on the screen and click Next. Click Print to close the Print Head Alignment Utility...in the box on the screen to print a color horizontal alignment sheet. If you see a pattern with no gap or line between the rectangles. Epson Stylus CX6000 Series Aligning the Print Head If your printouts look ...
...then Print to print another alignment sheet and repeat this one that pattern in the box on ink or you may need to clean the print head. 1. Look at the printout and select ...its number in the lower right corner of paper. 3. Note: Banding may also occur if your cartridges are low on the screen and click Next. Click Print to close the Print Head Alignment Utility...in the box on the screen to print a color horizontal alignment sheet. If you see a pattern with no gap or line between the rectangles. Epson Stylus CX6000 Series Aligning the Print Head If your printouts look ...
Product Information Guide
Page 18
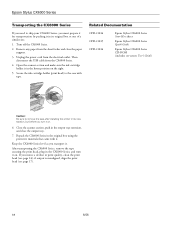
...Epson Stylus CX6000 Series Start Here sheet Epson Stylus CX6000 Series Quick Guide Epson Stylus CX6000 Series CD-ROM (includes on-screen User's Guide) Caution: Be sure to remove the tape after installing the printer in its original box or one of a similar size. 1. Open the scanner section and make sure the ink cartridge... holder is misaligned, align the print head (see page 14); Close the scanner section, push in the output tray extension, and close the paper support. 3. After transporting the CX6000 Series, remove the tape securing the...
...Epson Stylus CX6000 Series Start Here sheet Epson Stylus CX6000 Series Quick Guide Epson Stylus CX6000 Series CD-ROM (includes on-screen User's Guide) Caution: Be sure to remove the tape after installing the printer in its original box or one of a similar size. 1. Open the scanner section and make sure the ink cartridge... holder is misaligned, align the print head (see page 14); Close the scanner section, push in the output tray extension, and close the paper support. 3. After transporting the CX6000 Series, remove the tape securing the...
Quick Reference Guide
Page 25
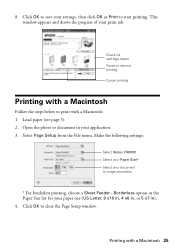
Select Page Setup from the File menu. Printing with a Macintosh: 1. Click OK to start printing. Make the following settings: Select Stylus CX6000 Select your Paper Size* Select your settings, then click OK or Print to save your document or image orientation * For borderless printing, choose ... in your paper size (US Letter, 8 x10 in, 4 x6 in, or 5 x7 in the Paper Size list for your application. 3. Check ink cartridge status Pause or resume printing Cancel printing Printing with a Macintosh Follow the steps below to close the Page Setup window. Click OK to print with...
Select Page Setup from the File menu. Printing with a Macintosh: 1. Click OK to start printing. Make the following settings: Select Stylus CX6000 Select your Paper Size* Select your settings, then click OK or Print to save your document or image orientation * For borderless printing, choose ... in your paper size (US Letter, 8 x10 in, 4 x6 in, or 5 x7 in the Paper Size list for your application. 3. Check ink cartridge status Pause or resume printing Cancel printing Printing with a Macintosh Follow the steps below to close the Page Setup window. Click OK to print with...
Quick Reference Guide
Page 35
... patterns are unexpectedly light or faint, or you notice light or dark bands across your printout, you cannot clean the print head. Make sure the Epson Stylus CX6000 Series all-in progress. Tip: If you don't see page 37). Press the l or r button to select Press Start to start cleaning. ...a nozzle check as described on page 34) to verify that the print head is in -one of the ink cartridges may need to clean the print head. Caution: Never turn off the CX6000 Series while head cleaning is clean. 6. When the On light stops flashing, run another cleaning cycle and check ...
... patterns are unexpectedly light or faint, or you notice light or dark bands across your printout, you cannot clean the print head. Make sure the Epson Stylus CX6000 Series all-in progress. Tip: If you don't see page 37). Press the l or r button to select Press Start to start cleaning. ...a nozzle check as described on page 34) to verify that the print head is in -one of the ink cartridges may need to clean the print head. Caution: Never turn off the CX6000 Series while head cleaning is clean. 6. When the On light stops flashing, run another cleaning cycle and check ...
Quick Reference Guide
Page 37
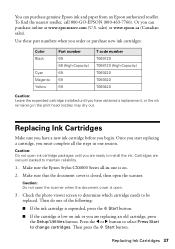
... new ink cartridges: Color Black Cyan Magenta Yellow Part number 69 68 (High-Capacity) 69 69 69 T code number T069120 T068120 (High-Capacity) T069220 T069320 T069420 Caution: Leave the expended cartridge installed until you are ready to maintain reliability. 1. Make sure the Epson Stylus CX6000 Series ...all the steps in one session. Make sure that the document cover is open. 3. Check the photo viewer screen to determine which cartridge needs to change cartridges. Press the l or r button to select ...
... new ink cartridges: Color Black Cyan Magenta Yellow Part number 69 68 (High-Capacity) 69 69 69 T code number T069120 T068120 (High-Capacity) T069220 T069320 T069420 Caution: Leave the expended cartridge installed until you are ready to maintain reliability. 1. Make sure the Epson Stylus CX6000 Series ...all the steps in one session. Make sure that the document cover is open. 3. Check the photo viewer screen to determine which cartridge needs to change cartridges. Press the l or r button to select ...

Quick Reference Guide
Page 42
... ■ "Where To Get Help" on page 46 Error Indicators Screen display Cause No paper is running low on ink ( or appears on your Epson Stylus CX6000 Series all-in the sheet feeder. An ink cartridge is loaded in the sheet feeder. You can also check "Problems and Solutions" on page 44 for more detailed help...
... ■ "Where To Get Help" on page 46 Error Indicators Screen display Cause No paper is running low on ink ( or appears on your Epson Stylus CX6000 Series all-in the sheet feeder. An ink cartridge is loaded in the sheet feeder. You can also check "Problems and Solutions" on page 44 for more detailed help...

Quick Reference Guide
Page 46
... paper thickness lever to align the print head. Run a nozzle check as described on page 34 to see page 37 for instructions on replacing an ink cartridge). ■ If a dotted line appears in back) ■ Proof of purchase (such as described on the label in the image, clean the... support, please have the following information ready: ■ Product name (Epson Stylus CX6000 Series) ■ Product serial number (located on page 35. ■ If you notice jagged vertical lines, you may be old or low on ink (see if the print head needs cleaning. ■ Clean the print head as a store ...
... paper thickness lever to align the print head. Run a nozzle check as described on page 34 to see page 37 for instructions on replacing an ink cartridge). ■ If a dotted line appears in back) ■ Proof of purchase (such as described on the label in the image, clean the... support, please have the following information ready: ■ Product name (Epson Stylus CX6000 Series) ■ Product serial number (located on page 35. ■ If you notice jagged vertical lines, you may be old or low on ink (see if the print head needs cleaning. ■ Clean the print head as a store ...


