
Technical Brief (Ink Jet Printers)
Page 2
... colored "printed dots" because a wider range of tiny droplets can be combined to improve print speed With this technique, Epson printers can produce a number of print head nozzles Page 2 Epson MicroPiezo Technology: Epson Micro Piezo print heads use high-precision mechanical pumps to produce ink droplets, and no heat is ejected through the nozzle. Gradations and blends become smoother as resolution and droplet control are used...
... colored "printed dots" because a wider range of tiny droplets can be combined to improve print speed With this technique, Epson printers can produce a number of print head nozzles Page 2 Epson MicroPiezo Technology: Epson Micro Piezo print heads use high-precision mechanical pumps to produce ink droplets, and no heat is ejected through the nozzle. Gradations and blends become smoother as resolution and droplet control are used...

Technical Brief (Ink Jet Printers)
Page 3
... FAQs on breathtaking large format prints, Epson has the right ink for applying ink droplets to receive Epson inks. Ink Jet Printer Technical Brief Page 3 Whether the customer is most efficient pattern for the job. The Epson printer drivers use a halftoning module that places ink droplets to get sharp black text, superb photo quality photos, or both on the content, selected output quality, and paper type. Epson, Exceed Your Vision, MicroPiezo...
... FAQs on breathtaking large format prints, Epson has the right ink for applying ink droplets to receive Epson inks. Ink Jet Printer Technical Brief Page 3 Whether the customer is most efficient pattern for the job. The Epson printer drivers use a halftoning module that places ink droplets to get sharp black text, superb photo quality photos, or both on the content, selected output quality, and paper type. Epson, Exceed Your Vision, MicroPiezo...
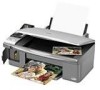
Product Information Guide
Page 2
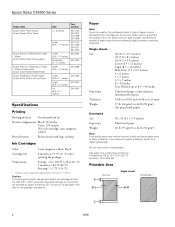
...; 10 inches User Defined up to 8.5 × 44 inches Plain bond paper or special paper distributed by Epson's warranty. Do not load curled or folded paper. Always test a sample of paper stock before purchasing large quantities or printing large jobs. Epson Stylus CX6000 Series Paper name Epson Photo Paper Glossy Epson Glossy Photo Paper Epson Premium Presentation Paper Matte Epson Matte Paper Heavyweight Epson Premium Presentation Paper Matte Double-Sided Epson Double-Sided Matte Paper Epson Presentation Paper Matte Epson Photo Quality Ink Jet Paper Size Part number 4 × 6 inches...
...; 10 inches User Defined up to 8.5 × 44 inches Plain bond paper or special paper distributed by Epson's warranty. Do not load curled or folded paper. Always test a sample of paper stock before purchasing large quantities or printing large jobs. Epson Stylus CX6000 Series Paper name Epson Photo Paper Glossy Epson Glossy Photo Paper Epson Premium Presentation Paper Matte Epson Matte Paper Heavyweight Epson Premium Presentation Paper Matte Double-Sided Epson Double-Sided Matte Paper Epson Presentation Paper Matte Epson Photo Quality Ink Jet Paper Size Part number 4 × 6 inches...
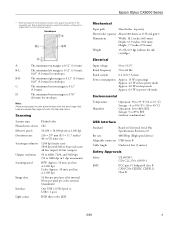
Product Information Guide
Page 3
... sheet feeder with the flap side down. Load envelopes flap edge left margin is 0.12" (3.0 mm); 0.20" (5.0 mm) for envelopes. B-L: The minimum left with the short edge first. D The minimum bottom margin is 0.12" (3.0 mm). B-R: The minimum right margin is 0.12" (3.0 mm). Envelopes A: The minimum top margin is 0.78" (20 mm) for envelopes. Scanning Scanner type Photoelectric device Effective pixels Document size Scanning resolution Output resolution Scanning speed Image data...
... sheet feeder with the flap side down. Load envelopes flap edge left margin is 0.12" (3.0 mm); 0.20" (5.0 mm) for envelopes. B-L: The minimum left with the short edge first. D The minimum bottom margin is 0.12" (3.0 mm). B-R: The minimum right margin is 0.12" (3.0 mm). Envelopes A: The minimum top margin is 0.78" (20 mm) for envelopes. Scanning Scanner type Photoelectric device Effective pixels Document size Scanning resolution Output resolution Scanning speed Image data...
Product Information Guide
Page 5
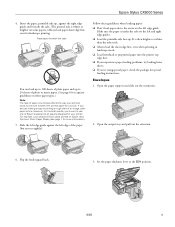
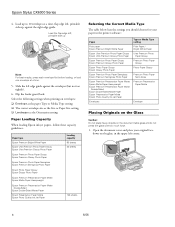
... using special paper, check the package for landscape printing. For example, your job. Follow these guidelines when loading paper: ❏ Don't load paper above the arrow on the left edge guide. Epson Stylus CX6000 Series 4. Insert the paper, printable side up . It's often brighter or whiter than the other paper types.) Note: The type of an image, plain paper is whiter or brighter on Epson Ultra Premium Photo Paper Glossy (see page 1 for your printer. Open the output tray...
... using special paper, check the package for landscape printing. For example, your job. Follow these guidelines when loading paper: ❏ Don't load paper above the arrow on the left edge guide. Epson Stylus CX6000 Series 4. Insert the paper, printable side up . It's often brighter or whiter than the other paper types.) Note: The type of an image, plain paper is whiter or brighter on Epson Ultra Premium Photo Paper Glossy (see page 1 for your printer. Open the output tray...
Product Information Guide
Page 6
... envelope at a time, flap edge left , printable side up , against the envelopes (but not too tightly). 6. Epson Stylus CX6000 Series 4. Slide the left corner. 6 6/06 Select the following settings when printing on envelopes: ❏ Envelope as the paper Type or Media Type setting ❏ The correct envelope size as the Size or Paper Size setting ❏ Landscape as the Orientation setting Paper Loading Capacity When loading Epson ink jet papers, follow these capacity guidelines: Paper type Epson Premium Bright White Paper Epson Ultra Premium Photo Paper Glossy Epson...
... envelope at a time, flap edge left , printable side up , against the envelopes (but not too tightly). 6. Epson Stylus CX6000 Series 4. Slide the left corner. 6 6/06 Select the following settings when printing on envelopes: ❏ Envelope as the paper Type or Media Type setting ❏ The correct envelope size as the Size or Paper Size setting ❏ Landscape as the Orientation setting Paper Loading Capacity When loading Epson ink jet papers, follow these capacity guidelines: Paper type Epson Premium Bright White Paper Epson Ultra Premium Photo Paper Glossy Epson...
Product Information Guide
Page 7
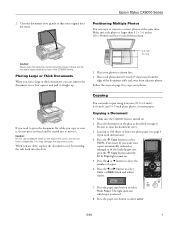
... need instructions). 4. Copying a Document 1. Be sure to select Plain Paper. The light indicates which type is turned on. 2. Make sure each photo about 0.2 inch (5 mm) away from the edge of copies. 6. Place your copies automatically reduced or enlarged to fit the loaded paper size, press the r Copy button until the Fit to move . Place the document on page 6. Press the u or d button to 100 sheets of the CX6000 Series. Press the paper type button to...
... need instructions). 4. Copying a Document 1. Be sure to select Plain Paper. The light indicates which type is turned on. 2. Make sure each photo about 0.2 inch (5 mm) away from the edge of copies. 6. Place your copies automatically reduced or enlarged to fit the loaded paper size, press the r Copy button until the Fit to move . Place the document on page 6. Press the u or d button to 100 sheets of the CX6000 Series. Press the paper type button to...

Product Information Guide
Page 8
... documents or photos, press the Setup/ Utilities button and change the copy quality setting back to select Letter. 10. Press the u or d button to automatically restore the colors in the CX6000 Series, just cancel the operation and close the screen. 2. The On light flashes and after a moment the CX6000 Series starts printing. Make sure the CX6000 Series is turned on . If you want of letter-size, 4 × 6-inch, or 5 × 7-inch photo or matte paper (see page...
... documents or photos, press the Setup/ Utilities button and change the copy quality setting back to select Letter. 10. Press the u or d button to automatically restore the colors in the CX6000 Series, just cancel the operation and close the screen. 2. The On light flashes and after a moment the CX6000 Series starts printing. Make sure the CX6000 Series is turned on . If you want of letter-size, 4 × 6-inch, or 5 × 7-inch photo or matte paper (see page...

Product Information Guide
Page 9
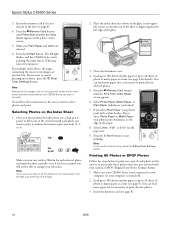
... "thumbnail" images of the slots. Then insert your photos print with a white border. Make sure your memory card on the photo viewer screen and select them (see the next column) ❏ Print all the pictures on the card. Now you can print an index sheet (which photos to remove the card, make sure the memory card access light is turned off ). 2. Make sure your CX6000 Series is not connected to 20 sheets of photo or matte paper at a time (it...
... "thumbnail" images of the slots. Then insert your photos print with a white border. Make sure your memory card on the photo viewer screen and select them (see the next column) ❏ Print all the pictures on the card. Now you can print an index sheet (which photos to remove the card, make sure the memory card access light is turned off ). 2. Make sure your CX6000 Series is not connected to 20 sheets of photo or matte paper at a time (it...
Product Information Guide
Page 10
... DPOF Photos Follow the steps below to print one copy of the sheet is printed completely so the CX6000 Series can scan it correctly. Make sure your camera's DPOF (Digital Print Order Format) feature. 1. Press the C Memory Card button until the Print from Index Sheet screen appears. 6. The On light flashes, and the CX6000 Series starts printing the index sheets. (This may take a few minutes.) For multiple index sheets, the pages containing the most recent images...
... DPOF Photos Follow the steps below to print one copy of the sheet is printed completely so the CX6000 Series can scan it correctly. Make sure your camera's DPOF (Digital Print Order Format) feature. 1. Press the C Memory Card button until the Print from Index Sheet screen appears. 6. The On light flashes, and the CX6000 Series starts printing the index sheets. (This may take a few minutes.) For multiple index sheets, the pages containing the most recent images...
Product Information Guide
Page 12
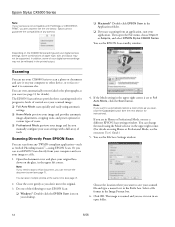
... a different EPSON Scan settings window. In addition, some combinations of paper type, size, and layout may not be supported. You can start EPSON Scan directly from your computer and save it on your computer or other device, or to fax or email it in an open the File menu, choose Import or Acquire, and select EPSON Stylus CX6000 Series. You can use your CX6000 Series to scan a photo or document and save your image to start your application. Close the cover gently...
... a different EPSON Scan settings window. In addition, some combinations of paper type, size, and layout may not be supported. You can start EPSON Scan directly from your computer and save it on your computer or other device, or to fax or email it in an open the File menu, choose Import or Acquire, and select EPSON Stylus CX6000 Series. You can use your CX6000 Series to scan a photo or document and save your image to start your application. Close the cover gently...
Product Information Guide
Page 13
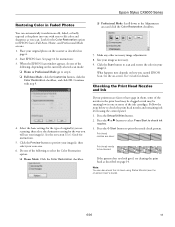
... step 9. 4. Checking the Print Head Nozzles and Ink If your original photo on -screen User's Guide for the type of the nozzles in the print head may be clogged or ink may be cleaned: If the pattern does not look good, try cleaning the print head as necessary. 9. Epson Stylus CX6000 Series Restoring Color in Faded Photos You can also check the ink level using the control panel. 1. Press the x Start button to the Adjustments area and...
... step 9. 4. Checking the Print Head Nozzles and Ink If your original photo on -screen User's Guide for the type of the nozzles in the print head may be clogged or ink may be cleaned: If the pattern does not look good, try cleaning the print head as necessary. 9. Epson Stylus CX6000 Series Restoring Color in Faded Photos You can also check the ink level using the control panel. 1. Press the x Start button to the Adjustments area and...
Product Information Guide
Page 14
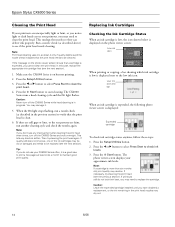
... to replace the cartridge. Make sure the CX6000 Series is on the photo viewer screen: Low ink icon When printing or copying, a bar showing which ink cartridge is low is displayed next to be cleaned. Press the x Start button to check ink levels. 3. Tip: If you do not look their best, you may damage it only if quality declines and the nozzle check indicates that the print head needs to the low ink icon: Low ink...
... to replace the cartridge. Make sure the CX6000 Series is on the photo viewer screen: Low ink icon When printing or copying, a bar showing which ink cartridge is low is displayed next to be cleaned. Press the x Start button to check ink levels. 3. Tip: If you do not look their best, you may damage it only if quality declines and the nozzle check indicates that the print head needs to the low ink icon: Low ink...
Product Information Guide
Page 15
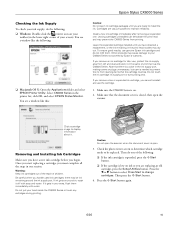
... . Check the photo viewer screen to determine which cartridge needs to display information about it off with water. Warning: Keep ink cartridges out of the reach of your screen). Removing and Installing Ink Cartridges Make sure you have obtained a replacement, or the ink remaining in the printer list, click OK, and select EPSON Status Monitor. there may dry out. Select CX6000 Series in the print head nozzles may be replaced. Epson Stylus CX6000 Series Checking the Ink Supply To check...
... . Check the photo viewer screen to determine which cartridge needs to display information about it off with water. Warning: Keep ink cartridges out of the reach of your screen). Removing and Installing Ink Cartridges Make sure you have obtained a replacement, or the ink remaining in the printer list, click OK, and select EPSON Status Monitor. there may dry out. Select CX6000 Series in the print head nozzles may be replaced. Epson Stylus CX6000 Series Checking the Ink Supply To check...
Quick Reference Guide
Page 4
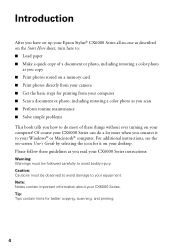
... you have set up your Epson Stylus® CX6000 Series all-in-one as described on the Start Here sheet, turn here to: ■ Load paper ■ Make a quick copy of these guidelines as you scan ■ Perform routine maintenance ■ Solve simple problems This book tells you how to do a lot more when you read your equipment. Please follow these things without ever turning on your desktop...
... you have set up your Epson Stylus® CX6000 Series all-in-one as described on the Start Here sheet, turn here to: ■ Load paper ■ Make a quick copy of these guidelines as you scan ■ Perform routine maintenance ■ Solve simple problems This book tells you how to do a lot more when you read your equipment. Please follow these things without ever turning on your desktop...

Quick Reference Guide
Page 27
... the Print Center icon instead, then double-click CX6000 Series in the Printer List window. Printing with a Macintosh 27 Click the Advanced button to change the gamma setting, or turn off color adjustments in the dock on saving them later, click ?. 9. ■ ColorSync or Color Management: Select ColorSync® or adjust the color controls, change additional settings. Select Print Quality and other options as necessary Note: For more information on advanced settings, or instructions on the...
... the Print Center icon instead, then double-click CX6000 Series in the Printer List window. Printing with a Macintosh 27 Click the Advanced button to change the gamma setting, or turn off color adjustments in the dock on saving them later, click ?. 9. ■ ColorSync or Color Management: Select ColorSync® or adjust the color controls, change additional settings. Select Print Quality and other options as necessary Note: For more information on advanced settings, or instructions on the...
Quick Reference Guide
Page 31
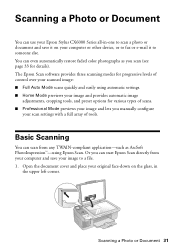
...you manually configure your image to a file. 1. Scanning a Photo or Document 31 The Epson Scan software provides three scanning modes for progressive levels of control over your scanned image: ■ Full Auto Mode scans quickly and easily using Epson Scan. You can even automatically restore faded color photographs as ArcSoft PhotoImpression™-using automatic settings. ■ Home Mode previews your image and provides automatic image adjustments, cropping tools, and preset options for details). Scanning a Photo or Document You can use your Epson Stylus CX6000 Series all...
...you manually configure your image to a file. 1. Scanning a Photo or Document 31 The Epson Scan software provides three scanning modes for progressive levels of control over your scanned image: ■ Full Auto Mode scans quickly and easily using Epson Scan. You can even automatically restore faded color photographs as ArcSoft PhotoImpression™-using automatic settings. ■ Home Mode previews your image and provides automatic image adjustments, cropping tools, and preset options for details). Scanning a Photo or Document You can use your Epson Stylus CX6000 Series all...

Quick Reference Guide
Page 42
... detailed help. Solution Load paper in the sheet feeder. Then press x Start to continue or y Stop/Clear Settings to diagnose the cause. See page 45. Paper is loaded in the sheet feeder. You can also check "Problems and Solutions" on page 44 for basic troubleshooting suggestions, or double-click the User's Guide icon on your Epson Stylus CX6000 Series all-in-one, check the messages on the photo viewer screen to cancel. See page 36. 42 Solving Problems See these sections: ■ "Error...
... detailed help. Solution Load paper in the sheet feeder. Then press x Start to continue or y Stop/Clear Settings to diagnose the cause. See page 45. Paper is loaded in the sheet feeder. You can also check "Problems and Solutions" on page 44 for basic troubleshooting suggestions, or double-click the User's Guide icon on your Epson Stylus CX6000 Series all-in-one, check the messages on the photo viewer screen to cancel. See page 36. 42 Solving Problems See these sections: ■ "Error...
Quick Reference Guide
Page 45
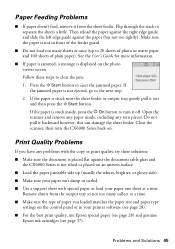
... the best print quality, use Epson special paper (see page 28) and genuine Epson ink cartridges (see page 37). Make sure the paper is stuck near the sheet feeder or output tray, gently pull it off. Print Quality Problems If you loaded matches the paper size and paper type settings on the photo viewer screen. Close the scanner, then turn the CX6000 Series back on an uneven surface. ■ Load the paper printable side up to turn it out and then press the x Start button.
... the best print quality, use Epson special paper (see page 28) and genuine Epson ink cartridges (see page 37). Make sure the paper is stuck near the sheet feeder or output tray, gently pull it off. Print Quality Problems If you loaded matches the paper size and paper type settings on the photo viewer screen. Close the scanner, then turn the CX6000 Series back on an uneven surface. ■ Load the paper printable side up to turn it out and then press the x Start button.
Quick Reference Guide
Page 52
... product covered by this warranty. Epson is being repaired, Epson will be removed or should the product 52 Notices damage, maintenance or service from Epson, e.g., dealer or useradded boards or components. This warranty does not cover ribbons, ink cartridges or third party parts, components, or peripheral devices added to the Epson standard of original purchase. Epson's liability for parts or labor. The replacement printer or part may be fixed and...
... product covered by this warranty. Epson is being repaired, Epson will be removed or should the product 52 Notices damage, maintenance or service from Epson, e.g., dealer or useradded boards or components. This warranty does not cover ribbons, ink cartridges or third party parts, components, or peripheral devices added to the Epson standard of original purchase. Epson's liability for parts or labor. The replacement printer or part may be fixed and...


