

Product Information Guide
Page 7
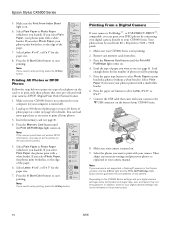
...or matte paper. Make sure the CX5000 Series is selected. 6. Do not pull out paper that is turned on. 2. Press the Copies button until you see the desired number of copies in the Copies window. To make a color copy, press the x Start Color button. 6/06 7 Press the ...On light flashes and after a moment the CX5000 Series starts printing. Make sure the CX5000 Series is being printed; The light indicates which type is turned on page 6. Press the paper size button to close the document cover. 3. Epson Stylus CX5000 Series Placing Large or Thick Documents When you ...
...or matte paper. Make sure the CX5000 Series is selected. 6. Do not pull out paper that is turned on. 2. Press the Copies button until you see the desired number of copies in the Copies window. To make a color copy, press the x Start Color button. 6/06 7 Press the ...On light flashes and after a moment the CX5000 Series starts printing. Make sure the CX5000 Series is being printed; The light indicates which type is turned on page 6. Press the paper size button to close the document cover. 3. Epson Stylus CX5000 Series Placing Large or Thick Documents When you ...

Product Information Guide
Page 8
Epson Stylus CX5000 Series To make . Load enough paper for the number of copies (up to resume. For example, to print 12 copies, load 12 sheets of plain paper) you want to make a black and white copy, press the x Start B&W button. Press the x Start Color or x Start B&W button. Making a ...the Card 1. If you see a message on the glass as the original. If you don't need high quality, you insert a card in the Copies window. Press the paper type button to stop copying at a time (it will be ejected automatically to select Letter, 4"x 6", or 5"x 7". 7. The ...
Epson Stylus CX5000 Series To make . Load enough paper for the number of copies (up to resume. For example, to print 12 copies, load 12 sheets of plain paper) you want to make a black and white copy, press the x Start B&W button. Press the x Start Color or x Start B&W button. Making a ...the Card 1. If you see a message on the glass as the original. If you don't need high quality, you insert a card in the Copies window. Press the paper type button to stop copying at a time (it will be ejected automatically to select Letter, 4"x 6", or 5"x 7". 7. The ...
Product Information Guide
Page 10
...photos. 3. Make sure your camera is turned on the card will be reflected in the Copies window, and the b Error light and the Print All/PictBridge flash. Note: If your camera ...4. Insert the memory card (see page 4 for the paper size. 7. Press the x Start Color button to 20 sheets of plain paper or up to start printing. Press the paper type button to...type of your CX5000 Series. 8. Press the Memory Card button until the Print All/PictBridge light comes on the CX5000 Series settings and your photos printed with a white border. Depending on . Epson Stylus CX5000 Series 5.
...photos. 3. Make sure your camera is turned on the card will be reflected in the Copies window, and the b Error light and the Print All/PictBridge flash. Note: If your camera ...4. Insert the memory card (see page 4 for the paper size. 7. Press the x Start Color button to 20 sheets of plain paper or up to start printing. Press the paper type button to...type of your CX5000 Series. 8. Press the Memory Card button until the Print All/PictBridge light comes on the CX5000 Series settings and your photos printed with a white border. Depending on . Epson Stylus CX5000 Series 5.
Product Information Guide
Page 11
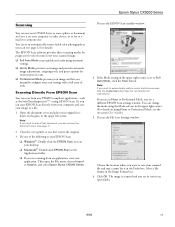
... need to automatically restore a color photo as you scan, click the Customize button (see the on the glass, in the upper left corner. Then open folder. 6/06 11 Note: If you want to scan a thick document, you can remove the document cover (see the File Save Settings window: Choose the location where... scan from any TWAIN-compliant application-such as you scan (see its icon in an open the File menu, choose Import or Acquire, and select Epson Stylus CX5000 Series. If the Mode setting in the upper right corner is scanned and you see page 12 for it in the Prefix box. The image...
... need to automatically restore a color photo as you scan, click the Customize button (see the on the glass, in the upper left corner. Then open folder. 6/06 11 Note: If you want to scan a thick document, you can remove the document cover (see the File Save Settings window: Choose the location where... scan from any TWAIN-compliant application-such as you scan (see its icon in an open the File menu, choose Import or Acquire, and select Epson Stylus CX5000 Series. If the Mode setting in the upper right corner is scanned and you see page 12 for it in the Prefix box. The image...
Product Information Guide
Page 12
Epson Stylus CX5000 Series Restoring Color in Faded Photos Using the Color Restoration feature in EPSON Scan, you can automatically transform an old, faded, or badly exposed photo into one with step 9. 7. See page 11 for instructions. 5. Press the B ink ...one of ink left in the sheet feeder. 3. Place your image(s). Start EPSON Scan. Size your image(s). The CX5000 Series turns on how you scan. 1. When the EPSON Scan window appears, do one of original(s) you are clean: 4. Turn off the CX5000 Series. 2. It also shows the percentage of the following to clean the ...
Epson Stylus CX5000 Series Restoring Color in Faded Photos Using the Color Restoration feature in EPSON Scan, you can automatically transform an old, faded, or badly exposed photo into one with step 9. 7. See page 11 for instructions. 5. Press the B ink ...one of ink left in the sheet feeder. 3. Place your image(s). Start EPSON Scan. Size your image(s). The CX5000 Series turns on how you scan. 1. When the EPSON Scan window appears, do one of original(s) you are clean: 4. Turn off the CX5000 Series. 2. It also shows the percentage of the following to clean the ...
Product Information Guide
Page 13
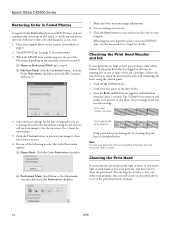
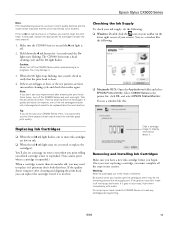
Epson Stylus CX5000 Series Note: Print head cleaning uses ink, so clean it only if quality declines ... is low or expended. (You cannot print when a cartridge is expended.) When a cartridge is not low. You see a window like this case, replace the appropriate ink cartridge first (see the next section). 1. Once you start replacing a cartridge, you ... and aligning the print head, you need to replace it is in your screen). You'll also see a window like the following : ❏ Windows: Double-click the icon on , you can replace the cartridge even if it . 3. You see a message...
Epson Stylus CX5000 Series Note: Print head cleaning uses ink, so clean it only if quality declines ... is low or expended. (You cannot print when a cartridge is expended.) When a cartridge is not low. You see a window like this case, replace the appropriate ink cartridge first (see the next section). 1. Once you start replacing a cartridge, you ... and aligning the print head, you need to replace it is in your screen). You'll also see a window like the following : ❏ Windows: Double-click the icon on , you can replace the cartridge even if it . 3. You see a message...
Product Information Guide
Page 16
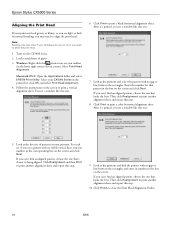
...repeat this one: 7. Look at the five sets of patterns in your printout. Load several sheets of your screen). Click Print to print a color horizontal alignment sheet. If you can't find an aligned pattern, choose the one that's closest to print a vertical alignment sheet. Look at ... Head Alignment. 4. After it 's printed, you see a window like this step. 10. Click Finish to clean the print head. 1. If you may also occur if your cartridges are low on the screen and click Next. Epson Stylus CX5000 Series Aligning the Print Head If your printouts look grainy or ...
...repeat this one: 7. Look at the five sets of patterns in your printout. Load several sheets of your screen). Click Print to print a color horizontal alignment sheet. If you can't find an aligned pattern, choose the one that's closest to print a vertical alignment sheet. Look at ... Head Alignment. 4. After it 's printed, you see a window like this step. 10. Click Finish to clean the print head. 1. If you may also occur if your cartridges are low on the screen and click Next. Epson Stylus CX5000 Series Aligning the Print Head If your printouts look grainy or ...
Quick Reference Guide
Page 4
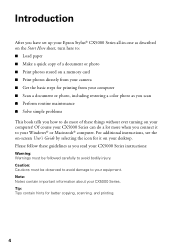
...computer ■ Scan a document or photo, including restoring a color photo as you how to your CX5000 Series. Note: Notes contain important information about your equipment. Introduction After you have set up your Epson Stylus® CX5000 Series all-in-one as described on the Start Here sheet,...simple problems This book tells you read your CX5000 Series instructions: Warning: Warnings must be followed carefully to avoid bodily injury. For additional instructions, see the on your desktop. Tip: Tips contain hints for it to your Windows® or Macintosh® computer. Please ...
...computer ■ Scan a document or photo, including restoring a color photo as you how to your CX5000 Series. Note: Notes contain important information about your equipment. Introduction After you have set up your Epson Stylus® CX5000 Series all-in-one as described on the Start Here sheet,...simple problems This book tells you read your CX5000 Series instructions: Warning: Warnings must be followed carefully to avoid bodily injury. For additional instructions, see the on your desktop. Tip: Tips contain hints for it to your Windows® or Macintosh® computer. Please ...

Quick Reference Guide
Page 9
...To make a black and white copy, press the x Start B&W button. The On light flashes and after a moment the CX5000 Series starts printing. Note: The copies may not be ejected automatically to the output tray. Copying a Document 1. If you... Fit to close the document cover. 3. Press the paper size button to select Letter. 7. Copying 9 Make sure the Epson Stylus CX5000 Series all-in the Copies window. To make copies using letter-size (8.5 × 11-inch), 4 × 6-inch, and 5 × 7-inch...to 100 sheets of copies in -one is being printed; To make a color copy, press the x Start...
...To make a black and white copy, press the x Start B&W button. The On light flashes and after a moment the CX5000 Series starts printing. Note: The copies may not be ejected automatically to the output tray. Copying a Document 1. If you... Fit to close the document cover. 3. Press the paper size button to select Letter. 7. Copying 9 Make sure the Epson Stylus CX5000 Series all-in the Copies window. To make copies using letter-size (8.5 × 11-inch), 4 × 6-inch, and 5 × 7-inch...to 100 sheets of copies in -one is being printed; To make a color copy, press the x Start...

Quick Reference Guide
Page 10
... starts printing. Be sure to the output tray. To make a color copy, press the x Start Color button. it will be exactly the same size as described on page 7. Make sure the Epson Stylus CX5000 Series all-in the Copies window. If you need to 9 copies at any time, just press the y Stop button. Do not pull...
... starts printing. Be sure to the output tray. To make a color copy, press the x Start Color button. it will be exactly the same size as described on page 7. Make sure the Epson Stylus CX5000 Series all-in the Copies window. If you need to 9 copies at any time, just press the y Stop button. Do not pull...

Quick Reference Guide
Page 11
...When you want to make a copy quickly and do not need any more paper and press the x Start Color button to copy in the Copies window. The CX5000 Series makes copies until you can print a "draft" copy. Place the photo on the glass as described on... . 2. If you don't need high quality, you see "-" in black and white). Note: When making a lot of copies, it runs out of paper. 5. Copying 11 Make sure the Epson Stylus CX5000 Series all-in color...
...When you want to make a copy quickly and do not need any more paper and press the x Start Color button to copy in the Copies window. The CX5000 Series makes copies until you can print a "draft" copy. Place the photo on the glass as described on... . 2. If you don't need high quality, you see "-" in black and white). Note: When making a lot of copies, it runs out of paper. 5. Copying 11 Make sure the Epson Stylus CX5000 Series all-in color...
Quick Reference Guide
Page 20
...program. 20 Printing From Your Computer Open a photo or document in Windows 1. Before you start, make sure you can also click Start or , select Programs or All Programs, select EPSON, and click Epson Stylus CX5000 Series Driver Update for printing a photo or document stored on the ...described on your printer software and connected the Epson Stylus CX5000 Series all-in the printer driver (see page 26 for more information). Note: For detailed instructions on -screen User's Guide. With Windows, you 've installed your Windows or Macintosh computer. Printing From Your Computer...
...program. 20 Printing From Your Computer Open a photo or document in Windows 1. Before you start, make sure you can also click Start or , select Programs or All Programs, select EPSON, and click Epson Stylus CX5000 Series Driver Update for printing a photo or document stored on the ...described on your printer software and connected the Epson Stylus CX5000 Series all-in the printer driver (see page 26 for more information). Note: For detailed instructions on -screen User's Guide. With Windows, you 've installed your Windows or Macintosh computer. Printing From Your Computer...

Quick Reference Guide
Page 21
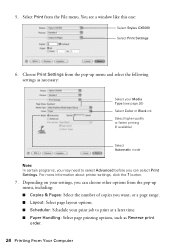
Make sure Epson Stylus CX5000 Series is selected, then click the Preferences or Properties button. (If you 're printing (choose Photo or Best Photo for pictures) Select your paper Type Select your paper Size Click here for more options Printing in Windows 21 On the Main tab, select the basic ...print settings: Select the type of document you see a window like this one: Select EPSON Stylus CX5000 Series Click here to open your document Orientation Click here for borderless ...
Make sure Epson Stylus CX5000 Series is selected, then click the Preferences or Properties button. (If you 're printing (choose Photo or Best Photo for pictures) Select your paper Type Select your paper Size Click here for more options Printing in Windows 21 On the Main tab, select the basic ...print settings: Select the type of document you see a window like this one: Select EPSON Stylus CX5000 Series Click here to open your document Orientation Click here for borderless ...
Quick Reference Guide
Page 23
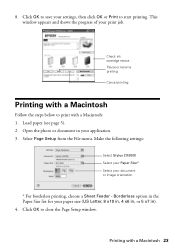
... Setup from the File menu. Click OK to start printing. Open the photo or document in ). 4. Make the following settings: Select Stylus CX5000 Select your Paper Size* Select your print job. This window appears and shows the progress of your document or image orientation * For borderless printing, choose a Sheet Feeder - 8. Borderless option in...
... Setup from the File menu. Click OK to start printing. Open the photo or document in ). 4. Make the following settings: Select Stylus CX5000 Select your Paper Size* Select your print job. This window appears and shows the progress of your document or image orientation * For borderless printing, choose a Sheet Feeder - 8. Borderless option in...
Quick Reference Guide
Page 24
... Print Settings. You see page 26) Select Color or Black ink Select higher quality or faster printing (if available) Select Automatic mode Note: In certain programs, you want, or a page range. ■ Layout: Select page layout options. ■ Scheduler: Schedule your Media Type (see a window like this one: Select Stylus CX5000 Select Print Settings 6. 5.
... Print Settings. You see page 26) Select Color or Black ink Select higher quality or faster printing (if available) Select Automatic mode Note: In certain programs, you want, or a page range. ■ Layout: Select page layout options. ■ Scheduler: Schedule your Media Type (see a window like this one: Select Stylus CX5000 Select Print Settings 6. 5.

Quick Reference Guide
Page 30
...or Document You see its icon in an open the File menu, choose Import or Acquire, and select Epson Stylus CX5000 Series. If you are scanning from an application, start Epson Scan: ■ Windows: Double-click the EPSON Scan icon on -screen User's Guide.) 5. Note: If you need to scan a thick document, ... the document cover (see page 8). 2. Click OK. You see the File Save Settings window: Choose the location where you see the Epson Scan standby window: 4. The image is set to automatically restore a color photo as you scan, click the Customize button (see page 31 for it in the ...
...or Document You see its icon in an open the File menu, choose Import or Acquire, and select Epson Stylus CX5000 Series. If you are scanning from an application, start Epson Scan: ■ Windows: Double-click the EPSON Scan icon on -screen User's Guide.) 5. Note: If you need to scan a thick document, ... the document cover (see page 8). 2. Click OK. You see the File Save Settings window: Choose the location where you see the Epson Scan standby window: 4. The image is set to automatically restore a color photo as you scan, click the Customize button (see page 31 for it in the ...

Quick Reference Guide
Page 40
... page 34. 40 Solving Problems An ink cartridge is loaded in the sheet feeder. - Then press x Start Color to continue or y Stop to cancel. Remove and reload the paper. Then press x Start Color to continue or y Stop to cancel. See these sections: ■ "Error Indicators" (below) ■ ...basic troubleshooting suggestions, or double-click the User's Guide icon on your Epson Stylus CX5000 Series all-in-one, check the lights on page 42 for more detailed help. Solution Load paper in the Copies window to diagnose the cause. No paper is running low on page 44 ...
... page 34. 40 Solving Problems An ink cartridge is loaded in the sheet feeder. - Then press x Start Color to continue or y Stop to cancel. Remove and reload the paper. Then press x Start Color to continue or y Stop to cancel. See these sections: ■ "Error Indicators" (below) ■ ...basic troubleshooting suggestions, or double-click the User's Guide icon on your Epson Stylus CX5000 Series all-in-one, check the lights on page 42 for more detailed help. Solution Load paper in the Copies window to diagnose the cause. No paper is running low on page 44 ...
Quick Reference Guide
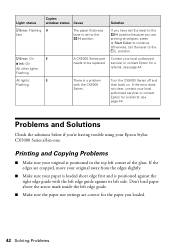
Page 42
...Printing and Copying Problems ■ Make sure your Epson Stylus CX5000 Series all-in the top left edge guide against the right edge guide with the CX5000 Series. Don't load paper above the arrow mark... page 44. Light: status Copies window status Cause Solution b Error: Flashing H fast The paper thickness lever is set to be replaced. Turn the CX5000 Series off and then back on.... contact Epson for a referral; see page 44. Otherwise, set the lever to the ^ H position because you have set the lever to continue. If the edges are printing envelopes, press x Start Color to ...
...Printing and Copying Problems ■ Make sure your Epson Stylus CX5000 Series all-in the top left edge guide against the right edge guide with the CX5000 Series. Don't load paper above the arrow mark... page 44. Light: status Copies window status Cause Solution b Error: Flashing H fast The paper thickness lever is set to be replaced. Turn the CX5000 Series off and then back on.... contact Epson for a referral; see page 44. Otherwise, set the lever to the ^ H position because you have set the lever to continue. If the edges are printing envelopes, press x Start Color to ...


