
Technical Brief (Impact Printers)
Page 5
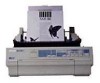
... Pitch : 10CPI Print Quality : LQ Character Table : PC 437 Continuous Rear : 11 inch Continuous Rear : 8.5mm Continuous Front : 7 inch Continuous Front : 8.5mm CutSheetFeeder 1 : 11 inch CutSheetFeeder 1 : 8.5mm CutSheetFeeder 2 : 11 inch CutSheetFeeder 2 : 8.5mm Manual Rear : 14 inch Manual Rear : 8.5mm Help: Select printer Font. EPSON Sales Training EPSON is the DOS-based printer setup utility that allows you...
... Pitch : 10CPI Print Quality : LQ Character Table : PC 437 Continuous Rear : 11 inch Continuous Rear : 8.5mm Continuous Front : 7 inch Continuous Front : 8.5mm CutSheetFeeder 1 : 11 inch CutSheetFeeder 1 : 8.5mm CutSheetFeeder 2 : 11 inch CutSheetFeeder 2 : 8.5mm Manual Rear : 14 inch Manual Rear : 8.5mm Help: Select printer Font. EPSON Sales Training EPSON is the DOS-based printer setup utility that allows you...
Product Information Guide
Page 7
...-LQ57APS LQ-570/1070 and ActionPrinter 5000/55OU Service Manual EL-LQ57AP5 LQ-570/1070 and AP5000/5500 Parts List 4000552COl-00 LQ-570/1070 User'sGuide Installation/Support Tips Most application programs let you specify the type of printer you can take full advantage of the printer's features. If your printer on its printer selection menu. Non-recommended Commands Epson recommends...
...-LQ57APS LQ-570/1070 and ActionPrinter 5000/55OU Service Manual EL-LQ57AP5 LQ-570/1070 and AP5000/5500 Parts List 4000552COl-00 LQ-570/1070 User'sGuide Installation/Support Tips Most application programs let you specify the type of printer you can take full advantage of the printer's features. If your printer on its printer selection menu. Non-recommended Commands Epson recommends...
User Manual
Page 7
Refer all products plugged into this product through cabinet slots as specifically explained in the User's Manual, do not attempt to service this product from the wall outlet and refer servicing to service personnel. 13. When the power cord or plug is ...
Refer all products plugged into this product through cabinet slots as specifically explained in the User's Manual, do not attempt to service this product from the wall outlet and refer servicing to service personnel. 13. When the power cord or plug is ...
User Manual
Page 11
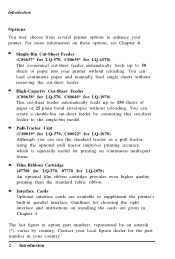
... supplement the printer's built-in Chapter 4. You can create a double-bin cut-sheet feeder by country, Contact your country. 2 Introduction You can load continuous paper and manually load single sheets without removing the cut -sheet feeder to the single-bin model. High-Capacity Cut-Sheet Feeder (C80638* for LQ-570, C80640* for LQ-1070) This...
... supplement the printer's built-in Chapter 4. You can create a double-bin cut-sheet feeder by country, Contact your country. 2 Introduction You can load continuous paper and manually load single sheets without removing the cut -sheet feeder to the single-bin model. High-Capacity Cut-Sheet Feeder (C80638* for LQ-570, C80640* for LQ-1070) This...
User Manual
Page 12
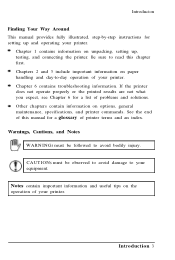
... not what you expect, see Chapter 6 for a glossary of problems and solutions. Warnings, Cautions, and Notes WARNINGS must be followed to read this manual for a list of printer terms and an index. Introducion Finding Your Way Around This manual provides fully illustrated, step-by-step instructions for setting up , testing, and connecting the...
... not what you expect, see Chapter 6 for a glossary of problems and solutions. Warnings, Cautions, and Notes WARNINGS must be followed to read this manual for a list of printer terms and an index. Introducion Finding Your Way Around This manual provides fully illustrated, step-by-step instructions for setting up , testing, and connecting the...

User Manual
Page 70
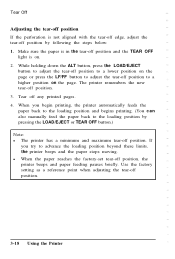
... can tear off all printed pages. Make sure printing has finished. When you resume printing, the printer automatically feeds the paper back to the loading position and begins printing. (You can also manually feed the paper back to the tear-off edge and the TEAR OFF light comes on adjusting the... tear-off position by following steps: 1. Tear Off Enter tear-off mode by performing the following the steps below. 1. Turn DIP switch 2-3 o n . 3. The printer advances the paper to the loading position by pressing the LOAD/EJECT or TEAR OFF button.) Using the TEAR OFF button Whether or not the...
... can tear off all printed pages. Make sure printing has finished. When you resume printing, the printer automatically feeds the paper back to the loading position and begins printing. (You can also manually feed the paper back to the tear-off edge and the TEAR OFF light comes on adjusting the... tear-off position by following steps: 1. Tear Off Enter tear-off mode by performing the following the steps below. 1. Turn DIP switch 2-3 o n . 3. The printer advances the paper to the loading position by pressing the LOAD/EJECT or TEAR OFF button.) Using the TEAR OFF button Whether or not the...
User Manual
Page 71
... a minimum and maximum tear-off position by following the steps below: 1. If you begin printing, the printer automatically feeds the paper back to the loading position and begins printing. (You c a n also manually feed the paper back to adjust the tear-off position and the TEAR OFF light is on the page.... Make sure the paper is in the tear-off position to advance the loading position beyond these limits, the printer beeps and the paper stops moving...
... a minimum and maximum tear-off position by following the steps below: 1. If you begin printing, the printer automatically feeds the paper back to the loading position and begins printing. (You c a n also manually feed the paper back to adjust the tear-off position and the TEAR OFF light is on the page.... Make sure the paper is in the tear-off position to advance the loading position beyond these limits, the printer beeps and the paper stops moving...

User Manual
Page 79
... a safe place; Cut-Sheet Feeders Two cut-sheet feeders are available for use with your printer: Single-bin High-capacity LQ-570 C80637* C80638* LQ-1070 C80639* C80640* * Substitute for last digit, which varies by following the instructions in the manual that comes with it . In either the single-bin or highcapacity cut -sheet feeders...
... a safe place; Cut-Sheet Feeders Two cut-sheet feeders are available for use with your printer: Single-bin High-capacity LQ-570 C80637* C80638* LQ-1070 C80639* C80640* * Substitute for last digit, which varies by following the instructions in the manual that comes with it . In either the single-bin or highcapacity cut -sheet feeders...
User Manual
Page 87
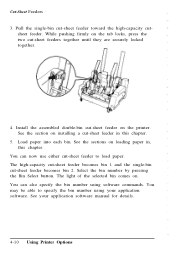
...tab locks, press the two cut - Load paper into each bin. You can also specify the bin number using your application software manual for details. 4-10 Using Printer Options Install the assembled double-bin cut -sheet feeder in , this chapter. 5. You can now use either cut -sheet feeder ...becomes bin 2. The light of the selected bin comes on loading paper in this chapter. While pushing firmly on the printer. See your application software. Cut-Sheet Feeders 3. See the sections on . Select the bin number by pressing the Bin Select button. Pull...
...tab locks, press the two cut - Load paper into each bin. You can also specify the bin number using your application software manual for details. 4-10 Using Printer Options Install the assembled double-bin cut -sheet feeder in , this chapter. 5. You can now use either cut -sheet feeder ...becomes bin 2. The light of the selected bin comes on loading paper in this chapter. While pushing firmly on the printer. See your application software. Cut-Sheet Feeders 3. See the sections on . Select the bin number by pressing the Bin Select button. Pull...
User Manual
Page 92
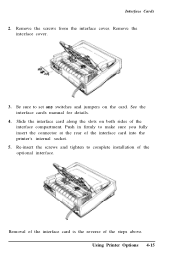
... the interface cover. 3. Push in firmly to complete installation of the interface card into the printer's internal socket. 5. Slide the interface card along the slots on the card. See the interface cards manual for details. 4. Re-insert the screws and tighten to make sure you fully insert the ...connector at the rear of the optional interface. Using Printer Options 4-15 Remove the screws from the interface cover. Be sure...
... the interface cover. 3. Push in firmly to complete installation of the interface card into the printer's internal socket. 5. Slide the interface card along the slots on the card. See the interface cards manual for details. 4. Re-insert the screws and tighten to make sure you fully insert the ...connector at the rear of the optional interface. Using Printer Options 4-15 Remove the screws from the interface cover. Be sure...

User Manual
Page 93
... the DTR flag to 1 (MARK) to indicate that it is ready to indicate that it prints an asterisk (*). Error handling When the printer detects a parity error, it cannot receive data. When you set the baud rate, see the bit-rate selection table in the buffer increases...to 0 (SPACE) to receive data. The printer ignores all other errors, including framing and overrun errors. 4-16 Using Printer Options Interface Cards The C823051/C823061 serial interface card To use the C823051/C823061 interface card, see the C823051/C823061 interface card manual. Selecting a baud rate You can select ...
... the DTR flag to 1 (MARK) to indicate that it is ready to indicate that it prints an asterisk (*). Error handling When the printer detects a parity error, it cannot receive data. When you set the baud rate, see the bit-rate selection table in the buffer increases...to 0 (SPACE) to receive data. The printer ignores all other errors, including framing and overrun errors. 4-16 Using Printer Options Interface Cards The C823051/C823061 serial interface card To use the C823051/C823061 interface card, see the C823051/C823061 interface card manual. Selecting a baud rate You can select ...


