
Technical Brief (Impact Printers)
Page 5
...: 8.5mm Manual Rear : 14 inch Manual Rear : 8.5mm Help: Select printer Font. Manual Front : 17 inch Manual Front : 8.5mm Print Direction : Bi-d Skip over hold : OFF Interface mode : Auto I/F interval : 10s Input Buffer : ON Auto Tear off : OFF Auto Line Feed : OFF Control Code : ESC/P 0 slash : OFF Buzzer : ON Roll Paper : OFF F1 : Execute F10: Previous F2 : Quit CR : Select item F3 : Default F4 : Change Port Printer Status Monitor Utility The Printer Status Monitor provides Windows 95/98 users with automatic error messaging for direct printer to the user...
...: 8.5mm Manual Rear : 14 inch Manual Rear : 8.5mm Help: Select printer Font. Manual Front : 17 inch Manual Front : 8.5mm Print Direction : Bi-d Skip over hold : OFF Interface mode : Auto I/F interval : 10s Input Buffer : ON Auto Tear off : OFF Auto Line Feed : OFF Control Code : ESC/P 0 slash : OFF Buzzer : ON Roll Paper : OFF F1 : Execute F10: Previous F2 : Quit CR : Select item F3 : Default F4 : Change Port Printer Status Monitor Utility The Printer Status Monitor provides Windows 95/98 users with automatic error messaging for direct printer to the user...
Product Brochure
Page 1
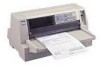
...,000 power-on forms up to 6-part forms and font versatility provides a variety of built-in fonts • MTBF rating of the EPSON LQ-670, the EPSON LQ-680Pro offers extreme durability. features EPSON ESC/P®2 and IBM® 2390 Plus emulation • Unbeatable service and support Includes two year limited warranty and access to the pins from unnecessary force. Printing 413 cps in High-Speed Draft mode, the EPSON LQ-680Pro creates Letter Quality...
...,000 power-on forms up to 6-part forms and font versatility provides a variety of built-in fonts • MTBF rating of the EPSON LQ-670, the EPSON LQ-680Pro offers extreme durability. features EPSON ESC/P®2 and IBM® 2390 Plus emulation • Unbeatable service and support Includes two year limited warranty and access to the pins from unnecessary force. Printing 413 cps in High-Speed Draft mode, the EPSON LQ-680Pro creates Letter Quality...
Product Brochure
Page 2
... 20.7 lb (9.4 kg) Control Panel Functions Font, pause, tear off, LF/FF, load/eject, micro adjust, self test, data dump and the default settings Reliability Total print volume MTBF Print head life Black fabric cartridge 20 million lines (except print head) 10,000 POH (25% duty cycle) 400 million strokes/wire 2 million characters (LQ mode, 10 cpi, 48 dots/character) Product/Accessory Part Numbers EPSON LQ-680Pro EPSON LQ-680Pro Ribbon cartridge High capacity cut sheet feeder Second bin cut sheet feeder) Push tractor feed (rear) Feeder Rear push tractor Cut sheet feeder bin1/bin2 (option...
... 20.7 lb (9.4 kg) Control Panel Functions Font, pause, tear off, LF/FF, load/eject, micro adjust, self test, data dump and the default settings Reliability Total print volume MTBF Print head life Black fabric cartridge 20 million lines (except print head) 10,000 POH (25% duty cycle) 400 million strokes/wire 2 million characters (LQ mode, 10 cpi, 48 dots/character) Product/Accessory Part Numbers EPSON LQ-680Pro EPSON LQ-680Pro Ribbon cartridge High capacity cut sheet feeder Second bin cut sheet feeder) Push tractor feed (rear) Feeder Rear push tractor Cut sheet feeder bin1/bin2 (option...
Product Information Guide
Page 2
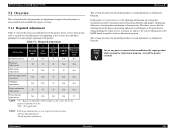
... graphics printing. Single-bin cut -sheet feeder up to 150 sheets of 22 lb (82 g/m²) paper up to 25 plain or bond envelopes up to 30 airmail envelopes up to 50 postcards The total thickness of the paper stack can be up to 0.20 inch (5 mm). EPSON LQ-680Pro Printer Specifications Mechanical Printing method Printing speed Printing direction Line spacing Printable columns Resolution Paper feed methods Paper feed speed 24-pin impact dot matrix High...
... graphics printing. Single-bin cut -sheet feeder up to 150 sheets of 22 lb (82 g/m²) paper up to 25 plain or bond envelopes up to 30 airmail envelopes up to 50 postcards The total thickness of the paper stack can be up to 0.20 inch (5 mm). EPSON LQ-680Pro Printer Specifications Mechanical Printing method Printing speed Printing direction Line spacing Printable columns Resolution Paper feed methods Paper feed speed 24-pin impact dot matrix High...
Product Information Guide
Page 8
... paper on the tractor to the tear-off edge of paper. utility to select auto tear-off function two ways: t Press the Tear Off button on the control panel t Use the default setting mode or the EPSON Remote! for thick envelopes, select position 4, 5, or 6. You can save paper that printing time may come off Position" on page 12. This speeds up printing. EPSON LQ-680Pro 11/00 for regular envelopes, select position 4; t Select Manual/CSF BIN2 to feed single sheets using the paper guide or optional cut -sheet...
... paper on the tractor to the tear-off edge of paper. utility to select auto tear-off function two ways: t Press the Tear Off button on the control panel t Use the default setting mode or the EPSON Remote! for thick envelopes, select position 4, 5, or 6. You can save paper that printing time may come off Position" on page 12. This speeds up printing. EPSON LQ-680Pro 11/00 for regular envelopes, select position 4; t Select Manual/CSF BIN2 to feed single sheets using the paper guide or optional cut -sheet...
Product Information Guide
Page 9
... using the default setting mode. The page length of the multipart forms is disabled while you turn on the control panel start flashing. See "Adjusting the Paper Thickness Lever" on page 8 and "Changing the Default Settings" on the auto tear-off Mode When you are using the default setting mode or the utility, also make sure the page length is not aligned with up to six parts including the original. Make sure printing has finished. Removing Continuous Paper 1. Press the Load/Eject button to feed...
... using the default setting mode. The page length of the multipart forms is disabled while you turn on the control panel start flashing. See "Adjusting the Paper Thickness Lever" on page 8 and "Changing the Default Settings" on the auto tear-off Mode When you are using the default setting mode or the utility, also make sure the page length is not aligned with up to six parts including the original. Make sure printing has finished. Removing Continuous Paper 1. Press the Load/Eject button to feed...
Product Information Guide
Page 10
... Auto or the correct position for your multipart forms as described in the printer between print jobs; For more information, see the User's Guide. 10 - Load single-sheet multipart forms glued at the side of the form only from the paper guide, not from the paper guide or with the optional cut -sheet feeder. Then select Envelope by pressing the Tear Off/Special Paper button. When printing on envelopes, make sure that your software settings keep the printing...
... Auto or the correct position for your multipart forms as described in the printer between print jobs; For more information, see the User's Guide. 10 - Load single-sheet multipart forms glued at the side of the form only from the paper guide, not from the paper guide or with the optional cut -sheet feeder. Then select Envelope by pressing the Tear Off/Special Paper button. When printing on envelopes, make sure that your software settings keep the printing...
Product Information Guide
Page 11
When printing on postcards, make sure the paper thickness lever is set to adjust the loading, printing, and tear-off micro adjust mode. You can use this feature to Auto or 2 or higher on the scale. Load either continuous or single-sheet paper. (Press the Load/Eject button to turn off the printer. 11/00 EPSON LQ-680Pro - 11 When loading a sheet from the rear (from the optional cut -sheet feeder. (For instructions on loading single sheets, see the User's Guide.) Before printing, make sure that...
When printing on postcards, make sure the paper thickness lever is set to adjust the loading, printing, and tear-off micro adjust mode. You can use this feature to Auto or 2 or higher on the scale. Load either continuous or single-sheet paper. (Press the Load/Eject button to turn off the printer. 11/00 EPSON LQ-680Pro - 11 When loading a sheet from the rear (from the optional cut -sheet feeder. (For instructions on loading single sheets, see the User's Guide.) Before printing, make sure that...
Product Information Guide
Page 14
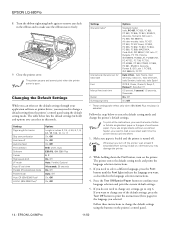
... the Font button until the Font lights indicate the language you may damage the printer. 2. Press the Tear Off/Special Paper button to confirm your application software or printer driver, you want to step 6. EPSON LQ-680Pro 11/00 The printer enters the default setting mode and prints the language selection instructions. 3. EPSON LQ-680Pro 8. Turn the ribbon-tightening knob again to remove any settings, go to change a default setting from the printer's control panel using the buttons on the printer. Settings Page length for tractor Skip over perforation Auto tear-off...
... the Font button until the Font lights indicate the language you may damage the printer. 2. Press the Tear Off/Special Paper button to confirm your application software or printer driver, you want to step 6. EPSON LQ-680Pro 11/00 The printer enters the default setting mode and prints the language selection instructions. 3. EPSON LQ-680Pro 8. Turn the ribbon-tightening knob again to remove any settings, go to change a default setting from the printer's control panel using the buttons on the printer. Settings Page length for tractor Skip over perforation Auto tear-off...
Product Information Guide
Page 15
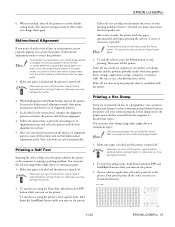
... send a print job to load a new sheet of paper each set of continuous paper that is causing a printing problem. To run the test using either single sheets or continuous paper. 1. EPSON LQ-680Pro 6. After you turn off . Whenever you determine the source of characters is turned off the printer. Either self test can print a hexadecimal dump to isolate communication problems between the printer and your printer driver settings, application settings, computer, or interface cable. (Be sure to use the printer's bidirectional adjustment mode to exit the default setting mode...
... send a print job to load a new sheet of paper each set of continuous paper that is causing a printing problem. To run the test using either single sheets or continuous paper. 1. EPSON LQ-680Pro 6. After you turn off . Whenever you determine the source of characters is turned off the printer. Either self test can print a hexadecimal dump to isolate communication problems between the printer and your printer driver settings, application settings, computer, or interface cable. (Be sure to use the printer's bidirectional adjustment mode to exit the default setting mode...

Product Information Guide
Page 16
..., carefully repack it off the printer. Cleaning the Printer 1. Then remove the ribbon cartridge. 7. Related Documentation 4013016-01 TM-LQ680 PL-LQ680 EPSON LQ-680/680Pro User's Guide EPSON LQ-680/680Pro Service Manual EPSON LQ-680Pro Parts Price List 16 - EPSON LQ-680Pro If characters are installed, remove them and pack them in the right column with lubricants; By comparing the characters printed in the printer's original box. Nonprintable codes, such as described below. Make sure that the print head is not hot.
..., carefully repack it off the printer. Cleaning the Printer 1. Then remove the ribbon cartridge. 7. Related Documentation 4013016-01 TM-LQ680 PL-LQ680 EPSON LQ-680/680Pro User's Guide EPSON LQ-680/680Pro Service Manual EPSON LQ-680Pro Parts Price List 16 - EPSON LQ-680Pro If characters are installed, remove them and pack them in the right column with lubricants; By comparing the characters printed in the printer's original box. Nonprintable codes, such as described below. Make sure that the print head is not hot.
User Manual
Page 10
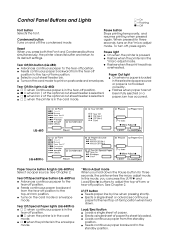
Reset When you press both the Font and Condensed buttons Pause light simultaneously, the printer clears its default settings. its buffer and return to q On when the printer is in the tear-off , press again. q Flashes when the print head has overheated. Paper Out light q Selects a cut -sheet feeder is loaded. q f f when continuous paper is paused. q Feeds continuous paper backward from the tear-off position. q o n when the printer is not loaded Tear Off/Bin lights (LQ-680) correctly. In this mode, you...
Reset When you press both the Font and Condensed buttons Pause light simultaneously, the printer clears its default settings. its buffer and return to q On when the printer is in the tear-off , press again. q Flashes when the print head has overheated. Paper Out light q Selects a cut -sheet feeder is loaded. q f f when continuous paper is paused. q Feeds continuous paper backward from the tear-off position. q o n when the printer is not loaded Tear Off/Bin lights (LQ-680) correctly. In this mode, you...
User Manual
Page 51
.... LQ-680Pro users are loaded in Appendix C. Doing so may not feed properly. Then use labels on shiny single-sheet backing, because the backing sheet tends to slip and may cause paper jams or damage to 2. Using Labels When selecting labels for printing, always choose labels mounted on the edge of a 2 multipart form can damage the print head. c Caution: t When printing on overlapping multipart forms, make sure that your software settings keep...
.... LQ-680Pro users are loaded in Appendix C. Doing so may not feed properly. Then use labels on shiny single-sheet backing, because the backing sheet tends to slip and may cause paper jams or damage to 2. Using Labels When selecting labels for printing, always choose labels mounted on the edge of a 2 multipart form can damage the print head. c Caution: t When printing on overlapping multipart forms, make sure that your software settings keep...
User Manual
Page 84
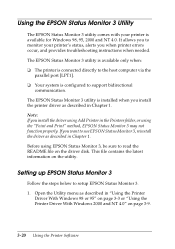
... Windows 98 or 95" on page 3-3 or "Using the Printer Driver With Windows 2000 and NT 4.0" on the utility. Setting up EPSON Status Monitor 3 Follow the steps below to read the README file on the driver disk. Before using the "Point and Print" method, EPSON Status Monitor 3 may not function properly. Using the EPSON Status Monitor 3 Utility The EPSON Status Monitor 3 utility comes with your printer's status, alerts you when printer errors occur, and provides troubleshooting instructions...
... Windows 98 or 95" on page 3-3 or "Using the Printer Driver With Windows 2000 and NT 4.0" on the utility. Setting up EPSON Status Monitor 3 Follow the steps below to read the README file on the driver disk. Before using the "Point and Print" method, EPSON Status Monitor 3 may not function properly. Using the EPSON Status Monitor 3 Utility The EPSON Status Monitor 3 utility comes with your printer's status, alerts you when printer errors occur, and provides troubleshooting instructions...
User Manual
Page 111
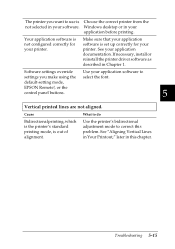
... of alignment. Troubleshooting 5-15 The printer you make using the select the font. If necessary, install or reinstall the printer driver software as described in your application software to do Bidirectional printing, which is the printer's standard printing mode, is Choose the correct printer from the not selected in Chapter 1. Software settings override Use your software. default-setting mode, EPSON Remote!, or the control panel buttons. 5 Vertical printed lines are not aligned. Windows desktop or in this problem. Use the printer's bidirectional adjustment mode to...
... of alignment. Troubleshooting 5-15 The printer you make using the select the font. If necessary, install or reinstall the printer driver software as described in your application software to do Bidirectional printing, which is the printer's standard printing mode, is Choose the correct printer from the not selected in Chapter 1. Software settings override Use your software. default-setting mode, EPSON Remote!, or the control panel buttons. 5 Vertical printed lines are not aligned. Windows desktop or in this problem. Use the printer's bidirectional adjustment mode to...
User Manual
Page 144
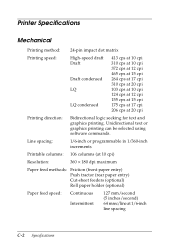
... graphics printing can be selected using software commands. Printer Specifications Mechanical Printing method: 24-pin impact dot matrix Printing speed: High-speed draft Draft Draft condensed LQ LQ condensed 413 cps at 10 cpi 310 cps at 10 cpi 372 cps at 12 cpi 465 cps at 15 cpi 264 cps at 17 cpi 310 cps at 20 cpi 103 cps at 10 cpi 124 cps at 12 cpi 155 cps at 15 cpi 175...
... graphics printing can be selected using software commands. Printer Specifications Mechanical Printing method: 24-pin impact dot matrix Printing speed: High-speed draft Draft Draft condensed LQ LQ condensed 413 cps at 10 cpi 310 cps at 10 cpi 372 cps at 12 cpi 465 cps at 15 cpi 264 cps at 17 cpi 310 cps at 20 cpi 103 cps at 10 cpi 124 cps at 12 cpi 155 cps at 15 cpi 175...
User Manual
Page 169
... characters per inch (cpi) The number of paper into the printer. characters per inch (cpi). Also called fanfold paper. dithering A halftoning method in a particular language. Glossary auto line feed When this option is turned on in both long edges, is perforated between pages, and is supplied in a folded stack. utility, each letter or symbol is formed by the size of printing characters. See also pitch. bidirectional printing Printing in which the print head prints in the default-setting mode...
... characters per inch (cpi) The number of paper into the printer. characters per inch (cpi). Also called fanfold paper. dithering A halftoning method in a particular language. Glossary auto line feed When this option is turned on in both long edges, is perforated between pages, and is supplied in a folded stack. utility, each letter or symbol is formed by the size of printing characters. See also pitch. bidirectional printing Printing in which the print head prints in the default-setting mode...
User Manual
Page 171
... bidirectional printing. See also characters per inch (dpi). self test A method for checking the operation of the font, which the print head prints in the number of character per inch (cpi). standby position The position of your printed pages at the printer's tear-off and top-of-form positions. The standard is printed. Unidirectional printing is useful for printing graphics because it is aligned with the tear-off edge. Using the micro adjust feature, you can adjust the tear-off position so that the paper's perforation...
... bidirectional printing. See also characters per inch (dpi). self test A method for checking the operation of the font, which the print head prints in the number of character per inch (cpi). standby position The position of your printed pages at the printer's tear-off and top-of-form positions. The standard is printed. Unidirectional printing is useful for printing graphics because it is aligned with the tear-off edge. Using the micro adjust feature, you can adjust the tear-off position so that the paper's perforation...
Service Manual
Page 54
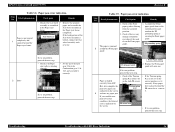
... grounding spring The paper is no problem, proceed the next step. • Check if the Paper eject roller is rotating correctly. PE sensor lever • If it correctly from the assemble suitable portion and position. Front Paper guide Front paper guide 2. Paper jam error indication Step No. Assemble the Front paper guide is placed around the Front paper guide. If any paper jam. Replace the Front paper guide with LED Error Indications 54 Paper jam error indication Step No...
... grounding spring The paper is no problem, proceed the next step. • Check if the Paper eject roller is rotating correctly. PE sensor lever • If it correctly from the assemble suitable portion and position. Front Paper guide Front paper guide 2. Paper jam error indication Step No. Assemble the Front paper guide is placed around the Front paper guide. If any paper jam. Replace the Front paper guide with LED Error Indications 54 Paper jam error indication Step No...
Service Manual
Page 101
.... CHECK P O IN T In case any service listed in order to maintain consistent printing function and quality, eliminating differences of the printer. If any parts is removed and assembled on this printer. Required Adjustment 1 2 3 4 5 Service item Printhead removal Head ID input NA Ink Change NA Bi-D Adjustme nt Q USB ID input NA Protection Counter reset NA Printhead replacement Q R S NA NA Main board replacement Q NA R S NA CR Unit replacement or removal NA NA Q NA NA CR Motor replacement...
.... CHECK P O IN T In case any service listed in order to maintain consistent printing function and quality, eliminating differences of the printer. If any parts is removed and assembled on this printer. Required Adjustment 1 2 3 4 5 Service item Printhead removal Head ID input NA Ink Change NA Bi-D Adjustme nt Q USB ID input NA Protection Counter reset NA Printhead replacement Q R S NA NA Main board replacement Q NA R S NA CR Unit replacement or removal NA NA Q NA NA CR Motor replacement...


