Product Manual
Page 2
... ...6 Hardware Installation 8 Installation Wizard 9 Installation Wizard Screen 14 Enabling UPnP for Windows XP/Me 17 Installing IP surveillance Software 21 Testing the DCS-3220G 25 Security ...26 Using and Configuring the DCS-3220G with a NAT Router 27 Using the DCS-3220G with an ...Installing IP surveillance Software 65 Launcher 70 Monitor Program 73 Scheduling 98 Playback Program 106 Schedule Video Recording with Motion Detection 121 Appendix ...124 Frequently Asked Questions 124 How to PING Your IP Address 127 Reset and Restore 128 I/O Connector 129 Adjusting the Camera...
... ...6 Hardware Installation 8 Installation Wizard 9 Installation Wizard Screen 14 Enabling UPnP for Windows XP/Me 17 Installing IP surveillance Software 21 Testing the DCS-3220G 25 Security ...26 Using and Configuring the DCS-3220G with a NAT Router 27 Using the DCS-3220G with an ...Installing IP surveillance Software 65 Launcher 70 Monitor Program 73 Scheduling 98 Playback Program 106 Schedule Video Recording with Motion Detection 121 Appendix ...124 Frequently Asked Questions 124 How to PING Your IP Address 127 Reset and Restore 128 I/O Connector 129 Adjusting the Camera...
Product Manual
Page 9
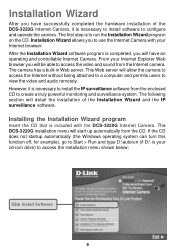
The first step is your cd-rom drive) to access the installation menu shown below: Click Install Software 9 The DCS-3220G installation menu will start up automatically from the Internet camera. Installation Wizard allows you to run the Installation Wizard program on the CD. If the CD does not startup automatically (the Windows operating system can turn this function off, for...
The first step is your cd-rom drive) to access the installation menu shown below: Click Install Software 9 The DCS-3220G installation menu will start up automatically from the Internet camera. Installation Wizard allows you to run the Installation Wizard program on the CD. If the CD does not startup automatically (the Windows operating system can turn this function off, for...
Product Manual
Page 10
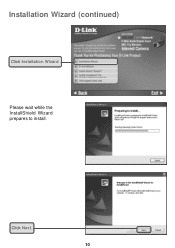
Installation Wizard (continued) Click Installation Wizard Please wait while the InstallShield Wizard prepares to install. Click Next. 10
Installation Wizard (continued) Click Installation Wizard Please wait while the InstallShield Wizard prepares to install. Click Next. 10
Product Manual
Page 11
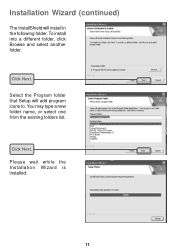
To install into a different folder, click Browse and select another folder. You may type a new folder name, or select one from the existing folders list. Please wait while the Installation Wizard is installed. 11 Click Next. Select the Program folder that Setup will install in the following folder. Click Next. Installation Wizard (continued) The InstallShield will add program icons to.
To install into a different folder, click Browse and select another folder. You may type a new folder name, or select one from the existing folders list. Please wait while the Installation Wizard is installed. 11 Click Next. Select the Program folder that Setup will install in the following folder. Click Next. Installation Wizard (continued) The InstallShield will add program icons to.

Product Manual
Page 12
Installation Wizard (continued) Installation is a device that supplies IP Addresses to ). The LED on the front of the DCS-3220G and an IP Address (which may or may be required if the Installation Wizard cannot find the camera. Click Finish. This will be correct ...depending on what you have your DCS3220G connected to its clients that are on your network, there will take approximately 5-7 seconds. 12 The opening Installation Wizard...
Installation Wizard (continued) Installation is a device that supplies IP Addresses to ). The LED on the front of the DCS-3220G and an IP Address (which may or may be required if the Installation Wizard cannot find the camera. Click Finish. This will be correct ...depending on what you have your DCS3220G connected to its clients that are on your network, there will take approximately 5-7 seconds. 12 The opening Installation Wizard...

Product Manual
Page 13
... are ready to use the DCS-3220G. 13 After you click on the Link to Selected Devices button. Click on the Link to Selected Devices button, Installation Wizard will now show a MAC address for the DCS-3220G and an IP address. You have a different IP Address. Installation Wizard (continued) The Installation Wizard will automatically open your camera! Your DCS3220G may not be correct...
... are ready to use the DCS-3220G. 13 After you click on the Link to Selected Devices button. Click on the Link to Selected Devices button, Installation Wizard will now show a MAC address for the DCS-3220G and an IP address. You have a different IP Address. Installation Wizard (continued) The Installation Wizard will automatically open your camera! Your DCS3220G may not be correct...

Product Manual
Page 14
... link all selected cameras. Click Next to configure Network settings for the camera. System Settings Enter a Camera Name and create a Root password for the camera. A second window will appear, prompting you to enter the camera's IP address or domain name. Remove Click to the network...any available cameras to connect to the network. Uncheck All Click to uncheck all selected devices to the network. Add Click to manually add a camera to remove the selected camera(s) from the network. Installation Wizard Screen The following options are available on the Installation Wizard screen by...
... link all selected cameras. Click Next to configure Network settings for the camera. System Settings Enter a Camera Name and create a Root password for the camera. A second window will appear, prompting you to enter the camera's IP address or domain name. Remove Click to the network...any available cameras to connect to the network. Uncheck All Click to uncheck all selected devices to the network. Add Click to manually add a camera to remove the selected camera(s) from the network. Installation Wizard Screen The following options are available on the Installation Wizard screen by...
Product Manual
Page 15
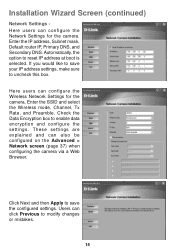
... can configure the Wireless Network Settings for the camera. Click Next and then Apply to modify changes or mistakes. 15 Enter the SSID and select the Wireless mode, Channel, Tx Rate, and Preamble. Check the Data Encryption box to enable data encryption and configure the settings. Installation Wizard Screen (continued) Network Settings Here users can...
... can configure the Wireless Network Settings for the camera. Click Next and then Apply to modify changes or mistakes. 15 Enter the SSID and select the Wireless mode, Channel, Tx Rate, and Preamble. Check the Data Encryption box to enable data encryption and configure the settings. Installation Wizard Screen (continued) Network Settings Here users can...

Product Manual
Page 16
Installation Wizard Screen (continued) The upgrade window allows users to factory defaults. Click the Reset to Default tab to reset the camera's settings to upload a saved firmware file. Locate the Firmware to confirm the upload. If the firmware is older than that currently on the camera. Package Information This displays information about the firmware and... - Selected Package This displays the file name of the firmware to be uploaded to display the current version and date. About - Reset to exit the Installation Wizard screen. 16 Upgrade - Click About to the camera.
Installation Wizard Screen (continued) The upgrade window allows users to factory defaults. Click the Reset to Default tab to reset the camera's settings to upload a saved firmware file. Locate the Firmware to confirm the upload. If the firmware is older than that currently on the camera. Package Information This displays information about the firmware and... - Selected Package This displays the file name of the firmware to be uploaded to display the current version and date. About - Reset to exit the Installation Wizard screen. 16 Upgrade - Click About to the camera.

Product Manual
Page 58
... changes effective If the suffix is omitted, the file named "video.jpg" on the external FTP server will restart and require the Installation Wizard software program to restore factory default settings. Configuration > Tools > Default Click on this screen to locate the IP address of the DCS3220G...3 o'clock, January 2nd, A.D. 2002. For instance, "[email protected]" means the JPEG image was captured at the specified interval. Using the DCS-3220G with an Internet browser (continued) Configuration > Tools > Applications (Continued) FTP put snapshots with date and time suffix -
... changes effective If the suffix is omitted, the file named "video.jpg" on the external FTP server will restart and require the Installation Wizard software program to restore factory default settings. Configuration > Tools > Default Click on this screen to locate the IP address of the DCS3220G...3 o'clock, January 2nd, A.D. 2002. For instance, "[email protected]" means the JPEG image was captured at the specified interval. Using the DCS-3220G with an Internet browser (continued) Configuration > Tools > Applications (Continued) FTP put snapshots with date and time suffix -

Product Manual
Page 126
...Installer icon is bad, how can I solve the problem? A2: The configuration on Page 49 for fluorescent light . Q: The images appear to adjust the image related parameters such as described in Adjusting the Internet Camera Focus in Windows and configure the computer with a valid IP address. Turn off DHCP from the setup wizard... connect the camera to the Advanced>Image Setting section on the Internet Camera image display is incorrect. Through the Advanced>Image Setting section of the Web management you need to be of this issue you need more than once from the Network Settings in ...
...Installer icon is bad, how can I solve the problem? A2: The configuration on Page 49 for fluorescent light . Q: The images appear to adjust the image related parameters such as described in Adjusting the Internet Camera Focus in Windows and configure the computer with a valid IP address. Turn off DHCP from the setup wizard... connect the camera to the Advanced>Image Setting section on the Internet Camera image display is incorrect. Through the Advanced>Image Setting section of the Web management you need to be of this issue you need more than once from the Network Settings in ...


