Product Manual
Page 3
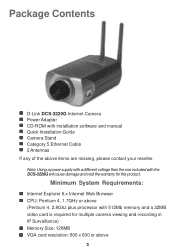
... video card is required for this product. Minimum System Requirements: Internet Explorer 6.x Internet Web Browser CPU: Pentium 4, 1.7GHz or above (Pentium 4, 2.8Ghz plus processor with installation software and manual Quick Installation Guide Camera Stand Category 5 Ethernet Cable 2 Antennas If any of the above 3 Note: Using a power supply with a different voltage than the one included with the DCS-3220G will cause damage and void the warranty for multiple camera viewing and recording in IP Surveillance) Memory Size...
... video card is required for this product. Minimum System Requirements: Internet Explorer 6.x Internet Web Browser CPU: Pentium 4, 1.7GHz or above (Pentium 4, 2.8Ghz plus processor with installation software and manual Quick Installation Guide Camera Stand Category 5 Ethernet Cable 2 Antennas If any of the above 3 Note: Using a power supply with a different voltage than the one included with the DCS-3220G will cause damage and void the warranty for multiple camera viewing and recording in IP Surveillance) Memory Size...
Product Manual
Page 4
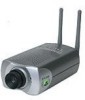
...demanding security and home/office monitoring needs. Introduction The D-Link SECURICAM NetworkTM DCS-3220G Wireless Internet Camera is a computer with the Internet Explorer Web browser (version 6.x or above). The DCS-3220G allows remote access from a conventional PC Camera because it is superior to 54 Mbps2 (Megabits per second of live image viewing with a valid IP Address. All that is required is a powerful surveillance system that is a standalone system with its motion-detection mode, capture still images and video images for remote monitoring. The Internet Camera can view...
...demanding security and home/office monitoring needs. Introduction The D-Link SECURICAM NetworkTM DCS-3220G Wireless Internet Camera is a computer with the Internet Explorer Web browser (version 6.x or above). The DCS-3220G allows remote access from a conventional PC Camera because it is superior to 54 Mbps2 (Megabits per second of live image viewing with a valid IP Address. All that is required is a powerful surveillance system that is a standalone system with its motion-detection mode, capture still images and video images for remote monitoring. The Internet Camera can view...

Product Manual
Page 5
... DCS-3220G Internet Camera can connect the Internet Camera to a variety of the D-Link product, which fails to install network cables. The Internet Camera provides an industry standard in/out external connector for closer viewing. Powerful Surveillance and Remote Monitoring Utility The powerful IP surveillance software application assigns an administrator with a pre-defined user ID and password who can configure and manage the Internet Camera directly from a remote site via the Intranet or the Internet. Supports a Variety of Protocols Supporting TCP/IP networking, SMTP...
... DCS-3220G Internet Camera can connect the Internet Camera to a variety of the D-Link product, which fails to install network cables. The Internet Camera provides an industry standard in/out external connector for closer viewing. Powerful Surveillance and Remote Monitoring Utility The powerful IP surveillance software application assigns an administrator with a pre-defined user ID and password who can configure and manage the Internet Camera directly from a remote site via the Intranet or the Internet. Supports a Variety of Protocols Supporting TCP/IP networking, SMTP...

Product Manual
Page 6
... flash indicating that the Internet Camera's settings are reverting back to the factory settings, then turn to green. This is the recommended cable type when the camera is pressed continuously for 5 seconds or when the Power LED changes from green to red for connections to provide a connection with a wireless network. This network port supports the NWay protocol, allowing the Internet Camera to a 100 Mbps Fast Ethernet network hub or switch. A reset to factory defaults is initiated when the reset button...
... flash indicating that the Internet Camera's settings are reverting back to the factory settings, then turn to green. This is the recommended cable type when the camera is pressed continuously for 5 seconds or when the Power LED changes from green to red for connections to provide a connection with a wireless network. This network port supports the NWay protocol, allowing the Internet Camera to a 100 Mbps Fast Ethernet network hub or switch. A reset to factory defaults is initiated when the reset button...
Product Manual
Page 7
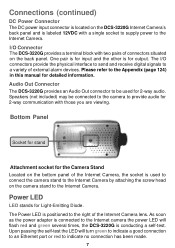
... manual for the Camera Stand Located on the bottom panel of the Internet Camera lens. Power LED LED stands for 2-way audio. The Power LED is conducting a self-test. Connections (continued) DC Power Connector The DC power input connector is located on the DCS-3220G Internet Camera's back panel and is for 2-way communication with those you are viewing. Audio Out Connector The DCS-3220G provides an Audio Out connector to be connected to the camera to the Internet Camera. Speakers (not included) may be used to connect...
... manual for the Camera Stand Located on the bottom panel of the Internet Camera lens. Power LED LED stands for 2-way audio. The Power LED is conducting a self-test. Connections (continued) DC Power Connector The DC power input connector is located on the DCS-3220G Internet Camera's back panel and is for 2-way communication with those you are viewing. Audio Out Connector The DCS-3220G provides an Audio Out connector to be connected to the camera to the Internet Camera. Speakers (not included) may be used to connect...
Product Manual
Page 8
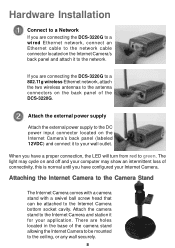
Hardware Installation Connect to a Network If you are holes located in the base of the camera stand allowing the Internet Camera to be attached to green. Attach the camera stand to the antenna connectors on the Internet Camera's back panel (labeled 12VDC) and connect it to the network. If you are connecting the DCS-3220G to a 802.11g wireless Ethernet network, attach the two wireless antennas to the Internet Camera and station it to...
Hardware Installation Connect to a Network If you are holes located in the base of the camera stand allowing the Internet Camera to be attached to green. Attach the camera stand to the antenna connectors on the Internet Camera's back panel (labeled 12VDC) and connect it to the network. If you are connecting the DCS-3220G to a 802.11g wireless Ethernet network, attach the two wireless antennas to the Internet Camera and station it to...

Product Manual
Page 12
... connected to). To accomplish this reset, lightly insert a paper clip (or a similar sized tool) into the reset hole on the back of the camera (see page 6 for the location of blinking red and green lights indicates a second reset cycle has completed. Installation Wizard (continued) Installation is a device that supplies IP Addresses to its clients that are on the same network. The opening Installation Wizard screen will appear and show a MAC address of the camera...
... connected to). To accomplish this reset, lightly insert a paper clip (or a similar sized tool) into the reset hole on the back of the camera (see page 6 for the location of blinking red and green lights indicates a second reset cycle has completed. Installation Wizard (continued) Installation is a device that supplies IP Addresses to its clients that are on the same network. The opening Installation Wizard screen will appear and show a MAC address of the camera...
Product Manual
Page 15
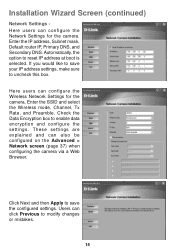
... reset IP address at boot is selected. Installation Wizard Screen (continued) Network Settings Here users can configure the Network Settings for the camera. Check the Data Encryption box to enable data encryption and configure the settings. Here users can also be configured on the Advanced > Network screen (page 37) when configuring the camera via a Web Browser. These settings are explained and can configure the Wireless Network Settings for the camera. Enter the IP address, Subnet mask, Default router IP, Primary DNS, and Secondary DNS...
... reset IP address at boot is selected. Installation Wizard Screen (continued) Network Settings Here users can configure the Network Settings for the camera. Check the Data Encryption box to enable data encryption and configure the settings. Here users can also be configured on the Advanced > Network screen (page 37) when configuring the camera via a Web Browser. These settings are explained and can configure the Wireless Network Settings for the camera. Enter the IP address, Subnet mask, Default router IP, Primary DNS, and Secondary DNS...

Product Manual
Page 16
... to factory defaults. Exit - Upgrade - Click the Exit tab to Default - Package Information This displays information about the firmware and plugin currently installed on the camera, a screen will appear indicating so and prompting the user to Upgrade Indicate the location of the firmware selected for upload. Reset to exit the Installation Wizard screen. 16 Selected Package This displays the file name of the firmware to be uploaded to upload a saved firmware file. Installation Wizard Screen (continued) The upgrade window allows users...
... to factory defaults. Exit - Upgrade - Click the Exit tab to Default - Package Information This displays information about the firmware and plugin currently installed on the camera, a screen will appear indicating so and prompting the user to Upgrade Indicate the location of the firmware selected for upload. Reset to exit the Installation Wizard screen. 16 Selected Package This displays the file name of the firmware to be uploaded to upload a saved firmware file. Installation Wizard Screen (continued) The upgrade window allows users...
Product Manual
Page 26
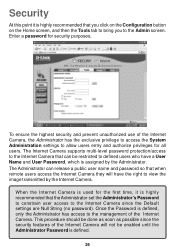
... the Configuration button on the Home screen, and then the Tools tab to bring you to the Admin screen. Once the Password is highly recommended that when remote users access the Internet Camera they will not be restricted to defined users who have the right to view the image transmitted by the Administrator. This procedure should be done as soon as possible since the Default settings are...
... the Configuration button on the Home screen, and then the Tools tab to bring you to the Admin screen. Once the Password is highly recommended that when remote users access the Internet Camera they will not be restricted to defined users who have the right to view the image transmitted by the Administrator. This procedure should be done as soon as possible since the Default settings are...
Product Manual
Page 27
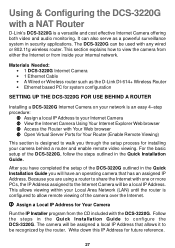
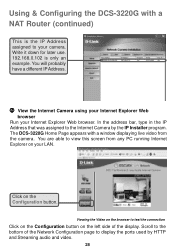
... Web browser Open Virtual Server Ports for Your Router (Enable Remote Viewing) This section is a versatile and cost effective Internet Camera offering both video and audio monitoring. Materials Needed: • 1 DCS-3220G Internet Camera • 1 Ethernet Cable • A Wired or Wireless router such as a powerful surveillance system in the Quick Installation Guide you will have completed the setup of the DCS-3220G outlined in security applications. Assign a Local IP Address for Your Camera Run the IP Installer program from inside your internal network. Using & Configuring...
... Web browser Open Virtual Server Ports for Your Router (Enable Remote Viewing) This section is a versatile and cost effective Internet Camera offering both video and audio monitoring. Materials Needed: • 1 DCS-3220G Internet Camera • 1 Ethernet Cable • A Wired or Wireless router such as a powerful surveillance system in the Quick Installation Guide you will have completed the setup of the DCS-3220G outlined in security applications. Assign a Local IP Address for Your Camera Run the IP Installer program from inside your internal network. Using & Configuring...
Product Manual
Page 28
... Internet Explorer Web browser. Using & Configuring the DCS-3220G with a window displaying live video from any PC running Internet Explorer on the left side of the Network Configuration page to display the ports used by the IP Installer program. You are able to your camera. Click on the Configuration button. Write it down for later use. 192.168.0.102 is the IP Address assigned to view this screen from the camera. Scroll to the Internet Camera by HTTP and Streaming audio and video...
... Internet Explorer Web browser. Using & Configuring the DCS-3220G with a window displaying live video from any PC running Internet Explorer on the left side of the Network Configuration page to display the ports used by the IP Installer program. You are able to your camera. Click on the Configuration button. Write it down for later use. 192.168.0.102 is the IP Address assigned to view this screen from the camera. Scroll to the Internet Camera by HTTP and Streaming audio and video...

Product Manual
Page 29
... your camera over the Internet. 29 Configure the initial settings of the DI-614+ by other devices (e.g. Using & Configuring the DCS-3220G with a NAT Router (continued) These are the port settings for your router on the public network and allows it to access the Internet. Ports that your router's WAN IP address can be changed if they are already in the DI-614+ Quick Installation Guide. The WAN IP Address will need to type in a multiple camera...
... your camera over the Internet. 29 Configure the initial settings of the DI-614+ by other devices (e.g. Using & Configuring the DCS-3220G with a NAT Router (continued) These are the port settings for your router on the public network and allows it to access the Internet. Ports that your router's WAN IP address can be changed if they are already in the DI-614+ Quick Installation Guide. The WAN IP Address will need to type in a multiple camera...
Product Manual
Page 36
... the client connects to speak. This protocol must push and hold the speaker button each time to the DCS-3220G successfully, the working protocol will be displayed in the user's PC and used for more real-time audio and video streams. However, packets may be dropped and images obscured due to disable or enable audio when viewing video. Using the DCS-3220G with the new setting. The chosen protocol will be recorded in...
... the client connects to speak. This protocol must push and hold the speaker button each time to the DCS-3220G successfully, the working protocol will be displayed in the user's PC and used for more real-time audio and video streams. However, packets may be dropped and images obscured due to disable or enable audio when viewing video. Using the DCS-3220G with the new setting. The chosen protocol will be recorded in...
Product Manual
Page 38
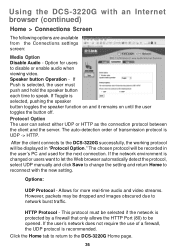
... type http://192.168.0.100:8080 in a different subnet. Invalid router settings may cause the failure of 192.168.0.100) from 80 to determine if the destination is configured, this box should be set to backup the primary one. Default router - Primary domain name server that translates names to destinations in the Web browser bar. 38 Using the DCS-3220G with an Internet browser (continued) Configuration > Advanced > Network Reset...
... type http://192.168.0.100:8080 in a different subnet. Invalid router settings may cause the failure of 192.168.0.100) from 80 to determine if the destination is configured, this box should be set to backup the primary one. Default router - Primary domain name server that translates names to destinations in the Web browser bar. 38 Using the DCS-3220G with an Internet browser (continued) Configuration > Advanced > Network Reset...

Product Manual
Page 43
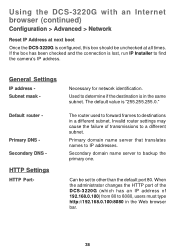
... connection for the backup FTP server. Click Apply to make changes effective Invalid settings may be used if the 1st FTP server is located inside a network that this rule and allow the uploading of the external FTP server. Granted user name on the backup FTP server. Passive mode setting for FTP may cause the DCS-3220G to the 2nd FTP server. 2nd FTP user name - 2nd FTP password 2nd FTP remote folder Secondary FTP passive Mode - Consult with an Internet browser (continued) Configuration > Advanced...
... connection for the backup FTP server. Click Apply to make changes effective Invalid settings may be used if the 1st FTP server is located inside a network that this rule and allow the uploading of the external FTP server. Granted user name on the backup FTP server. Passive mode setting for FTP may cause the DCS-3220G to the 2nd FTP server. 2nd FTP user name - 2nd FTP password 2nd FTP remote folder Secondary FTP passive Mode - Consult with an Internet browser (continued) Configuration > Advanced...
Product Manual
Page 61
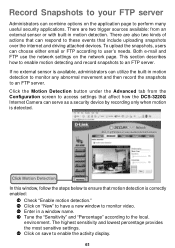
... either email or FTP according to access settings that affect how the DCS-3220G Internet Camera can respond to ensure that motion detection is detected. Click the Motion Detection button under the Advanced tab from an external sensor or with built-in a window name. There are two trigger sources available: from the Configuration screen to user's needs. X Back Door Click Motion Detection In this window, follow the steps below to these events that...
... either email or FTP according to access settings that affect how the DCS-3220G Internet Camera can respond to ensure that motion detection is detected. Click the Motion Detection button under the Advanced tab from an external sensor or with built-in a window name. There are two trigger sources available: from the Configuration screen to user's needs. X Back Door Click Motion Detection In this window, follow the steps below to these events that...
Product Manual
Page 121
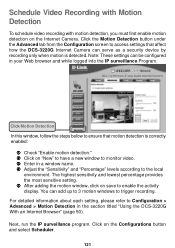
... on save to ensure that affect how the DCS-3220G Internet Camera can serve as a security device by recording only when motion is correctly enabled: Check "Enable motion detection." Schedule Video Recording with Motion Detection To schedule video recording with motion detection, you must first enable motion detection on the Configurations button and select Scheduler. 121 Note: These settings can add up to 3 motion windows to trigger recording. Click on the Internet Camera. Click the Motion Detection button under the Advanced tab from the Configuration screen to monitor video...
... on save to ensure that affect how the DCS-3220G Internet Camera can serve as a security device by recording only when motion is correctly enabled: Check "Enable motion detection." Schedule Video Recording with Motion Detection To schedule video recording with motion detection, you must first enable motion detection on the Configurations button and select Scheduler. 121 Note: These settings can add up to 3 motion windows to trigger recording. Click on the Internet Camera. Click the Motion Detection button under the Advanced tab from the Configuration screen to monitor video...

Product Manual
Page 125
... DCS-3220G is used only on a computer? The DCS-3220G uses port 5001 for control and synchronization, port 5002 for streaming audio and port 5003 for the Internet Camera to be accessed outside your network. A2: Other possible problems might be faulty. If the problem is open for use with any Web server you change the default ports) need to have running on the network? The firewall may not be configured on the network, port 80 is not solved the Internet Camera...
... DCS-3220G is used only on a computer? The DCS-3220G uses port 5001 for control and synchronization, port 5002 for streaming audio and port 5003 for the Internet Camera to be accessed outside your network. A2: Other possible problems might be faulty. If the problem is open for use with any Web server you change the default ports) need to have running on the network? The firewall may not be configured on the network, port 80 is not solved the Internet Camera...
Product Manual
Page 130
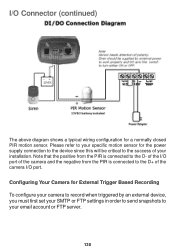
Configuring Your Camera for External Trigger Based Recording To configure your camera to record when triggered by an external device, you must first set your SMTP or FTP settings in order to send snapshots to the success of your email account or FTP server. 130 Please refer to your specific motion sensor for a normally closed PIR motion sensor. I /O port. Note that the positive from the PIR is connected to the D+ of the...
Configuring Your Camera for External Trigger Based Recording To configure your camera to record when triggered by an external device, you must first set your SMTP or FTP settings in order to send snapshots to the success of your email account or FTP server. 130 Please refer to your specific motion sensor for a normally closed PIR motion sensor. I /O port. Note that the positive from the PIR is connected to the D+ of the...


