User Manual
Page 2
...Power Adapter ...8 Autorun Installation ...9 Software Installation ...10 Adjusting the Camera Focus ...19 Setting up a Wireless Connection with WPS (DCS-2121 only)...20 Using the Configuration Menu ...21 LIVE VIDEO...22 LIVE VIDEO > Camera ...22 SETUP ...23 SETUP > Wizard ...23 SETUP > Network Setup...24 SETUP > Wireless (DCS-2121 only) ...25 SETUP > Dynamic DNS...26 SETUP > Image... Device Management...36 MAINTENANCE > Backup and Restore ...37 MAINTENANCE > Firmware Upgrade ...38 STATUS ...39 STATUS> Device Info...39 STATUS> Log...40 HELP ...41 Installing the DCS-2102/2121 Behind a Router...42 i
...Power Adapter ...8 Autorun Installation ...9 Software Installation ...10 Adjusting the Camera Focus ...19 Setting up a Wireless Connection with WPS (DCS-2121 only)...20 Using the Configuration Menu ...21 LIVE VIDEO...22 LIVE VIDEO > Camera ...22 SETUP ...23 SETUP > Wizard ...23 SETUP > Network Setup...24 SETUP > Wireless (DCS-2121 only) ...25 SETUP > Dynamic DNS...26 SETUP > Image... Device Management...36 MAINTENANCE > Backup and Restore ...37 MAINTENANCE > Firmware Upgrade ...38 STATUS ...39 STATUS> Device Info...39 STATUS> Log...40 HELP ...41 Installing the DCS-2102/2121 Behind a Router...42 i
User Manual
Page 3
1) Identify Your Camera on the Network ...42 2) Assign a Local IP Address and Port for Your Camera ...43 3) Open the HTTP Port ...44 4) Open Virtual Server Ports to Enable Remote Image Viewing ...46 Viewing Your Camera Over the Internet ...47 Viewing Your Camera Over the Internet Behind a Router...47 Frequently Asked Questions...48 Internet Camera Features ...48 Internet Camera Installation ...49 How to Ping Your IP Address...51 Time Zone Table ...53 DI/DO Input specifications ...54 Technical Specifications...55 ii
1) Identify Your Camera on the Network ...42 2) Assign a Local IP Address and Port for Your Camera ...43 3) Open the HTTP Port ...44 4) Open Virtual Server Ports to Enable Remote Image Viewing ...46 Viewing Your Camera Over the Internet ...47 Viewing Your Camera Over the Internet Behind a Router...47 Frequently Asked Questions...48 Internet Camera Features ...48 Internet Camera Installation ...49 How to Ping Your IP Address...51 Time Zone Table ...53 DI/DO Input specifications ...54 Technical Specifications...55 ii

User Manual
Page 4
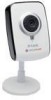
DCS-2102 Megapixel Internet Camera „ D-Link DCS-2102 Megapixel Internet Camera „ CAT 5 Ethernet Cable „ Power Adapter „ Mounting Kit „ Quick Installation Guide „ CD-ROM with Software and Product Documentation DCS-2121 Megapixel Wireless Internet Camera „ D-Link DCS-2121 Megapixel Wireless Internet Camera „ Detachable antenna „ CAT 5 Ethernet Cable „ Power Adapter „ Mounting Kit „ Quick...
DCS-2102 Megapixel Internet Camera „ D-Link DCS-2102 Megapixel Internet Camera „ CAT 5 Ethernet Cable „ Power Adapter „ Mounting Kit „ Quick Installation Guide „ CD-ROM with Software and Product Documentation DCS-2121 Megapixel Wireless Internet Camera „ D-Link DCS-2121 Megapixel Wireless Internet Camera „ Detachable antenna „ CAT 5 Ethernet Cable „ Power Adapter „ Mounting Kit „ Quick...
User Manual
Page 5
Minimum System Requirements „ Wired (10/100 Fast Ethernet) network „ Wireless 802.11g network (for DCS-2121 only, for wireless use only) „ PC with: y 1.3 GHz processor or higher y 128 MB memory or more y Windows XP SP2 or Vista y Internet Explorer 6 or higher „ Multiple camera operation requires: y 2.4 GHz processor or higher y 512 MB memory or more y Video card/chipset with 32 MB RAM y Windows XP SP2 or Vista y Internet Explorer 6 or higher „ Wireless use requires (DCS-2121 only): y 802.11g Wireless Router or Access Point (for wireless use) 2
Minimum System Requirements „ Wired (10/100 Fast Ethernet) network „ Wireless 802.11g network (for DCS-2121 only, for wireless use only) „ PC with: y 1.3 GHz processor or higher y 128 MB memory or more y Windows XP SP2 or Vista y Internet Explorer 6 or higher „ Multiple camera operation requires: y 2.4 GHz processor or higher y 512 MB memory or more y Video card/chipset with 32 MB RAM y Windows XP SP2 or Vista y Internet Explorer 6 or higher „ Wireless use requires (DCS-2121 only): y 802.11g Wireless Router or Access Point (for wireless use) 2
User Manual
Page 6
... Congratulations on your purchase of both image quality and bandwidth efficiency „ WPS support for easy network setup (DCS-2121) „ 802.11g wireless connectivity (DCS-2121) 3 The DCS-2102/2121 is a complete system with remote monitoring and motion detection features for a complete and cost...allows optimization of the DCS-2102/2121 Megapixel Internet Camera! The DCS-2102/2121 also comes with a built-in CPU and web server that transmits high quality video images for your Ethernet/Fast Ethernet or 802.11g wireless network. Unlike a standard webcam, the DCS-2102/2121 is a ...
... Congratulations on your purchase of both image quality and bandwidth efficiency „ WPS support for easy network setup (DCS-2121) „ 802.11g wireless connectivity (DCS-2121) 3 The DCS-2102/2121 is a complete system with remote monitoring and motion detection features for a complete and cost...allows optimization of the DCS-2102/2121 Megapixel Internet Camera! The DCS-2102/2121 also comes with a built-in CPU and web server that transmits high quality video images for your Ethernet/Fast Ethernet or 802.11g wireless network. Unlike a standard webcam, the DCS-2102/2121 is a ...
User Manual
Page 7
...grabber cards. The Site Survey feature also allows you can configure and manage the Internet Camera directly from the Web browser to nearby wireless networks. 4 Features and Benefits „ Simple to Use: The DCS-2102/2121 is a computer with Internet Explorer 6.0 or above. „ Supports a ... Configuration: Using a standard Web browser, Administrators can access your existing network environment. It can also be integrated easily into your DCS-2102/2121 at anytime, from anywhere in the world. The Internet Camera allows remote access from a Web browser for live video images over ...
...grabber cards. The Site Survey feature also allows you can configure and manage the Internet Camera directly from the Web browser to nearby wireless networks. 4 Features and Benefits „ Simple to Use: The DCS-2102/2121 is a computer with Internet Explorer 6.0 or above. „ Supports a ... Configuration: Using a standard Web browser, Administrators can access your existing network environment. It can also be integrated easily into your DCS-2102/2121 at anytime, from anywhere in the world. The Internet Camera allows remote access from a Web browser for live video images over ...
User Manual
Page 8
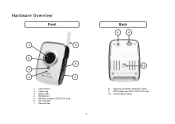
Status LED 4. Reset button 5 Back 8 9 10 8. Focus ring 3. Wireless antenna (DCS-2121 only) 6. Camera base mount WPS button and LED (DCS-2121 only) 10. Hardware Overview Front 1 5 2 6 3 4 7 1. Microphone 5. Camera lens 2. SD Card slot 7. Antenna connector (DCS-2121 only) 9.
Status LED 4. Reset button 5 Back 8 9 10 8. Focus ring 3. Wireless antenna (DCS-2121 only) 6. Camera base mount WPS button and LED (DCS-2121 only) 10. Hardware Overview Front 1 5 2 6 3 4 7 1. Microphone 5. Camera lens 2. SD Card slot 7. Antenna connector (DCS-2121 only) 9.
User Manual
Page 10
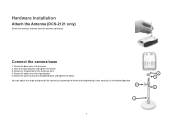
Take the hinge bracket and tighten the wheel. 3. Screw the hinge bracket into the base. 2. Screw the camera onto the completed base and tighten the collar. You can adjust the angle and pivot of the camera by loosening the wheel and retightening it after moving it to the desired position. 2 1 7 5 4 3 Screw the base stem into the base stem. 4. Screw the collar onto the hinge bracket. 5. Hardware Installation Attach the Antenna (DCS-2121 only) Screw the wireless antenna onto the antenna connector. Connect the camera base 1.
Take the hinge bracket and tighten the wheel. 3. Screw the hinge bracket into the base. 2. Screw the camera onto the completed base and tighten the collar. You can adjust the angle and pivot of the camera by loosening the wheel and retightening it after moving it to the desired position. 2 1 7 5 4 3 Screw the base stem into the base stem. 4. Screw the collar onto the hinge bracket. 5. Hardware Installation Attach the Antenna (DCS-2121 only) Screw the wireless antenna onto the antenna connector. Connect the camera base 1.
User Manual
Page 11
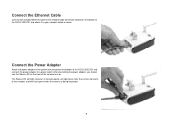
..., you should see the Status LED on the front of the camera turn on the bottom of the DCS-2102/2121 and connect the power adapter to a power outlet. Connect the Ethernet Cable Connect the included Ethernet cable to the network cable connector located on . Connect the Power Adapter Attach the power... adapter to the power jack located on the bottom of the DCS-2102/2121 and attach it receives power, will light green after the camera connects to the network, and will light red when it to your network switch or router. The Status LED will flash green when the...
..., you should see the Status LED on the front of the camera turn on the bottom of the DCS-2102/2121 and connect the power adapter to a power outlet. Connect the Ethernet Cable Connect the included Ethernet cable to the network cable connector located on . Connect the Power Adapter Attach the power... adapter to the power jack located on the bottom of the DCS-2102/2121 and attach it receives power, will light green after the camera connects to the network, and will light red when it to your network switch or router. The Status LED will flash green when the...
User Manual
Page 12
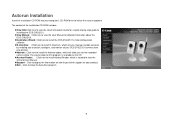
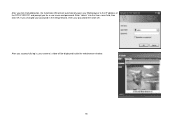
...the autorun program. Click to view recorded camera video. The source code for this program is needed to get further support for detailed information about the DCS-2102/2121. „Installation Wizard: Click here to install the DCS-2102/2121's initial configuration software. „D-ViewCam...: Click here to install D-ViewCam, which lets you manage multiple cameras by enabling you to search, configure, and monitor all your DCS-2102/2121 cameras from one...
...the autorun program. Click to view recorded camera video. The source code for this program is needed to get further support for detailed information about the DCS-2102/2121. „Installation Wizard: Click here to install the DCS-2102/2121's initial configuration software. „D-ViewCam...: Click here to install D-ViewCam, which lets you manage multiple cameras by enabling you to search, configure, and monitor all your DCS-2102/2121 cameras from one...
User Manual
Page 18
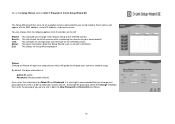
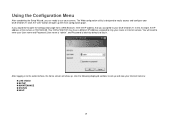
...ID and Password. This will refresh the list of the selected camera. This will open the setup wizard, which will guide you through initial network setup of cameras after rescanning for all available cameras connected to keep your camera's network setup. This closes the Setup Wizard program. It is blank]... enter the password you want to use in order to your wired network. Wizard Clicking on your wired network. You can choose from the following options from the buttons on StartÆ ProgramsÆ D-Link Setup Wizard SE. To run the Setup Wizard, click on the left...
...ID and Password. This will refresh the list of the selected camera. This will open the setup wizard, which will guide you through initial network setup of cameras after rescanning for all available cameras connected to keep your camera's network setup. This closes the Setup Wizard program. It is blank]... enter the password you want to use in order to your wired network. Wizard Clicking on your wired network. You can choose from the following options from the buttons on StartÆ ProgramsÆ D-Link Setup Wizard SE. To run the Setup Wizard, click on the left...
User Manual
Page 19
... connection. After entering your settings, click Next. (DCS-2121 only) The availability of what these settings should use a static IP, the camera's IP Address, Subnet Mask, Gateway, and DNS addresses must correspond with your network. Click Infrastructure for use with your wireless network settings for your wireless network. Click Next. Click Next. 16 Here, you...
... connection. After entering your settings, click Next. (DCS-2121 only) The availability of what these settings should use a static IP, the camera's IP Address, Subnet Mask, Gateway, and DNS addresses must correspond with your network. Click Infrastructure for use with your wireless network settings for your wireless network. Click Next. Click Next. 16 Here, you...

User Manual
Page 20
Wait until the Link LED on the camera turns green, then click Link to launch your Web browser and view your settings. This may take a few minutes. (Wireless settings are for DCS-2121 only) Camera setup is now complete! Otherwise, click Restart to modify your camera settings. If you need to make any changes, click Back to save and apply your images. 17
Wait until the Link LED on the camera turns green, then click Link to launch your Web browser and view your settings. This may take a few minutes. (Wireless settings are for DCS-2121 only) Camera setup is now complete! Otherwise, click Restart to modify your camera settings. If you need to make any changes, click Back to save and apply your images. 17
User Manual
Page 21
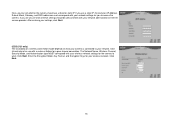
After you click the Link button, the Installation Wizard will be displayed inside the web browser window. 18 Enter "admin" into the User name field, then click OK. If you for a user name and password. After you successfully log in the Setup Wizard, enter your Web browser to the IP address of the DCS-2102/2121 and prompt you changed your password in , your camera's video will automatically open your password then click OK.
After you click the Link button, the Installation Wizard will be displayed inside the web browser window. 18 Enter "admin" into the User name field, then click OK. If you for a user name and password. After you successfully log in the Setup Wizard, enter your Web browser to the IP address of the DCS-2102/2121 and prompt you changed your password in , your camera's video will automatically open your password then click OK.
User Manual
Page 22
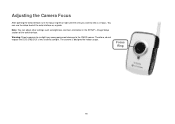
The camera is in the SETUP > Image Setup section of the web interface as brightness, contrast, orientation in focus. You can adjust other settings such as a guide. Note: You can use the video feed of the web interface. Warning: Direct exposure to sunlight may cause permanent damage to direct sunlight. Therefore, do not expose the DCS-2102/2121's lens to the CMOS sensor. Focus Ring 19 Adjusting the Camera Focus After opening the web interface, turn the focus ring left or right until the area you want to view is designed for indoor usage.
The camera is in the SETUP > Image Setup section of the web interface as brightness, contrast, orientation in focus. You can adjust other settings such as a guide. Note: You can use the video feed of the web interface. Warning: Direct exposure to sunlight may cause permanent damage to direct sunlight. Therefore, do not expose the DCS-2102/2121's lens to the CMOS sensor. Focus Ring 19 Adjusting the Camera Focus After opening the web interface, turn the focus ring left or right until the area you want to view is designed for indoor usage.

User Manual
Page 23
...with WPS (DCS-2121 only) If your wireless access point or router supports push-button Wireless Protected Setup (WPS), you may need to enter the web interface to activate WPS. After plugging the power adapter to your devices to activate WPS and allow your camera and the ... connection. Note: On some routers/access points, you can quickly configure your wireless network and camera without using the camera's web interface. After WPS is successfully activated, the WPS LED on the back of the camera for further assistance. WPS button 20 After pressing the button, it should start flashing...
...with WPS (DCS-2121 only) If your wireless access point or router supports push-button Wireless Protected Setup (WPS), you may need to enter the web interface to activate WPS. After plugging the power adapter to your devices to activate WPS and allow your camera and the ... connection. Note: On some routers/access points, you can quickly configure your wireless network and camera without using the camera's web interface. After WPS is successfully activated, the WPS LED on the back of the camera for further assistance. WPS button 20 After pressing the button, it should start flashing...
User Manual
Page 24
... you are ready to use your Internet Camera: „ LIVE VIDEO „ SETUP „ MAINTENANCE „ STATUS „ HELP 21 Click the "Link" button will need to enter your User name and Password (User name is "admin", and Password is blank by your DCS-2102/2121. If you would like to set... up and view your camera. Use the following displayed sections to open up .
... you are ready to use your Internet Camera: „ LIVE VIDEO „ SETUP „ MAINTENANCE „ STATUS „ HELP 21 Click the "Link" button will need to enter your User name and Password (User name is "admin", and Password is blank by your DCS-2102/2121. If you would like to set... up and view your camera. Use the following displayed sections to open up .
User Manual
Page 25
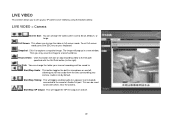
...: Click it to a local hard drive. Start/Stop Talking: This will start or stop recording video to the file path specified with others near the camera. LIVE VIDEO This section allows you to set up in full screen mode. Set Path: You can change the video screen size to Small, Medium... view the video in a new window. Start/Stop GP Output: This will toggle the GP DO output on your manual recordings will pop up your camera. Record Video: Click this image to capture a snapshot image. Start/Stop Audio: This button toggles the built-in microphone on by using the buttons below...
...: Click it to a local hard drive. Start/Stop Talking: This will start or stop recording video to the file path specified with others near the camera. LIVE VIDEO This section allows you to set up in full screen mode. Set Path: You can change the video screen size to Small, Medium... view the video in a new window. Start/Stop GP Output: This will toggle the GP DO output on your manual recordings will pop up your camera. Record Video: Click this image to capture a snapshot image. Start/Stop Audio: This button toggles the built-in microphone on by using the buttons below...

User Manual
Page 26
...and snapshots. You can also see these settings by clicking on the left side (Network Setup / Wireless Setup / Motion Detection / Snapshot). Note: If the camera is set to SXGA mode in each step of your camera. Simply follow the instructions given in Audio and Video, Motion Detection and Motion ...Triggered Snapshots are disabled. 23 SETUP This section allows you can use the Internet Connection Setup Wizard for initial network setup, and you to further set up...
...and snapshots. You can also see these settings by clicking on the left side (Network Setup / Wireless Setup / Motion Detection / Snapshot). Note: If the camera is set to SXGA mode in each step of your camera. Simply follow the instructions given in Audio and Video, Motion Detection and Motion ...Triggered Snapshots are disabled. 23 SETUP This section allows you can use the Internet Connection Setup Wizard for initial network setup, and you to further set up...
User Manual
Page 27
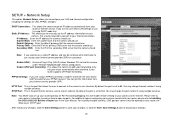
...'s instruction manual on configuring your camera to Installing the DCS-2102/2121 Behind a Router later in the User Manual. Default Gateway: Enter the default gateway that the camera should use , contact your PPPoE account. Note: You MUST also set to use . For additional help on how to get this camera under "Network Neighborhood" without configuration. You...
...'s instruction manual on configuring your camera to Installing the DCS-2102/2121 Behind a Router later in the User Manual. Default Gateway: Enter the default gateway that the camera should use , contact your PPPoE account. Note: You MUST also set to use . For additional help on how to get this camera under "Network Neighborhood" without configuration. You...


