Owners Manual
Page 1
K855PCM1DMX Before using it, be sure to read the precautions contained in this User's Guide, and keep the User's Guide in a safe place for purchasing this CASIO Product. E Digital Camera EX-Z3 User's Guide Thank you for future reference.
K855PCM1DMX Before using it, be sure to read the precautions contained in this User's Guide, and keep the User's Guide in a safe place for purchasing this CASIO Product. E Digital Camera EX-Z3 User's Guide Thank you for future reference.
Owners Manual
Page 2
Camera Rechargeable lithium ion battery (NP-20) PHOTO CHARGE USB USB Cradle (CA-21) Strap CD-ROM USB Cable Basic Reference • Note that all of ... soon as possible. Special AC Adaptor (Inlet Type) * The shape of the AC adaptor depends on the area where you purchased the camera. If something is missing, contact your camera. AC power cord * 2 Special AC Adaptor (Plug-in Type) INTRODUCTION INTRODUCTION Unpacking Check to make sure that the shape of the AC...
Camera Rechargeable lithium ion battery (NP-20) PHOTO CHARGE USB USB Cradle (CA-21) Strap CD-ROM USB Cable Basic Reference • Note that all of ... soon as possible. Special AC Adaptor (Inlet Type) * The shape of the AC adaptor depends on the area where you purchased the camera. If something is missing, contact your camera. AC power cord * 2 Special AC Adaptor (Plug-in Type) INTRODUCTION INTRODUCTION Unpacking Check to make sure that the shape of the AC...

Owners Manual
Page 3
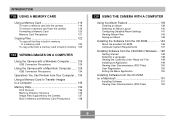
... record an image 17 To view a recorded image 17 To delete an image 18 19 GETTING READY About This Manual 19 General Guide 20 Camera 20 USB Cradle 21 Monitor Screen Contents 22 REC mode 22 PLAY mode 23 Changing the Contents of the Monitor Screen 24 Indicator Lamps 24... 25 Power Requirements 25 To load the battery 25 To remove the battery 27 To charge the battery 27 Power Supply Precautions 32 Turning the Camera On and Off 35 Configuring Power Saving Settings 36 Using the On-screen Menus 37 Configuring Display Language and Clock Settings ... 39 To configure...
... record an image 17 To view a recorded image 17 To delete an image 18 19 GETTING READY About This Manual 19 General Guide 20 Camera 20 USB Cradle 21 Monitor Screen Contents 22 REC mode 22 PLAY mode 23 Changing the Contents of the Monitor Screen 24 Indicator Lamps 24... 25 Power Requirements 25 To load the battery 25 To remove the battery 27 To charge the battery 27 Power Supply Precautions 32 Turning the Camera On and Off 35 Configuring Power Saving Settings 36 Using the On-screen Menus 37 Configuring Display Language and Clock Settings ... 39 To configure...

Owners Manual
Page 4
...Precautions 45 About Auto Focus 46 About the REC Mode Monitor Screen 46 Using the Optical Viewfinder 47 Using Zoom 48 Optical Zoom 48 Digital Zoom 49 Using the Flash 50 Flash Unit Status 52 Flash Precautions 52 Using the Self-timer 53 Specifying Image Size and Quality ...Coupling Shot 69 Recording a Subject onto an Existing Background Image (Pre-shot 71 Using the Movie Mode 73 Using the Histogram 75 REC Mode Camera Settings 76 Specifying ISO Sensitivity 76 Turning Image Review On and Off 77 Assigning Functions to the [̇] and [̈] Keys 77 Specifying ...
...Precautions 45 About Auto Focus 46 About the REC Mode Monitor Screen 46 Using the Optical Viewfinder 47 Using Zoom 48 Optical Zoom 48 Digital Zoom 49 Using the Flash 50 Flash Unit Status 52 Flash Precautions 52 Using the Self-timer 53 Specifying Image Size and Quality ...Coupling Shot 69 Recording a Subject onto an Existing Background Image (Pre-shot 71 Using the Movie Mode 73 Using the Histogram 75 REC Mode Camera Settings 76 Specifying ISO Sensitivity 76 Turning Image Review On and Off 77 Assigning Functions to the [̇] and [̈] Keys 77 Specifying ...
Owners Manual
Page 6
... a file from a memory card to built-in memory 123 124 VIEWING IMAGES ON A COMPUTER Using the Camera with a Windows Computer ........ 124 USB Connection Precautions 129 Using the Camera with a Macintosh Computer ....... 129 USB Connection Precautions 134 Operations You Can Perform from Your Computer .. 134 ...135 Memory Data 136 DCF Protocol 136 Memory Directory Structure 136 Image Files Supported by the Camera 137 Built-in Memory and Memory Card Precautions 138 139 USING THE CAMERA WITH A COMPUTER Using the Album Feature 139 Creating an album 139 Selecting an Album Layout...
... a file from a memory card to built-in memory 123 124 VIEWING IMAGES ON A COMPUTER Using the Camera with a Windows Computer ........ 124 USB Connection Precautions 129 Using the Camera with a Macintosh Computer ....... 129 USB Connection Precautions 134 Operations You Can Perform from Your Computer .. 134 ...135 Memory Data 136 DCF Protocol 136 Memory Directory Structure 136 Image Files Supported by the Camera 137 Built-in Memory and Memory Card Precautions 138 139 USING THE CAMERA WITH A COMPUTER Using the Album Feature 139 Creating an album 139 Selecting an Album Layout...
Owners Manual
Page 9
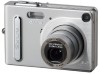
...34 million total pixels) for images that print beautifully. • 2.0-inch TFT color LCD monitor screen • 12X seamless zoom 3X optical zoom, 4X digital zoom • 10MB Flash memory Images can be recorded without using a memory card. • Support for SD memory cards and MMC (MultiMedia Cards)...• Best Shot Simply select the sample scene that include you and your friend, even if you add a subject to record and the camera performs troublesome setups automatically for your current location. You can select from among 162 cities in the Best Shot mode. • Triple Self-timer...
...34 million total pixels) for images that print beautifully. • 2.0-inch TFT color LCD monitor screen • 12X seamless zoom 3X optical zoom, 4X digital zoom • 10MB Flash memory Images can be recorded without using a memory card. • Support for SD memory cards and MMC (MultiMedia Cards)...• Best Shot Simply select the sample scene that include you and your friend, even if you add a subject to record and the camera performs troublesome setups automatically for your current location. You can select from among 162 cities in the Best Shot mode. • Triple Self-timer...
Owners Manual
Page 10
...Web browser. It also comes with audio • DCF Data Storage DCF (Design rule for Camera File system) data storage protocol provides image inter-compatibility between the digital camera and printers. • PRINT Image Matching II Compatible Images include PRINT Image Matching II data ...(mode setting and other camera setup information). Images can also have a specific image appear on the ...
...Web browser. It also comes with audio • DCF Data Storage DCF (Design rule for Camera File system) data storage protocol provides image inter-compatibility between the digital camera and printers. • PRINT Image Matching II Compatible Images include PRINT Image Matching II data ...(mode setting and other camera setup information). Images can also have a specific image appear on the ...
Owners Manual
Page 11
... shock. Doing so can damage your eyesight. • Keep the small parts and accessories of this camera" and "the camera" refer to the CASIO EX-Z3 Digital Camera. • Never try to observe the following important precautions whenever using the flash, the camera should be at least one meter (3.3´) from the eyes of the subject. • Keep...
... shock. Doing so can damage your eyesight. • Keep the small parts and accessories of this camera" and "the camera" refer to the CASIO EX-Z3 Digital Camera. • Never try to observe the following important precautions whenever using the flash, the camera should be at least one meter (3.3´) from the eyes of the subject. • Keep...
Owners Manual
Page 12
...of the current image impossible, it to be deleted. Data Error Precautions • Your digital camera is still flashing after you turn it off the camera - Removing the battery, removing the memory card, or placing the camera onto the USB cradle while the operation lamp is manufactured using precision... computer memory. • Never open the battery cover, disconnect the AC adaptor from the camera, or unplug the AC adaptor from the power outlet, and contact your dealer or nearest CASIO authorized service center. • Never use any other image data already stored in any other...
...of the current image impossible, it to be deleted. Data Error Precautions • Your digital camera is still flashing after you turn it off the camera - Removing the battery, removing the memory card, or placing the camera onto the USB cradle while the operation lamp is manufactured using precision... computer memory. • Never open the battery cover, disconnect the AC adaptor from the camera, or unplug the AC adaptor from the power outlet, and contact your dealer or nearest CASIO authorized service center. • Never use any other image data already stored in any other...
Owners Manual
Page 13
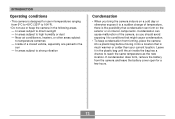
... the following areas. - If condensation does form, remove the battery from forming, place the camera into a location that condensation can cause malfunction of the camera, so you bring the camera indoors on interior components. In areas subject to temperature extremes - Inside of a closed vehicle, especially one ...is much warmer or colder than your current location. In areas subject to high humidity or dust - INTRODUCTION Operating conditions • This camera is designed for use in temperatures ranging from 0°C to 40°C (32°F to 104°F). • Do not use...
... the following areas. - If condensation does form, remove the battery from forming, place the camera into a location that condensation can cause malfunction of the camera, so you bring the camera indoors on interior components. In areas subject to temperature extremes - Inside of a closed vehicle, especially one ...is much warmer or colder than your current location. In areas subject to high humidity or dust - INTRODUCTION Operating conditions • This camera is designed for use in temperatures ranging from 0°C to 40°C (32°F to 104°F). • Do not use...
Owners Manual
Page 14
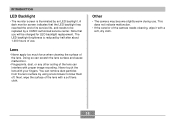
...backlight. Never touch the lens with proper image recording. Next, wipe the surface of use . Other • The camera may become slightly warm during use . This does not indicate malfunction. • If the exterior of the lens. Lens... • Never apply too much force when cleaning the surface of the camera needs cleaning, wipe it with a soft lens cloth. You can scratch the lens surface and cause malfunction. • ...replacement. Doing so can remove dust particles from the lens surface by a CASIO authorized service center.
...backlight. Never touch the lens with proper image recording. Next, wipe the surface of use . Other • The camera may become slightly warm during use . This does not indicate malfunction. • If the exterior of the lens. Lens... • Never apply too much force when cleaning the surface of the camera needs cleaning, wipe it with a soft lens cloth. You can scratch the lens surface and cause malfunction. • ...replacement. Doing so can remove dust particles from the lens surface by a CASIO authorized service center.
Owners Manual
Page 15
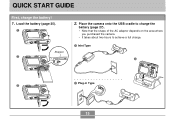
Load the battery (page 25). 1 2. Place the camera onto the USB cradle to charge the battery (page 27). • Note that the shape of the AC adaptor depends on the area where you purchased the camera. • It takes about two hours to achieve a full charge. 1 Inlet Type Stopper 2 2 3 1 Plug-in Type PLAY REC MENU SET DISP PHOTO CHARGE USB 15 QUICK START GUIDE QUICK START GUIDE First, charge the battery! 1.
Load the battery (page 25). 1 2. Place the camera onto the USB cradle to charge the battery (page 27). • Note that the shape of the AC adaptor depends on the area where you purchased the camera. • It takes about two hours to achieve a full charge. 1 Inlet Type Stopper 2 2 3 1 Plug-in Type PLAY REC MENU SET DISP PHOTO CHARGE USB 15 QUICK START GUIDE QUICK START GUIDE First, charge the battery! 1.

Owners Manual
Page 16
Press [SET] to turn on the camera. 2. PLAY REC MENU 4. Press the power button to register the language setting. Use [̆] and [̄] to select the geographical area you want, and then ..., and then press [SET]. 8. QUICK START GUIDE To configure display language and clock settings • Be sure to configure the following settings before using the camera to select the language you want. 1 3. SET DISP 2, 3, 4, 5, 6, 7, 8, 9 5. Press [̆] to record images. (See page 39 for details.) 1. Use [̆] and [̄] to select the...
Press [SET] to turn on the camera. 2. PLAY REC MENU 4. Press the power button to register the language setting. Use [̆] and [̄] to select the geographical area you want, and then ..., and then press [SET]. 8. QUICK START GUIDE To configure display language and clock settings • Be sure to configure the following settings before using the camera to select the language you want. 1 3. SET DISP 2, 3, 4, 5, 6, 7, 8, 9 5. Press [̆] to record images. (See page 39 for details.) 1. Use [̆] and [̄] to select the...

Owners Manual
Page 17
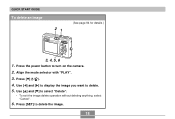
Press the power button to turn on the camera. 2. Use [̇] and [̈] to compose the image, and then press the shutter release button half way. • When proper focus is achieved, the focus ... PLAY REC MENU SET DISP 3 1. Press the power button to turn on the camera. 2. Align the mode selector with "PLAY". 3. Holding the camera still, gently press the shutter release button. Align the mode selector with "REC". 3. Point the camera at the subject, use the monitor screen or viewfinder to scroll through the images...
Press the power button to turn on the camera. 2. Use [̇] and [̈] to compose the image, and then press the shutter release button half way. • When proper focus is achieved, the focus ... PLAY REC MENU SET DISP 3 1. Press the power button to turn on the camera. 2. Align the mode selector with "PLAY". 3. Holding the camera still, gently press the shutter release button. Align the mode selector with "REC". 3. Point the camera at the subject, use the monitor screen or viewfinder to scroll through the images...
Owners Manual
Page 18
Align the mode selector with "PLAY". 3. Press [SET] to delete. 5. QUICK START GUIDE To delete an image 21 (See page 94 for details.) PLAY REC MENU SET DISP 3, 4, 5, 6 1. Use [̇] and [̈] to display the image you want to delete the image. 18 Use [̆] and [̄] to turn on the camera. 2. Press the power button to select "Delete". • To exit the image delete operation without deleting anything, select "Cancel". 6. Press [̄] ( ). 4.
Align the mode selector with "PLAY". 3. Press [SET] to delete. 5. QUICK START GUIDE To delete an image 21 (See page 94 for details.) PLAY REC MENU SET DISP 3, 4, 5, 6 1. Use [̇] and [̈] to display the image you want to delete the image. 18 Use [̆] and [̄] to turn on the camera. 2. Press the power button to select "Delete". • To exit the image delete operation without deleting anything, select "Cancel". 6. Press [̄] ( ). 4.
Owners Manual
Page 19
... images, see page 118. 19 About This Manual This section contains information about the conventions used in this : The CASIO EX-Z3 Digital Camera The location where the camera is always enclosed by the button name inside of the following table defines the terminology used in this manual. s On-screen Text On-screen text ...
... images, see page 118. 19 About This Manual This section contains information about the conventions used in this : The CASIO EX-Z3 Digital Camera The location where the camera is always enclosed by the button name inside of the following table defines the terminology used in this manual. s On-screen Text On-screen text ...

Owners Manual
Page 20
GETTING READY General Guide The following illustrations show the names of each component, button, and switch on the camera. Camera s Front s Back 1 2 34 5 6 1 Shutter release button 2 Power button 3 Flash 4 Self-timer lamp 5 Microphone 6 Lens 7 8 90A 7 Viewfinder B 8 Operation lamp PLAY REC 9 Mode selector MENU 0 [MENU] button A Zoom button SET B Strap ring C [SET] button DISP D F E [DISP] button ED C F Monitor Screen 20
GETTING READY General Guide The following illustrations show the names of each component, button, and switch on the camera. Camera s Front s Back 1 2 34 5 6 1 Shutter release button 2 Power button 3 Flash 4 Self-timer lamp 5 Microphone 6 Lens 7 8 90A 7 Viewfinder B 8 Operation lamp PLAY REC 9 Mode selector MENU 0 [MENU] button A Zoom button SET B Strap ring C [SET] button DISP D F E [DISP] button ED C F Monitor Screen 20
Owners Manual
Page 21
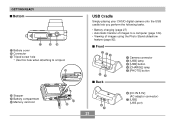
...] lamp 5 [PHOTO] button s Back 6 7 21 6 [DC IN 5.3V] (AC adaptor connector) 7 [USB] (USB port) J J Stopper K Battery compartment L Memory card slot K L USB Cradle Simply placing your CASIO digital camera onto the USB cradle lets you perform the following tasks. • Battery charging (page 27) • Automatic transfer of images to a tripod. GETTING READY s Bottom...
...] lamp 5 [PHOTO] button s Back 6 7 21 6 [DC IN 5.3V] (AC adaptor connector) 7 [USB] (USB port) J J Stopper K Battery compartment L Memory card slot K L USB Cradle Simply placing your CASIO digital camera onto the USB cradle lets you perform the following tasks. • Battery charging (page 27) • Automatic transfer of images to a tripod. GETTING READY s Bottom...
Owners Manual
Page 22
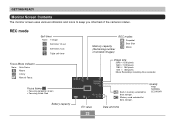
... None Auto Focus Macro Infinity Manual Focus Focus frame • Focusing complete: Green • Focusing failed: Red Battery capacity Memory capacity (Remaining number of the camera's status. Quality FINE NORMAL ECONOMY Date and time GETTING READY Monitor Screen Contents The monitor screen uses various indicators and icons to keep you informed...
... None Auto Focus Macro Infinity Manual Focus Focus frame • Focusing complete: Green • Focusing failed: Red Battery capacity Memory capacity (Remaining number of the camera's status. Quality FINE NORMAL ECONOMY Date and time GETTING READY Monitor Screen Contents The monitor screen uses various indicators and icons to keep you informed...
Owners Manual
Page 23
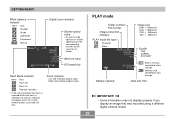
... Flash Mode indicator None Auto Flash Off Flash On Red-eye reduction • If the camera detects that was recorded using a different digital camera model. 23 GETTING READY White balance indicator None Auto Sunlight Shade Light Bulb Fluorescent Manual Digital zoom indicator Shutter speed value • An out of range aperture or shutter speed...
... Flash Mode indicator None Auto Flash Off Flash On Red-eye reduction • If the camera detects that was recorded using a different digital camera model. 23 GETTING READY White balance indicator None Auto Sunlight Shade Light Bulb Fluorescent Manual Digital zoom indicator Shutter speed value • An out of range aperture or shutter speed...


