
Owners Manual
Page 3
... Precautions 11 Data Error Precautions 12 Operating conditions 13 Condensation 13 LED Backlight 14 Lens 14 Other 14 15 QUICK START GUIDE First, charge the battery 15 To configure display language and clock settings ..... 16 To record an image 17 To view a recorded image 17 To delete an image 18 19 GETTING READY About This Manual 19 General Guide 20 Camera 20 USB Cradle 21 Monitor Screen Contents 22 REC mode 22 PLAY mode 23 Changing the Contents...
... Precautions 11 Data Error Precautions 12 Operating conditions 13 Condensation 13 LED Backlight 14 Lens 14 Other 14 15 QUICK START GUIDE First, charge the battery 15 To configure display language and clock settings ..... 16 To record an image 17 To view a recorded image 17 To delete an image 18 19 GETTING READY About This Manual 19 General Guide 20 Camera 20 USB Cradle 21 Monitor Screen Contents 22 REC mode 22 PLAY mode 23 Changing the Contents...

Owners Manual
Page 4
... Digital Zoom 49 Using the Flash 50 Flash Unit Status 52 Flash Precautions 52 Using the Self-timer 53 Specifying Image Size and Quality 55 To specify the image size 55 To specify image quality 56 57 OTHER RECORDING FUNCTIONS Selecting the Focus Mode 57 Using Auto Focus 57 Using the Macro Mode 58 Using the Infinity Mode 59 Using Manual Focus 59 Using Focus Lock 60 Exposure Compensation (EV Shift 61 Adjusting White Balance 63 Adjusting White Balance Manually 64 Using the Best Shot Mode 65 Creating Your Own Best Shot Setup 66 Combining Shots...
... Digital Zoom 49 Using the Flash 50 Flash Unit Status 52 Flash Precautions 52 Using the Self-timer 53 Specifying Image Size and Quality 55 To specify the image size 55 To specify image quality 56 57 OTHER RECORDING FUNCTIONS Selecting the Focus Mode 57 Using Auto Focus 57 Using the Macro Mode 58 Using the Infinity Mode 59 Using Manual Focus 59 Using Focus Lock 60 Exposure Compensation (EV Shift 61 Adjusting White Balance 63 Adjusting White Balance Manually 64 Using the Best Shot Mode 65 Creating Your Own Best Shot Setup 66 Combining Shots...
Owners Manual
Page 5
... Playing a Movie 85 Displaying the 9-image View 86 Selecting a Specific Image in the 9-image View 87 Displaying the Calendar Screen 87 Playing a Slide Show 88 To specify the slideshow images 90 To specify the slideshow time 91 To set the slideshow interval 91 Using the Photo Stand Feature 92 Rotating the Display Image 93 94 DELETING FILES Deleting a Single File 94 Deleting All Files 95 96 FILE MANAGEMENT Folders 96 Memory Folders and Files 96 Protecting Files 97 To protect a single file 97 To protect...
... Playing a Movie 85 Displaying the 9-image View 86 Selecting a Specific Image in the 9-image View 87 Displaying the Calendar Screen 87 Playing a Slide Show 88 To specify the slideshow images 90 To specify the slideshow time 91 To set the slideshow interval 91 Using the Photo Stand Feature 92 Rotating the Display Image 93 94 DELETING FILES Deleting a Single File 94 Deleting All Files 95 96 FILE MANAGEMENT Folders 96 Memory Folders and Files 96 Protecting Files 97 To protect a single file 97 To protect...
Owners Manual
Page 6
INTRODUCTION 118 USING A MEMORY CARD Using a Memory Card 119 To insert a memory card into the camera 119 To remove a memory card from the camera 119 Formatting a Memory Card 120 Memory Card Precautions 121 Copying Files 122 To copy all the files in built-in memory to a memory card 122 To copy a file from a memory card to built-in memory 123 124 VIEWING IMAGES ON A COMPUTER Using the Camera with a Windows Computer ........ 124 USB Connection Precautions 129 Using the Camera with a Macintosh Computer ....... 129 USB Connection Precautions 134 Operations You Can Perform ...
INTRODUCTION 118 USING A MEMORY CARD Using a Memory Card 119 To insert a memory card into the camera 119 To remove a memory card from the camera 119 Formatting a Memory Card 120 Memory Card Precautions 121 Copying Files 122 To copy all the files in built-in memory to a memory card 122 To copy a file from a memory card to built-in memory 123 124 VIEWING IMAGES ON A COMPUTER Using the Camera with a Windows Computer ........ 124 USB Connection Precautions 129 Using the Camera with a Macintosh Computer ....... 129 USB Connection Precautions 134 Operations You Can Perform ...
Owners Manual
Page 8
... malfunction, repairs, or battery replacement. assumes no responsibility for any third party due to CASIO COMPUTER CO., LTD. assumes no responsibility for any damage or loss caused by deletion of data as stipulated above, all important data on other related rights to these applications revert to the use of Photo Loader and/or Photohands. • CASIO COMPUTER CO., LTD. Compatibility Software Copyright C 1997...
... malfunction, repairs, or battery replacement. assumes no responsibility for any third party due to CASIO COMPUTER CO., LTD. assumes no responsibility for any damage or loss caused by deletion of data as stipulated above, all important data on other related rights to these applications revert to the use of Photo Loader and/or Photohands. • CASIO COMPUTER CO., LTD. Compatibility Software Copyright C 1997...
Owners Manual
Page 9
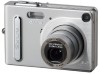
... Pixels A high-resolution megapixel CCD provides 3.2 million effective pixels (3.34 million total pixels) for images that print beautifully. • 2.0-inch TFT color LCD monitor screen • 12X seamless zoom 3X optical zoom, 4X digital zoom • 10MB Flash memory Images can be recorded without using a memory card. • Support for SD memory cards and MMC (MultiMedia Cards) for memory expansion • Easy Charging Just place the camera onto the USB cradle to charge its USB cradle. • Best...
... Pixels A high-resolution megapixel CCD provides 3.2 million effective pixels (3.34 million total pixels) for images that print beautifully. • 2.0-inch TFT color LCD monitor screen • 12X seamless zoom 3X optical zoom, 4X digital zoom • 10MB Flash memory Images can be recorded without using a memory card. • Support for SD memory cards and MMC (MultiMedia Cards) for memory expansion • Easy Charging Just place the camera onto the USB cradle to charge its USB cradle. • Best...
Owners Manual
Page 10
... date, which was developed by professional print services. 10 You can be incorporated into Web pages quickly and easily. • Calendar screen A simple operation displays a full-month calendar on the monitor screen when the alarm time is reached. • Album Function HTML files are generated automatically to create an album of recorded images. A printer that supports USB DIRECT-PRINT, you recorded them. • USB DIRECT-PRINT support Your camera supports USB DIRECT-PRINT, which helps to your PC. When connected directly...
... date, which was developed by professional print services. 10 You can be incorporated into Web pages quickly and easily. • Calendar screen A simple operation displays a full-month calendar on the monitor screen when the alarm time is reached. • Album Function HTML files are generated automatically to create an album of recorded images. A printer that supports USB DIRECT-PRINT, you recorded them. • USB DIRECT-PRINT support Your camera supports USB DIRECT-PRINT, which helps to your PC. When connected directly...
Owners Manual
Page 11
... to your nearest CASIO authorized service center for repair. When using the EX-Z3. Using the camera under these conditions creates the danger of the camera, immediately turn it off . High-voltage internal components create the risk of fire and electric shock. All references in display while operating a motor vehicle or while walking. INTRODUCTION Precautions General Precautions Be sure to the eyes. Doing so...
... to your nearest CASIO authorized service center for repair. When using the EX-Z3. Using the camera under these conditions creates the danger of the camera, immediately turn it off . High-voltage internal components create the risk of fire and electric shock. All references in display while operating a motor vehicle or while walking. INTRODUCTION Precautions General Precautions Be sure to the eyes. Doing so...
Owners Manual
Page 12
... with this camera. Removing the battery, removing the memory card, or placing the camera onto the USB cradle while the operation lamp is manufactured using precision digital components. Data Error Precautions • Your digital camera is still flashing after you turn it off the camera - Doing so will not only make storage of an aircraft or in file memory. - Next, remove the camera's battery and/or unplug the AC adaptor power cord from the power outlet and...
... with this camera. Removing the battery, removing the memory card, or placing the camera onto the USB cradle while the operation lamp is manufactured using precision digital components. Data Error Precautions • Your digital camera is still flashing after you turn it off the camera - Doing so will not only make storage of an aircraft or in file memory. - Next, remove the camera's battery and/or unplug the AC adaptor power cord from the power outlet and...

Owners Manual
Page 17
...; When proper focus is achieved, the focus frame turns green and the green operation lamp lights. 4. Holding the camera still, gently press the shutter release button. Align the mode selector with "REC". 3. Align the mode selector with "PLAY". 3. Point the camera at the subject, use the monitor screen or viewfinder to scroll through the images. 17 Press the power button to turn on the camera. 2. QUICK START GUIDE To record an image Green operation lamp 2 14 3 PLAY REC MENU SET DISP...
...; When proper focus is achieved, the focus frame turns green and the green operation lamp lights. 4. Holding the camera still, gently press the shutter release button. Align the mode selector with "REC". 3. Align the mode selector with "PLAY". 3. Point the camera at the subject, use the monitor screen or viewfinder to scroll through the images. 17 Press the power button to turn on the camera. 2. QUICK START GUIDE To record an image Green operation lamp 2 14 3 PLAY REC MENU SET DISP...
Owners Manual
Page 19
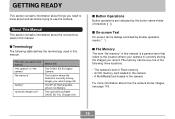
... you record (page 43) The NP-20 Rechargeable Lithium Ion Battery The optionally available CASIO BC-10L Charger Unit s Button Operations Button operations are indicated by double quotation marks (" "). s Terminology The following three locations. • The camera's built-in Flash memory • An SD memory card loaded in the camera • A MultiMediaCard loaded in this : The CASIO EX-Z3 Digital Camera The location where the camera is currently storing images you need to...
... you record (page 43) The NP-20 Rechargeable Lithium Ion Battery The optionally available CASIO BC-10L Charger Unit s Button Operations Button operations are indicated by double quotation marks (" "). s Terminology The following three locations. • The camera's built-in Flash memory • An SD memory card loaded in the camera • A MultiMediaCard loaded in this : The CASIO EX-Z3 Digital Camera The location where the camera is currently storing images you need to...
Owners Manual
Page 21
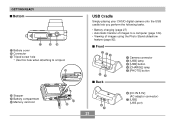
J J Stopper K Battery compartment L Memory card slot K L USB Cradle Simply placing your CASIO digital camera onto the USB cradle lets you perform the following tasks. • Battery charging (page 27) • Automatic transfer of images using the Photo Stand slideshow feature (page 92). s Front 1 23 PHOTO CHARGE USB 54 1 Camera connector 2 [USB] lamp 3 [USB] button 4 [CHARGE] lamp 5 [PHOTO] button s Back 6 7 21 6 [DC IN 5.3V] (AC adaptor connector) 7 [USB] (USB port) GETTING READY s Bottom G HI G Battery cover H Connector I Tripod screw...
J J Stopper K Battery compartment L Memory card slot K L USB Cradle Simply placing your CASIO digital camera onto the USB cradle lets you perform the following tasks. • Battery charging (page 27) • Automatic transfer of images using the Photo Stand slideshow feature (page 92). s Front 1 23 PHOTO CHARGE USB 54 1 Camera connector 2 [USB] lamp 3 [USB] button 4 [CHARGE] lamp 5 [PHOTO] button s Back 6 7 21 6 [DC IN 5.3V] (AC adaptor connector) 7 [USB] (USB port) GETTING READY s Bottom G HI G Battery cover H Connector I Tripod screw...
Owners Manual
Page 23
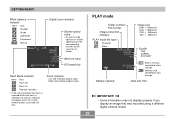
... Light Bulb Fluorescent Manual Digital zoom indicator Shutter speed value • An out of range aperture or shutter speed causes the corresponding monitor screen value to turn amber. PLAY mode Folder number/ File number Image protection indicator PLAY mode file type Snapshot Movie Image size 2048 ҂ 1536 pixels 1600 ҂ 1200 pixels 1280 ҂ 960 pixels 640 ҂ 480 pixels Quality FINE NORMAL ECONOMY Battery capacity Built-in memory selected for data storage. Memory card selected for data storage. Right side indicates digital zoom. Date and time IMPORTANT...
... Light Bulb Fluorescent Manual Digital zoom indicator Shutter speed value • An out of range aperture or shutter speed causes the corresponding monitor screen value to turn amber. PLAY mode Folder number/ File number Image protection indicator PLAY mode file type Snapshot Movie Image size 2048 ҂ 1536 pixels 1600 ҂ 1200 pixels 1280 ҂ 960 pixels 640 ҂ 480 pixels Quality FINE NORMAL ECONOMY Battery capacity Built-in memory selected for data storage. Memory card selected for data storage. Right side indicates digital zoom. Date and time IMPORTANT...
Owners Manual
Page 30
... operations: Zoom to full wide angle Auto Focus Zoom to full close-up , and then charge the battery. Low temperatures and continued use reduce battery life. Operation Continuous Recording*1 (Continuous Snapshot Recording) Continuous Playback*2 Approximate Battery Life 75 minutes (450 shots) 120 minutes Supported Battery: NP-20 (Rated Capacitance: 680mAh) *1 Continuous Recording Conditions • Normal temperature: 25°C (77°F) • Flash: Off • Monitor screen: On • Image recorded about every 10 seconds using the camera until power automatically turns...
... operations: Zoom to full wide angle Auto Focus Zoom to full close-up , and then charge the battery. Low temperatures and continued use reduce battery life. Operation Continuous Recording*1 (Continuous Snapshot Recording) Continuous Playback*2 Approximate Battery Life 75 minutes (450 shots) 120 minutes Supported Battery: NP-20 (Rated Capacitance: 680mAh) *1 Continuous Recording Conditions • Normal temperature: 25°C (77°F) • Flash: Off • Monitor screen: On • Image recorded about every 10 seconds using the camera until power automatically turns...
Owners Manual
Page 36
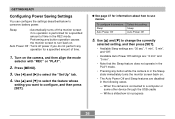
...", "2 min", and "Off". • Available Auto Power Off settings are disabled in the PLAY mode. • Pressing any button operation causes the monitor screen to turn back on. When the camera is in the Sleep state immediately turns the monitor screen back on the camera, and then align the mode selector with "REC" or "PLAY". 2. Performing any button while the camera is connected to configure, and then press [SET]. Press [MENU]. 3.
...", "2 min", and "Off". • Available Auto Power Off settings are disabled in the PLAY mode. • Pressing any button operation causes the monitor screen to turn back on. When the camera is in the Sleep state immediately turns the monitor screen back on the camera, and then align the mode selector with "REC" or "PLAY". 2. Performing any button while the camera is connected to configure, and then press [SET]. Press [MENU]. 3.
Owners Manual
Page 43
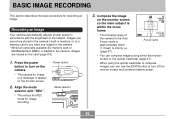
... the camera, images are stored in the camera's built-in memory, or to turn off the monitor screen and conserve battery power. 2. BASIC IMAGE RECORDING BASIC IMAGE RECORDING This section describes the basic procedure for image recording. Mode selector PLAY REC MENU 43 Compose the image on the card (page118). 1. Images you have one loaded in the camera. • When an optionally available SD memory card or MultiMediaCard (MMC) is within the focus frame...
... the camera, images are stored in the camera's built-in memory, or to turn off the monitor screen and conserve battery power. 2. BASIC IMAGE RECORDING BASIC IMAGE RECORDING This section describes the basic procedure for image recording. Mode selector PLAY REC MENU 43 Compose the image on the card (page118). 1. Images you have one loaded in the camera. • When an optionally available SD memory card or MultiMediaCard (MMC) is within the focus frame...

Owners Manual
Page 45
... recorded images. • When "Auto" is selected for the ISO sensitivity setting (page 76), the camera automatically adjusts its sensitivity in file memory and even lead to malfunction of the camera. • Never remove the memory card while an image is focused properly, press the shutter release button the rest of the way down to record. • The number of this, you are using the camera indoors under such lighting, you have flash turned...
... recorded images. • When "Auto" is selected for the ISO sensitivity setting (page 76), the camera automatically adjusts its sensitivity in file memory and even lead to malfunction of the camera. • Never remove the memory card while an image is focused properly, press the shutter release button the rest of the way down to record. • The number of this, you are using the camera indoors under such lighting, you have flash turned...

Owners Manual
Page 46
... IMAGE RECORDING About Auto Focus • Auto Focus tends not to slow down, which causes some reason, try using focus lock (page 60) or manual focus (page 59). Solid color walls or objects with the image quality setting currently selected on the monitor screen in the REC mode is moved during recording, or when recording the types of the REC mode monitor screen to work well if the camera is a simplified image for...
... IMAGE RECORDING About Auto Focus • Auto Focus tends not to slow down, which causes some reason, try using focus lock (page 60) or manual focus (page 59). Solid color walls or objects with the image quality setting currently selected on the monitor screen in the REC mode is moved during recording, or when recording the types of the REC mode monitor screen to work well if the camera is a simplified image for...
Owners Manual
Page 49
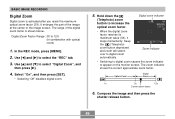
.... Optical Zoom Digital Zoom 1x 3x 12x Current zoom factor 6. Compose the image and then press the shutter release button. 49 In the REC mode, press [MENU]. 2. The zoom indicator shows the current approximate zoom factor. Keep the (Telephoto) zoom button depressed and zoom will switch over to 12X (in combination with optical zoom) 1. Select "On", and then press [SET]. • Selecting "Off" disables digital zoom. 5. Digital Zoom Factor Range: 3X to digital zoom automatically. Use...
.... Optical Zoom Digital Zoom 1x 3x 12x Current zoom factor 6. Compose the image and then press the shutter release button. 49 In the REC mode, press [MENU]. 2. The zoom indicator shows the current approximate zoom factor. Keep the (Telephoto) zoom button depressed and zoom will switch over to 12X (in combination with optical zoom) 1. Select "On", and then press [SET]. • Selecting "Off" disables digital zoom. 5. Digital Zoom Factor Range: 3X to digital zoom automatically. Use...
Owners Manual
Page 51
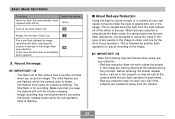
... times when you press the shutter release button while the red operation lamp is followed by image recording with flash, reducing the chance of red-eye in the image to close, and one designed to the subjects so they all look at the camera while the pre-flash operation is selected as the flash mode, the camera performs two preflash operations, one for exposure settings. Make sure that it uses for the Auto Focus operation...
... times when you press the shutter release button while the red operation lamp is followed by image recording with flash, reducing the chance of red-eye in the image to close, and one designed to the subjects so they all look at the camera while the pre-flash operation is selected as the flash mode, the camera performs two preflash operations, one for exposure settings. Make sure that it uses for the Auto Focus operation...


